在实现网格布局前,SOUI支持两种布局形式:相对布局,和线性布局,其中线性布局是2017年2月份才支持的布局。
这两年工作都在Android这里,Android里有号称5大布局(RelativeLayout, LinearLayout, FrameLayout, GridLayout,TableLayout)。
FrameLayout很简单,在SOUI里一般用TabCtrl就实现了。RelativeLayout和SOUI自己的相对布局功能类似,线性布局也有了,但是一直没有实现GridLayout(TableLayout和GridLayout类似)。
之所以没有做GridLayout,主要是觉得组合SOUI现有的布局功能可以模拟出GridLayout的效果,哲学说:如无必要,勿增实体。
前几天群里有人问做一个行列对齐的布局在SOUI里要怎么实现。我回答说用线性布局去组合。
后来认真想了想,虽然线性布局组合可以勉强达到效果,但是布局写起来还是会很难看,这时候我才感觉到了实现一个GridLayout的必要性。
好在SOUI的布局系统经过前一段时间的重构已经能够很容易的扩展,要实现一个GridLayout也不是什么困难的事。
经过近一周的打磨,SOUI版的GridLayout已经通过了主要的测试,至少能够满足我的布局要求了。
下面我们先看看效果,再看在SOUI里要如何使用。
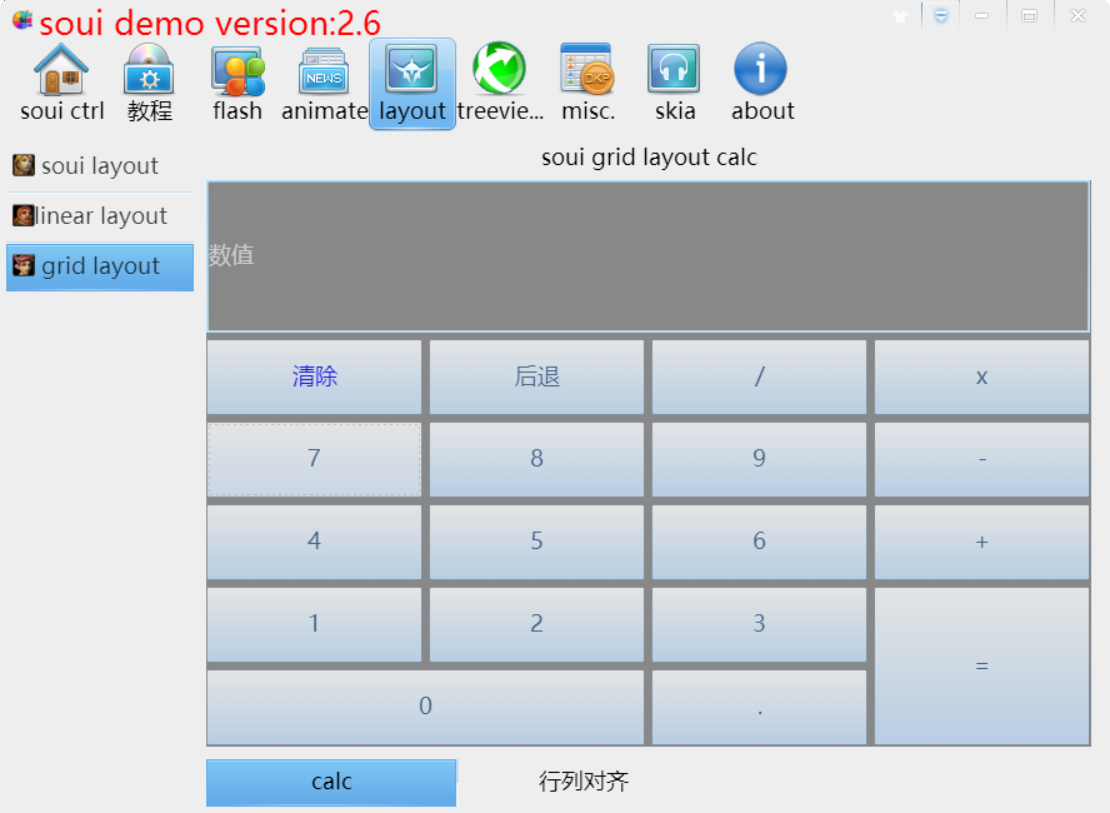
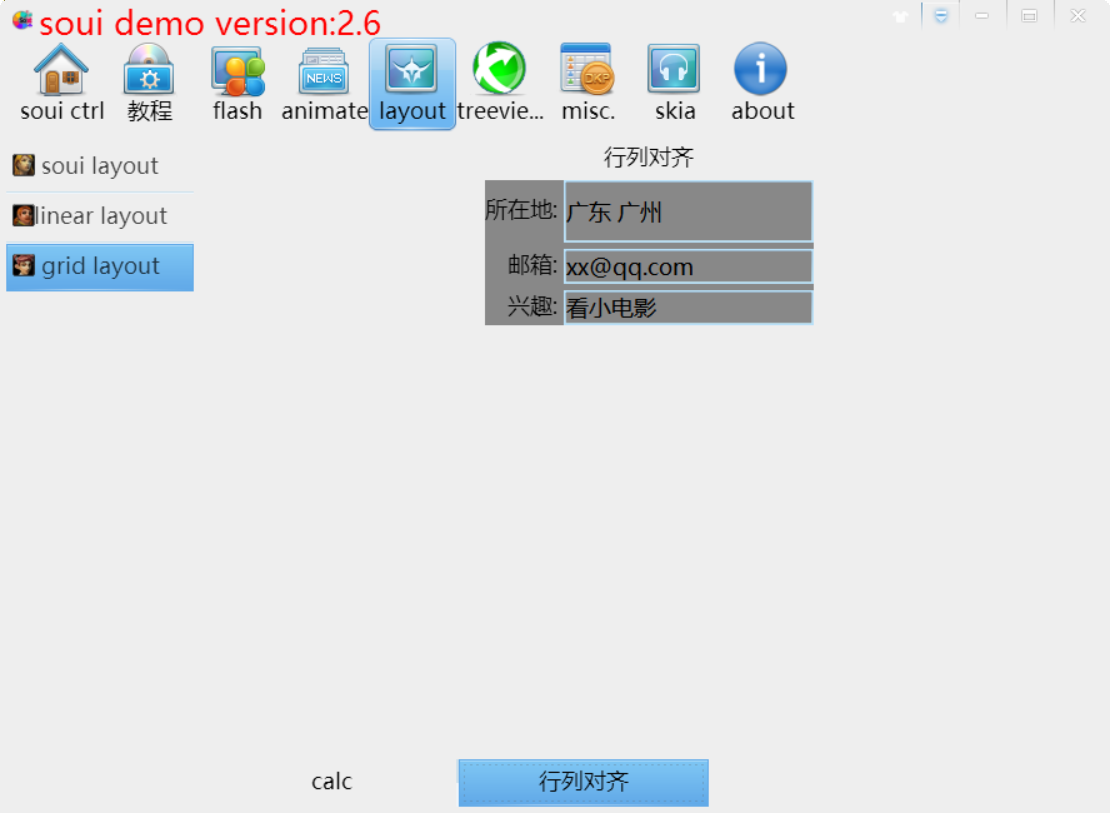
上面是demos/demo中新增加的两个布局,一个是计算器布局,一个是行列对齐示例。
计算器布局是网络上介绍Android的GridLayout的必备例子,而行列对齐是开发中经常要用到的布局。
先看看上图的计算器布局XML:
  1           <window pos="10,[5,-10,-10" layout="gridLayout" colorBkgnd="#888888" columnCount="4" rowCount="6" xInterval="5" yInterval="5" xGravity="fill" yGravity="fill">
  2             <edit
  3               size="0,0"
  4             cueText="数值"
  5             columnSpan="4"
  6             rowWeight="2"
  7         />
  8
  9             <button
 10               size="0,0"
 11             text="清除"
 12             columnWeight="1"
 13             rowWeight="1"
 14             colorText="#0000ff"
 15         />
 16
 17             <button
 18               size="0,0"
 19             text="后退"
 20             columnWeight="1"
 21             rowWeight="1"
 22         />
 23
 24             <button
 25               size="0,0"
 26             text="/"
 27             columnWeight="1"
 28             rowWeight="1"
 29         />
 30             <!--//列 行权重为1-->
 31             <button
 32               size="0,0"
 33                 text="x"
 34                 columnWeight="1"
 35                 rowWeight="1"
 36             />
 37             <!--//列 行权重为1-->
 38             <button
 39               size="0,0"
 40                 text="7"
 41                 columnWeight="1"
 42                 rowWeight="1"
 43             />
 44             <!--//列 行权重为1-->
 45             <button
 46               size="0,0"
 47                 text="8"
 48                 columnWeight="1"
 49                 rowWeight="1"
 50             />
 51             <!--//列 行权重为1-->
 52             <button
 53               size="0,0"
 54                 text="9"
 55                 columnWeight="1"
 56                 rowWeight="1"
 57             />
 58             <!--//列 行权重为1-->
 59             <button
 60               size="0,0"
 61                 text="-"
 62                 columnWeight="1"
 63                 rowWeight="1"
 64             />
 65             <!--//列 行权重为1-->
 66             <button
 67               size="0,0"
 68                 text="4"
 69                 columnWeight="1"
 70                 rowWeight="1"
 71             />
 72             <!--//列 行权重为1-->
 73             <button
 74               size="0,0"
 75                 text="5"
 76                 columnWeight="1"
 77                 rowWeight="1"
 78             />
 79             <!--//列 行权重为1-->
 80             <button
 81               size="0,0"
 82                 text="6"
 83                 columnWeight="1"
 84                 rowWeight="1"
 85             />
 86             <!--//列 行权重为1-->
 87             <button
 88               size="0,0"
 89                 text="+"
 90                 columnWeight="1"
 91                 rowWeight="1"
 92             />
 93             <!--//列 行权重为1-->
 94             <button
 95               size="0,0"
 96                 text="1"
 97                 columnWeight="1"
 98                 rowWeight="1"
 99             />
100             <!--//列 行权重为1-->
101             <button
102               size="0,0"
103                 text="2"
104                 columnWeight="1"
105                 rowWeight="1"
106             />
107             <!--//列 行权重为1-->
108             <button
109               size="0,0"
110                 text="3"
111                 columnWeight="1"
112                 rowWeight="1"
113             />
114             <!--//列 行权重为1-->
115             <button
116               size="0,0"
117                 text="="
118                 rowSpan="2"
119                 columnWeight="1"
120                 rowWeight="2"
121             />
122             <button
123               size="0,0"
124                 text="0"
125                 columnSpan="2"
126                 columnWeight="2"
127                 rowWeight="1"
128             />
129             <!--跨两列 自动填充 列权重2 行权重1-->
130             <button
131               size="0,0"
132                 text="."
133                 columnWeight="1"
134                 rowWeight="1"
135             />
136             <!--列 行 权重1-->
137
138           </window>
上面代码中,首先需要注意的是在window的layout属性里指定为gridLayout。
然后我们指定了columnCount, rowCount, xInterval, yInterval, xGravity, yGravity等属性。这些属性都是GridLayout才有的属性。
在这个window的子控件中,我们把每个控件的size都指定为"0,0", 同时指定了columnWeight, rowWeight属性,这样可以保证大小只受weight控制,不受控件显示内容影响。也可以指定columnSpan, rowSpan来指定行列合并 ,具体属性含义这里不一一介绍,还是参考源代码更好。
计算器的例子演示了平均分割父窗口,GridLayout同样支持适应子窗口。
 1 <window pos="|0,[5" offset="-0.5,0" layout="gridLayout" columnCount="2" xInterval="5" yInterval="5" xGravity="right" colorBkgnd="#888888">
 2             <text size="-1,-1">所在地:</text>
 3             <edit size="200,50" layout_xGravity="fill">广东 广州</edit>
 4
 5             <text size="-1,-1">邮箱:</text>
 6             <edit size="200,-1" layout_xGravity="fill">xx@qq.com</edit>
 7
 8             <text size="-1,-1">兴趣:</text>
 9             <edit size="200,-1" layout_xGravity="fill">看小电影</edit>
10
11           </window>
在上面代码中,我们让这个GridLayout水平居中,宽度是子窗口自适应。在父窗口中我们指定了xGravity="right", 使得它的每一列水平方向默认使用右对齐(如果不指定则是剧中对齐,如这里的垂直方向)。
第一列的3个文本控件都是自适应大小,第二列宽度指定为200,高度则有点变化。上面代码中还指定了一个layout_xGravity="fill"的属性,其实在这里是没有必要的(本来是想演示填充整个父窗口的右边)。
子控件的layout_xGravity和父控件的xGravity是一个主从关系。优先使用子控件指定的属性,如果子控件没有指定,则使用父窗口的属性。
GridLayout就介绍到这里。 UI,just so so!
启程软件 2017.7.5