简介
Spring Cloud Config为分布式系统中的外部化配置提供了服务器端和客户端支持,服务器端统一管理所有配置文件,客户端在启动时从服务端获取配置信息。服务器端有多种配置方式,如将配置文件存储在本地或者存储在远程Git仓库等等,并且在配置文件被更改时,可以通过多种途径如actuator的/refresh端点或者Spring Cloud Bus来动态刷新客户端的配置,而无需重新启动客户端。
项目介绍
- sc-parent,父模块(请参照SpringCloud学习笔记(1):Eureka注册中心)
- sc-eureka,注册中心(请参照SpringCloud学习笔记(1):Eureka注册中心)
- sc-config-client,访问配置中心的客户端
- sc-config-server,本地配置中心
- sc-config-server-git,远程配置中心
创建访问配置中心的客户端
1.在父模块下创建子模块项目sc-config-client,pom.xml:
<project xmlns="http://maven.apache.org/POM/4.0.0" xmlns:xsi="http://www.w3.org/2001/XMLSchema-instance" xsi:schemaLocation="http://maven.apache.org/POM/4.0.0 http://maven.apache.org/xsd/maven-4.0.0.xsd">
  <modelVersion>4.0.0</modelVersion>
  <parent>
    <groupId>com.cf</groupId>
    <artifactId>sc-parent</artifactId>
    <version>0.0.1-SNAPSHOT</version>
  </parent>
  <artifactId>sc-config-client</artifactId>

  <dependencies>
  	<dependency>
		<groupId>org.springframework.cloud</groupId>
		<artifactId>spring-cloud-starter-config</artifactId>
	</dependency>
  </dependencies>
</project>
2.创建启动类configclient.ConfigClientApplication:
package configclient;
import org.springframework.boot.SpringApplication;
import org.springframework.boot.autoconfigure.SpringBootApplication;

@SpringBootApplication
public class ConfigClientApplication {
	public static void main(String[] args) {
		SpringApplication.run(ConfigClientApplication.class, args);
	}
}
3.创建configclient.controller.ConfigClientController:
package configclient.controller;

import org.springframework.beans.factory.annotation.Value;
import org.springframework.web.bind.annotation.GetMapping;
import org.springframework.web.bind.annotation.RequestMapping;
import org.springframework.web.bind.annotation.RestController;

@RestController
@RequestMapping("/client")
public class ConfigClientController {
	@Value("${nickName}")
	private String nickName;

	@GetMapping("/hello")
	public String hello(){
		return "hello," + nickName;
	}
}
4.创建bootstrap.yml:
spring:
  application:
    name: sc-config-client
  profiles:
    active: dev
  cloud:
    config:
      uri:  http://localhost:9003
      fail-fast: true

server:
  port: 9002
spring.cloud.config.uri:指定配置中心地址
spring.cloud.config.fail-fase:当连接不上配置中心服务器时,是否使当前客户端异常停止,而不是以默认配置启动。
使用本地配置中心
1.在父模块下创建子模块项目sc-config-server,pom.xml:
<project xmlns="http://maven.apache.org/POM/4.0.0" xmlns:xsi="http://www.w3.org/2001/XMLSchema-instance" xsi:schemaLocation="http://maven.apache.org/POM/4.0.0 http://maven.apache.org/xsd/maven-4.0.0.xsd">
  <modelVersion>4.0.0</modelVersion>
  <parent>
    <groupId>com.cf</groupId>
    <artifactId>sc-parent</artifactId>
    <version>0.0.1-SNAPSHOT</version>
  </parent>
  <artifactId>sc-config-server</artifactId>

  <dependencies>
  	<dependency>
		<groupId>org.springframework.cloud</groupId>
		<artifactId>spring-cloud-config-server</artifactId>
	</dependency>
  </dependencies>
</project>
2.创建启动类configserver.ConfigServerApplication:
package configserver;
import org.springframework.boot.SpringApplication;
import org.springframework.boot.autoconfigure.SpringBootApplication;
import org.springframework.cloud.config.server.EnableConfigServer;

@SpringBootApplication
@EnableConfigServer
public class ConfigServerApplication {
	public static void main(String[] args) {
		SpringApplication.run(ConfigServerApplication.class, args);
	}
}
3.创建application.yml:
server:
  port: 9003

spring:
  application:
    name: sc-config-server
  profiles:
    active: native
  cloud:
    config:
      server:
        native:
          searchLocations: classpath:/conf
spring.profiles.active:配置文件的获取方式
spring.cloud.config.server.native.search-locations:本地配置文件的存放路径
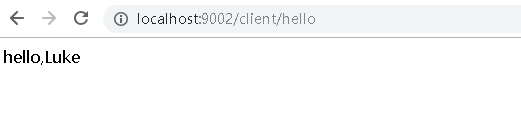
4.创建/src/main/resources/conf/sc-config-client-dev.yml文件:
nickName: Luke
该文件内容为客户端需要从服务端获取的配置信息,文件名称和客户端配置是相对应的,如sc-config-client-dev.yml=【spring.application.name】-【 spring.profiles.active】.yml
5.测试
启动本地配置中心sc-config-server成功后再启动客户端sc-config-client,访问http://localhost:9002/client/hello,客户端成功从配置中心获取nickName的配置:
使用远程配置中心
1.在父模块下创建子模块项目sc-config-server-git,pom.xml:
<project xmlns="http://maven.apache.org/POM/4.0.0" xmlns:xsi="http://www.w3.org/2001/XMLSchema-instance" xsi:schemaLocation="http://maven.apache.org/POM/4.0.0 http://maven.apache.org/xsd/maven-4.0.0.xsd">
  <modelVersion>4.0.0</modelVersion>
  <parent>
    <groupId>com.cf</groupId>
    <artifactId>sc-parent</artifactId>
    <version>0.0.1-SNAPSHOT</version>
  </parent>
  <artifactId>sc-config-server-git</artifactId>

  <dependencies>
  	<dependency>
		<groupId>org.springframework.cloud</groupId>
		<artifactId>spring-cloud-config-server</artifactId>
	</dependency>
	<dependency>
	    <groupId>org.springframework.cloud</groupId>
	    <artifactId>spring-cloud-starter-netflix-eureka-client</artifactId>
	</dependency>
  </dependencies>
</project>
2.创建启动类configserver.GitConfigServerApplication:
package configserver;
import org.springframework.boot.SpringApplication;
import org.springframework.boot.autoconfigure.SpringBootApplication;
import org.springframework.cloud.config.server.EnableConfigServer;

@SpringBootApplication
@EnableConfigServer
public class GitConfigServerApplication {
	public static void main(String[] args) {
		SpringApplication.run(GitConfigServerApplication.class, args);
	}
}
3.创建application.yml:
server:
  port: 9005

eureka:
  client:
    serviceUrl:
      defaultZone: http://localhost:8080/eureka/

spring:
  application:
    name: sc-config-server-git
  cloud:
    config:
      server:
        git:
          uri: https://github.com/yinchao3577/test777.git
          username: xxxxx
          password: xxxxx
      label: master
      fail-fast: true
spring.cloud.config.server.git.uri:git存储库地址
spring.cloud.config.server.git.username:用户名
spring.cloud.config.server.git.password:密码
spring.cloud.config.server.git.searchPaths:配置文件所在目录,若在根目录则无需配置
spring.cloud.config.label:Git Repository的分支,默认为master
4.更改客户端配置
pom.xml添加Eureka依赖:
	<dependency>
	    <groupId>org.springframework.cloud</groupId>
	    <artifactId>spring-cloud-starter-netflix-eureka-client</artifactId>
	</dependency>
bootstrap.yml改为:
spring:
  application:
    name: sc-config-client
  cloud:
    config:
      name: myconfig2
      label: master
      discovery:
        enabled: true
        service-id: sc-config-server-git #使用Eureka注册中心来发现Config配置中心服务

server:
  port: 9002

eureka:
  client:
    serviceUrl:
      defaultZone: http://localhost:8080/eureka/
spring.cloud.config.name:远程仓库中配置文件的名称
spring.cloud.config.discovery.enabled:是否开启配置中心服务发现
spring.cloud.config.discovery.service-id:配置中心服务名称
5.测试
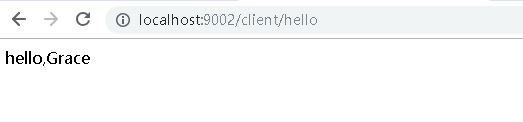
远程仓库myconfig2.yml值为:
nickName: Grace
依次启动注册中心sc-eureka、远程配置中心sc-config-server-git,sc-config-server-git启动成功后再启动客户端sc-config-client,访问http://localhost:9002/client/hello,客户端成功从配置中心获取nickName的配置:
手动刷新配置
actuator中包含一个/refresh的端点,用于配置的刷新。对该端点的调用实质是对RefreshScope类的调用,RefreshScope是上下文中的一个bean,它包含一个公共refreshAll()方法和refresh(String)方法,分别用来刷新范围内的所有bean或者指定的单个bean。
1.更改客户端配置
pom.xml添加actuator依赖:
	<dependency>
        <groupId>org.springframework.boot</groupId>
        <artifactId>spring-boot-starter-actuator</artifactId>
    </dependency>
bootstrap.yml添加开启refresh节点的配置:
management:
  endpoints:
    web:
      exposure:
        include: 'refresh'