年后到现在一直很忙,都没什么时间记录东西了,其实之前工作中积累了很多知识点,一直都堆在备忘录里,只是因为近几个月经历了一些事情,没有太多的经历来写了,但是一些重要的东西,我还是希望能坚持记录下来。正好最近公司用到了一些本篇文章的知识点,所以就抽空记录一下。
本文代码github地址:https://github.com/shaweiwei/RibbonTest/tree/master
简介
ribbon 是一个客户端负载均衡器,它和nginx的负载均衡相比,区别是一个是客户端负载均衡,一个是服务端负载均衡。ribbon可以单独使用,也可以配合eureka使用。
使用
单独使用
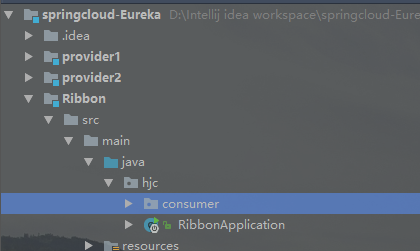
1.首先我们先在原来的基础上新建一个Ribbon模块,如下图:
现在我们单独使用ribbon,在Ribbon模块下添加依赖,如下图所示:
<dependency>
       <groupId>org.springframework.cloud</groupId>
       <artifactId>spring-cloud-starter-ribbon</artifactId>
       <version>1.4.0.RELEASE</version>
</dependency>
修改application.yml文件,如下所示:

server:
  port: 8082
spring:
  application:
    name: Ribbon-Consumer
#providers这个是自己命名的,ribbon,listOfServer这两个是规定的
providers:
  ribbon:
    listOfServers: localhost:8080,localhost:8081
在Ribbon模块下新建一个测试类如下代码 * Created by cong on 2018/5/8. */
@RestController
public class ConsumerController {

  //注入负载均衡客户端
   @Autowired
    private LoadBalancerClient loadBalancerClient;

    @RequestMapping("/consumer")
    public String helloConsumer() throws ExecutionException, InterruptedException {
     //这里是根据配置文件的那个providers属性取的
        ServiceInstance serviceInstance = loadBalancerClient.choose("providers");
      //负载均衡算法默认是轮询,轮询取得服务
        URI uri = URI.create(String.format("http://%s:%s", serviceInstance.getHost(), serviceInstance.getPort()));
        return uri.toString();
  }
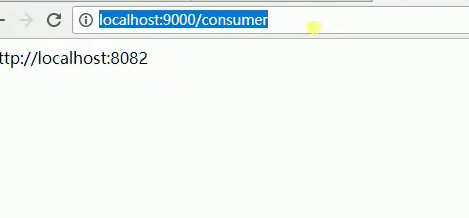
运行结果如下:
会轮询的获取到两个服务的URL 访问第一次,浏览器出现http://localhost:8080 访问第二次就会出现http://localhost:8081
在eureka环境下使用
下面这个例子是在之前这篇文章的例子上改的,Spring Cloud(二):Spring Cloud Eureka Server高可用注册服务中心的配置
先看下写好的结构

先介绍下大致功能,EurekaServer提供服务注册功能,RibbonServer里会调用ServiceHello里的接口,ServiceHello和ServiceHello2是同样的服务,只是为了方便分布式部署。
EurekaServer
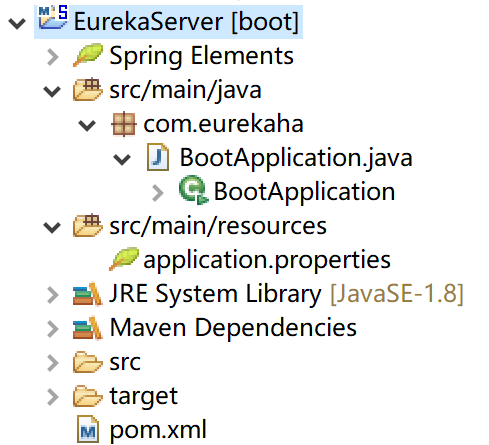
pom依赖
<dependencies>
      <dependency>
          <groupId>org.springframework.cloud</groupId>
          <artifactId>spring-cloud-starter-eureka-server</artifactId>
      </dependency>
    <dependency>
        <groupId>org.springframework.boot</groupId>
        <artifactId>spring-boot-actuator</artifactId>
    </dependency>
    <dependency>
        <groupId>org.springframework.cloud</groupId>
        <artifactId>spring-cloud-starter-config</artifactId>
    </dependency>
  </dependencies>
BootApplication
@SpringBootApplication
@EnableEurekaServer
public class BootApplication {
    public static void main(String[] args) {
        SpringApplication.run(BootApplication.class, args);
    }

}
application.properties
server.port=8760
spring.application.name=eureka-server
#eureka.instance.hostname=peer1
eureka.client.serviceUrl.defaultZone=http://localhost:${server.port}/eureka
RibbonServer

BootApplication
红色部分代码是关键
@SpringBootApplication
@EnableDiscoveryClient
@RestController
@RibbonClients(value={
        @RibbonClient(name="service-hi",configuration=RibbonConfig.class)
})
public class BootApplication {
    public static void main(String[] args) {
        SpringApplication.run(BootApplication.class, args);
    }
}
RibbonConfig
@Configuration
public class RibbonConfig {

    @Bean
    @LoadBalanced
    public RestTemplate restTemplate(){
        return new RestTemplate();
    }

    @Bean
    public IRule ribbonRule() {
        return new RoundRobinRule();
    }
}
TestController
@RestController
public class TestController {


    @Autowired
    @LoadBalanced
    private  RestTemplate restTemplate;
    @Autowired
    SpringClientFactory springClientFactory;

    @RequestMapping("/consumer")
    public String helloConsumer() throws ExecutionException, InterruptedException {
        ILoadBalancer loadBalancer = springClientFactory.getLoadBalancer("service-hi");
        List<Server> servers = loadBalancer.getReachableServers();
        System.out.println(",......"+servers.size());
        return restTemplate.getForEntity("http://service-hi/hi",String.class).getBody();
    }
}
application.properties
server.port=8618
spring.application.name=ribbon-service
eureka.client.serviceUrl.defaultZone=http://localhost:8760/eureka/
ServiceHello

BootApplication
@SpringBootApplication
@EnableDiscoveryClient
@RestController
public class BootApplication {
    public static void main(String[] args) {
        SpringApplication.run(BootApplication.class, args);
    }


    @RequestMapping(value="/hi",method=RequestMethod.GET)
    public String hi(){
        return "hi";
    }


}
application.properties
server.port=8788
spring.application.name=service-hi
eureka.client.serviceUrl.defaultZone=http://localhost:8760/eureka/
#service-hi.ribbon.NFLoadBalancerRuleClassName=com.netflix.loadbalancer.RoundRobinRule
ServiceHello2
和ServiceHello一样,只是端口不同,另外为了区分,接口hi返回的值也改成不一样。
查看结果
然后就是分别启动各个服务。
查看eureka信息,可以看到服务都启动了。

浏览器里输入http://localhost:8618/consumer,多调用几次,可以看到分别结果是hi和hi2交替出现。
这说明负载均衡实现了,而且我选择的负载均衡策略是轮询,所以hi和hi2肯定是交替出现。
负载均衡策略
Ribbon的核心组件是IRule,是所有负载均衡算法的父接口,其子类有:


每一个类就是一种负载均衡算法
RoundRobinRule 轮询
RandomRule 随机
AvailabilityFilteringRule 会先过滤掉由于多次访问故障而处于断路器跳闸状态的服务,还有并发的连接数超过阈值的服务,然后对剩余的服务列表进行轮询
WeightedResponseTimeRule 权重 根据平均响应时间计算所有服务的权重,响应时间越快服务权重越大被选中的概率越高。刚启动时,如果统计信息不足,则使用轮询策略,等信息足够,切换到 WeightedResponseTimeRule
RetryRule 重试 先按照轮询策略获取服务,如果获取失败则在指定时间内重试,获取可用服务
BestAvailableRule 选过滤掉多次访问故障而处于断路器跳闸状态的服务,然后选择一个并发量最小的服务
ZoneAvoidanceRule 符合判断server所在区域的性能和server的可用性选择服务
原理与源码分析
ribbon实现的关键点是为ribbon定制的RestTemplate,ribbon利用了RestTemplate的拦截器机制,在拦截器中实现ribbon的负载均衡。负载均衡的基本实现就是利用applicationName从服务注册中心获取可用的服务地址列表,然后通过一定算法负载,决定使用哪一个服务地址来进行http调用。
Ribbon的RestTemplate
RestTemplate中有一个属性是List<ClientHttpRequestInterceptor> interceptors,如果interceptors里面的拦截器数据不为空,在RestTemplate进行http请求时,这个请求就会被拦截器拦截进行,拦截器实现接口ClientHttpRequestInterceptor,需要实现方法是
ClientHttpResponse intercept(HttpRequest request, byte[] body, ClientHttpRequestExecution execution)
      throws IOException;
也就是说拦截器需要完成http请求,并封装一个标准的response返回。
ribbon中的拦截器
在Ribbon 中也定义了这样的一个拦截器,并且注入到RestTemplate中,是怎么实现的呢?
在Ribbon实现中,定义了一个LoadBalancerInterceptor,具体的逻辑先不说,ribbon就是通过这个拦截器进行拦截请求,然后实现负载均衡调用。
拦截器定义在org.springframework.cloud.client.loadbalancer.LoadBalancerAutoConfiguration.LoadBalancerInterceptorConfig#ribbonInterceptor
@Configuration
@ConditionalOnMissingClass("org.springframework.retry.support.RetryTemplate")
static class LoadBalancerInterceptorConfig {
   @Bean
    //定义ribbon的拦截器
   public LoadBalancerInterceptor ribbonInterceptor(
         LoadBalancerClient loadBalancerClient,
         LoadBalancerRequestFactory requestFactory) {
      return new LoadBalancerInterceptor(loadBalancerClient, requestFactory);
   }

   @Bean
   @ConditionalOnMissingBean
    //定义注入器,用来将拦截器注入到RestTemplate中,跟上面配套使用
   public RestTemplateCustomizer restTemplateCustomizer(
         final LoadBalancerInterceptor loadBalancerInterceptor) {
      return restTemplate -> {
               List<ClientHttpRequestInterceptor> list = new ArrayList<>(
                       restTemplate.getInterceptors());
               list.add(loadBalancerInterceptor);
               restTemplate.setInterceptors(list);
           };
   }
}
ribbon中的拦截器注入到RestTemplate
定义了拦截器,自然需要把拦截器注入到、RestTemplate才能生效,那么ribbon中是如何实现的?上面说了拦截器的定义与拦截器注入器的定义,那么肯定会有个地方使用注入器来注入拦截器的。
在org.springframework.cloud.client.loadbalancer.LoadBalancerAutoConfiguration#loadBalancedRestTemplateInitializerDeprecated方法里面,进行注入,代码如下。
@Configuration
@ConditionalOnClass(RestTemplate.class)
@ConditionalOnBean(LoadBalancerClient.class)
@EnableConfigurationProperties(LoadBalancerRetryProperties.class)
public class LoadBalancerAutoConfiguration {

   @LoadBalanced
   @Autowired(required = false)
   private List<RestTemplate> restTemplates = Collections.emptyList();

   @Bean
   public SmartInitializingSingleton loadBalancedRestTemplateInitializerDeprecated(
         final ObjectProvider<List<RestTemplateCustomizer>> restTemplateCustomizers) {
       //遍历context中的注入器,调用注入方法。
      return () -> restTemplateCustomizers.ifAvailable(customizers -> {
            for (RestTemplate restTemplate : LoadBalancerAutoConfiguration.this.restTemplates) {
                for (RestTemplateCustomizer customizer : customizers) {
                    customizer.customize(restTemplate);
                }
            }
        });
   }
   //......
   }
遍历context中的注入器,调用注入方法,为目标RestTemplate注入拦截器,注入器和拦截器都是我们定义好的。
还有关键的一点是:需要注入拦截器的目标restTemplates到底是哪一些?因为RestTemplate实例在context中可能存在多个,不可能所有的都注入拦截器,这里就是@LoadBalanced注解发挥作用的时候了。
LoadBalanced注解
严格上来说,这个注解是spring cloud实现的,不是ribbon中的,它的作用是在依赖注入时,只注入实例化时被@LoadBalanced修饰的实例。
例如我们定义Ribbon的RestTemplate的时候是这样的
@Bean
    @LoadBalanced
    public RestTemplate rebbionRestTemplate(){
        return new RestTemplate();
    }
因此才能为我们定义的RestTemplate注入拦截器。
那么@LoadBalanced是如何实现这个功能的呢?其实都是spring的原生操作,@LoadBalance的源码如下
/**
 * Annotation to mark a RestTemplate bean to be configured to use a LoadBalancerClient
 * @author Spencer Gibb
 */
@Target({ ElementType.FIELD, ElementType.PARAMETER, ElementType.METHOD })
@Retention(RetentionPolicy.RUNTIME)
@Documented
@Inherited
@Qualifier
public @interface LoadBalanced {
}
很明显,‘继承’了注解@Qualifier,我们都知道以前在xml定义bean的时候,就是用Qualifier来指定想要依赖某些特征的实例,这里的注解就是类似的实现,restTemplates通过@Autowired注入,同时被@LoadBalanced修饰,所以只会注入@LoadBalanced修饰的RestTemplate,也就是我们的目标RestTemplate。
拦截器逻辑实现
LoadBalancerInterceptor源码如下。
public class LoadBalancerInterceptor implements ClientHttpRequestInterceptor {

    private LoadBalancerClient loadBalancer;
    private LoadBalancerRequestFactory requestFactory;

    public LoadBalancerInterceptor(LoadBalancerClient loadBalancer, LoadBalancerRequestFactory requestFactory) {
        this.loadBalancer = loadBalancer;
        this.requestFactory = requestFactory;
    }

    public LoadBalancerInterceptor(LoadBalancerClient loadBalancer) {
        // for backwards compatibility
        this(loadBalancer, new LoadBalancerRequestFactory(loadBalancer));
    }

    @Override
    public ClientHttpResponse intercept(final HttpRequest request, final byte[] body,
            final ClientHttpRequestExecution execution) throws IOException {
        final URI originalUri = request.getURI();
        String serviceName = originalUri.getHost();
        Assert.state(serviceName != null, "Request URI does not contain a valid hostname: " + originalUri);
        return this.loadBalancer.execute(serviceName, requestFactory.createRequest(request, body, execution));
    }
}
拦截请求执行
@Override
public <T> T execute(String serviceId, LoadBalancerRequest<T> request) throws IOException {
   ILoadBalancer loadBalancer = getLoadBalancer(serviceId);
    //在这里负载均衡选择服务
   Server server = getServer(loadBalancer);
   if (server == null) {
      throw new IllegalStateException("No instances available for " + serviceId);
   }
   RibbonServer ribbonServer = new RibbonServer(serviceId, server, isSecure(server,
         serviceId), serverIntrospector(serviceId).getMetadata(server));
//执行请求逻辑
   return execute(serviceId, ribbonServer, request);
}
我们重点看getServer方法,看看是如何选择服务的
protected Server getServer(ILoadBalancer loadBalancer) {
   if (loadBalancer == null) {
      return null;
   }
    //
   return loadBalancer.chooseServer("default"); // TODO: better handling of key
}
代码配置随机loadBlancer,进入下面代码
public Server chooseServer(Object key) {
    if (counter == null) {
        counter = createCounter();
    }
    counter.increment();
    if (rule == null) {
        return null;
    } else {
        try {
            //使用配置对应负载规则选择服务
            return rule.choose(key);
        } catch (Exception e) {
            logger.warn("LoadBalancer [{}]:  Error choosing server for key {}", name, key, e);
            return null;
        }
    }
}
这里配置的是RandomRule,所以进入RandomRule代码
public Server choose(ILoadBalancer lb, Object key) {
    if (lb == null) {
        return null;
    }
    Server server = null;

    while (server == null) {
        if (Thread.interrupted()) {
            return null;
        }
        //获取可用服务列表
        List<Server> upList = lb.getReachableServers();
        List<Server> allList = lb.getAllServers();

        //随机一个数
        int serverCount = allList.size();
        if (serverCount == 0) {
            /*
             * No servers. End regardless of pass, because subsequent passes
             * only get more restrictive.
             */
            return null;
        }

        int index = rand.nextInt(serverCount);
        server = upList.get(index);

        if (server == null) {
            /*
             * The only time this should happen is if the server list were
             * somehow trimmed. This is a transient condition. Retry after
             * yielding.
             */
            Thread.yield();
            continue;
        }

        if (server.isAlive()) {
            return (server);
        }

        // Shouldn't actually happen.. but must be transient or a bug.
        server = null;
        Thread.yield();
    }

    return server;

}
随机负载规则很简单,随机整数选择服务,最终达到随机负载均衡。我们可以配置不同的Rule来实现不同的负载方式。