一、概述
FutureTask包装器是一种非常便利的机制,同时实现了Future和Runnable接口。
类图如下:
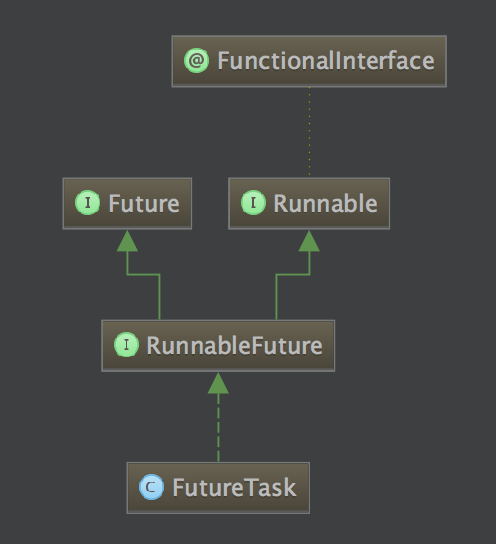
FutureTask是一种可以取消的异步的计算任务。它的计算是通过Callable实现的,它等价于可以携带结果的Runnable,并且有三个状态:等待、运行和完成。完成包括所有计算以任意的方式结束,包括正常结束、取消和异常。
Future有个get方法而获取结果只有在计算完成时获取,否则会一直阻塞直到任务转入完成状态,然后会返回结果或者抛出异常。
FutureTask有下面几个重要的方法:
1.get()
阻塞一直等待执行完成拿到结果
2.get(int timeout, TimeUnit timeUnit)
阻塞一直等待执行完成拿到结果,如果在超时时间内,没有拿到抛出异常
3.isCancelled()
是否被取消
4.isDone()
是否已经完成
5.cancel(boolean mayInterruptIfRunning)
试图取消正在执行的任务
二、FutureTask的状态转换过程
* NEW -> COMPLETING -> NORMAL
 * NEW -> COMPLETING -> EXCEPTIONAL
 * NEW -> CANCELLED
 * NEW -> INTERRUPTING -> INTERRUPTED
三、FutureTask的执行过程
创建一个futureTask对象task
提交task到调度器executor等待调度或者在另外一个线程中执行task

等待调度中...

如果此时currentThread调取执行结果task.get(),会有几种情况
if task 还没有被executor调度或正在执行中
    阻塞当前线程,并加入到一个阻塞链表中waitNode
else if task被其它Thread取消,并取消成功 或task处于中断状态
    throw exception
else if task执行完毕,返回执行结果,或执行存在异常,返回异常信息


如果此时有另外一个线程调用task.get()

执行过程同上
四、应用场景
1. Future用于异步获取执行结果或者取消任务。
2. 在高并发场景下确保任务只执行一次。
五、源码分析
1.核心状态
 1  /**
 2  * The run state of this task, initially NEW.  The run state
 3  * transitions to a terminal state only in methods set,
 4  * setException, and cancel.  During completion, state may take on
 5  * transient values of COMPLETING (while outcome is being set) or
 6  * INTERRUPTING (only while interrupting the runner to satisfy a
 7  * cancel(true)). Transitions from these intermediate to final
 8  * states use cheaper ordered/lazy writes because values are unique
 9  * and cannot be further modified.
10  *
11  * Possible state transitions:
12  * NEW -> COMPLETING -> NORMAL
13  * NEW -> COMPLETING -> EXCEPTIONAL
14  * NEW -> CANCELLED
15  * NEW -> INTERRUPTING -> INTERRUPTED
16  */
17 private volatile int state;
18 private static final int NEW          = 0;
19 private static final int COMPLETING   = 1;
20 private static final int NORMAL       = 2;
21 private static final int EXCEPTIONAL  = 3;
22 private static final int CANCELLED    = 4;
23 private static final int INTERRUPTING = 5;
24 private static final int INTERRUPTED  = 6;
2.构造函数
 1 public FutureTask(Callable<V> callable) {
 2     if (callable == null)
 3         throw new NullPointerException();
 4     this.callable = callable;
 5     this.state = NEW;       // ensure visibility of callable
 6 }
 7
 8 public FutureTask(Runnable runnable, V result) {
 9     this.callable = Executors.callable(runnable, result);
10     this.state = NEW;       // ensure visibility of callable
11 }
3.获取执行结果
 1 public V get() throws InterruptedException, ExecutionException {
 2     int s = state;
 3     if (s <= COMPLETING)
 4         s = awaitDone(false, 0L);
 5     return report(s);
 6 }
 7
 8 public V get(long timeout, TimeUnit unit)
 9     throws InterruptedException, ExecutionException, TimeoutException {
10     if (unit == null)
11         throw new NullPointerException();
12     int s = state;
13     if (s <= COMPLETING &&
14         (s = awaitDone(true, unit.toNanos(timeout))) <= COMPLETING)
15         throw new TimeoutException();
16     return report(s);
17 }
4.执行方法
 1 public void run() {
 2     if (state != NEW ||
 3         !UNSAFE.compareAndSwapObject(this, runnerOffset,
 4                                      null, Thread.currentThread()))
 5         return;
 6     try {
 7         Callable<V> c = callable;
 8         if (c != null && state == NEW) {
 9             V result;
10             boolean ran;
11             try {
12                 result = c.call();
13                 ran = true;
14             } catch (Throwable ex) {
15                 result = null;
16                 ran = false;
17                 setException(ex);
18             }
19             if (ran)
20                 set(result);
21         }
22     } finally {
23         // runner must be non-null until state is settled to
24         // prevent concurrent calls to run()
25         runner = null;
26         // state must be re-read after nulling runner to prevent
27         // leaked interrupts
28         int s = state;
29         if (s >= INTERRUPTING)
30             handlePossibleCancellationInterrupt(s);
31     }
32 }
5.设置状态
 1 protected void set(V v) {
 2     if (UNSAFE.compareAndSwapInt(this, stateOffset, NEW, COMPLETING)) {
 3         outcome = v;
 4         UNSAFE.putOrderedInt(this, stateOffset, NORMAL); // final state
 5         finishCompletion();
 6     }
 7 }
 8
 9 protected void setException(Throwable t) {
10     if (UNSAFE.compareAndSwapInt(this, stateOffset, NEW, COMPLETING)) {
11         outcome = t;
12         UNSAFE.putOrderedInt(this, stateOffset, EXCEPTIONAL); // final state
13         finishCompletion();
14     }
15 }
六、代码示例
1. FutureTask执行多任务计算的使用场景
利用FutureTask和ExecutorService,可以用多线程的方式提交计算任务,主线程继续执行其他任务,当主线程需要子线程的计算结果时,在异步获取子线程的执行结果。
 1 public class FutureTaskForMultiCompute {
 2     public static void main(String[] args) throws InterruptedException, ExecutionException {
 3         // 创建任务集合
 4         List<FutureTask<Integer>> taskList = new ArrayList<FutureTask<Integer>>();
 5         // 创建线程池
 6         ExecutorService exec = Executors.newFixedThreadPool(5);
 7         for (int i = 0; i < 10; i++) {
 8             FutureTask<Integer> ft = new FutureTask<>(new ComputeTask(i, ""+i));
 9             taskList.add(ft);
10             // 提交给线程池执行任务,也可以通过exec.invokeAll(taskList)一次性提交所有任务;
11             exec.submit(ft);
12         }
13
14         System.out.println("所有计算任务提交完毕, 主线程接着干其他事情!");
15
16         // 开始统计各计算线程计算结果
17         Integer totalResult = 0;
18         for (FutureTask<Integer> ft : taskList) {
19             totalResult += ft.get();
20         }
21
22         // 关闭线程池
23         exec.shutdown();
24         System.out.println("多任务计算后的总结果是:" + totalResult);
25     }
26
27 }
28 class ComputeTask implements Callable<Integer> {
29
30     private Integer result = 0;
31     private String taskName = "";
32
33     public String getTaskName(){
34         return this.taskName;
35     }
36
37     public ComputeTask(Integer iniResult, String taskName){
38         result = iniResult;
39         this.taskName = taskName;
40         System.out.println("生成子线程计算任务: "+taskName);
41     }
42
43     @Override
44     public Integer call() throws Exception {
45         for (int i = 0; i < 100; i++) {
46             result =+ i;
47         }
48         // 休眠5秒钟,观察主线程行为,预期的结果是主线程会继续执行,到要取得FutureTask的结果是等待直至完成。
49         Thread.sleep(5000);
50         System.out.println("子线程计算任务: "+taskName+" 执行完成!");
51         return result;
52     }
53
54 }
2. FutureTask在高并发环境下确保任务只执行一次
在很多高并发的环境下,往往我们只需要某些任务只执行一次。这种使用情景FutureTask的特性恰能胜任。举一个例子,假设有一个带key的连接池,当key存在时,即直接返回key对应的对象;当key不存在时,则创建连接。对于这样的应用场景,通常采用的方法为使用一个Map对象来存储key和连接池对应的对应关系,典型的代码如下面所示:
 1 public class FutureTaskTest {
 2     private Map<String, Connection> connectionPool = new HashMap<String, Connection>();
 3     private ReentrantLock lock = new ReentrantLock();
 4
 5     public Connection getConnection(String key){
 6         try {
 7             lock.lock();
 8             if(connectionPool.containsKey(key)){
 9                 return connectionPool.get(key);
10             }else{
11                 //创建 Connection
12                 Connection conn = createConnection();
13                 connectionPool.put(key, conn);
14                 return conn;
15             }
16         } finally{
17             lock.unlock();
18         }
19
20     }
21
22     //创建Connection
23     private Connection createConnection(){
24         return null;
25     }
26
27 }
在上面的例子中,我们通过加锁确保高并发环境下的线程安全,也确保了connection只创建一次,然而确牺牲了性能。改用ConcurrentHash的情况下,几乎可以避免加锁的操作,性能大大提高,但是在高并发的情况下有可能出现Connection被创建多次的现象。这时最需要解决的问题就是当key不存在时,创建Connection的动作能放在connectionPool之后执行,这正是FutureTask发挥作用的时机,基于ConcurrentHashMap和FutureTask的改造代码如下:
 1 public class FutureTaskTest {
 2     private ConcurrentHashMap<String,FutureTask<Connection>>connectionPool = new ConcurrentHashMap<String, FutureTask<Connection>>();
 3
 4     public Connection getConnection(String key) throws Exception{
 5         FutureTask<Connection> connectionTask = connectionPool.get(key);
 6         if(connectionTask!=null){
 7             return connectionTask.get();
 8         }
 9         else{
10             Callable<Connection> callable = new Callable<Connection>(){
11                 @Override
12                 public Connection call() throws Exception {
13                     // TODO Auto-generated method stub
14                     return createConnection();
15                 }
16             };
17             FutureTask<Connection> newTask = new FutureTask<Connection>(callable);
18             connectionTask = connectionPool.putIfAbsent(key, newTask);
19             if(connectionTask==null){
20                 connectionTask = newTask;
21                 connectionTask.run();
22             }
23             return connectionTask.get();
24         }
25     }
26
27     //创建Connection
28     private Connection createConnection(){
29         return null;
30     }
31
32 }
经过这样的改造,可以避免由于并发带来的多次创建连接及锁的出现。