第1章 Zabbix入门
1.1 Zabbix概述
Zabbix是一款能够监控各种网络参数以及服务器健康性和完整性的软件。Zabbix使用灵活的通知机制,允许用户为几乎任何事件配置基于邮件的告警。这样可以快速反馈服务器的问题。基于已存储的数据,Zabbix提供了出色的报告和数据可视化功能。
1.2 Zabbix 基础架构

第2章 Zabbix部署
2.1 集群规划
|
节点 |
服务 |
|
hadoop102 |
zabbix-server、zabbix-agent、MySQL、zabbix-web |
|
hadoop103 |
zabbix-agent |
|
hadoop104 |
zabbix-agent |
2.2 准备工作
2.2.1 关闭防火墙(3台节点,已关闭)
sudo service iptables stop
sudo chkconfig iptables off
2.2.2 关闭SELinux(hadoop102)
1) 修改配置文件/etc/selinux/config
sudo vim /etc/selinux/config
# This file controls the state of SELinux on the system.
# SELINUX= can take one of these three values:
# enforcing - SELinux security policy is enforced.
# permissive - SELinux prints warnings instead of enforcing.
# disabled - No SELinux policy is loaded.
SELINUX=disabled
# SELINUXTYPE= can take one of these two values:
# targeted - Targeted processes are protected,
# mls - Multi Level Security protection.
SELINUXTYPE=targeted
2)重启服务器
sudo reboot
2.3 Zabbix-server/agent编译及安装
2.3.1 创建用户
sudo groupadd --system zabbix
sudo useradd --system -g zabbix -d /usr/lib/zabbix -s /sbin/nologin -c "Zabbix Monitoring System" zabbix
2.3.2 上传zabbix安装包并解压
将安装包上传至/opt/software路径并解压到当前路径
tar -zxvf zabbix-4.2.8.tar.gz
2.3.3 创建zabbix数据库和表
1)进入/opt/software/zabbix-4.2.8/database/mysql路径
cd /opt/software/zabbix-4.2.8/database/mysql
2)进入MySQL客户端执行建表语句,并导入zabbix提供的sql脚本
mysql>
create database zabbix default character set utf8 collate utf8_bin;
use zabbix;
source schema.sql;
source data.sql;
source images.sql;
2.3.4 编译环境准备
1)上传并安装安装MySQL相关rpm包
sudo rpm -ivh MySQL-devel-5.6.24-1.el6.x86_64.rpm
sudo rpm -ivh MySQL-embedded-5.6.24-1.el6.x86_64.rpm
sudo rpm -ivh MySQL-shared-5.6.24-1.el6.x86_64.rpm
sudo rpm -ivh MySQL-shared-compat-5.6.24-1.el6.x86_64.rpm
2)安装所需依赖
sudo rpm -ivh http://www.city-fan.org/ftp/contrib/yum-repo/rhel6/x86_64/city-fan.org-release-2-1.rhel6.noarch.rpm
sudo yum-config-manager --enable city-fan.org
sudo rpm -ivh http://dl.fedoraproject.org/pub/epel/6/x86_64/Packages/l/libnghttp2-1.6.0-1.el6.1.x86_64.rpm
sudo rpm -e --nodeps libxml2-python-2.7.6-21.el6.x86_64
sudo yum install -y libcurl libcurl-devel libxml2 libxml2-devel net-snmp-devel libevent-devel pcre-devel gcc-c++
2.3.5 编译及安装
1)进入/opt/software/zabbix-4.2.8路径
cd /opt/software/zabbix-4.2.8
2)编译安装
./configure --enable-server --enable-agent --with-mysql --enable-ipv6 --with-net-snmp --with-libcurl --with-libxml2
sudo make install
2.3.6 修改配置文件
1)修改zabbix-server配置文件
sudo vim /usr/local/etc/zabbix_server.conf
DBHost=hadoop102
DBName=zabbix
DBUser=root
DBPassword=123456
2)修改zabbix-agent配置文件
sudo vim /usr/local/etc/zabbix_agentd.conf
Server=hadoop102
#ServerActive=127.0.0.1
#Hostname=Zabbix server
2.3.7 编写系统服务脚本
1)编辑zabbix-server文件
sudo vim /etc/init.d/zabbix-server
2)内容如下
#!/bin/sh
#
# chkconfig: - 85 15
# description: Zabbix server daemon
# config: /usr/local/etc/zabbix_server.conf
#
### BEGIN INIT INFO
# Provides: zabbix
# Required-Start: $local_fs $network
# Required-Stop: $local_fs $network
# Default-Start:
# Default-Stop: 0 1 2 3 4 5 6
# Short-Description: Start and stop Zabbix server
# Description: Zabbix server
### END INIT INFO
# Source function library.
. /etc/rc.d/init.d/functions
if [ -x /usr/local/sbin/zabbix_server ]; then
exec=/usr/local/sbin/zabbix_server
else
exit 5
fi
prog=zabbix_server
conf=/usr/local/etc/zabbix_server.conf
pidfile=/tmp/zabbix_server.pid
timeout=10
if [ -f /etc/sysconfig/zabbix-server ]; then
. /etc/sysconfig/zabbix-server
fi
lockfile=/var/lock/subsys/zabbix-server
start()
{
echo -n $"Starting Zabbix server: "
daemon $exec -c $conf
rv=$?
echo
[ $rv -eq 0 ] && touch $lockfile
return $rv
}
stop()
{
echo -n $"Shutting down Zabbix server: "
killproc -p $pidfile -d $timeout $prog
rv=$?
echo
[ $rv -eq 0 ] && rm -f $lockfile
return $rv
}
restart()
{
stop
start
}
case "$1" in
start|stop|restart)
$1
;;
force-reload)
restart
;;
status)
status -p $pidfile $prog
;;
try-restart|condrestart)
if status $prog >/dev/null ; then
restart
fi
;;
reload)
action $"Service ${0##*/} does not support the reload action: " /bin/false
exit 3
;;
*)
echo $"Usage: $0 {start|stop|status|restart|try-restart|force-reload}"
exit 2
;;
esac
3)加执行权限
sudo chmod +x /etc/init.d/zabbix-server
4)编辑zabbix-agent文件
sudo vim /etc/init.d/zabbix-agent
5)内容如下
#!/bin/sh
#
# chkconfig: - 86 14
# description: Zabbix agent daemon
# processname: zabbix_agentd
# config: /usr/local/etc/zabbix_agentd.conf
#
### BEGIN INIT INFO
# Provides: zabbix-agent
# Required-Start: $local_fs $network
# Required-Stop: $local_fs $network
# Should-Start: zabbix zabbix-proxy
# Should-Stop: zabbix zabbix-proxy
# Default-Start:
# Default-Stop: 0 1 2 3 4 5 6
# Short-Description: Start and stop Zabbix agent
# Description: Zabbix agent
### END INIT INFO
# Source function library.
. /etc/rc.d/init.d/functions
if [ -x /usr/local/sbin/zabbix_agentd ]; then
exec=/usr/local/sbin/zabbix_agentd
else
exit 5
fi
prog=zabbix_agentd
conf=/usr/local/etc/zabbix_agentd.conf
pidfile=/tmp/zabbix_agentd.pid
timeout=10
if [ -f /etc/sysconfig/zabbix-agent ]; then
. /etc/sysconfig/zabbix-agent
fi
lockfile=/var/lock/subsys/zabbix-agent
start()
{
echo -n $"Starting Zabbix agent: "
daemon $exec -c $conf
rv=$?
echo
[ $rv -eq 0 ] && touch $lockfile
return $rv
}
stop()
{
echo -n $"Shutting down Zabbix agent: "
killproc -p $pidfile -d $timeout $prog
rv=$?
echo
[ $rv -eq 0 ] && rm -f $lockfile
return $rv
}
restart()
{
stop
start
}
case "$1" in
start|stop|restart)
$1
;;
force-reload)
restart
;;
status)
status -p $pidfile $prog
;;
try-restart|condrestart)
if status $prog >/dev/null ; then
restart
fi
;;
reload)
action $"Service ${0##*/} does not support the reload action: " /bin/false
exit 3
;;
*)
echo $"Usage: $0 {start|stop|status|restart|try-restart|force-reload}"
exit 2
;;
esac
6)加执行权限
sudo chmod +x /etc/init.d/zabbix-agent
2.4 部署Zabbix-web
2.4.1 部署httpd
1)安装httpd
sudo yum -y install httpd
2)修改httpd配置文件
sudo vim /etc/httpd/conf/httpd.conf
将以下红色部分放至改配置文件的对应位置
317 <Directory "/var/www/html">
318
319 #
320 # Possible values for the Options directive are "None", "All",
321 # or any combination of:
322 # Indexes Includes FollowSymLinks SymLinksifOwnerMatch ExecCGI MultiViews
323 #
324 # Note that "MultiViews" must be named *explicitly* --- "Options All"
325 # doesn't give it to you.
326 #
327 # The Options directive is both complicated and important. Please see
328 # http://httpd.apache.org/docs/2.2/mod/core.html#options
329 # for more information.
330 #
331 Options Indexes FollowSymLinks
332
333 #
334 # AllowOverride controls what directives may be placed in .htaccess files.
335 # It can be "All", "None", or any combination of the keywords:
336 # Options FileInfo AuthConfig Limit
337 #
338 AllowOverride None
339
340 #
341 # Controls who can get stuff from this server.
342 #
343 Order allow,deny
344 Allow from all
345 <IfModule mod_php5.c>
346 php_value max_execution_time 300
347 php_value memory_limit 128M
348 php_value post_max_size 16M
349 php_value upload_max_filesize 2M
350 php_value max_input_time 300
351 php_value max_input_vars 10000
352 php_value always_populate_raw_post_data -1
353 php_value date.timezone Asia/Shanghai
354 </IfModule>
355
356 </Directory>
3)拷贝zabbix-web的php文件到httpd的指定目录
sudo mkdir /var/www/html/zabbix
sudo cp -a /opt/software/zabbix-4.2.8/frontends/php/* /var/www/html/zabbix/
2.4.2 安装php5.6
1)安装yum源
wget http://dl.fedoraproject.org/pub/epel/6/x86_64/epel-release-6-8.noarch.rpm
wget http://rpms.famillecollet.com/enterprise/remi-release-6.rpm
sudo rpm -ivh epel-release-6-8.noarch.rpm remi-release-6.rpm
2)激活yum源
sudo yum-config-manager --enable remi-php56
3)安装php及相关组件
sudo yum install -y php php-bcmath php-mbstring php-xmlwriter php-xmlreader php-mcrypt php-cli php-gd php-curl php-mysql php-ldap php-zip php-fileinfo
2.5 Zabbix启动
2.5.1 启动Zabbix-Server
1)启动
sudo service zabbix-server start
2)开机自启
sudo chkconfig --add zabbix-server
sudo chkconfig zabbix-server on
2.5.2 启动Zabbix-Agent
1)启动
sudo service zabbix-agent start
2)开机自启
sudo chkconfig --add zabbix-agent
sudo chkconfig zabbix-agent on
2.5.3 启动Zabbix-Web(httpd)
1)启动
sudo service httpd start
2)开机自启
sudo chkconfig httpd on
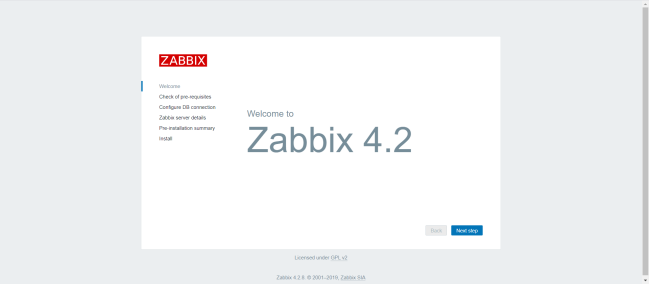
2.6 Zabbix登录
1)浏览器访问http://hadoop102/zabbix
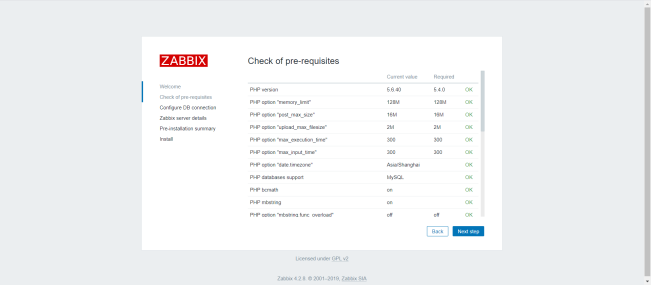
2)检查配置
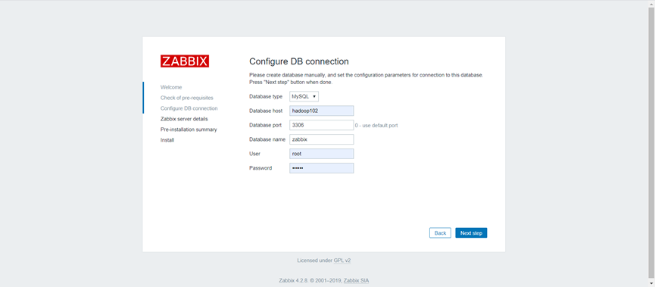
3)配置数据库
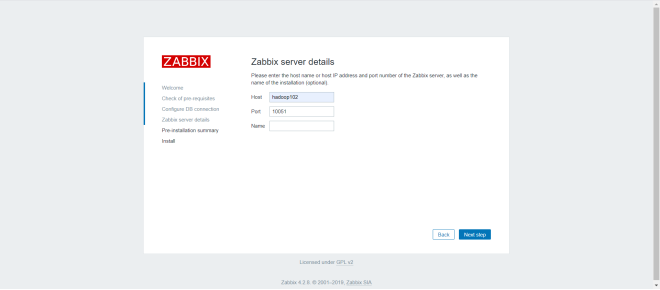
4)配置zabbix-server
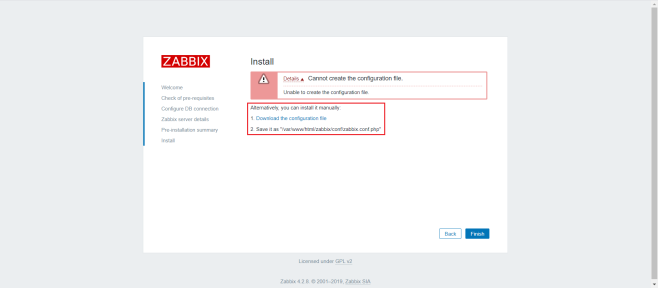
5)下载配置文件,并上传至指定路径
6)登录,用户名:Admin,密码zabbix

第3章 Zabbix安装之agent节点
3.1 创建用户
sudo groupadd --system zabbix
sudo useradd --system -g zabbix -d /usr/lib/zabbix -s /sbin/nologin -c "Zabbix Monitoring System" zabbix
3.2 编译环境准备
sudo yum -y install gcc-c++ pcre-devel
3.3 解压Zabbix安装包
将安装包上传至/opt/software路径并解压到当前路径
tar -zxvf zabbix-4.2.8.tar.gz
3.4 编译及安装
1)进入/opt/software/zabbix-4.2.8路径,执行以下编译安装命令
./configure --enable-agent
sudo make install
2)修改zabbix-agent配置文件
sudo vim /usr/local/etc/zabbix_agentd.conf
Server=hadoop102
#ServerActive=127.0.0.1
#Hostname=Zabbix server
3.5 编辑系统服务脚本
1)编辑zabbix-agent文件
sudo vim /etc/init.d/zabbix-agent
2)内容如下
#!/bin/sh
#
# chkconfig: - 86 14
# description: Zabbix agent daemon
# processname: zabbix_agentd
# config: /usr/local/etc/zabbix_agentd.conf
#
### BEGIN INIT INFO
# Provides: zabbix-agent
# Required-Start: $local_fs $network
# Required-Stop: $local_fs $network
# Should-Start: zabbix zabbix-proxy
# Should-Stop: zabbix zabbix-proxy
# Default-Start:
# Default-Stop: 0 1 2 3 4 5 6
# Short-Description: Start and stop Zabbix agent
# Description: Zabbix agent
### END INIT INFO
# Source function library.
. /etc/rc.d/init.d/functions
if [ -x /usr/local/sbin/zabbix_agentd ]; then
exec=/usr/local/sbin/zabbix_agentd
else
exit 5
fi
prog=zabbix_agentd
conf=/usr/local/etc/zabbix_agentd.conf
pidfile=/tmp/zabbix_agentd.pid
timeout=10
if [ -f /etc/sysconfig/zabbix-agent ]; then
. /etc/sysconfig/zabbix-agent
fi
lockfile=/var/lock/subsys/zabbix-agent
start()
{
echo -n $"Starting Zabbix agent: "
daemon $exec -c $conf
rv=$?
echo
[ $rv -eq 0 ] && touch $lockfile
return $rv
}
stop()
{
echo -n $"Shutting down Zabbix agent: "
killproc -p $pidfile -d $timeout $prog
rv=$?
echo
[ $rv -eq 0 ] && rm -f $lockfile
return $rv
}
restart()
{
stop
start
}
case "$1" in
start|stop|restart)
$1
;;
force-reload)
restart
;;
status)
status -p $pidfile $prog
;;
try-restart|condrestart)
if status $prog >/dev/null ; then
restart
fi
;;
reload)
action $"Service ${0##*/} does not support the reload action: " /bin/false
exit 3
;;
*)
echo $"Usage: $0 {start|stop|status|restart|try-restart|force-reload}"
exit 2
;;
esac
3)加执行权限
sudo chmod +x /etc/init.d/zabbix-agent
3.6 启动Zabbix-Agent
1)启动
sudo service zabbix-agent start
2)开机自启
sudo chkconfig --add zabbix-agent
sudo chkconfig zabbix-agent on
第4章 Zabbix使用
4.1 Zabbix术语
3.1.1 Host(主机)
一台你想监控的网络设备,用IP或域名表示。
3.2.1 Item(监控项)
你想要接收的主机的特定数据,一个度量数据。
3.2.2 Trigger(触发器)
一个被用于定义问题阈值和“评估”监控项接收到的数据的逻辑表达式。
3.2.3 Action(动作)
一个对事件做出反应的预定义的操作,比如邮件通知。
4.2 Zabbix实战
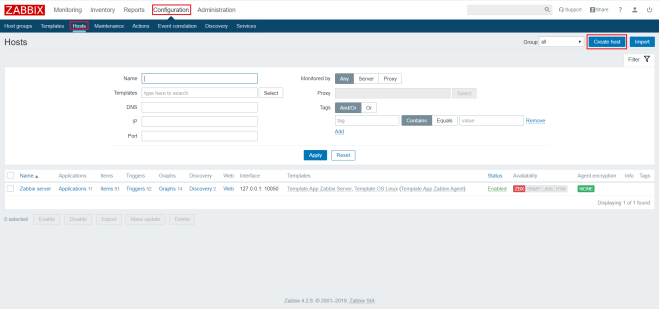
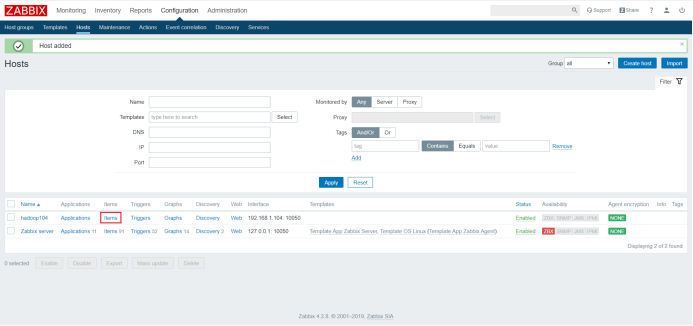
4.2.1 创建Host
1)点击Configuration/Hosts/Create host
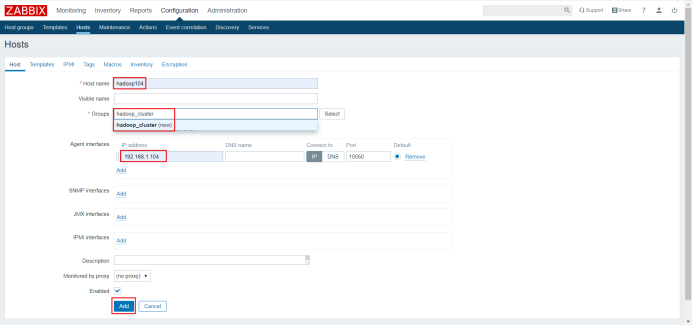
2)配置Host
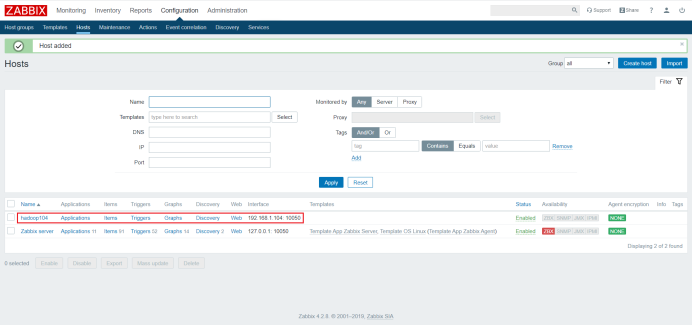
3)查看新增Host
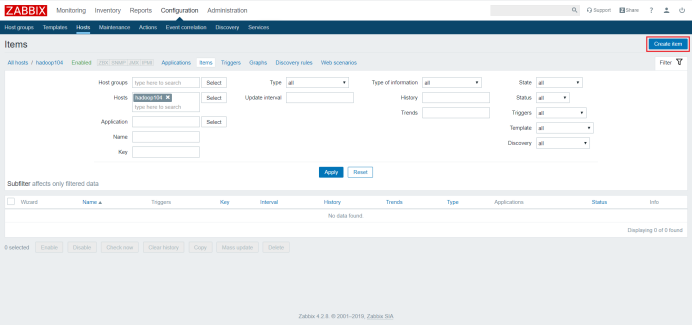
4.2.2 创建Item
1)点击Items
2)点击Create item
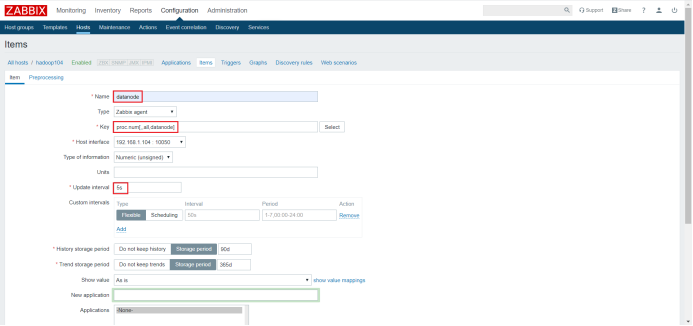
3)配置Item
4)查看创建的Item
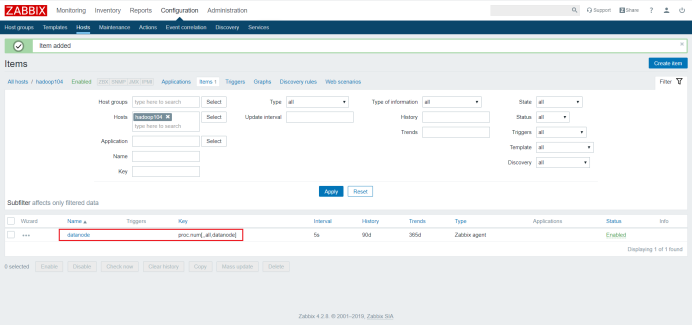
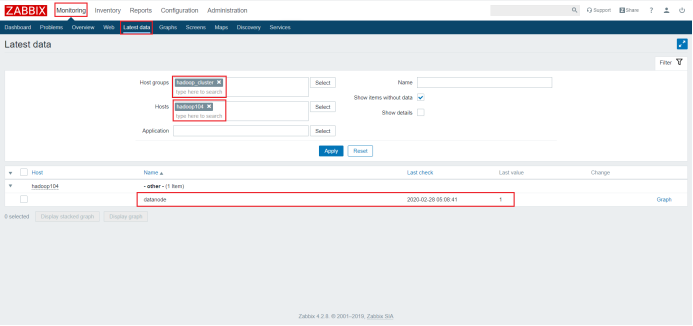
5)查看Item最新数据
4.2.3 创建Trigger
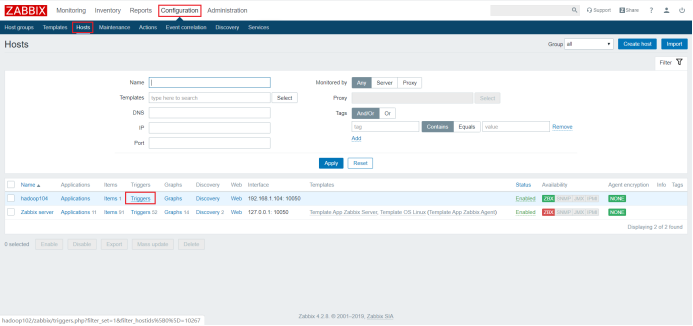
1)点击Conguration/Hosts/Triggers
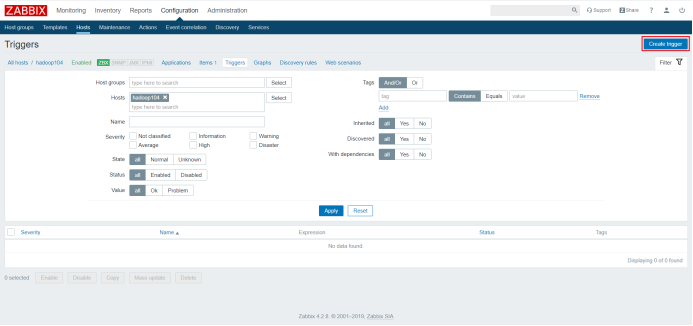
2)点击Create Trigger
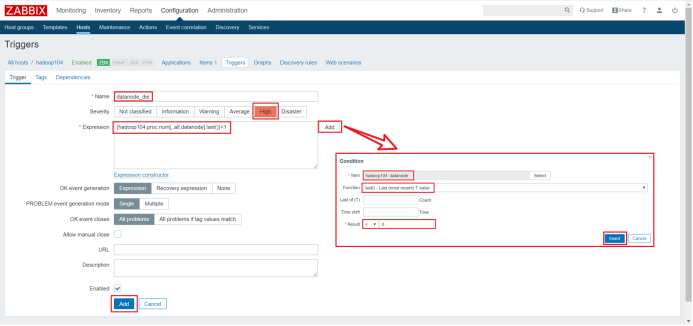
3)编辑Trigger
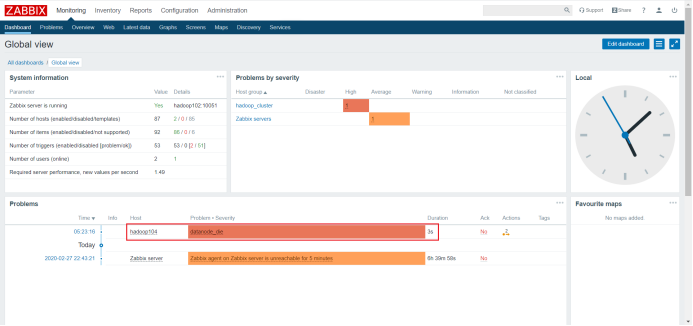
4)测试Trigger
关闭集群中的HDFS,会有如下效果
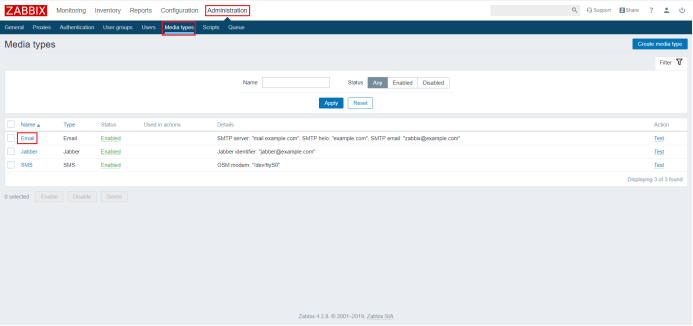
4.2.4 创建Media type
1)点击Administration/Media types/Email
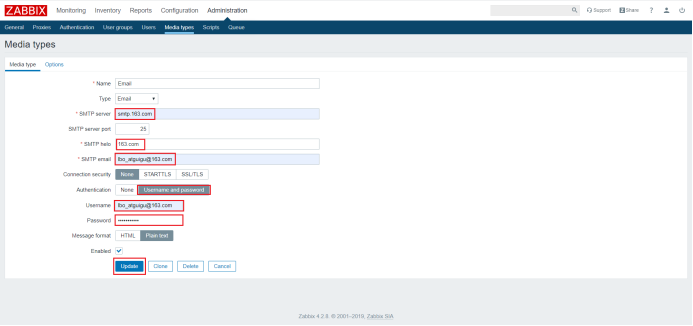
2)编辑Email
3)测试Email

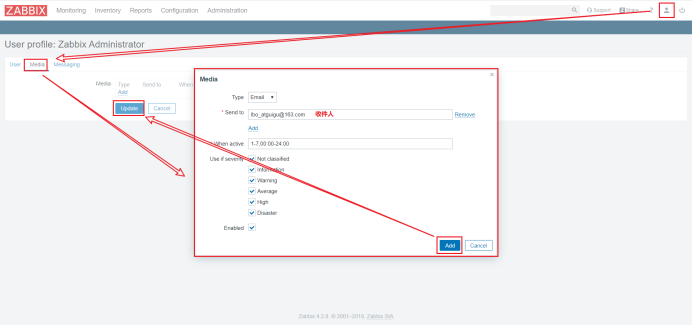
4)Email绑定收件人
4.2.4 创建Action
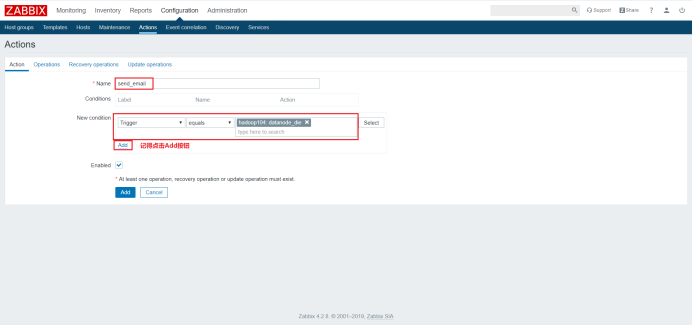
1)点击Configuration/Actions/Create action
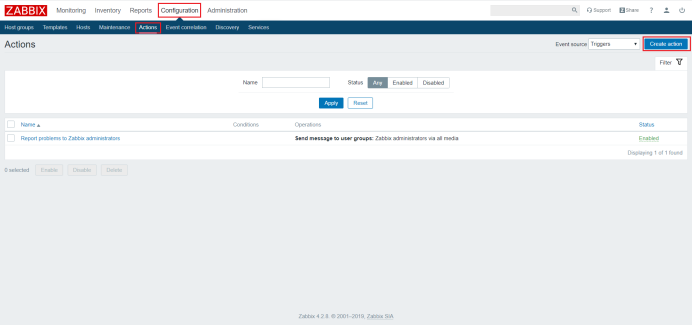
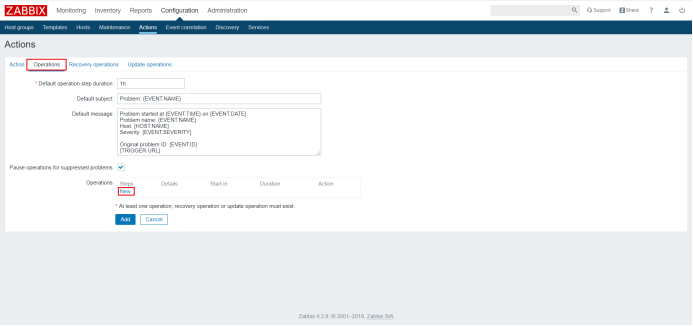
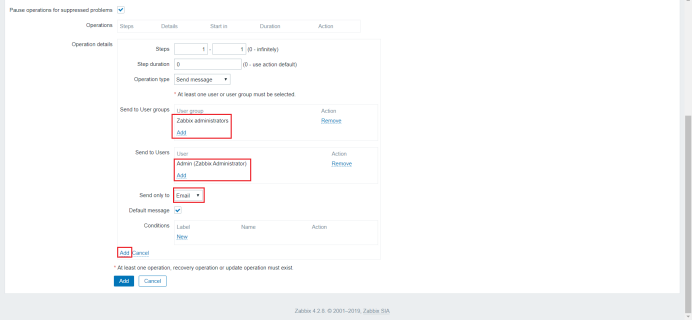
2)编辑Action
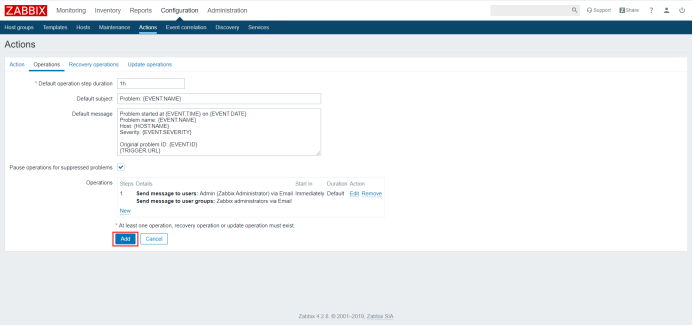
3)测试
重新启动HDFS,再关闭HDFS时,即可收到邮件通知