Windows 8.1 新增的一些控件,分别是:AppBar、CommandBar、DatePicker、TimePicker、Flyout、MenuFlyout、SettingsFlyout、Hub 和 Hyperlink。我们分成两篇来介绍,本篇先为大家介绍AppBar、CommandBar、DatePicker 和 TimePicker。
1. AppBar
Windows 8.1引入了几种新的控件来帮助我们更快捷的创建应用程序栏,分别是AppBarButton、AppBarToggleButton 和 AppBarSeparator。应用程序栏按钮默认外观是圆圈,而不是常规按钮的矩形(做过WP的开发者一定不会陌生);设置内容需要使用Label 和 Icon 属性,而不是Content;它有两种尺寸,普通和精简,可以通过IsCompact属性来控制。
    <Page.BottomAppBar>
        <AppBar>
            <Grid>
                <StackPanel Orientation="Horizontal" HorizontalAlignment="Left">
                    <AppBarButton Icon="AlignLeft" Label="AlignLeft" IsCompact="False"/>
                    <AppBarButton Icon="AlignCenter" Label="AlignCenter" IsCompact="False"/>
                    <AppBarButton Icon="AlignRight" Label="AlignRight" IsCompact="False"/>
                    <AppBarSeparator/>
                    <AppBarToggleButton Icon="Dislike" Label="Dislike"/>
                    <AppBarToggleButton Icon="Like" Label="Like" IsChecked="True"/>
                </StackPanel>
                <StackPanel Orientation="Horizontal" HorizontalAlignment="Right">
                    <AppBarButton Icon="Refresh" Label="Refresh"/>
                    <AppBarButton Icon="Help" Label="Help"/>
                </StackPanel>
            </Grid>
        </AppBar>
    </Page.BottomAppBar>

如上图所示,我们创建了一个简单的应用程序栏。按钮被分为两部分,左侧包括了三个AppBarButton 和两个AppBarToggleButton,中间用AppBarSepator隔开;右侧为两个AppBarButton。大家通过代码和运行效果就能很明显的看到程序栏按钮与常规按钮在形状和属性设置上的不同。另外也可以看到AppBarToggleButton拥有的状态切换功能。如果我们试着把按钮的IsCompact都设置为true, 则效果是这样的:

可以看到,设置IsCompact属性后,按钮的文字消失了,而且按钮所占空间变小了。这种变化在应用处于Snapped状态时较为常用。
另外,按钮的Icon属性提供了四种图标元素表现方式,分别是:
- FontIcon —— 基于指定字体系列的字型
- BitmapIcon —— 基于指定Uri的位图图像文件
- PathIcon —— 基于路径数据
- SymbolIcon —— 基于Segoe UI Symbol 字体的字型预定义列表。
下面我们在例子中分别讲述这几种表现方式
<Page.BottomAppBar> <AppBar> <StackPanel Orientation="Horizontal" HorizontalAlignment="Left"> <AppBarButton Label="FontIcon"> <AppBarButton.Icon> <FontIcon FontFamily="Candara" Glyph="Ω"/> </AppBarButton.Icon> </AppBarButton> <AppBarButton Label="BitmapIcon" Click="AppBarButton_Click"> <AppBarButton.Icon> <BitmapIcon UriSource="ms-appx:///Assets/Logo.scale-100.png"/> </AppBarButton.Icon> </AppBarButton> <AppBarToggleButton Label="PathIcon" Click="AppBarButton_Click"> <AppBarToggleButton.Icon> <PathIcon Data="F1 M 20, 10L 10,30L 30,30"/> </AppBarToggleButton.Icon> </AppBarToggleButton> <AppBarButton Icon="Help" Label="SymbolIcon" Click="AppBarButton_Click"/> </StackPanel> </AppBar> </Page.BottomAppBar>

2. CommandBar
Windows 8.1 引入的CommandBar在很大程度上简化了我们创建应用程序栏的过程,它会把按钮分为右侧的主命令(Primary Commands)和左侧的辅助命令(Secondary Commands)来自动进行布局,还可以根据应用大小的变化自动调整自身大小。默认情况下,按钮被添加到主命令集合中而显示在程序栏右侧,当按钮被显式添加到辅助命令集合时,它将显示在程序栏左侧。当应用程序栏中仅包括AppBarButton、AppBarToggleButton 和 AppBarSeparator 时,我们应该选择使用CommandBar。而当更复杂的内容,如文本,图像等存在时,我们选择使用AppBar 控件。
    <Page.BottomAppBar>
        <CommandBar>
            <AppBarToggleButton Icon="Shuffle" Label="Shuffle" Click="AppBarButton_Click"/>
            <AppBarToggleButton Icon="RepeatAll" Label="Repeat" Click="AppBarButton_Click"/>
            <AppBarSeparator/>
            <AppBarButton Icon="Back" Label="Back" Click="AppBarButton_Click"/>
            <AppBarButton Icon="Stop" Label="Stop" Click="AppBarButton_Click"/>
            <AppBarButton Icon="Play" Label="Play" Click="AppBarButton_Click"/>
            <AppBarButton Icon="Forward" Label="Forward" Click="AppBarButton_Click"/>

            <CommandBar.SecondaryCommands>
                <AppBarButton Icon="Like" Label="Like" Click="AppBarButton_Click"/>
                <AppBarButton Icon="Dislike" Label="Dislike" Click="AppBarButton_Click"/>
            </CommandBar.SecondaryCommands>
        </CommandBar>
    </Page.BottomAppBar>
如上面代码所示,Like 和 Dislike 按钮在辅助命令集合中,它们会出现在程序栏的左侧,而其他按钮默认加入主命令集合,会排列在程序栏右侧。来看看运行效果图:

3. DatePicker
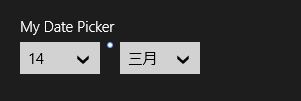
Windows 8.1 引入了DatePicker,也就是日期选取控件,很多应用中都会用到日期选取控件(不知道为什么8.1才加入,以前项目里都是自己写的),例如航班时间、约会时间等等。我们先来看看它的外观


上面两张图分别是默认和打开选取器时的效果。大家可能也发现了,年份并没有特殊的限制,如果我们想选择出生年月的话,那么超过2014年明显是不合理的;如果想选择一个计划完成时间,那么2013年以前的年份也是我们不想看到的。这时候我们可以利用DatePicker控件的MaxYear 或 MinYear 来实现。比如我们想把MaxYear设为今年,代码如下:
        public MainPage()
        {
            this.InitializeComponent();

            datePicker.MaxYear = DateTimeOffset.Now;
        }

运行效果正如我们所想。另外DatePicker还提供了很多种显示方式,我们可以分别通过DayFormat、MonthFormat 和 YearFormat 对日月年进行格式调整。
     <DatePicker x:Name="datePicker" Header="My Date Picker"
                 DayFormat="{}{day.integer(2)}" MonthFormat="{}{month.solo.abbreviated(3)}" YearFormat="{}{year.abbreviated}"/>

看起来有点难懂,不过好在我们可以在DatePicker属性选项中选择,而不是自己去写。另外如果我们想隐藏掉年月日中某项,可以通过设置YearVisible、MonthVisible 和 DayVisible来完成。比如我们不想显示日子:
     <DatePicker x:Name="datePicker" Header="My Date Picker" DayVisible="False"
                 DayFormat="{}{day.integer(2)}" MonthFormat="{}{month.solo.abbreviated(3)}" YearFormat="{}{year.abbreviated}"/>
我们看到,日子没有显示。同理我们可以完成月和年的设置。
4. TimePicker
TimePicker多数时候会和DatePicker搭配使用,来完成日期和时间的选取。默认外观是这样的

我们看到,TimePicker显示的是24小时制,我们可以通过修改ClockIdentifier属性让它显示为12小时制
<TimePicker Header="Time Picker" ClockIdentifier="12HourClock" x:Name="timePicker"/>

如上图所示,ClockIdentifier设置为12HourClock时,显示为12小时制,同时会显示上午/下午的选项;类似的,设置为24HourClock时,显示为24小时制,上午/下午的选项消失。
我们还可以通过设置Time属性来修改TimePicker的默认值
        public MainPage()
        {
            this.InitializeComponent();
            timePicker.Time = new TimeSpan(20, 19, 0);
        }

如上图所示,我们设置时间为20:19,也就是下午8:19。另外我们可以把分钟选择器的增量值设置为适合我们的值,比如半个小时。
<TimePicker Header="Time Picker" ClockIdentifier="12HourClock" MinuteIncrement="30" x:Name="timePicker"/>

我们看到,设置后的TimePicker,分钟选择只有0和30两种,这正是我们想要的。
到这里我们就把AppBar、CommandBar、DatePicker 和 TimePicker的用法介绍完了,下一篇我们会介绍剩余的新增控件,谢谢大家。