首先,先看我个人的项目结构。
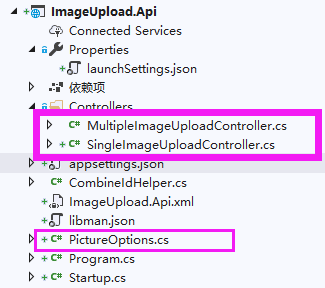
这个webapi项目是专门作为图片上传的业务处理,而其中分为两个控制器:单图片上传和多图片上传。在接下来的内容主要还是针对单文件上传,对于多文件的上传,我暂且尚未研究成功。
其中pictureoptions类,由于我把关于图片上传相关的配置项(保存路径、限制的文件类型和大小)写在了配置文件中,所以接下来会通过依赖注入的方式,注入到这个类中
接下来,正式开工
第一步,配置文件的设置
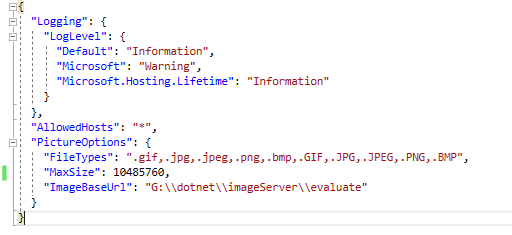
"PictureOptions": {
"FileTypes": ".gif,.jpg,.jpeg,.png,.bmp,.GIF,.JPG,.JPEG,.PNG,.BMP",
"MaxSize": 10485760,
"ImageBaseUrl": "G:\dotnet\imageServer\evaluate"
}
然后在项目根目录下新建PictureOptions类
 1     public class PictureOptions
 2     {
 3         /// <summary>
 4         /// 允许的文件类型
 5         /// </summary>
 6         public string FileTypes { get; set; }
 7         /// <summary>
 8         /// 最大文件大小
 9         /// </summary>
10         public int MaxSize { get; set; }
11         /// <summary>
12         /// 图片的基地址
13         /// </summary>
14         public string ImageBaseUrl { get; set; }
15     }
第二步,依赖注入
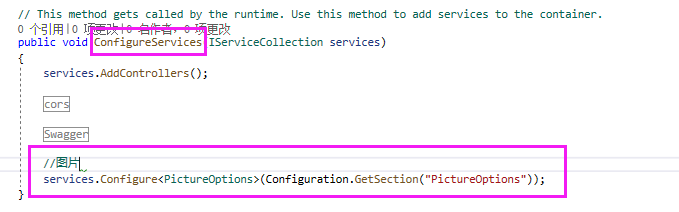
1 services.Configure<PictureOptions>(Configuration.GetSection("PictureOptions"));
在SingleImageUploadController中构造注入
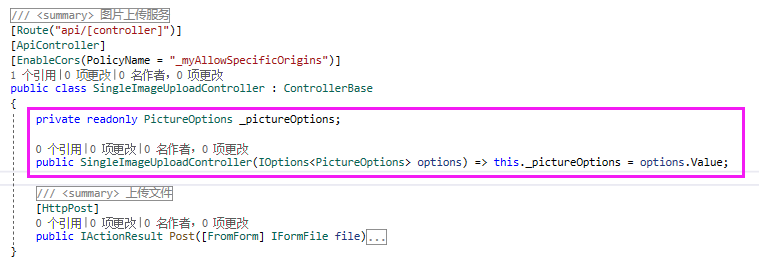
这里要注意,你要把Cors跨域配置好,关于跨域,可以前往阅读我的另一篇博文
第三步,构建POST api
在element-ui中关于upload组件的api说明文档,可以发现一个非常重要的信息


upload组件他实际是通过提交form表单的方式去请求url
所以,后台这边,我们也是要通过form表单,获取上传的文件,具体代码如下:
 1         /// <summary>
 2         /// 上传文件
 3         /// </summary>
 4         /// <param name="file">来自form表单的文件信息</param>
 5         /// <returns></returns>
 6         [HttpPost]
 7         public IActionResult Post([FromForm] IFormFile file)
 8         {
 9             if (file.Length <= this._pictureOptions.MaxSize)//检查文件大小
10             {
11                 var suffix = Path.GetExtension(file.FileName);//提取上传的文件文件后缀
12                 if (this._pictureOptions.FileTypes.IndexOf(suffix) >= 0)//检查文件格式
13                 {
14                     CombineIdHelper combineId = new CombineIdHelper();//我自己的combine id生成器
15                     using (FileStream fs = System.IO.File.Create($@"{this._pictureOptions.ImageBaseUrl}{combineId.CreateId()}{suffix}"))//注意路径里面最好不要有中文
16                     {
17                         file.CopyTo(fs);//将上传的文件文件流,复制到fs中
18                         fs.Flush();//清空文件流
19                     }
20                     return StatusCode(200, new { newFileName = $"{combineId.LastId}{suffix}" });//将新文件文件名回传给前端
21                 }
22                 else
23                     return StatusCode(415, new { msg = "不支持此文件类型" });//类型不正确
24             }
25             else
26                 return StatusCode(413, new { msg = $"文件大小不得超过{this._pictureOptions.MaxSize / (1024f * 1024f)}M" });//请求体过大,文件大小超标
27         }
第四步,配置前端vue项目
 1         <el-upload
 2           action="http://192.168.43.73:5008/api/SingleImageUpload"
 3           list-type="picture-card"
 4           :on-preview="handlePictureCardPreview"
 5           :on-remove="handleRemove"
 6           :on-success="handleUploadSuccess"
 7           :on-error="handleUploadError"
 8         >
 9           <i class="el-icon-plus"></i>
10         </el-upload>
11         <el-dialog :visible.sync="dialogVisible">
12           <img width="100%" :src="dialogImageUrl" alt />
13         </el-dialog>
然后是method
 1   data () {
 2     return {
 3       dialogImageUrl: '',
 4       dialogVisible: false,
 5       images: []
 6     }
 7   },
 8   methods: {
 9     handleRemove (file, fileList) {
10       this.images.forEach((element, index, arr) => {
11         if (file.name === element.oldFile.name) {
12           arr.splice(index, 1)
13         }
14       })
15       console.log(this.images)
16     },
17     handlePictureCardPreview (file) {
18       this.dialogImageUrl = file.url
19       this.dialogVisible = true
20     },
21     handleUploadSuccess (response, file, fileList) {
22       console.log(response)
23       console.log(file)
24       console.log(fileList)
25       this.images.push({
26         newFileName: response.newFileName, // 服务器端的新文件名,即后端回调过来的数据
27         oldFile: {
28           name: file.name, // 上传之前的文件名,客户端的
29           url: file.url // 页面显示上传的图片的src属性绑定用的
30         }
31       })
32     },
33     handleUploadError (response, file, fileList) {
34       this.$message.error(JSON.parse(response.message).msg)
35     }
36   }
这里面注意各个handle中频繁出现的三个参数:response 、 file 和 fileList
其中response,就是后端发送过来的数据
file:单文件上传时,他包含了该文件所有信息
fileList:指的是多文件上传所包含的文件信息