*以下技巧均源自于Lea Verou所著《CSS Secrets》
半透明边框
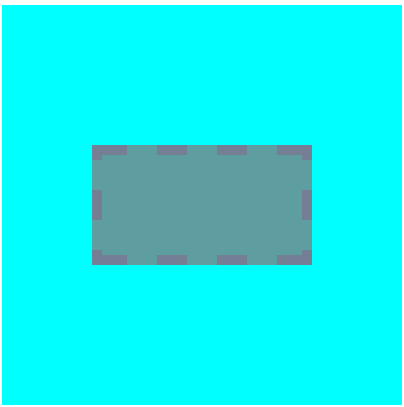
按照常规的思维,我们在添加半透明的边框时无非是将边框颜色设置一个透明度,如下:
 1 <!DOCTYPE html>
 2 <html lang="en">
 3 <head>
 4     <meta charset="UTF-8">
 5     <title>Title</title>
 6     <style>
 7         .outerBox{
 8             position: relative;
 9             width: 400px;
10             height: 400px;
11             background-color: aqua;
12         }
13         .innerBox{
14             position: absolute;
15             top: 0;
16             bottom: 0;
17             left: 0;
18             right: 0;
19             width: 200px;
20             height: 100px;
21             margin: auto;
22             background-color: cadetblue;
23             border: 10px dashed rgba(200,0,100,.2);
24         }
25     </style>
26 </head>
27 <body>
28     <div class="outerBox">
29         <div class="innerBox"></div>
30     </div>
31 </body>
32 </html>
然而显示的效果并不理想,背景图片侵入了透明的边框中。

当然我们可以在背景外层再加一层div,然后将div设置为透明,然后将背景居中也可以达到透明边框的效果,但是比较繁琐。
这里我们可以在innerBox类中添加一条属性background-clip: padding-box;(这个属性的初始值是border-box) 表示侵入到padding之外的background将会被截去。实现效果如下:

多重边框
border属性并不支持多个边框的设定,涉及到多重边框时我们常规的思路要么是使用多个div层层嵌套,层层居中。要么是使用背景图模拟多重边框。这里我们以另外两个角度来实现多重边框。
- box-shadow
box-shadow的相关语法是box-shadow: h-shadow v-shadow blur spread color inset; 当我们将h-shadow v-shadow blur设置为0。再加上正值的拓张半径spread 。我们就能模拟实线的边框。
最重要的是,box-shadow支持逗号分隔语法,这意味着我们能加任意数量的投影。我们将之前的边框去除,加上box-shadow: 0 0 0 5px deeppink, 0 0 0 10px darkred, 0 0 0 15px #4C608B;

这种方法非常便捷,但是需要注意的是。阴影与边框在布局中的行为并不一致,它不占据实际的“位置”也无法响应事件。此时我们需要使用外边距模拟阴影所占据的位置。或者在box-shadow中加入inset关键字改为内置阴影再使用内边距模拟所占据的位置,这样做既是实体布局又可以响应事件。
- outline
当我们只需要两层边框时可以考虑在border的基础上加上outline(描边)。这样做有一个优点就是outline的样式比较灵活,而box-shadow只能模拟实线。与outline-offset配合使用可以控制描边与边缘的位置关系。
这里我们做一个简单的缝边效果:
<!DOCTYPE html>
<html lang="en">
<head>
    <meta charset="UTF-8">
    <title>Title</title>
    <style>
        .outerBox{
            position: relative;
            width: 400px;
            height: 400px;
            background-color: aqua;
        }
        .innerBox{
            position: absolute;
            top: 0;
            bottom: 0;
            left: 0;
            right: 0;
            width: 200px;
            height: 100px;
            margin: auto;
            background-color: cadetblue;
            border: 5px solid cadetblue;
            border-radius:5px;
            outline: 1px dashed #fff;
            outline-offset: -5px;
        }
    </style>
</head>
<body>
    <div class="outerBox">
        <div class="innerBox"></div>
    </div>
</body>
</html>

要注意的是,描边并没有圆角属性,当我们在圆角外描边的时候,有可能出现无法贴合的情况。此时不要采用这种方式。
