转自:https://wenku.baidu.com/view/84fa86ae360cba1aa911da02.html
自定义拦截器需要特别注意的是不要忘记引入struts2默认的拦截器。为了实现某些操作,我们可以自定义拦截器,自定义拦截器有三种方式定义。分别为实现Interceptor接口,继承抽象类AbstractInterceptor,继承MethodFilterInteceptor类。
方式一,实现Interceptor接口。重写String intercept(ActionInvocation invocation)方法。
准备工作,新建struts2interceptor项目。构建一个登录环境:当我们点登录链接时,便成功登录(为了方便,这里不进行验证)。即在link.jsp页面中写如下链接:<a href="<%=request.getContextPath()%>/login.action">登录</a> 然后,我们点击此链接便可以登录。login.action在strutst.xml中的的配置如下:
<package name="interceptor" extends="struts-default">
<action name="login"
class="com.asm.LoginAction">
<result name="success">/success.jsp</result>
</action>
</package>
com.asm.LoginAction为了简单,com.asm.LoginAction总是返回SUCCESS;这样请求这个Action总会返回到.../success.jsp页面。
编写拦截器:MyInterceptor类,内容如下:
package com.asm;
import com.opensymphony.xwork2.ActionInvocation;
import com.opensymphony.xwork2.interceptor.Interceptor;
public class MyInterceptor implements Interceptor {
public void destroy() {
}
public void init() {
}
public String intercept(ActionInvocation invocation) throws Exception {
System.out.println("开始拦截");
String result = invocation.invoke();
System.out.println("结束拦截");
return result;
}
}
为了使用此拦截器,我们必须将此拦截器进行注册,随后再在要使用此拦截器的Action中引用。即首先在<package>中注册,内容如下:
<interceptors>
<interceptor name="myIpt" class="com.asm.MyInterceptor"></interceptor>
</interceptors>
注册完成后,如果我们要在login.action中使用此拦截器,只需要在<action>中增加如下内容:
<interceptor-ref name="myIpt"></interceptor-ref>
这样便成功为LoginAction配置了我们自定义的拦截器MyInterceptor,下面只需发布测试。
实例流程分析:当我们为LoginAction配置了拦截器时,并且有客户端请求此Action时,会首先被此拦截器拦住,然后执行System.out.println("开始拦截"),随后我们调用invocation.invoke()方法,它会把请求继续传递给下一个拦截器,下一个拦截器也会继续执行相应代码后再调用invoke方法继续传递,直到请求到达最后一个拦截器,它会把请求传递给Action,比如,我们这里只用到了一个拦截器,当它执行完成后,会把请求直接转交到LoginAction处理,LoginAction处理完成后,它会返回结果给MyInterceptor拦截器。
方式二、继承AbstractInterceptor抽象类,重写String intercept(ActionInvocation invocation)方法
创建拦截器类MyAbstractInterceptor:主要代码如下:
package com.asm;
import com.opensymphony.xwork2.ActionInvocation;
import com.opensymphony.xwork2.interceptor.AbstractInterceptor;
public class MyAbstractInterceptor extends AbstractInterceptor {
public String intercept(ActionInvocation invocation) throws Exception {
System.out.println("Abs开始拦截");
String result = invocation.invoke();
System.out.println("Abs结束拦截");
return result;
}
}
然后注册此拦截器,在<interceptors>元素进行进行配置,内容如下:
<interceptor name="myAbs"
class="com.asm.MyAbstractInterceptor"></interceptor>
随后再在LoginAction中引用此拦截器,即在<action name="login"
...>配置如下内容:
<interceptor-ref name="myAbs"></interceptor-ref>
最后发布测试。
方式三、继承MethodFilterInteceptor类,重写String doIntercept(ActionInvocation invocation) 方法。
创建拦截器类MyMethodFilterInterceptor,主要代码如下:
package com.asm;
import com.opensymphony.xwork2.ActionInvocation;
import com.opensymphony.xwork2.interceptor.MethodFilterInterceptor;
public class MyMethodFilterInterceptor extends MethodFilterInterceptor{
protected String doIntercept(ActionInvocation invocation) throws Exception {
System.out.println("method开始拦截");
String result=invocation.invoke();
System.out.println("method结束拦截");
return result;
}
}
然后注册此拦截器,在<interceptors>元素进行进行配置,内容如下:
<interceptor name="myMet"
class="com.asm.MyMethodFilterInterceptor">
</interceptor>
随后再在LoginAction中引用此拦截器,即在<action name="login"
...>配置如下内容:
<interceptor-ref name="myMet"></interceptor-ref>
最后发布测试。
分析:当配置到此,实质便为LoginAction配置了三个拦截器,当我们点击登录时会在控制台打印出如下语句:
开始拦截
Abs开始拦截
method开始拦截
--先执行拦截器,再执行此Action
method结束拦截
Abs结束拦截
结束拦截
其实当我们点击登录时,本来是要访问LoginAction,最后会把LoginAction的执行结果传递给访问者。但是当我们配置了拦截器时,当我们去访问Action时,会首先被拦截,随后拦截器执行一些操作后才会继续把请求传递下去。下面作图说明拦截流程:

结合现实理解:比如我们要去某楼层找某人(LoginAction)取一个资源(LoginAction处理后返回的结果,这里表现为success.jsp),(1)进楼层时会被大门保安拦截检查(第一个拦截器:MyInterceptor拦截器),(2)检查通过后再进电梯时会被电梯保安员检查(第二个拦截器:MyAbstractInterceptor拦截器),(3)检查通过后再上到某楼层会被楼层保安员检查(第三个拦截器:MethodAction拦截器
),(4)检查通过后会找到某个(LoginAction),并与某个交谈(LoginAction处理),随后某个人和我们会带着请求的资源出去,(5)出去时,会依次被楼层,电梯,大门保安员检查,最终检查通过。某个人把资源给我们(实质就是返回请求资源给客户端)。
其实拦截器的执行流程和过滤器差不多,所以我们不防用过滤器的眼光来看这些拦截器。
注意:我们在为LoginAction配置拦截器时,都没使用默认的拦截器,是原因这里的测试可以不用,但是以后在我们使用自定义的拦截器是,一定要加上默认的拦截器,否则会导致许多不可预知的结果。
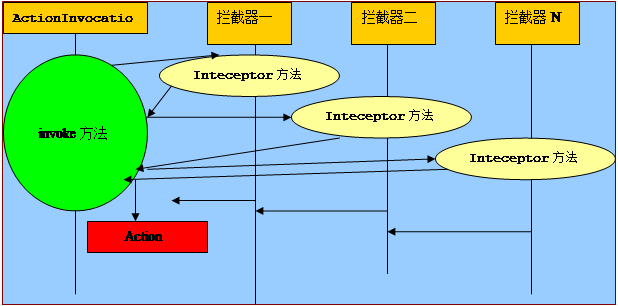
补充:从上面的图并结合代码,我们可以看出拦截器的核心过程应该是ActionInvocation对这些拦截器回调处理,下面我们建立com.asm.interceptor.simulation来模拟这一过程,具体的代码参源文件,在此略去。在此我们作图分析ActionInvocation的实现过程:
补充2:上面分别使用了三种方式来创建自定义的拦截器,第一种方式是最原始的实现方式(实现Interceptor接口),第二种方式的好处是我们可以不必重写所有的方法(继承AbstractInterceptor抽象类),较常用。第三种方式进行了扩展(继承MethodFilterInterceptor类),下面将会展示它的扩展性能。