作为.neter,看到.net core 2.0的正式发布,心里是有点小激动的,迫不及待的体验了一把,发现速度确实是快了很多,其中也遇到一些小问题,所以整理了一些学习笔记:
环境说明
服务器系统:CentOS 7.3 64位
相关工具:putty、Xftp
服务器软件软件:.netcore、nginx、supervisor、mysql
安装CentOS7
这个就不细说了,网上教程很多,我这边是阿里云的ecs服务器,操作系统为centos 7.3 x64
安装.NET Core SDK for CentOS7
sudo yum install libunwind libicu(安装libicu依赖)
curl -sSL -o dotnet.tar.gz https://aka.ms/dotnet-sdk-2.0.0-linux-x64 (下载sdk压缩包)
mkdir -p ~/dotnet && tar zxf dotnet.tar.gz -C ~/dotnet 解压缩)
sudo ln -s /opt/dotnet/dotnet /usr/local/bin(创建链接)
参见官方文档, 需要注意的地方是第四行跟官方文档有点出入,这是建立连接,而官方文档的是添加path(只在当前session有效:export PATH=$PATH:$HOME/dotnet)
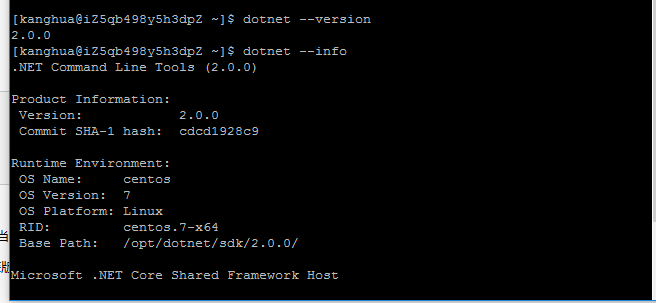
,执行这些操作之前请务必卸载旧版本及预览版本(我是直接删除旧版本的文件,执行 dotnet --info 可以查看已安装版本信息),当执行dotnet --version xianshi 2.0.0时表示安装.net core 2.0成功
参考资料: https://www.microsoft.com/net/core#linuxcentos
搭建ftp环境
安装vsftpd
1、以管理员(root)身份执行以下命令
- yum install vsftpd
2、设置开机启动vsftpd ftp服务
- chkconfig vsftpd on
3、启动vsftpd服务
- service vsftpd start
管理vsftpd相关命令:
停止vsftpd: service vsftpd stop
重启vsftpd: service vsftpd restart
配置防火墙
在 CentOS 7.3中
暂时开放 ftp 服务
# firewall-cmd --add-service=ftp
永久开放 ftp 服务
# firewall-cmd --add-service=ftp --permanent
永久关闭
# firewall-cmd --remove-service=ftp --permanent
success
让设定生效
# systemctl restart firewalld
添加ftp用户
下面是添加ftpuser用户,设置根目录为/home/wwwroot/ftpuser,禁止此用户登录SSH的权限,并限制其访问其它目录(当不存在指定目录时需要创建相关目录)。
1、修改/etc/vsftpd/vsftpd.conf
vim /etc/vsftpd/vsftpd.conf
如需禁用匿名登录把第一行的 anonymous_enable=YES ,改为NO
将底下三行
- #chroot_list_enable=YES
- # (default follows)
- #chroot_list_file=/etc/vsftpd.chroot_list
改为
- chroot_list_enable=YES
- # (default follows)
- chroot_list_file=/etc/vsftpd/chroot_list
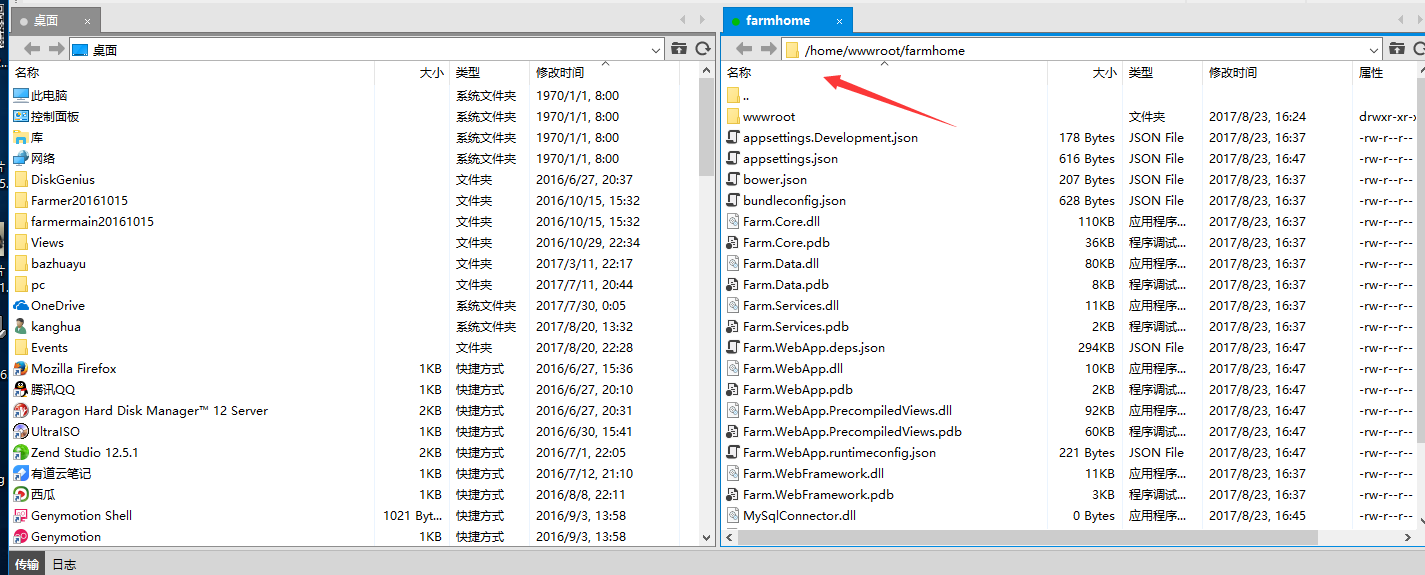
3、增加用户farmhome,指向目录/home/wwwroot/farmhome,禁止登录SSH权限。
useradd -d /home/wwwroot/farmhome -g ftp -s /sbin/nologin farmhome
4、设置用户口令
passwd farmhome
5、编辑文件chroot_list:
- vim /etc/vsftpd/chroot_list
内容为ftp用户名,每个用户占一行,如:
farmhome
6、重新启动vsftpd
service vsftpd restart
7.用xftp等客户端软件应该就能访问到该目录了;
安装mysql
一、官网下载mysql
# wget https://repo.mysql.com//mysql57-community-release-el7-11.noarch.rpm (去mysql官网获取最新的rpm包 https://dev.mysql.com/downloads/repo/yum/)
# rpm -ivh mysql-community-release-el7-5.noarch.rpm
# yum install mysql-community-server
安装完成后重启mysql服务
service mysqld restart
二、mysql相关配置
初次安装mysql,root账户没有密码。
[root@yl-web yl]# mysql -u root
Welcome to the MySQL monitor.  Commands end with ; or g.
Your MySQL connection id is 3
Server version: 5.6.26 MySQL Community Server (GPL)

Copyright (c) 2000, 2015, Oracle and/or its affiliates. All rights reserved.

Oracle is a registered trademark of Oracle Corporation and/or its
affiliates. Other names may be trademarks of their respective
owners.

Type 'help;' or 'h' for help. Type 'c' to clear the current input statement.

mysql> show databases;
+--------------------+
| Database           |
+--------------------+
| information_schema |
| mysql              |
| performance_schema |
| test               |
+--------------------+
rows in set (0.01 sec)

mysql>
设置密码
mysql> set password for 'root'@'localhost' =password('password');
Query OK, 0 rows affected (0.00 sec)

mysql>
不需要重启数据库即可生效。
mysql新建用户(用户farmhome,密码123456):
mysql>create user 'farmhome'@'%' identified by '123';
mysql远程连接设定(把在所有数据库的所有表的所有权限赋值给位于所有IP地址的root用户)
1 mysql> grant all privileges on *.* to root@'%'identified by 'password';
部署asp.net core
1.防火墙配置
运行、停止、禁用firewalld
启动:# systemctl start firewalld
查看状态:# systemctl status firewalld 或者 firewall-cmd --state
停止:# systemctl disable firewalld
禁用:# systemctl stop firewalld
将接口添加到区域,默认接口都在public
# firewall-cmd --zone=public --add-interface=eth0 --permanent
永久生效再加上 --permanent 然后reload防火墙
设置默认接口区域
# firewall-cmd --set-default-zone=public --permanent
立即生效无需重启
打开端口
加入一个端口到区域:
# firewall-cmd --zone=public --add-port=5000/tcp --permanent
# firewall-cmd --zone=public --add-port=80/tcp --permanent
查看所有打开的端口:
# firewall-cmd --zone=dmz --list-ports

2.用xftp上传程序到指定目录即上的
进入指定目录运行程序
 View Code
如出现不能绑定ipv6等错误时,请修改Program.cs,添加UseUrls("http://0.0.0.0:50");
View Code配置Nginx
安装Nginx
curl -o nginx.rpm http://nginx.org/packages/centos/7/noarch/RPMS/nginx-release-centos-7-0.el7.ngx.noarch.rpm
rpm -ivh nginx.rpm
yum install nginx


安装成功!
输入:systemctl start nginx 来启动nginx。
输入:systemctl enable nginx 来设置nginx的开机启动(linux宕机、重启会自动运行nginx不需要连上去输入命令)。
测试nginx是否可以访问。

配置nginx对ASP.NET Core应用的转发
修改
View Code将文件内容替换为
server {
listen 80;
location / {
proxy_pass http://localhost:5000;
proxy_http_version 1.1;
proxy_set_header Upgrade $http_upgrade;
proxy_set_header Connection keep-alive;
proxy_set_header Host $host;
proxy_cache_bypass $http_upgrade;
}}
再次运行程序
donet /home/wwwroot/farmhome/famrhome.dll
如出现502错误时由于SELinux保护机制所导致,我们需要将nginx添加至SELinux的白名单。
接下来我们通过一些命令解决这个问题:
yum install policycoreutils-python

sudo cat /var/log/audit/audit.log | grep nginx | grep denied | audit2allow -M mynginx

sudo semodule -i mynginx.pp
配置守护服务(Supervisor)
目前存在三个问题
问题1:ASP.NET Core应用程序运行在shell之中,如果关闭shell则会发现ASP.NET Core应用被关闭,从而导致应用无法访问,这种情况当然是我们不想遇到的,而且生产环境对这种情况是零容忍的。
问题2:如果ASP.NET Core进程意外终止那么需要人为连进shell进行再次启动,往往这种操作都不够及时。
问题3:如果服务器宕机或需要重启我们则还是需要连入shell进行启动。
为了解决这个问题,我们需要有一个程序来监听ASP.NET Core 应用程序的状况。在应用程序停止运行的时候立即重新启动。这边我们用到了Supervisor这个工具,Supervisor使用Python开发的。
安装Supervisor
yum install python-setuptools
easy_install supervisor
配置Supervisor
mkdir /etc/supervisor
echo_supervisord_conf > /etc/supervisor/supervisord.conf
修改supervisord.conf文件,
vim /etc/supervisor/supervisord.conf
将文件尾部的配置(表示加载配置文件目录下的配置文件)

修改为

ps:如果服务已启动,修改配置文件可用“supervisorctl reload”命令来使其生效
配置对ASP.NET Core应用的守护
创建一个 farmhomeapp.conf文件
View Code,内容大致如下
[program:farmhomewebapp]
command=dotnet farmhome.dll ; 运行程序的命令
directory=/home/wwwroot/farmhome/ ; 命令执行的目录
autorestart=true ; 程序意外退出是否自动重启
stderr_logfile=/var/log/WebApplication1.err.log ; 错误日志文件
stdout_logfile=/var/log/WebApplication1.out.log ; 输出日志文件
environment=ASPNETCORE_ENVIRONMENT=Production ; 进程环境变量
user=root ; 进程执行的用户身份
stopsignal=INT
运行supervisord,查看是否生效
supervisord -c /etc/supervisor/supervisord.conf

ps -ef
如存在指定进程表示成功

至此关于ASP.NET Core应用程序的守护即配置完成。
配置Supervisor开机启动
新建一个“supervisord.service”文件
vim /usr/lib/systemd/system/supervisord.service
内容如下
# dservice for systemd (CentOS 7.0+)
# by ET-CS (https://github.com/ET-CS)
[Unit]
Description=Supervisor daemon

[Service]
Type=forking
ExecStart=/usr/bin/supervisord -c /etc/supervisor/supervisord.conf
ExecStop=/usr/bin/supervisorctl shutdown
ExecReload=/usr/bin/supervisorctl reload
KillMode=process
Restart=on-failure
RestartSec=42s

[Install]
WantedBy=multi-user.target
执行命令:systemctl enable supervisord 设定开机启动
执行命令:systemctl is-enabled supervisord #来验证是否为开机启动

本文是环境搭建完后依据记忆写的博客,可能会有错误,欢迎指正,不知不觉已经凌晨了,明天继续上asp.net core2 及EF Core Fluent API 及 EF Core for MySql 相关介绍
相关内容参考: