How to make a mini map for your scene in Unity3d
This is my first tutorial on Unity, kinda nervous writing it... Anyway have you guys ever play Hitman, Dynasty Warrior, Starcraft or any RTS games? Usually at the bottom left of those games, there's a 2d map showing where the players are and where you're suppose to go etc.
Well, that's what I'm trying to write about today, how to make a simple
mini map similar to that, instead of using the top down camera method.
This comes in handy when you're trying to create a mini map to locate
the player and the enemies (AIs) current position... Like Hitman, where
you can see where everyone's heading from within a map.
I've already set up the scene for an easy start, download it here:
I've already set up the scene for an easy start, download it here:
Starting project
Final project
And... let's get started!
First, import the "startPackage" into Unity, then expand the "My Scenes" folder in the Project view and open up the "tut" scene. There should be a "well" textured terrain with mountains, a prefab called "Enemy" in the form of a cube, a first person controller, and a game object called "Waypoints" which contains a bunch of other game objects with "w" follow by a number on their name inside. Click "Play" to play the scene, and you should see the cube starting to move by itself across all the waypoints in the scene.
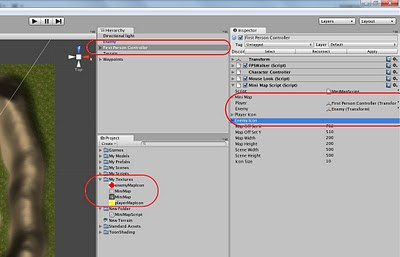
Next, create a new Javascript file, name it "MiniMapScript" (or whatever
that suits you). Double click on it in the project view to edit it. Now
we are gonna create a few variables for the script (comments are added
for explanation):
//For placing the image of the mini map.
var miniMap : GUIStyle;
//Two transform variables, one for the player's and the enemy's,
var player : Transform;
var enemy : Transform;
//Icon images for the player and enemy(s) on the map.
var playerIcon : GUIStyle;
var enemyIcon : GUIStyle;
//Offset variables (X and Y) - where you want to place your map on screen.
var mapOffSetX = 762;
var mapOffSetY = 510;
//The width and height of your map as it'll appear on screen,
var mapWidth = 200;
var mapHeight = 200;
//Width and Height of your scene, or the resolution of your terrain.
var sceneWidth = 500;
var sceneHeight = 500;
//The size of your player's and enemy's icon on the map.
var iconSize = 10;
private var iconHalfSize;
function Update () { //So that the pivot point of the icon is at the middle of the image.
Final project
And... let's get started!
First, import the "startPackage" into Unity, then expand the "My Scenes" folder in the Project view and open up the "tut" scene. There should be a "well" textured terrain with mountains, a prefab called "Enemy" in the form of a cube, a first person controller, and a game object called "Waypoints" which contains a bunch of other game objects with "w" follow by a number on their name inside. Click "Play" to play the scene, and you should see the cube starting to move by itself across all the waypoints in the scene.
//For placing the image of the mini map.
var miniMap : GUIStyle;
//Two transform variables, one for the player's and the enemy's,
var player : Transform;
var enemy : Transform;
//Icon images for the player and enemy(s) on the map.
var playerIcon : GUIStyle;
var enemyIcon : GUIStyle;
//Offset variables (X and Y) - where you want to place your map on screen.
var mapOffSetX = 762;
var mapOffSetY = 510;
//The width and height of your map as it'll appear on screen,
var mapWidth = 200;
var mapHeight = 200;
//Width and Height of your scene, or the resolution of your terrain.
var sceneWidth = 500;
var sceneHeight = 500;
//The size of your player's and enemy's icon on the map.
var iconSize = 10;
private var iconHalfSize;
function Update () { //So that the pivot point of the icon is at the middle of the image.
//You'll know what it means later...
iconHalfSize = iconSize/2;
}
}
 Now there's a few thing you need to understand before we proceed...
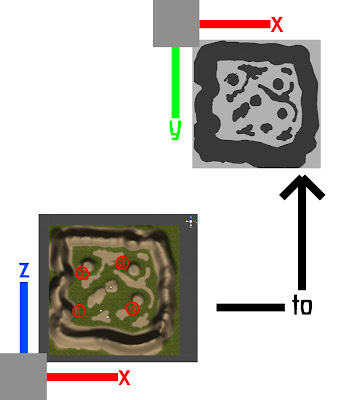
So what we are trying to do here is to take the X and Z (not Y) position of both the player and enemy, and convert them into the X and Y (again, not Z) axis of the screen (for the map).
 When
you look at the image above. it's like you're gonna flip the whole
things up (Z and X to Y and X). I'm not sure if Unity has a function for
what I just mentioned above, I know there's something called
GUI.matrix4x4, but at the moment I was to lazy to find out, and I used
the directly proportional method, to "convert them".
Under the Update function, add this line:
function GetMapPos(pos : float, mapSize, sceneSize) {
return pos * mapSize/sceneSize;
}
Basically what this line of function does is to take the position (pos)
of the player, multiply by the height or width of the map, and then
divide by the resolution (height or width) of the terrain, and it'll
return back a value which we could use later to locate the player's
position as it is on the map.
After that, create a new OnGUI function below the GetMapPos function, write these in:
function OnGUI() {
GUI.BeginGroup(Rect(mapOffSetX,mapOffSetY,mapWidth,mapHeight), miniMap);
var pX = GetMapPos(transform.position.x, mapWidth, sceneWidth);
var pZ = GetMapPos(transform.position.z, mapHeight, sceneHeight);
var playerMapX = pX - iconHalfSize;
var playerMapZ = ((pZ * -1) - iconHalfSize) + mapHeight;
GUI.Box(Rect(playerMapX, playerMapZ, iconSize, iconSize), "", playerIcon);
GUI.EndGroup();
}
The first line (GUI.BeginGroup) and the last (GUI.EndGroup) is to create
a GUI group and placed it at the bottom right of the screen using the
mapOffSetX and mapOffSetY variables in Rect(), and the GUI texture for
it would be the miniMap GUIStyle which we just set-up earlier.
The second and third line (pX and pZ) is two new variables which has the returned value of the GetMapPos function...
The forth line (playerMapX) contains the information of the player's
X-axis position on the map. It is minus by iconHalfSize so that we can
have the pivot point of the player's icon which would appear on the map
to be in the middle (looks more appropriate that way).
The fifth line (playerMapZ), like playerMapX, contains the information
of the player's Y position on the map (it's written as playerMapZ to let
you know that we are taking the player's Z-axis position in the scene,
you can name it to anything you want actually).
Like what I've mentioned in the sketch I posted above (the one with the Z
& X axis, and Y & X axis), when you are creating the map, you
have to flip the Z-axis in scene vertically to make it the Y-axis in
map. To do that, we multiply "pZ" with negative one (which would flip
it), and then plus the mapHeight to get the value of the Y-axis in map.
The sixth line is to create a GUI.Box which would represent the player
on the map, together with the playerIcon GUIStyle as the texture...
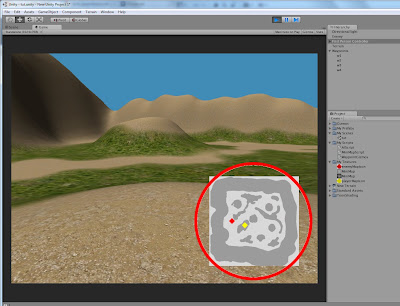
Those stuff should be enough by now. Click "Play" and you should be able
to see a map on the screen, and a small, yellow, diamond-shaped icon on
the map (the player).
Try to move around, and you should see the yellow icon move along too.
If it didn't, check your line again, see if you didn't confuse the Z
axis with the Y axis (unless if you choose to write it accordingly,
instead of copy and paste).
If you understand what I've wrote thus far, you should be able to code
the enemy part yourself. But if you can't, below is the full codes, copy
and paste them to your script:
//For placing the image of the mini map.
var miniMap : GUIStyle;
//Two transform variables, one for the player's and the enemy,
var player : Transform;
var enemy : Transform;
//Icon images for the player and enemy(s) on the map.
var playerIcon : GUIStyle;
var enemyIcon : GUIStyle;
//Offset variables (X and Y) - where you want to place your map on screen.
var mapOffSetX = 762;
var mapOffSetY = 510;
//The width and height of your map as it'll appear on screen,
var mapWidth = 200;
var mapHeight = 200;
//Resolution (both width and height) of your terrain.
var sceneWidth = 500;
var sceneHeight = 500;
//The size of your player and enemy's icon as it would appear on the map.
var iconSize = 10;
var iconHalfSize;
function Update () {
iconHalfSize = iconSize/2;
}
function GetMapPos(pos : float, mapSize : float, sceneSize : float) {
return pos * mapSize/sceneSize;
}
function OnGUI() {
//Everything about the map.
GUI.BeginGroup(Rect(mapOffSetX,mapOffSetY,mapWidth,mapHeight), miniMap);
var pX = GetMapPos(transform.position.x, mapWidth, sceneWidth);
var pZ = GetMapPos(transform.position.z, mapHeight, sceneHeight);
var playerMapX = pX - iconHalfSize;
var playerMapZ = ((pZ * -1) - iconHalfSize) + mapHeight;
GUI.Box(Rect(playerMapX, playerMapZ, iconSize, iconSize), "", playerIcon);
var sX = GetMapPos(enemy.transform.position.x, mapWidth, sceneWidth);
var sZ = GetMapPos(enemy.transform.position.z, mapHeight, sceneHeight);
var enemyMapX = sX - iconHalfSize;
var enemyMapZ = ((sZ * -1) - iconHalfSize) + mapHeight;
GUI.Box(Rect(enemyMapX, enemyMapZ, iconSize, iconSize), "", enemyIcon);
GUI.EndGroup();
}
And that's basically all... If you have any question (like an error or
bug), drop me a message at leezhifei168@rocketmail.com, I'll try to
answer to your problem as soon as I can.
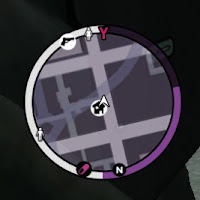
Please be noted the final product will not look like one of in GTAs, but
those in RTS games, where you have an entire big area in a small map.
To do the effect like in GTA, you have to use a top down camera and some
shaders, I'll try to post a tutorial about it later when I'm free.


