总结有关按钮的各种样式
㈠基本按钮样式
看一下没有进行css样式设计时按钮的样子与进行样式设计的按钮样子
<!DOCTYPE html>
<html>
<head>
<meta charset="utf-8">
<title>基本按钮样式</title>
<style>
.button {
    background-color: skyblue;
    border: none;
    color: white;
    padding: 15px 30px;
    text-align: center;
    text-decoration: none;
    display: inline-block;
    font-size: 18px;
    margin: 4px 2px;
    cursor: pointer;
}
</style>
</head>
<body>

<h2>CSS 按钮</h2>

<button>默认按钮</button>
<a href="#" class="button">链接按钮</a>
<button class="button">按钮</button>
<input type="button" class="button" value="输入框按钮">

</body>
</html>
效果图:
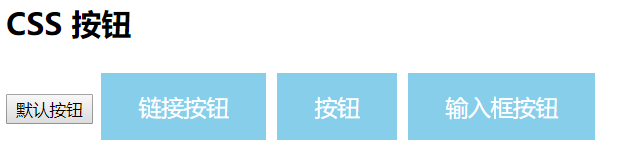
看,这就是两者之间的区别,接下来详细的介绍每一个样式添加后的样子。
注:cursor: pointer:光标呈现为指示链接的指针(一只手)。
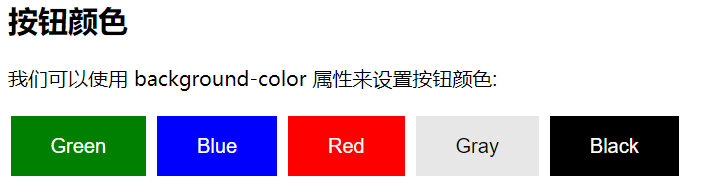
㈡按钮颜色
使用 background-color 属性来设置按钮颜色:
<!DOCTYPE html>
<html>
<head>
<meta charset="utf-8">
<title>样色样式</title>
<style>
.button {
    background-color: green;
    border: none;
    color: white;
    padding: 15px 32px;
    text-align: center;
    text-decoration: none;
    display: inline-block;
    font-size: 16px;
    margin: 4px 2px;
    cursor: pointer;
}

.button2 {background-color: blue;} /* Blue */
.button3 {background-color: red;} /* Red */
.button4 {background-color: #e7e7e7; color: black;} /* Gray */
.button5 {background-color: black;}
</style>
</head>
<body>

<h2>按钮颜色</h2>
<p>我们可以使用 background-color 属性来设置按钮颜色:</p>

<button class="button">Green</button>
<button class="button button2">Blue</button>
<button class="button button3">Red</button>
<button class="button button4">Gray</button>
<button class="button button5">Black</button>

</body>
</html>
效果图:
㈢按钮大小
可以使用 font-size 属性来设置按钮大小:
<!DOCTYPE html>
<html>
<head>
<meta charset="utf-8">
<title>大小样式)</title>
<style>
.button {
         background-color: deeppink;
         border: none;
         color: white;
         padding: 15px 32px;
         text-align: center;
         text-decoration: none;
         display: inline-block;
         font-size: 16px;
         margin: 4px 2px;
         cursor: pointer;
}

.button1 {font-size: 10px;}
.button2 {font-size: 12px;}
.button3 {font-size: 16px;}
.button4 {font-size: 20px;}
.button5 {font-size: 24px;}
</style>
</head>
<body>

<h2>按钮大小</h2>
<p>我们可以使用 font-size 属性来设置按钮大小:</p>

<button class="button button1">10px</button>
<button class="button button2">12px</button>
<button class="button button3">16px</button>
<button class="button button4">20px</button>
<button class="button button5">24px</button>

</body>
</html>
效果图:

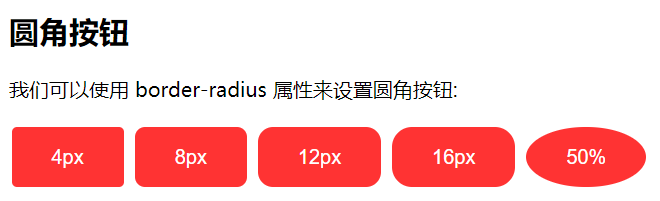
㈣圆角按钮
可以使用 border-radius 属性来设置圆角按钮:
<!DOCTYPE html>
<html>
<head>
<meta charset="utf-8">
<title>圆角样式</title>
<style>
.button {
    background-color: #FF3333;
    border: none;
    color: white;
    padding: 15px 32px;
    text-align: center;
    text-decoration: none;
    display: inline-block;
    font-size: 16px;
    margin: 4px 2px;
    cursor: pointer;
}

.button1 {border-radius: 4px;}
.button2 {border-radius: 8px;}
.button3 {border-radius: 12px;}
.button4 {border-radius: 16px;}
.button5 {border-radius: 50%;}
</style>
</head>
<body>

<h2>圆角按钮</h2>
<p>我们可以使用 border-radius 属性来设置圆角按钮:</p>

<button class="button button1">4px</button>
<button class="button button2">8px</button>
<button class="button button3">12px</button>
<button class="button button4">16px</button>
<button class="button button5">50%</button>

</body>
</html>
效果图:
㈤按钮边框颜色
可以使用 border 属性设置按钮边框颜色:
<!DOCTYPE html>
<html>
<head>
<meta charset="utf-8">
<title>按钮边框样式</title>
<style>
.button {
    background-color: green;
    border: none;
    color: white;
    padding: 15px 32px;
    text-align: center;
    text-decoration: none;
    display: inline-block;
    font-size: 16px;
    margin: 4px 2px;
    cursor: pointer;
}

.button1 {
    background-color: white;
    color: black;
    border: 2px solid #4CAF50;
}

.button2 {
    background-color: white;
    color: black;
    border: 2px solid #008CBA;
}

.button3 {
    background-color: white;
    color: black;
    border: 2px solid #f44336;
}

.button4 {
    background-color: white;
    color: black;
    border: 2px solid #e7e7e7;
}

.button5 {
    background-color: white;
    color: black;
    border: 2px solid #555555;
}
</style>
</head>
<body>

<h2>按钮边框颜色</h2>
<p>我们可以使用 border 属性设置按钮边框颜色:</p>

<button class="button button1">Green</button>
<button class="button button2">Blue</button>
<button class="button button3">Red</button>
<button class="button button4">Gray</button>
<button class="button button5">Black</button>

</body>
</html>
效果图:

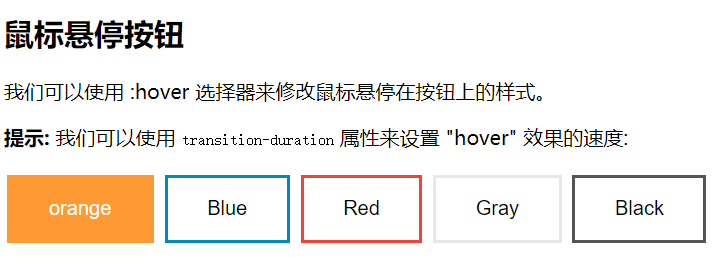
㈥鼠标悬停按钮
可以使用 :hover 选择器来修改鼠标悬停在按钮上的样式。
使用 transition-duration 属性来设置 "hover" 效果的速度
<!DOCTYPE html>
<html>
<head>
<meta charset="utf-8">
<title>悬停按钮样式</title>
<style>
.button {
    background-color: #FF9933;
    border: none;
    color: white;
    padding: 16px 32px;
    text-align: center;
    text-decoration: none;
    display: inline-block;
    font-size: 16px;
    margin: 4px 2px;
    -webkit-transition-duration: 0.5s; /* Safari */
    transition-duration: 0.5s;
    cursor: pointer;
}

.button1 {
    background-color: white;
    color: black;
    border: 2px solid #FF9933;
}

.button1:hover {
    background-color:#FF9933;
    color: white;
}

.button2 {
    background-color: white;
    color: black;
    border: 2px solid #008CBA;
}

.button2:hover {
    background-color: #008CBA;
    color: white;
}

.button3 {
    background-color: white;
    color: black;
    border: 2px solid #f44336;
}

.button3:hover {
    background-color: #f44336;
    color: white;
}

.button4 {
    background-color: white;
    color: black;
    border: 2px solid #e7e7e7;
}

.button4:hover {background-color: #e7e7e7;}

.button5 {
    background-color: white;
    color: black;
    border: 2px solid #555555;
}

.button5:hover {
    background-color: #555555;
    color: white;
}
</style>
</head>
<body>

<h2>鼠标悬停按钮</h2>
<p>我们可以使用 :hover 选择器来修改鼠标悬停在按钮上的样式。</p>
<p><strong>提示:</strong> 我们可以使用 <code>transition-duration</code> 属性来设置 "hover" 效果的速度:</p>

<button class="button button1">orange</button>
<button class="button button2">Blue</button>
<button class="button button3">Red</button>
<button class="button button4">Gray</button>
<button class="button button5">Black</button>

</body>
</html>
效果图:
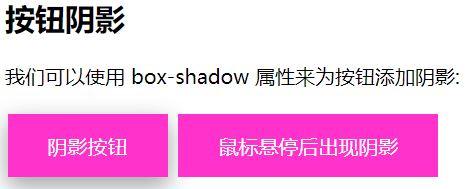
㈦按钮阴影
可以使用 box-shadow 属性来为按钮添加阴影:
<!DOCTYPE html>
<html>
<head>
<meta charset="utf-8">
<title>阴影样式</title>
<style>
.button {
    background-color: #FF33CC; /* Green */
    border: none;
    color: white;
    padding: 15px 32px;
    text-align: center;
    text-decoration: none;
    display: inline-block;
    font-size: 16px;
    margin: 4px 2px;
    cursor: pointer;
    -webkit-transition-duration: 0.55s; /* Safari */
    transition-duration: 0.5s;
}

.button1 {
    box-shadow: 0 8px 16px 0 rgba(0,0,0,0.2), 0 6px 20px 0 rgba(0,0,0,0.19);
}

.button2:hover {
    box-shadow: 0 12px 16px 0 rgba(0,0,0,0.3),0 17px 50px 0 rgba(0,0,0,0.19);
}
</style>
</head>
<body>

<h2>按钮阴影</h2>
<p>我们可以使用 box-shadow 属性来为按钮添加阴影:</p>

<button class="button button1">阴影按钮</button>
<button class="button button2">鼠标悬停后出现阴影</button>

</body>
</html>
效果图:
鼠标没有悬停时的样子:
鼠标悬停后的样子:

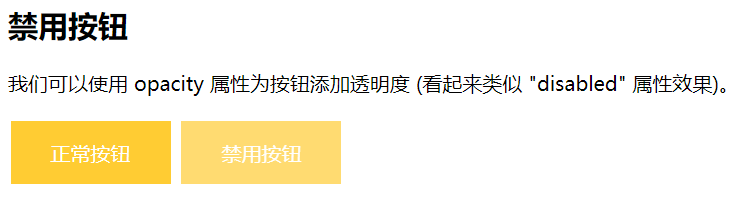
㈧禁用按钮
可以使用 opacity 属性为按钮添加透明度 (看起来类似 "disabled" 属性效果)。
可以添加 cursor 属性并设置为 "not-allowed" 来设置一个禁用的图片:
<!DOCTYPE html>
<html>
<head>
<meta charset="utf-8">
<title>禁用样式</title>
<style>
.button {
    background-color: #FFCC33; /* Green */
    border: none;
    color: white;
    padding: 15px 32px;
    text-align: center;
    text-decoration: none;
    display: inline-block;
    font-size: 16px;
    margin: 4px 2px;
    cursor: pointer;
}

.disabled {
    opacity: 0.7;
    cursor: not-allowed;
}
</style>
</head>
<body>

<h2>禁用按钮</h2>
<p>我们可以使用 opacity 属性为按钮添加透明度 (看起来类似 "disabled" 属性效果)。</p>

<button class="button">正常按钮</button>
<button class="button disabled">禁用按钮</button>

</body>
</html>
效果图:
㈨按钮宽度
默认情况下,按钮的大小有按钮上的文本内容决定( 根据文本内容匹配长度 )。 我们可以使用 width 属性来设置按钮的宽度:
如果要设置固定宽度可以使用像素 (px) 为单位,如果要设置响应式的按钮可以设置为百分比。
<!DOCTYPE html>
<html>
<head>
<meta charset="utf-8">
<title>宽度样式</title>
<style>
.button {
    background-color: #993366;
    border: none;
    color: white;
    padding: 15px 32px;
    text-align: center;
    text-decoration: none;
    display: inline-block;
    font-size: 16px;
    margin: 4px 2px;
    cursor: pointer;
}

.button1 {width: 250px;}
.button2 {width: 50%;}
.button3 {
    padding-left: 0;
    padding-right: 0;
    width: 100%;
}
</style>
</head>
<body>

<h2>按钮宽度</h2>
<p>默认情况下,按钮的大小有按钮上的文本内容决定( 根据文本内容匹配长度 )。 我们可以使用 width 属性来设置按钮的宽度:</p>
<p><strong>提示:</strong>  如果要设置固定宽度可以使用像素 (px) 为单位,如果要设置响应式的按钮可以设置为百分比。</p>

<button class="button button1">250px</button><br>
<button class="button button2">50%</button><br>
<button class="button button3">100%</button>

</body>
</html>
效果图:

㈩按钮组
移除外边距并添加 float:left 来设置按钮组:
<!DOCTYPE html>
<html>
<head>
<meta charset="utf-8">
<title>按钮组</title>
<style>
.button {
    background-color: #33CCCC; /* Green */
    border: none;
    color: white;
    padding: 15px 32px;
    text-align: center;
    text-decoration: none;
    display: inline-block;
    border-radius: 8px;
    font-size: 16px;
    cursor: pointer;
    float: left;
}

.button:hover {
    background-color: #3399CC;
}
</style>
</head>
<body>

<h2>按钮组</h2>
<p>移除外边距并添加 float:left 来设置按钮组:</p>

<button class="button">Button</button>
<button class="button">Button</button>
<button class="button">Button</button>
<button class="button">Button</button>

<p style="clear:both"><br>记住要清除浮动,否则下一个 p 元素的按钮也会显示在同一行。</p>

</body>
</html>
效果图:

(十一)带边框按钮组
可以使用 border 属性设置按钮边框颜色:
<!DOCTYPE html>
<html>
<head>
<meta charset="utf-8">
<title>按钮边框颜色样式</title>
<style>
.button {
    background-color: #4CAF50;
    border: none;
    color: white;
    padding: 15px 32px;
    text-align: center;
    text-decoration: none;
    display: inline-block;
    font-size: 16px;
    margin: 4px 2px;
    cursor: pointer;
}

.button1 {
    background-color: white;
    color: black;
    border: 2px solid #4CAF50;
}

.button2 {
    background-color: white;
    color: black;
    border: 2px solid #008CBA;
}

.button3 {
    background-color: white;
    color: black;
    border: 2px solid #f44336;
}

.button4 {
    background-color: white;
    color: black;
    border: 2px solid #e7e7e7;
}

.button5 {
    background-color: white;
    color: black;
    border: 2px solid #555555;
}
</style>
</head>
<body>

<h2>按钮边框颜色</h2>
<p>我们可以使用 border 属性设置按钮边框颜色:</p>

<button class="button button1">Green</button>
<button class="button button2">Blue</button>
<button class="button button3">Red</button>
<button class="button button4">Gray</button>
<button class="button button5">Black</button>

</body>
</html>
效果图:
(十二)按钮动画
示例1:鼠标移动到按钮上后添加箭头标记:
<!DOCTYPE html>
<html>
<head>
<meta charset="utf-8">
<title>箭头动画效果</title>
<style>
.button {
  display: inline-block;
  border-radius:8px;
  background-color: #33FFFF;
  border: none;
  color: #FFFFFF;
  text-align: center;
  font-size: 28px;
  padding: 20px;
  width: 200px;
  transition: all 0.5s;
  cursor: pointer;
  margin: 5px;
}

.button span {
  cursor: pointer;
  display: inline-block;
  position: relative;
  transition: 0.5s;
}

.button span:after {
  content: '→';
  position: absolute;
  opacity: 0;
  top: 0;
  right: -20px;
  transition: 0.5s;
}

.button:hover span {
  padding-right: 25px;
}

.button:hover span:after {
  opacity: 1;
  right: 0;
}
</style>
</head>
<body>

<h2>按钮动画</h2>

<button class="button" style="vertical-align:middle"><span>Hover </span></button>

</body>
</html>
效果图:

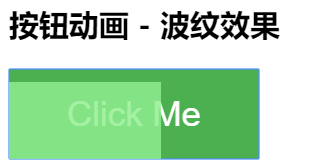
示例2:点击时添加 "波纹" 效果:
<!DOCTYPE html>
<html>
<head>
<meta charset="utf-8">
<title>波纹动画</title>
<style>
.button {
    position: relative;
    background-color: #4CAF50;
    border: none;
    font-size: 28px;
    color: #FFFFFF;
    padding: 20px;
    width: 200px;
    text-align: center;
    -webkit-transition-duration: 0.4s; /* Safari */
    transition-duration: 0.4s;
    text-decoration: none;
    overflow: hidden;
    cursor: pointer;
}

.button:after {
    content: "";
    background: #90EE90;
    display: block;
    position: absolute;
    padding-top: 300%;
    padding-left: 350%;
    margin-left: -20px!important;
    margin-top: -120%;
    opacity: 0;
    transition: all 0.8s
}

.button:active:after {
    padding: 0;
    margin: 0;
    opacity: 1;
    transition: 0s
}
</style>
</head>
<body>

<h2>按钮动画 - 波纹效果</h2>

<button class="button">Click Me</button>

</body>
</html>
效果图:
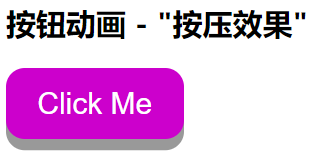
示例3:点击时添加 "压下" 效果:
<!DOCTYPE html>
<html>
<head>
<meta charset="utf-8">
<title>按压样式</title>
<style>
.button {
  display: inline-block;
  padding: 15px 25px;
  font-size: 24px;
  cursor: pointer;
  text-align: center;
  text-decoration: none;
  outline: none;
  color: #fff;
  background-color: #CC00CC;
  border: none;
  border-radius: 15px;
  box-shadow: 0 9px #999;
}

.button:hover {background-color: #CC0099;}

.button:active {
  background-color: #CC0099;
  box-shadow: 0 5px #666;
  transform: translateY(4px);
}
</style>
</head>
<body>

<h2>按钮动画 - "按压效果"</h2>

<button class="button">Click Me</button>

</body>
</html>
效果图:
按压前:
按压后:
