说来惭愧,这个应用调试,折腾了我一整天,google了很多帖子,才算整明白,今天在这里做个记录和分享吧,也作为自己后续的参考!
第一步,ckeditor(本博文论及的ckeditor版本4.5.6)的配置图片文件上传功能,默认这个是没有开启的,就不用多说,ckeditor官网上也说的很清楚!http://docs.ckeditor.com
下面简单的说下配置(配置文件algoConfig.js):
 1 CKEDITOR.editorConfig = function( config ) {
 2     config.toolbarGroups = [
 3         { name: 'document', groups: [ 'mode', 'document', 'doctools' ] },
 4         { name: 'clipboard', groups: [ 'clipboard', 'undo' ] },
 5         { name: 'editing', groups: [ 'find', 'selection', 'spellchecker', 'editing' ] },
 6         { name: 'forms', groups: [ 'forms' ] },
 7         '/',
 8         { name: 'basicstyles', groups: [ 'basicstyles', 'cleanup' ] },
 9         { name: 'paragraph', groups: [ 'list', 'indent', 'blocks', 'align', 'bidi', 'paragraph' ] },
10         { name: 'links', groups: [ 'links' ] },
11         { name: 'insert', groups: [ 'insert' ] },
12         '/',
13         { name: 'styles', groups: [ 'styles' ] },
14         { name: 'colors', groups: [ 'colors' ] },
15         { name: 'tools', groups: [ 'tools' ] },
16         { name: 'others', groups: [ 'others' ] },
17         { name: 'about', groups: [ 'about' ] }
18     ];
19
20     config.removeButtons = 'Source,Save,NewPage,Scayt';
21     config.image_previewText=' ';     //预览区域显示内容
22     config.filebrowserImageBrowseUrl = '/browse/mgmt/img';
23     config.filebrowserImageUploadUrl = '/upload/mgmt/img';
24 };
上图中,背景颜色加高亮的为关键配置。等号左边的是key,等号右边的,则对应于web应用中的一个url,这个是配合后台应用中一个controller的处理,也就是一个servlet的操作。具体如何处理,后面再说!
再多罗嗦一下,我的这个配置中,涉及到图片预览区的那堆看不懂的文字的去除处理。我将其清掉了!如上面的21行的配置。另外,我的ckeditor工具栏中,去掉了一部分的button。具体如何操作,可以参考ckeditor的samples下面的toolbarconfigurator里面有个index.html,在浏览器里打开,可以参照着说明即可定制自己的工具栏。
在应用的js文件中作如下的配置,即可以enable定制的CKeditor。
1 /**
2  * 下面是用CKeditor进行编辑文件
3  */
4 CKEDITOR.replace( 'practice_content',    // practice_content是html文件中的对应的textarea编辑区的ID名称,注意不要写成#practice_content
5 {
6     language: 'zh-cn',
7     uiColor: '#c3c8d1',
8     customConfig: '/js/ckeditor/algoConfig.js' //自定义自己的toobar风格
9 });
到现在为止,定制的CKeditor的图片上传配置部分算是结束了。
此时,可以看到页面上的ckeditor的状态为下图所示:
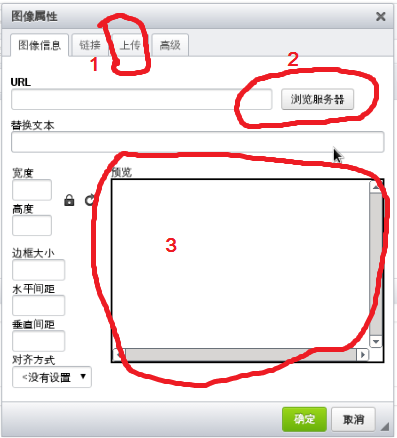
说明下: 图中1标记对应配置:config.filebrowserImageUploadUrl = '/upload/mgmt/img';
图中2标记对应配置:config.filebrowserImageBrowseUrl = '/browse/mgmt/img';
图中3标记对应配置:config.image_previewText=' ';
第二步,就是图片文件上传的后台处理了,这步就是添加url /upload/mgmt/img的后台响应。由于ckeditor的文件上传是采用的表单form以post的方式提交enctype为multipart/form-data的文件到后台服务器(此数据可以从html页面debug方式查看,如下图所示),那么对应的后台文件接受,则也采用Multipartfile的形式。
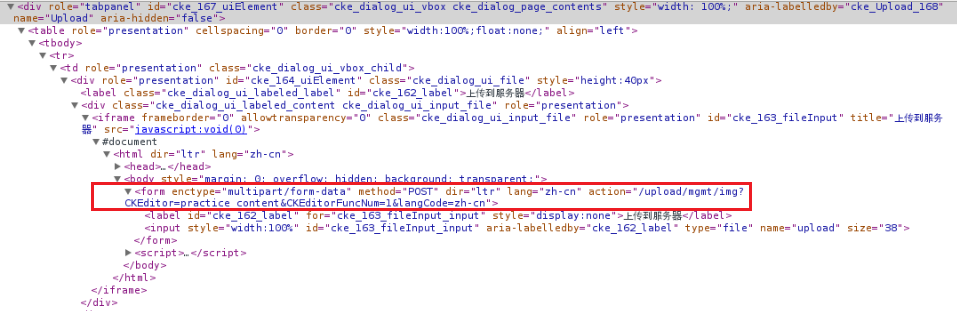
所以,后台的程序,应该也不是很难实现的事情。我就直接贴代码了,有兴趣的,自己可以看看!
 1 @RequestMapping(value="/upload/mgmt/img", method=RequestMethod.POST)
 2     public void handleFileUpload(User user,  @RequestParam("upload") MultipartFile file,
 3             HttpServletRequest request, HttpServletResponse response){
 4         String name = "";
 5         if (!file.isEmpty()) {
 6             try {
 7                 response.setContentType("text/html; charset=UTF-8");
 8                 response.setHeader("Cache-Control", "no-cache");
 9                 response.setHeader("X-Frame-Options", "SAMEORIGIN");
10                 PrintWriter out = response.getWriter();
11
12                 String fileClientName = getFileName(file.getOriginalFilename());
13                 String fileFix = StringUtils.substring(fileClientName,
14                         fileClientName.lastIndexOf(".") + 1);
15                 if (!StringUtils.equalsIgnoreCase(fileFix, "jpg")
16                         && !StringUtils.equalsIgnoreCase(fileFix, "jpeg")
17                         && !StringUtils.equalsIgnoreCase(fileFix, "bmp")
18                         && !StringUtils.equalsIgnoreCase(fileFix, "gif")
19                         && !StringUtils.equalsIgnoreCase(fileFix, "png")) {
20                     logger.error("Incorrect format of the uploading file -- " + fileFix);
21                     return;
22                 }
23
24                 if (logger.isInfoEnabled()) {
25                     logger.info("Begin uploading: " + file.getName());
26                 }
27
28                 // 为了客户端已经设置好了图片名称在服务器继续能够明确识别,这里不改名称
29                 // 获取目录
30                 File floder = buildFolder(user, request, FileType.IMAGE);
31                 if (null == floder) {
32                     logger.info("folder is null");
33                     return;
34                 }
35
36                 File newfile = new File(floder, fileClientName);
37                 byte[] bytes = file.getBytes();
38                 BufferedOutputStream stream = new BufferedOutputStream(new FileOutputStream(newfile));
39                 stream.write(bytes);
40                 stream.close();
41
42                 if (logger.isInfoEnabled()) {
43                     logger.info("Uploading done,floder: " + newfile.getPath());
44                 }
45
46                 // 组装返回url,以便于ckeditor定位图片
47                 String fileUrl = request.getContextPath() + MueasConstants.APP_RUNNING_FILES_DIR;
48                 fileUrl += IMAGE_DIR + File.separator + newfile.getName();
49                 fileUrl = StringUtils.replace(fileUrl, "//", "/");
50
51                 // 将上传的图片的url返回给ckeditor
52                 String callback = request.getParameter("CKEditorFuncNum");
53                 String script = "<script type="text/javascript">window.parent.CKEDITOR.tools.callFunction(" + callback + ", '" + fileUrl + "');</script>";
54
55                 out.println(script);
56                 out.flush();
57                 out.close();
58             } catch (Exception e) {
59                 logger.info("You failed to upload " + name + " => " + e.getMessage());
60             }
61         } else {
62             logger.info("You failed to upload " + name + " because the file was empty.");
63         }
64     }
其中,代码里面的红色部分比较值得注意,其他都不是太难的事情。
第一处红色部分是为了解决下面的错误:
| Refused to display 'http://localhost:8080/upload/mgmt/img?CKEditor=practice_content&CKEditorFuncNum=1&langCode=zh-cn' in a frame because it set 'X-Frame-Options' to 'DENY'. |
第二处(30行)和第三处(47-49行)是为了让上传上来的文件存放的位置和ckeditor上传文件获取的URL地址(GET方式)的一致性。
这里再上传一下创建存放文件的目录的代码:
 1 private File buildFolder(User user, HttpServletRequest request, FileType type) {
 2
 3         String realPath = request.getSession().getServletContext().getRealPath(MueasConstants.APP_RUNNING_FILES_DIR);
 4         String folderdir = "";
 5         //如果不存在,创建
 6         switch(type){
 7         case IMAGE:
 8             folderdir += realPath + IMAGE_DIR;
 9             break;
10         case FILE:
11             folderdir += realPath + FILE_DIR;
12             break;
13         case FLASH:
14             folderdir += realPath + FLASH_DIR;
15             break;
16         case VIDEO:
17             folderdir += realPath + VIDEO_DIR;
18             break;
19         }
20
21         File floder = new File(folderdir);
22         if (!floder.exists()) {
23             if (!floder.mkdirs()) {
24                 logger.error("Create folder failed! path=" + folderdir);
25                 return null;
26             }
27         }
28         return floder;
29     }
这里,根据文件类型,创建不同的子目录。其中重点是request.getSession().getServletContext().getRealPath(MueasConstants.APP_RUNNING_FILES_DIR);这个,大家若不是很明白,可以查看一下文档。
另外,就是配合使用的request.getContextPath() + MueasConstants.APP_RUNNING_FILES_DIR;总之,就是为了让地址一致,存放文件的位置地址要让取文件的GET指令能够得到文件即可。
最后说下,为了控制上传文件的大小,在spring-boot的配置文件中添加下面的信息:
|
multipart.maxFileSize = 3Mb |
运行起来后,可以做测试图片文件上传的功能了,效果如下图所示:
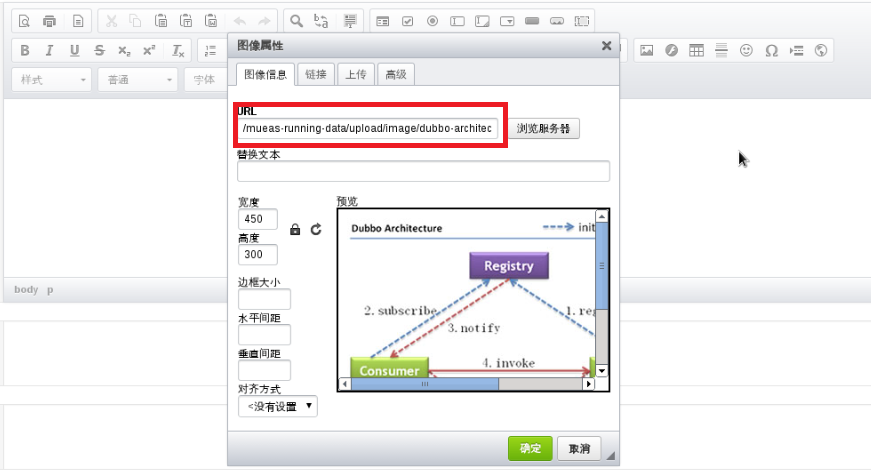
此时,点击“确定”按钮,图片文件就会显示在自己设计的textarea的区域了。是不是不那么难?
话说回来,调通了是觉得不难,但是,在没有调通的时候,就那个x-options-frame的问题,就让我很头疼。
其次,在后台处理的代码中,起初,我采用的是commons-fileupload插件中的代码处理的,但是总不成功,一下午,google了很多外文帖子,也不凑效,遂改成上面的代码处理。其commons-fileupload关键参考代码如下:
 1     DiskFileItemFactory factory = new DiskFileItemFactory();
 2     // maximum size that will be stored in memory
 3     factory.setSizeThreshold(maxMemSize);
 4
 5     // Create a new file upload handler
 6     ServletFileUpload upload = new ServletFileUpload(factory);
 7     // maximum file size to be uploaded.
 8
 9     upload.setSizeMax(maxFileSize);
10
11     List<FileItem> fileItems = upload.parseRequest(request);
测试过程中,总是遇到列表filetems为空的问题,其实request中是有上传过来的文件信息的。折腾了很久,还是没有找到原因。算一个Open Point吧,若有高人或者过来人,可以给我指点一下。