前言
开门见山开篇名义,本篇博客将讲解一下Android中Fragment的内容,必要的地方会提供相应的演示代码,并且会在最后给出源码下载。
本文主要有以下内容:
Fragment,碎片,是Android3.0之后新增加的特性。主要是为了支持更多的UI设计在大屏幕设备上,如平板。因为现在设备的屏幕越来越大,使用Fragment可以更灵活的管理视图层次的变化。像Activity一样,可以创建Fragment来包含View,进行布局,但是Fragment必须嵌入在Activity中,不能单独存在,而且一个Activity可以嵌入多个Fragment,同时一个Fragment可以被多个Activity重用。

上图是从官方文档中挂载的,可以很清晰的说明Activity和Fragment的关系和优点。在平板中,因为屏幕大,显示的内容全,如果还像手机哪样通过Activity跳转的方式去加载UI,太浪费屏幕资源了,而如上左图,可以结合Fragment布局,使一个Activity左右分别包含一个Fragment,这样可以通过对左边Fragment的操作来影响右边Fragment的显示,例如:新闻阅读,系统设置等。如果一个应用的是采用Activity+Fragment结合布局,那么可以很方便的在平板与手机之间相互移植,大部分代码是可以重用的,并且Fragment无需在AndroidManifest.xml清单文件中注册。
上面已经介绍了Fragment,再来讲讲如何使用Fragment。使用Fragment必须继承这个类或其子类,并且重写其的onCreateView()方法,这个方法是用于指定Fragment在初次加载的时候,显示的View。下面是这个方法的签名:
public View onCreateView(LayoutInflater inflater,ViewGroup container,Bundle savedInstanceState)
- inflater:当前布局的填充者,可以用inflater.inflate()方法去填充一个布局文件。
- container:为包裹当前Fragment的容器,一般是一个布局控件。
- savedInstanceState:当前实例化的状态,一般用不上。
onCreateView()返回一个View,用于Fragment的显示,这里使用inflater.inflate()方法动态膨胀一个View对象做返回值,inflate()的签名如下:
public View inflate(int resource,ViewGroup root,boolean attachToRoot)
- resource:动态膨胀的布局资源ID。
- root:膨胀出的View的上层布局对象,一般传递onCreateView的container参数即可。
- attachToRoot:指定展开的布局是否依附到root这个ViewGroup中,一般传递false即可。
inflate()的resource是一个普通的布局资源,和之前的布局没有什么特殊性。而在布局中使用Fragment使用<fragment/>标签来在XML文件中布局,大多数属性与UI控件一样,但是其中有两个属性需要特别注意:
- android:name:这个Fragment的实现类。
- android:layout_weight:当前Fragment在Activity的权重,数值越大,在Activity中占的权重越大。
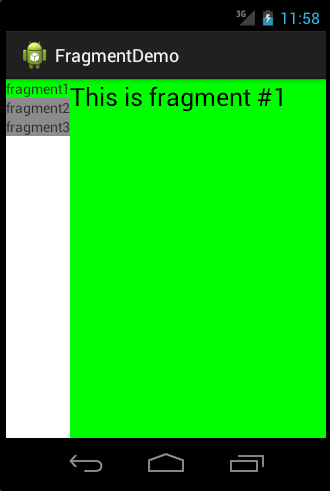
下面通过一个示例,来演示一下Fragment在Activity中的应用。示例中在一个Activity中,添加了两个Fragment。
activity_fragment.xml:

 1 <?xml version="1.0" encoding="utf-8"?>
 2 <LinearLayout xmlns:android="http://schemas.android.com/apk/res/android"
 3     android:layout_width="match_parent"
 4     android:layout_height="match_parent"
 5     android:orientation="horizontal" >
 6
 7     <fragment
 8         android:id="@+id/fragment1"
 9         android:name="com.example.fragmentSimple.Fragment1"
10         android:layout_width="0px"
11         android:layout_height="match_parent"
12         android:layout_weight="2" />
13
14     <fragment
15         android:id="@+id/fragment2"
16         android:name="com.example.fragmentSimple.Fragment2"
17         android:layout_width="0px"
18         android:layout_height="match_parent"
19         android:layout_weight="1" />
20
21 </LinearLayout>
Fragment1:
 1 package com.example.fragmentSimple;
 2
 3 import com.example.fragmentdemo.R;
 4 import android.app.Fragment;
 5 import android.os.Bundle;
 6 import android.view.LayoutInflater;
 7 import android.view.View;
 8 import android.view.ViewGroup;
 9
10 public class Fragment1 extends Fragment {
11
12     @Override
13     public View onCreateView(LayoutInflater inflater, ViewGroup container,
14             Bundle savedInstanceState) {
15         // 填充一个布局View到ViewGrope中
16         return inflater.inflate(R.layout.fragment1, container, false);
17     }
18 }
Fragment2:
 1 package com.example.fragmentSimple;
 2
 3 import com.example.fragmentdemo.R;
 4
 5 import android.os.Bundle;
 6 import android.app.Fragment;
 7 import android.view.LayoutInflater;
 8 import android.view.View;
 9 import android.view.ViewGroup;
10
11 public class Fragment2 extends Fragment {
12
13     @Override
14     public View onCreateView(LayoutInflater inflater, ViewGroup container,
15             Bundle savedInstanceState) {
16         return inflater.inflate(R.layout.fragment2, container, false);
17     }
18 }
启动后显示效果:

Fragment有自己独立的生命周期,但是它有是依托于Activity的,所以Fragment的生命周期直接受Activity的影响。下图很直观的描述了Activity的生命周期:

从上图中可以看出Fragment的生命周期大体上和Activity一样,有两个生命周期方法需要注意,onAttach()附加、onDetach()剥离,从这两个方法的位置可以看出,Fragment在创建的时候,是先附加到Activity中,然后才开始从onCreateView()中加载View的,记住这一点很重要。并且在生命周期结束的时候,也是先销毁onDestroy()然后才回调onDetach()从Activity中剥离这个Fragment。
在代码中管理一个Fragment非常简单,需要用到一个FragmentTransaction对象,这个对象通过getFragmentManager().beginTransaction()获取,它将开启一个事务,用于操作一个ViewGroup中的Fragment。
FragmentTransaction的常用方法:
- add():增加一个Fragment,具有多个重载。
- replace():替换一个Fragment,具有多个重载。
- remove():移除掉一个指定的Fragment。
- addToBackStack():在事务中添加一个栈,用于回退。
- commit():提交事务。
其中add、replace、remove都是很常见的方法,无需过多介绍。但是addToBackStack()方法就需要额外讲解一下,正常情况下,应用中的Activity是有一个任务栈去管理它的。默认情况下,当我们在不同的Activity中跳转的时候,点击回退总是能回到上一个Activity中。而Fragment是嵌套在Activity,所以默认无法向Activity的任务栈中添加,当点击回退的时候只会回到上一个Activity,不会理会Fragment的操作(add、replace、remove),而使用addToBackStack()可以将当前的事务添加到另一个栈中,这个栈由Fragment的Activity管理,这个栈中的每一条都是一个Fragment的一次事务,有了这个栈去管理Fragment,就可以通过回退按键,反向回滚Fragment的事务。这一点很重要,因为Fragment无需在清单文件中配置,所以现在有些应用会使用Fragment来布局跳转。
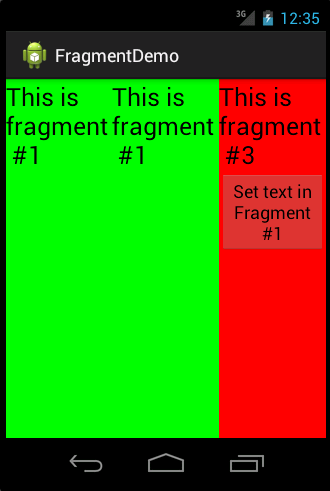
下面通过一个示例,演示一下动态操作Fragment的例子。在示例中,会实现一个分栏的效果,在左边点击项会动态修改右边的内容。
布局文件,activity_fragmenttab.xml:
 1 <?xml version="1.0" encoding="utf-8"?>
 2 <LinearLayout xmlns:android="http://schemas.android.com/apk/res/android"
 3     android:layout_width="match_parent"
 4     android:layout_height="match_parent"
 5     android:orientation="horizontal" >
 6
 7     <LinearLayout
 8         android:layout_width="wrap_content"
 9         android:layout_height="match_parent"
10         android:orientation="vertical" >
11
12         <TextView
13             android:id="@+id/tabfgt1"
14             android:layout_width="wrap_content"
15             android:layout_height="wrap_content"
16             android:text="fragment1" />
17
18         <TextView
19             android:id="@+id/tabfgt2"
20             android:layout_width="wrap_content"
21             android:layout_height="wrap_content"
22             android:text="fragment2" />
23
24         <TextView
25             android:id="@+id/tabfgt3"
26             android:layout_width="wrap_content"
27             android:layout_height="wrap_content"
28             android:text="fragment3" />
29     </LinearLayout>
30
31     <LinearLayout
32         android:id="@+id/content"
33         android:layout_width="match_parent"
34         android:layout_height="match_parent"
35         android:orientation="vertical" >
36     </LinearLayout>
37
38 </LinearLayout>
FragmentTabActivity.java:
 1 package com.example.fragmentTab;
 2
 3 import com.example.fragmentSimple.Fragment1;
 4 import com.example.fragmentSimple.Fragment2;
 5 import com.example.fragmentTurn.Fragment3;
 6 import com.example.fragmentdemo.R;
 7
 8 import android.app.Activity;
 9 import android.app.FragmentManager;
10 import android.app.FragmentTransaction;
11 import android.graphics.Color;
12 import android.os.Bundle;
13 import android.view.View;
14 import android.widget.TextView;
15
16 public class FragmentTabActivity extends Activity {
17     private TextView tabfgt1, tabfgt2, tabfgt3;
18
19     @Override
20     protected void onCreate(Bundle savedInstanceState) {
21         // TODO Auto-generated method stub
22         super.onCreate(savedInstanceState);
23         setContentView(R.layout.activity_fragmenttab);
24
25         tabfgt1 = (TextView) findViewById(R.id.tabfgt1);
26         tabfgt2 = (TextView) findViewById(R.id.tabfgt2);
27         tabfgt3 = (TextView) findViewById(R.id.tabfgt3);
28
29         tabfgt1.setOnClickListener(click);
30         tabfgt2.setOnClickListener(click);
31         tabfgt3.setOnClickListener(click);
32
33     }
34
35     private View.OnClickListener click = new View.OnClickListener() {
36
37         @Override
38         public void onClick(View v) {
39             tabfgt1.setBackgroundColor(Color.GRAY);
40             tabfgt2.setBackgroundColor(Color.GRAY);
41             tabfgt3.setBackgroundColor(Color.GRAY);
42             // 获取FragmentManager对象
43             FragmentManager fm = getFragmentManager();
44             // 开启事务
45             FragmentTransaction ft = fm.beginTransaction();
46             switch (v.getId()) {
47             case R.id.tabfgt1:
48                 tabfgt1.setBackgroundColor(Color.GREEN);
49                 // 替换R.id.content中的Fragment
50                 ft.replace(R.id.content, new Fragment1());
51                 break;
52             case R.id.tabfgt2:
53                 tabfgt2.setBackgroundColor(Color.YELLOW);
54                 ft.replace(R.id.content, new Fragment2());
55                 break;
56             case R.id.tabfgt3:
57                 tabfgt3.setBackgroundColor(Color.RED);
58                 ft.replace(R.id.content, new Fragment3());
59                 break;
60             default:
61                 break;
62             }
63             // 提交事务
64             ft.commit();
65         }
66     };
67 }
效果展示:

既然Fragment是嵌套在Activity中的,而在Fragment加载的布局文件中,又可以额外的布局,那么出现了新的问题,如何操作两个不同Fragment中的控件呢?回忆一下在Activity中,操作一个控件需要通过findViewById(int)方法通过控件的ID去找到控件,而使用Fragment其实到最后Fragment.onCreateActivity()的时候是把膨胀的View加载到Activity中了,所以可以直接在Activity中通过findViewById()方法找到控件,进而操作它,这一点和直接操作Activity的方式一致。但是如果需要在一个Fragment中操作另外一个Fragment的控件,就需要用到Fragment.getActivity()来获取到当前Fragment承载的Activity对象,拿到这个Activity对象,获取到其中的控件就不成问题了。
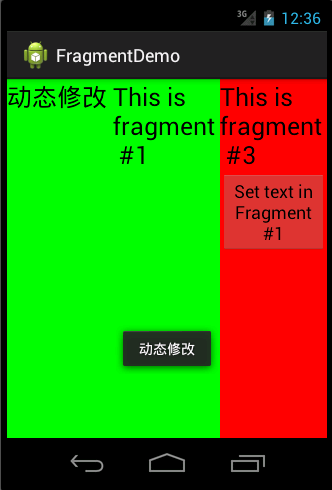
下面通过一个示例来演示Fragment中的交互,在Activity中,有三个Fragment,从其中的一个Fragment的Button点击的时候,修改其他Fragment的值。
布局,activity_fragmentturn.xml
 1 <?xml version="1.0" encoding="utf-8"?>
 2 <LinearLayout xmlns:android="http://schemas.android.com/apk/res/android"
 3     android:layout_width="match_parent"
 4     android:layout_height="match_parent"
 5     android:orientation="horizontal" >
 6
 7     <fragment
 8         android:id="@+id/fragment1"
 9         android:name="com.example.fragmentSimple.Fragment1"
10         android:layout_width="0px"
11         android:layout_height="match_parent"
12         android:layout_weight="1" />
13     <!-- 加载了两个Fragment1 -->
14      <fragment
15         android:id="@+id/fragment2"
16         android:name="com.example.fragmentSimple.Fragment1"
17         android:layout_width="0px"
18         android:layout_height="match_parent"
19         android:layout_weight="1" />
20     <fragment
21         android:id="@+id/fragment3"
22         android:name="com.example.fragmentTurn.Fragment3"
23         android:layout_width="0px"
24         android:layout_height="match_parent"
25         android:layout_weight="1" />
26
27 </LinearLayout>
带Button的Fragment:
 1 package com.example.fragmentTurn;
 2
 3 import com.example.fragmentdemo.R;
 4
 5 import android.app.Fragment;
 6 import android.os.Bundle;
 7 import android.view.LayoutInflater;
 8 import android.view.View;
 9 import android.view.ViewGroup;
10 import android.widget.Button;
11 import android.widget.TextView;
12 import android.widget.Toast;
13 public class Fragment3 extends Fragment {
14
15
16     @Override
17     public View onCreateView(LayoutInflater inflater, ViewGroup container,
18             Bundle savedInstanceState) {
19         // TODO Auto-generated method stub
20         return inflater.inflate(R.layout.fragment3, container, false);
21     }
22     @Override
23     public void onStart() {
24         super.onStart();
25         // 方法2: 在Fragment中获取操作其他Fragment的控件
26 //        Button btnGetText=(Button)getActivity().findViewById(R.id.btnGetText);
27 //        btnGetText.setOnClickListener(new View.OnClickListener() {
28 //
29 //            @Override
30 //            public void onClick(View v) {
31 //                TextView tv=(TextView)getActivity().findViewById(R.id.tvFragment1);
32 //                Toast.makeText(getActivity(), tv.getText().toString()    ,Toast.LENGTH_SHORT).show();
33 //            }
34 //        });
35     }
36 }
FragmentTurnActivity.java:
 1 package com.example.fragmentTurn;
 2
 3
 4 import com.example.fragmentdemo.R;
 5
 6 import android.app.Activity;
 7 import android.os.Bundle;
 8 import android.view.View;
 9 import android.widget.Button;
10 import android.widget.TextView;
11 import android.widget.Toast;
12
13 public class FragmentTurnActivity extends Activity {
14     @Override
15     protected void onCreate(Bundle savedInstanceState) {
16         // TODO Auto-generated method stub
17         super.onCreate(savedInstanceState);
18         setContentView(R.layout.activity_fragmentturn);
19         // 方法1:在Activity中操作旗下Fragment中的控件
20         Button btn=(Button)findViewById(R.id.btnGetText);
21         btn.setOnClickListener(new View.OnClickListener() {
22
23             @Override
24             public void onClick(View v) {
25                 TextView tv=(TextView)findViewById(R.id.tvFragment1);
26                 tv.setText("动态修改");
27                 Toast.makeText(FragmentTurnActivity.this,tv.getText().toString() ,Toast.LENGTH_SHORT    ).show();
28             }
29         });
30     }
31 }
效果展示:
从上面的例子有一个问题,无论是在Activity中使用findViewById()还是在Fragment中使用getActivity().findViewById(),虽然可以获取到控件,但是有个例外的情况。就是在Activity中,同时使用了两个一样的Fragment,这个时候仅仅使用上面介绍的方法,只能通过id获取到第一个Fragment中的控件。因为,在布局文件中定义的控件,就算ID重复了,AndroidSDK维护的R.java类中,也只会声明一次,也就是说,想在Activity中区分同一个Fragment类的两个实例中的控件,是无法做到的。
那么就嘚换一个思路,我的解决方案:在Fragment中声明一个View变量,然后在onCreateView中膨胀的View并不直接返回,而是把它引用到声明的View变量上,然后在应用的任何地方,使用getFragmentManager().findFragmentById(int)通过Fragment的Id找到这个Fragment对象,然后获取其中的View对象,使用View.findViewById(int)找到Fragment的对应Id的控件,进而操作它,这里就不提供示例了。虽然这个方法可以解决问题,但是一般不推荐如此做,因为大部分场景没必要在一个Activity中定义两个相同的Fragment。
上面已经提到,Fragment是Android3.0行增加的特性。 而对于低版本的Android设备,Google也没有放弃。细心的朋友应该已经发现了,当对Fragment引用包的时候,会有两个选项,android.app.Fragment和android.support.v4.app.Fragment,其中android.support.v4.app.Fragment就是为了兼容低版本而考虑的,只需要引用它即可。
一般而言,如果考虑向下兼容的问题的话,推荐直接引用android.support.v4.app.Fragment包进行开发,就不会存在兼容性的问题。