今天说说python使用flask如何进行接口开发。
一、安装Python依赖库
pip install flask
二、Flask使用
1、使用Flask开发接口,运行代码与接口代码同在一个文件里
 1 import flask
 2 import json
 3
 4
 5 # print(__name__) #__main__,代表当前Python文件
 6 server = flask.Flask(__name__) #起动一个服务,把咱们当前这个Python文件,当做一个服务
 7
 8 #装饰器
 9 #ip:8000/index?uge
10 @server.route('/index',methods=['get']) #默认是get请求,可以不写或是同时写get,post
11 def index():
12     res = {'msg':'这是我开发的第一个接口', 'msg_code': 0}
13     return json.dumps(res, ensure_ascii=False) #二进制转化为utf-8
14
15 @server.route('/reg', methods=['post'])
16 def reg():
17     username = flask.request.values.get('username')
18     pwd = flask.request.values.get('passwd')
19     if username and pwd:
20         sql = 'select * from my_user where username="%s";' %username
21         if my_db(sql):
22             res = {'msg':'用户已存在', 'msg_code':2001}
23         else:
24             insert_sql = 'insert into my_user (username,passwd,is_admin)VALUES ("%s","%s",0);' %(username,pwd)
25             my_db(insert_sql)
26             res = {'msg':'注册成功.', 'msg_code':0}
27     else:
28         res = {'msg':'必填字段未填,请查看接口文档!', 'msg_code':1001}
29         #1001必填字段未填
30     return json.dumps(res, ensure_ascii=False)
31
32 #debug=True,修改代码后,不需要重启服务,它会帮你自动重启
33 server.run(port=7777, debug=True, host='0.0.0.0')  #起动服务。默认端口号是5000,
34 # host='0.0.0.0'指定后,别人可以通过ip访问,监听所有的网卡
运行方式:
在IDE里直接运行,get请求可以在浏览器直接请求,Post请求可以自己写请求代码,或使用Postman等工具都可以。
2、按不同的目录组织代码结构,实现更好模块化管理
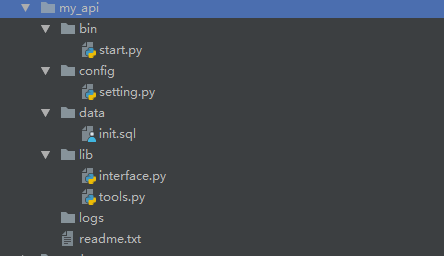
其中interface.py为接口实现逻辑:如readme描述:
这个是api接口
/reg
    注册接口
    入参:
    username:
    passwd:
    启动程序是在bin目录下

    启动程序
        python bin/start.py
新的interface.py
import flask,json
from lib.tools import my_db,op_redis,my_md5

#写接口的逻辑
# print(__name__) #__main__,代表当前Python文件
server = flask.Flask(__name__) #起动一个服务,把咱们当前这个Python文件,当做一个服务


#装饰器
#ip:8000/index?uge
@server.route('/index',methods=['get']) #默认是get请求,可以不写或是同时写get,post
def index():
    res = {'msg':'这是我开发的第一个接口', 'msg_code': 0}
    return json.dumps(res, ensure_ascii=False) #二进制转化为utf-8

@server.route('/reg', methods=['post'])
def reg():
    username = flask.request.values.get('username')
    pwd = flask.request.values.get('passwd')
    if username and pwd:
        sql = 'select * from my_user where username="%s";' %username
        if my_db(sql):
            res = {'msg':'用户已存在', 'msg_code':2001}
        else:
            insert_sql = 'insert into my_user (username,passwd,is_admin)VALUES ("%s","%s",0);' %(username,pwd)
            my_db(insert_sql)
            res = {'msg':'注册成功.', 'msg_code':0}
    else:
        res = {'msg':'必填字段未填,请查看接口文档!', 'msg_code':1001}
        #1001必填字段未填
    return json.dumps(res, ensure_ascii=False)
start.py:
from lib.interface import server
from config.setting import SERVER_PORT


#debug=True,修改代码后,不需要重启服务,它会帮你自动重启
server.run(port=SERVER_PORT, debug=True, host='0.0.0.0')  #起动服务。默认端口号是5000,
# host='0.0.0.0'指定后,别人可以通过ip访问,监听所有的
三、有关系的接口怎么来开发
这里主要说一下,如果下面的接口依赖前面的接口的,应该怎么使用呢?如一些接口依赖登录后才能进行相关的操作,这个时候可以通过cookie来获取相应的登录信息
1、还是据二的目录,interface.py如下
import flask,time,json
from lib import tools

server = flask.Flask(__name__)
@server.route('/login')
def login():
    username = flask.request.values.get('username')
    pwd = flask.request.values.get('pwd')
    if username == 'xxxxxx' and pwd == '123456':
        #登录成功,写session
        session_id = tools.my_md5(username+time.strftime(time.strftime('%Y%m%d%H%M%S')))
        key = 'txz_session:%s' %username
        tools.op_redis(key, session_id, 120)
        res = {'session_id': session_id,
               'error_code':0,
               'msg': '登录成功',
               'login_time':time.strftime(time.strftime('%Y%m%d%H%M%S'))} #用户的返回结果
        json_res = json.dumps(res, ensure_ascii=False)
        res = flask.make_response(json_res)  #make_response,构造成返回结果的对象
        cookie_key = 'txz_session:%s' %username
        res.set_cookie(cookie_key,session_id,3600) #600是cookie的失效时间
        return res


@server.route('/posts')
def posts():
    # print(flask.request.cookies) #打印cookie
    cookies = flask.request.cookies
    username = ''
    session = ''
    for key,value in cookies.items():
        if key.startswith('txz_session'): #判断cookie以txz开头的话,取到它
            username=key
            print(username)
            session= value #调用接口的时候用户传过来的session,从cookie里面取过来的
            print(value)
    #redis
    redis_session = tools.op_redis(username)
    if redis_session == session: #判断传过来的session,与redis里的session是否一样
        title = flask.request.values.get('title')
        content = flask.request.values.get('content')
        article_key = 'article:%s' % title
        tools.op_redis(article_key,content)  # 把文章写入redis
        res = {'msg': '文章发表成功!', 'code': 0}
    else:
        res = {'msg': '用户未登录', 'code': 2009}

    print('user...', username)
    print('session_id', session)

    # session = flask.request.values.get('')

    return json.dumps(res, ensure_ascii=False)


#http://127.0.0.1:8989/all_posts开发一个获取所有文章的接口
@server.route('/all_posts')
def all_posts():
    # print(flask.request.cookies) #打印cookie
    cookies = flask.request.cookies
    username = ''
    session = ''
    for key,value in cookies.items():
        if key.startswith('txz_session'): #判断cookie以txz开头的话,取到它
            username=key
            session= value #调用接口的时候用户传过来的session,从cookie里面取过来的
    #redis
    redis_session = tools.op_redis(username)
    if redis_session == session: #判断传过来的session,与redis里的session是否一样
        all_keys = tools.op_redis_keys('article*')
        # print(all_keys)
        all_article = {}
        #[b'article:Pythonxe6x8exa5xe5x8fxa3xe5xbcx80xe5x8fx91', b'article:lily']
        for title in all_keys:
            print(title.decode('utf-8'))
            str_title = title.decode('utf-8')
            key_title = str_title.split(':')[-1]
            all_article[key_title] = tools.op_redis(title)

        res = {'articles': all_article, 'code': 0}
    else:
        res = {'msg': '用户未登录', 'code': 2009}

    return json.dumps(res, ensure_ascii=False)
start.py:
import sys,os
# sys.path.insert(0, r'D:python_codesyzsyz-bijiday8
ew_api')

# print(os.path.abspath(__file__)) #windows下的__file__分隔符问题
BASE_PATH = os.path.dirname(os.path.dirname(os.path.abspath(__file__))) #获取程序主目录
sys.path.insert(0,BASE_PATH)

from lib.interface import server
from config.setting import SERVER_PORT

server.run(host='0.0.0.0', port=SERVER_PORT, debug=True)
四、总结
1、使用Flask可以开发相应的接口,快速实现mock接口等操作。
2、有依赖的接口使用cookie进行相应的处理,先在客户端setcookie后,在使用接口时进行获取验证。