4.1 Spring JDBC
Spring的JDBC模块负责数据库资源管理和错误处理,化简了开发者对数据库的操作。
4.11 Spring JdbcTemplate的解析
* JdbcTemplate类是Spring JDBC的核心类
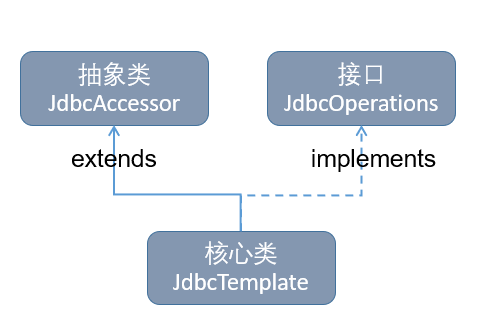
* JdbcTemplate类的继承结构:

抽象类JdbcAccessor为子类提供了一些访问数据库时使用的公共属性:
DateSource:其主要功能是获取数据库连接,具体实现时还可以引入对数据库连接的缓冲池和分布式事务的支持,它可以作为访问数据库资源的标准接口。
SQLExceptionTranslator:org.springframework.jdbc.support.SQLExceptionTranslator接口负责对SQLException进行转译工作。通过必要的设置或者获取SQLExceptionTranslator中的方法,可以使JdbcTemplate在需要处理SQLException时,委托SQLExceptionTranslator的实现类来完成1相关的转译工作。
JdbcOperations接口定义了JdbcTemplate类中可以使用的操作集合,包括添加、修改、查询、删除等操作。
4.12 Spring JDBC的配置
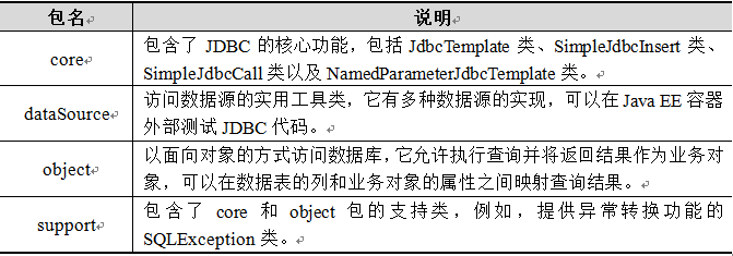
Spring JDBC模块主要由4个包组成,分别是core(核心包)、dataSource(数据源包)、object(对象包)和support(支持包),关于这4个包的具体说明:

dataSource又有4个属性,放在property元素里,<property name="固定属性名" value="对应值" />。

上表中的属性值在实际配置时,需要根据数据库类型和设置进行相应配置。
配置模板:
</beans>
<!--1、配置数据源-->
<bean id="dataSourceID" class="org.springframework.jdbc.datasource.DriverManagerDataSource">
    <property name="driverClassName" value="com.mysql.jdbc.Driver"/>
    <property name="url" value="jdbc:mysql://localhost:3306/spring"/>
    <property name="username" value="root"/>
    <property name="password" value="****"/>
</bean>

<!--2、配置JDBC模板-->
<bean id="jdbcTemplateID" class="org.springframework.jdbc.core.JdbcTemplate">
    <property name="dataSource" ref="dataSourceID"/> <!--注入数据源-->
</bean>

<!--3、配置注入类 即 配置需要实例化的Bean-->
<bean id="xxx" class="Xxx">
    <property name="jdbcTemplate" ref="jdbcTemplateID"/> <!--注入JDBC模板-->
</bean>
4.2 Spring JdbcTemplate的常用方法
4.21 execute()
execute(String sql)可以执行sql语句,说白了就是在数据库里的SQL语句用String存起来,传进去执行。
<?xml version="1.0" encoding="UTF-8"?>
<beans xmlns="http://www.springframework.org/schema/beans"
    xmlns:xsi="http://www.w3.org/2001/XMLSchema-instance"
    xsi:schemaLocation="http://www.springframework.org/schema/beans
     http://www.springframework.org/schema/beans/spring-beans-4.3.xsd">

    <!-- 1、配置数据源,后面的包由org开头,那么正规,一看就是导入的包,固定的,照抄就行 -->
    <bean id="dataSource111" class="org.springframework.jdbc.datasource.DriverManagerDataSource">
        <!--数据库驱动 -->
        <property name="driverClassName" value="com.mysql.jdbc.Driver" />
        <!--连接数据库的url -->
        <property name="url" value="jdbc:mysql://localhost:3306/spring" />
        <!--连接数据库的用户名 -->
        <property name="username" value="root" />
        <!--连接数据库的密码 -->
        <property name="password" value="****" />
    </bean>

    <!-- 2、配置JDBC模板 -->
    <bean id="jdbcTemplate"
           class="org.springframework.jdbc.core.JdbcTemplate">
        <!-- 默认必须使用数据源,ref和上面的id一样  -->
        <property name="dataSource" ref="dataSource111" />
    </bean>

    <!-- 3配置注入类 定义id为accountDao的Bean-->
    <bean id="accountDao" class="com.itheima.jdbc.AccountDaoImpl">
        <!-- 依赖注入:将jdbcTemplate注入到accountDao实例中 -->
        <property name="jdbcTemplate" ref="jdbcTemplate" />
    </bean>
</beans>
测试类:
package com.itheima.jdbc;
import java.util.List;
import org.junit.Test;
import org.springframework.context.ApplicationContext;
import org.springframework.context.support.ClassPathXmlApplicationContext;
import org.springframework.jdbc.core.JdbcTemplate;

public class JdbcTemplateTest {
    /**
     * 使用execute()方法建表
     */
    public static void main(String[] args) {
        // 加载配置文件
        ApplicationContext applicationContext =
           new ClassPathXmlApplicationContext("applicationContext.xml");
        // 获取JdbcTemplate实例
        JdbcTemplate jdTemplate =
               (JdbcTemplate) applicationContext.getBean("jdbcTemplate");
        // 使用execute()方法执行SQL语句,创建用户账户管理表account
        jdTemplate.execute("create table account(" +
                             "id int primary key auto_increment," +
                             "username varchar(50)," +
                             "balance double)");
        System.out.println("账户表account创建成功!");
    }

    @Test
    public void mainTest() {
        // 加载配置文件
        ApplicationContext applicationContext =
                new ClassPathXmlApplicationContext("applicationContext.xml");
        // 获取JdbcTemplate实例
        JdbcTemplate jdTemplate =
                (JdbcTemplate) applicationContext.getBean("jdbcTemplate");
        // 使用execute()方法执行SQL语句,创建用户账户管理表account
        jdTemplate.execute("create table account(" +
                               "id int primary key auto_increment," +
                               "username varchar(50)," +
                               "balance double)");
        System.out.println("账户表account创建成功!");System.out.println("facai222");
    }

    @Test
    public void addAccountTest() {
        // 加载配置文件
        ApplicationContext applicationContext =
                new ClassPathXmlApplicationContext("applicationContext.xml");
        // 获取AccountDao实例
        AccountDao accountDao =
                (AccountDao) applicationContext.getBean("accountDao");
        // 创建Account对象,并向Account对象中添加数据
        Account account = new Account();
        account.setUsername("tom");
        account.setBalance(1000.00);
        // 执行addAccount()方法,并获取返回结果
        int num = accountDao.addAccount(account);
        if (num > 0) {
            System.out.println("成功插入了" + num + "条数据!");
        } else {
            System.out.println("插入操作执行失败!");
        }
    }

    @Test
    public void updateAccountTest() {
        // 加载配置文件
        ApplicationContext applicationContext =
                new ClassPathXmlApplicationContext("applicationContext.xml");
        // 获取AccountDao实例
        AccountDao accountDao =
                (AccountDao) applicationContext.getBean("accountDao");
        // 创建Account对象,并向Account对象中添加数据
        Account account = new Account();
        account.setId(1);//对id为1的信息修改
        account.setUsername("tom2");
        account.setBalance(2000.00);
        // 执行updateAccount()方法,并获取返回结果
        int num = accountDao.updateAccount(account);
        if (num > 0) {
            System.out.println("成功修改了" + num + "条数据!");
        } else {
            System.out.println("修改操作执行失败!");
        }
    }

    @Test
    public void deleteAccountTest() {
        // 加载配置文件
        ApplicationContext applicationContext =
                new ClassPathXmlApplicationContext("applicationContext.xml");
        // 获取AccountDao实例
        AccountDao accountDao =
                (AccountDao) applicationContext.getBean("accountDao");
        // 执行deleteAccount()方法,并获取返回结果
        int num = accountDao.deleteAccount(1);
        if (num > 0) {
            System.out.println("成功删除了" + num + "条数据!");
        } else {
            System.out.println("删除操作执行失败!");
        }
    }

    @Test
    public void findAccountByIdTest() {
        // 加载配置文件
        ApplicationContext applicationContext =
                new ClassPathXmlApplicationContext("applicationContext.xml");
        // 获取AccountDao实例
        AccountDao accountDao =
                (AccountDao) applicationContext.getBean("accountDao");
        // 执行findAccountById()方法
        Account account = accountDao.findAccountById(1);
        System.out.println(account);
    }

    @Test
    public void findAllAccountTest() {
        // 加载配置文件
        ApplicationContext applicationContext =
                new ClassPathXmlApplicationContext("applicationContext.xml");
        // 获取AccountDao实例
        AccountDao accountDao =
                (AccountDao) applicationContext.getBean("accountDao");
        // 执行findAllAccount()方法,获取Account对象的集合
        List<Account> account = accountDao.findAllAccount();
        // 循环输出集合中的对象
        for (Account act : account) {
            System.out.println(act);
        }
    }
}
(1)建表的SQL语句:creat table account(id int primary key auto_increment,username varchar(50),balance double )
建一个名为account的,整型id为主码,50个长度的字符型username,浮点型的balance,这三个属性,不加分号。主码是自己生成的,不需要自己传进去,比如传进两个属性username和balance分别是Tom和10086,id自动赋值为1,并且不能更改。
(2)有命令行查询数据库需要先用:use 数据库名;比如use spring;进入数据库。查表:show tables;查内容:select * from 表名;
(3)软件测试分为单元、集成、确认和系统测试等,单元测试是最底层的。JUnit是进行单元测试的开源框架。@Test是单元测试的注解,运行一个不在主函数的方法,点击方法名,右键,Run as,2 JUnit Test。
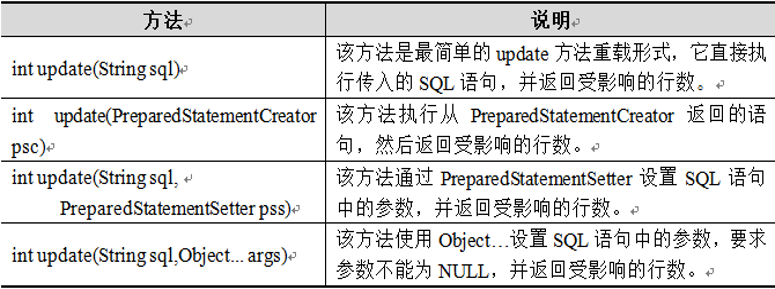
4.22 update():可以完成插入,更新和删除数据的操作。

 Account.java
 AccountDao.java
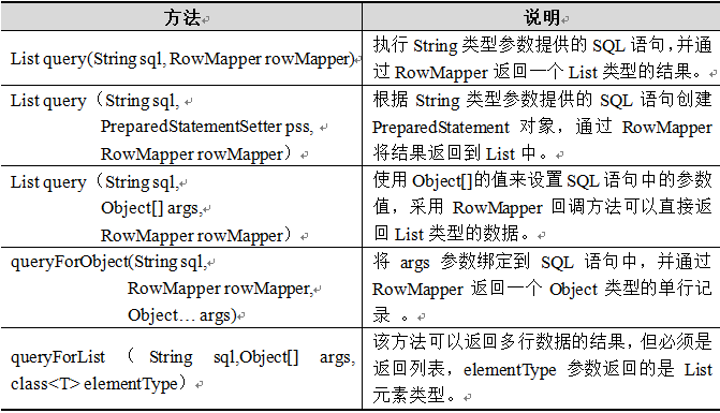
4.23 query()
