Envireronment:
VMware® Workstation 12 Pro 12.0.1 build-3160714(Host: Windows 7 Ultimate)
Centos 6.5 x64
Greenplum 4.3.8.0
Resource:
Greenplum 4.3.8.0(greenplum-db-4.3.8.0-build-1-RHEL5-x86_64.bin) 下载
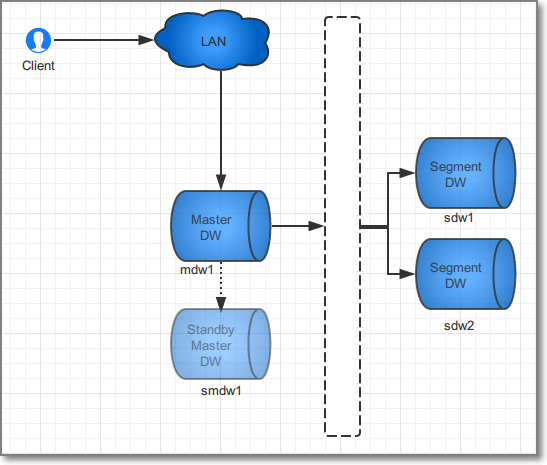
规划
| 角色 | 数量 | 内存 | CPU |
| master | 1 | 4GB | 1*2 core |
| master mirror | 1 | 4GB | 1*2 core |
| segment(mirror) | 3 | 4GB | 1*2 core |
Envireronment setup:
- 在VMware中安装5台虚拟机,操作系统为Centos 6.5。
- mdw
- smdw
- sdw1
- sdw2
- sdw3
- 网络设置(每台)
- 设置主机名称
-
vi /etc/sysconfig/network -
 View Code
1 NETWORKING=yes
2 HOSTNAME=mdw
- 安装ifconfig(如果已经安装,可以跳过)
-
yum install net-tools.x86_64
- 设置静态IP(防止重启后DHCP分配新的IP)
-
vi /etc/sysconfig/network-scripts/ifcfg-eth0
-
View Code
 1 DEVICE="eth0"
 2 BOOTPROTO="static"
 3 HWADDR=00:0C:29:60:2A:86
 4 UUID="49d0102f-482f-4079-bfd7-bb79f4ff3dc5"
 5 IPADDR=192.168.254.180
 6 GATEWAY=192.168.254.2
 7 DNS1=192.168.254.2
 8 IPV6INIT="yes"
 9 NM_CONTROLLED="yes"
10 ONBOOT="yes"
11 TYPE="Ethernet"

-
-
# BOOTPROTO=static - 固定
# UUID、HWADDR - ifconfig中查看
# IPADDR、GATEWAY、DNS1 - 按照需要进行配置
- 重新启动网络
-
service network restart
- 检查域名解析
-
vi /etc/resolv.conf -
View Code
1 # Generated by NetworkManager
2 nameserver 192.168.254.2
- 网络检查
-
ping cn.pool.ntp.org - 重新启动系统后检查主机名称
-
shutdown -r now
-
hostname - 配置Hosts
-
vi /etc/hosts
View Code1 127.0.0.1 localhost localhost.localdomain localhost4 localhost4.localdomain4 2 ::1 localhost localhost.localdomain localhost6 localhost6.localdomain6 3 4 192.168.254.180 mdw 5 192.168.254.181 smdw 6 192.168.254.201 sdw1 7 192.168.254.202 sdw2 8 192.168.254.203 sdw3
-
ping msdw
-
- 系统配置(每台)
-
- 关闭防火墙
-
service iptables stop
chkconfig iptables off

#查看防火墙状态
service iptables status - 关闭SELINUX状态(SELINUX=disabled)
-
vi /etc/selinux/config
View Code1 # This file controls the state of SELinux on the system. 2 # SELINUX= can take one of these three values: 3 # enforcing - SELinux security policy is enforced. 4 # permissive - SELinux prints warnings instead of enforcing. 5 # disabled - No SELinux policy is loaded. 6 SELINUX=disabled 7 # SELINUXTYPE= can take one of these two values: 8 # targeted - Targeted processes are protected, 9 # mls - Multi Level Security protection. 10 SELINUXTYPE=targeted
-
# 查看SELINUX状态
getenforce
- Greenplum系统配置(每台)
- Linux系统参数
-
vi /etc/sysctl.conf
View Code1 # Kernel sysctl configuration file for Red Hat Linux 2 # 3 # For binary values, 0 is disabled, 1 is enabled. See sysctl(8) and 4 # sysctl.conf(5) for more details. 5 6 kernel.shmmax = 500000000 7 kernel.shmmni = 4096 8 kernel.shmall = 4000000000 9 kernel.sem = 250 512000 100 2048 10 kernel.sysrq = 1 11 kernel.core_uses_pid = 1 12 kernel.msgmnb = 65536 13 kernel.msgmax = 65536 14 kernel.msgmni = 2048 15 net.ipv4.tcp_syncookies = 1 16 net.ipv4.ip_forward = 0 17 net.ipv4.conf.default.accept_source_route = 0 18 net.ipv4.tcp_tw_recycle = 1 19 net.ipv4.tcp_max_syn_backlog = 4096 20 net.ipv4.conf.all.arp_filter = 1 21 net.ipv4.ip_local_port_range = 1025 65535 22 net.core.netdev_max_backlog = 10000 23 net.core.rmem_max = 2097152 24 net.core.wmem_max = 2097152 25 vm.overcommit_memory = 2
-
vi /etc/security/limits.conf
View Code1 # /etc/security/limits.conf 2 # 3 #Each line describes a limit for a user in the form: 4 # 5 #<domain> <type> <item> <value> 6 # 7 #Where: 8 #<domain> can be: 9 # - an user name 10 # - a group name, with @group syntax 11 # - the wildcard *, for default entry 12 # - the wildcard %, can be also used with %group syntax, 13 # for maxlogin limit 14 # 15 #<type> can have the two values: 16 # - "soft" for enforcing the soft limits 17 # - "hard" for enforcing hard limits 18 # 19 #<item> can be one of the following: 20 # - core - limits the core file size (KB) 21 # - data - max data size (KB) 22 # - fsize - maximum filesize (KB) 23 # - memlock - max locked-in-memory address space (KB) 24 # - nofile - max number of open files 25 # - rss - max resident set size (KB) 26 # - stack - max stack size (KB) 27 # - cpu - max CPU time (MIN) 28 # - nproc - max number of processes 29 # - as - address space limit (KB) 30 # - maxlogins - max number of logins for this user 31 # - maxsyslogins - max number of logins on the system 32 # - priority - the priority to run user process with 33 # - locks - max number of file locks the user can hold 34 # - sigpending - max number of pending signals 35 # - msgqueue - max memory used by POSIX message queues (bytes) 36 # - nice - max nice priority allowed to raise to values: [-20, 19] 37 # - rtprio - max realtime priority 38 # 39 #<domain> <type> <item> <value> 40 # 41 42 #* soft core 0 43 #* hard rss 10000 44 #@student hard nproc 20 45 #@faculty soft nproc 20 46 #@faculty hard nproc 50 47 #ftp hard nproc 0 48 #@student - maxlogins 4 49 50 * soft nofile 65536 51 52 * hard nofile 65536 53 54 * soft nproc 131072 55 56 * hard nproc 131072 57 58 * soft core unlimited 59 60 # End of file
文件末尾增加
* soft nofile 65536
* hard nofile 65536
* soft nproc 131072
* hard nproc 131072
* soft core unlimited
-
vi /etc/security/limits.d/90-nproc.conf
View Code1 # Default limit for number of user's processes to prevent 2 # accidental fork bombs. 3 # See rhbz #432903 for reasoning. 4 5 * soft nproc 131072 6 root soft nproc unlimited
-
1024修改为131072
- 挂载xfs文件系统
- 查看当前系统磁盘
-
fdisk -l
- 查看当前磁盘信息
-
df -h - 关闭系统,为虚拟机增加磁盘,并重新启动(VMware操作)
-
shutdown -P now
- 安装xfs软件包
-
yum install xfsprogs.x86_64
- 查看磁盘
-
df -h
View Code1 Disk /dev/sdb: 10.7 GB, 10737418240 bytes 2 255 heads, 63 sectors/track, 1305 cylinders 3 Units = cylinders of 16065 * 512 = 8225280 bytes 4 Sector size (logical/physical): 512 bytes / 512 bytes 5 I/O size (minimum/optimal): 512 bytes / 512 bytes 6 Disk identifier: 0x00000000
- 格式化磁盘
-
mkfs.xfs -f /dev/sdb
- 挂载磁盘设备
-
mkdir /data1/
mount -t xfs -o rw,noatime,inode64,allocsize=16m /dev/sdb /data1/
- 配置/etc/fstab(/dev/sdb /data1 xfs rw,noatime,inode64,allocsize=16m 1 1)
-
vi /etc/fstab -
View Code
 1 # /etc/fstab
 2 # Created by anaconda on Tue Sep 27 06:55:40 2016
 3 #
 4 # Accessible filesystems, by reference, are maintained under '/dev/disk'
 5 # See man pages fstab(5), findfs(8), mount(8) and/or blkid(8) for more info
 6 #
 7 UUID=03a6530f-4ebf-4bb0-827d-89a7b00cc568 /                       ext4    defaults        1 1
 8 UUID=2f0fd35f-d36b-41dd-8088-cc2789ce63e0 /boot                   ext4    defaults        1 2
 9 UUID=55b9c2f9-45ca-42aa-91a6-0276eab07691 swap                    swap    defaults        0 0
10 tmpfs                   /dev/shm                tmpfs   defaults        0 0
11 devpts                  /dev/pts                devpts  gid=5,mode=620  0 0
12 sysfs                   /sys                    sysfs   defaults        0 0
13 proc                    /proc                   proc    defaults        0 0
14
15 /dev/sdb /data1 xfs rw,noatime,inode64,allocsize=16m 1 1
- I/O访问策略(追加elevator=deadline,重启后生效)
-
cat /sys/block/sdb/queue/scheduler
vi /boot/grub/menu.lst
-
View Code
 1 # grub.conf generated by anaconda
 2 #
 3 # Note that you do not have to rerun grub after making changes to this file
 4 # NOTICE:  You have a /boot partition.  This means that
 5 #          all kernel and initrd paths are relative to /boot/, eg.
 6 #          root (hd0,0)
 7 #          kernel /vmlinuz-version ro root=/dev/sda2
 8 #          initrd /initrd-[generic-]version.img
 9 #boot=/dev/sda
10 default=0
11 timeout=5
12 splashimage=(hd0,0)/grub/splash.xpm.gz
13 hiddenmenu
14 title CentOS (2.6.32-431.el6.x86_64)
15         root (hd0,0)
16         kernel /vmlinuz-2.6.32-431.el6.x86_64 ro root=UUID=baf13251-2e5f-40eb-a011-2cf098d27c5c rd_NO_LUKS rd_NO_LVM LANG=en_US.UTF-8 rd_NO_MD SYSFONT=latarcyrheb-sun16 crashkernel=auto  KEYBOARDTYPE=pc KEYTABLE=us rd_NO_DM rhgb quiet elevator=deadline
17         initrd /initramfs-2.6.32-431.el6.x86_64.img
- 磁盘read-ahead设置(blockdev --setra /dev/sd*)
-
blockdev --getra /dev/sda
vi /etc/rc.d/rc.local
View Code1 #!/bin/sh 2 # 3 # This script will be executed *after* all the other init scripts. 4 # You can put your own initialization stuff in here if you don't 5 # want to do the full Sys V style init stuff. 6 7 touch /var/lock/subsys/local 8 blockdev --setra 65536 /dev/sd*
- 重新启动系统
-
shutdown -r now
安装Greenplum
- 上传文件到master(mdw)主机
- rz(可以使用其它方式上传)
-
yum install lrzsz.x86_64
-
mkdir /root/app
cd /root/app
rz

#从虚拟机host上选择greenplum-db-4.3.8.0-build-1-RHEL5-x86_64.bin进行上传,也可使用wget进行下载 - wget(省略)
- GP binary安装master(mdw)
-
/bin/bash greenplum-db-4.3.8.0-build-1-RHEL5-x86_64.bin
q #略过 Do you accept the Pivotal Database license agreement? [yes|no] yes <Enter> #默认路径安装 Install Greenplum Database into </usr/local/greenplum-db-4.3.8.0>? [yes|no] yes
/usr/local/greenplum-db-4.3.8.0 does not exist. Create /usr/local/greenplum-db-4.3.8.0 ? [yes|no] (Selecting no will exit the installer) yes - 创建服务器列表master(mdw)
-
创建host_file,包含了Greenplum部署的所有主机名,内容如下:
mdw
smdw
sdw1
sdw2
sdw3
创建一个hostfile_segonly,包含了所有的Segment Host的主机名,内容如下: sdw1 sdw2 sdw3创建hostfile_exkeys,包含了所有的Greenplum主机的网口对应的主机名(因为有可能是双网卡的服务器),内如如下: mdw smdw sdw1 sdw2 sdw3 - 设置ssh免密码登陆master(mdw)
-
ssh-keygen -t rsa -
cat ~/.ssh/id_rsa.pub >> ~/.ssh/authorized_keys
-
chmod 600 ~/.ssh/authorized_keys
#copy到所有服务器上
scp ~/.ssh/authorized_keys root@smdw:~/.ssh/
#测试
ssh smdw
- 安装GPDB master(mdw)
-
source /usr/local/greenplum-db/greenplum_path.shgpseginstall -f host_file -u gpadmin -p gpadmin
#确保gpadmin有访问host_file的权限 - 确认安装master(mdw)
-
gpssh -f host_file -e ls -l $GPHOME如有密码提示
-
gpssh-exkeys -f /home/gpadmin/host_file
- 创建数据存储区域
- master(mdw)
-
mkdir /data/
mkdir /data/master
chown -R gpadmin:gpadmin /data/
- standby master(smdw) - 在master(mdw)上远程创建
-
source /usr/local/greenplum-db/greenplum_path.sh
gpssh -h smdw -e 'mkdir /data/'
gpssh -h smdw -e 'mkdir /data/master'
gpssh -h smdw -e 'chown -R gpadmin:gpadmin /data/'
- segment(每个)
-
gpssh -f hostfile_segonly -e 'mkdir /data'
gpssh -f hostfile_segonly -e 'mkdir /data/primary'
gpssh -f hostfile_segonly -e 'mkdir /data/mirror'
gpssh -f hostfile_segonly -e 'chown -R gpadmin:gpadmin /data/'
- 配置NTP
- master(mdw)
-
vi /etc/ntp.conf# Permit time synchronization with our time source, but do not # permit the source to query or modify the service on this system. restrict default nomodify restrict -6 default kod nomodify notrap nopeer noquery # Permit all access over the loopback interface. This could # be tightened as well, but to do so would effect some of # the administrative functions. restrict 127.0.0.1 restrict -6 ::1 # Hosts on local network are less restricted. #restrict 192.168.1.0 mask 255.255.255.0 nomodify notrap # Use public servers from the pool.ntp.org project. # Please consider joining the pool (http://www.pool.ntp.org/join.html). server cn.pool.ntp.org
- standby master(smdw)
-
vi /etc/ntp.conf -
server mdw prefer server cn.pool.ntp.org - segment
-
vi /etc/ntp.confserver mdw perfer server smdw - 在master(mdw)主机,使用NTP守护进程同步所有Segment主机的系统时钟
-
gpssh -f host_file -v -e 'ntpd'
- 开启各个NTP客户机的ntpd服务
-
/etc/init.d/ntpd start
chkconfig --level 35 ntpd on

#进行一次同步
ntpdate cn.pool.ntp.org
- 安装前系统环境检查
- 检查操作系统配置
-
su gpadmin

source /usr/local/greenplum-db/greenplum_path.sh
gpssh -f host_file -e hostname
gpcheck -f host_file -m mdw -s smdw
- 硬件环境检查
-
gpcheckperf -f host_file -r N -d /tmp > subnet1.out
gpcheckperf -f hostfile_segonly -d /data/mirror -r ds
- 初始化GPDB系统
-
cp $GPHOME/docs/cli_help/gpconfigs/gpinitsystem_config gpinitsystem_config
vi gpinitsystem_config
#### the specified interface addresses). declare -a DATA_DIRECTORY=(/data/primary /data/primary /data/primary) -
################################################
#### OPTIONAL MIRROR PARAMETERS
################################################

#### Base number by which mirror segment port numbers
#### are calculated.
MIRROR_PORT_BASE=50000

#### Base number by which primary file replication port
#### numbers are calculated.
REPLICATION_PORT_BASE=41000

#### Base number by which mirror file replication port
#### numbers are calculated.
MIRROR_REPLICATION_PORT_BASE=51000

#### File system location(s) where mirror segment data directories
#### will be created. The number of mirror locations must equal the
#### number of primary locations as specified in the
#### DATA_DIRECTORY parameter.
declare -a MIRROR_DATA_DIRECTORY=(/data/mirror /data/mirror /data/mirror)
运行初始化命令
-
gpinitsystem -c gpinitsystem_config -h hostfile_segonly -s smdw
环境变量
- master(mdw)
-
su gpadmin
vi ~/.bashrc -
# .bashrc # Source global definitions if [ -f /etc/bashrc ]; then . /etc/bashrc fi # User specific aliases and functions source /usr/local/greenplum-db/greenplum_path.sh export MASTER_DATA_DIRECTORY=/data/master/gpseg-1 export PGPORT=5432 export PGUSER=gpadmin export PGDATABASE=gp_test -
source ~/.bashrc
- standby master(smdw)
-
scp .bashrc smdw
安装失败撤销
- ~/gpAdminLogs/
- 运行撤销脚本
-
sh backout_gpinitsystem_gpdmin_20160928_012034
试用
-
psql -d gp_test
create table test(id int primary key,col1 varchar(32));
insert into test select 1,'greenplum' ;
select * from test;
安装完成.