以下内容都已经过试验,边走边记,懒得排版
- 安装aphach
  yum install -y httpd

  systemctl start httpd
netstat -tulp
- 安装桌面
尽量不用桌面,实在是太耗资源,1G内存立马就满了,1核cpu到60%;
yum groupinstall -y 'Desktop' 'X Window System' #xclock试图形化
yum -y groupinstall "X Window System" "Chinese Support" "Desktop"
yum grouplist
yum groupinstall "GNOME Desktop" "Graphical Administration Tools" //是否需要?
yum install epel-release
yum install xrdp
yum install tigervnc-server
vncpasswd root
SElinux应该关闭它
sestatus
setenforce 0
firewall-cmd --permanent --zone=public --add-port=3389/tcp
firewall-cmd --permanent --zone=public --add-port=5901-5905/tcp
firewall-cmd --reload
systemctl start xrdp
参考https://www.cnblogs.com/xiaochina/p/6900234.html
- 安装mysql
yum -y remove mysql //移除所有mysql相关,包括mariadb
wget http://repo.mysql.com/mysql57-community-release-el7-11.noarch.rpm
yum localinstall mysql57-community-release-el7-8.noarch.rpm
yum -y install mysql-community-server
systemctl start mysqld
systemctl enable mysqld
grep 'temporary password' /var/log/mysqld.log//找密码
mysql -u root -p
set password for 'root'@'localhost'=password('MyNewPass4!');
配置文件:/etc/my.cnf
日志文件:/var/log//var/log/mysqld.log
服务启动脚本:/usr/lib/systemd/system/mysqld.service
socket文件:/var/run/mysqld/mysqld.pid
如果忘记root密码,则按如下操作恢复:
在[mysqld]的段中加上一句:skip-grant-tables 保存并且退出vi。
mysql -u root
update mysql.user set authentication_string=password('123qwe') where user='root' and Host = 'localhost';
flush privileges
show variables like 'port';
默认远程连接是3306端口,可以在/etc/my.cnf里加上port=???改为别的端口,但记得在阿里云服务器管理的安全组中,打开相应的端口。
记得要use mysql update user set host='%' where user='root'
- 安装php
yum -y install php
yum install php-mysql
yum install -y php-gd php-ldap php-odbc php-pear php-xml php-xmlrpc php-mbstring php-snmp php-soap curl curl-devel php-bcmath
- 安装git服务
yum -y install git
useradd -m -d /home/git -s /usr/bin/git-shell git //创建一个git连接的专用账户
passwd git //修改git用户的密码
git init --bare /home/git/??? //创建空的仓库
chown -R git:git yhmd.git //给git用户操作权限
git@39.98.205.57:/home/git/??? //仓库地址
服务器端 git clone /home/git/yhmd.git 会在当前目录生成yhmd/.git yhmd/yhmd 用yhmd/yhmd做为web目录即可
yhmd.git/hooks/post-receive hook git pull
chmod +x /home/git/yhmd.git/hooks/post-receive //增加脚本执行权限
chown -R git:git /var/www/html/yhmd/
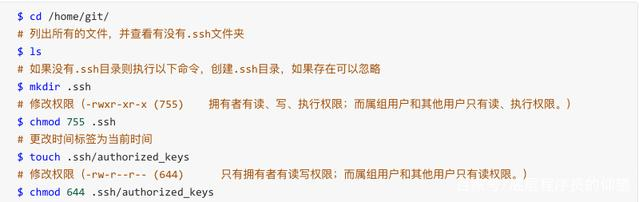
ssh-keygen -t rsa -C "35955204@qq.com"
生成key,将.pub内容复制到authorized_keys里,另一个文件就是key
自动部署 hooks/post-receive内容
#!/bin/bash
while read oldrev newrev ref
do
    if [[ $ref =~ .*/master$ ]];
    then
        echo "接收到master分支提交,正在发布中..."
        git --work-tree=/var/www/html/yhmd --git-dir=/home/git/yhmd.git checkout -f master
    else
        echo "Ref $ref successfully received.  Doing nothing: only the master branch may be deployed on this server."
    fi
done