针对物体轮廓,opencv还提供了一些相关的函数,来处理轮廓查找,绘制,拟合,以及计算轮廓周长和面积等,详细介绍如下:
1. 寻找和绘制轮廓
opencv的findContours()能寻找图片中的轮廓,实现的是下面论文的算法:
Satoshi Suzuki and others. Topological structural analysis of digitized binary images by border following. Computer Vision, Graphics, and Image Processing, 30(1):32–46, 1985.
函数对应的参数如下:
contours, hierarchy =cv2.findContours(image, mode, method, offset=None) image: 单通道的二值图(若输入灰度图,非零像素点会被设成1,0像素点设成0) mode: 轮廓检索模式,包括RETR_EXTERNAL,RETR_LIST,RETR_CCOMP,RETR_TREE,RETR_FLOODFILL RETR_EXTERNAL: 只检索最外层的轮廓 (返回值会设置所有hierarchy[i][2]=hierarchy[i][3]=-1) RETR_LIST: 检索所有的轮廓,但不建立轮廓间的层次关系(hierarchy relationship) RETR_CCOMP: 检测所有的轮廓,但只建立两个等级关系,外围为顶层,若外围内的内围轮廓还包含了其他的轮廓信息,则内围内的所有轮廓均归属于顶层,只有内围轮廓不再包含子轮廓时,其为内层。 RETR_TREE:检测所有轮廓,所有轮廓建立一个等级树结构。外层轮廓包含内层轮廓,内层轮廓还可以继续包含内嵌轮廓。 RETR_FLOODFILL: method: 轮廓的近似方法,包括CHAIN_APPROX_NONE,CHAIN_APPROX_SIMPLE,CHAIN_APPROX_TC89_L1,CHAIN_APPROX_TC89_KCOS CHAIN_APPROX_NONE: 保存物体边界上所有连续的轮廓点到contours中,即点(x1,y1)和点(x2,y2),满足max(abs(x1-x2),abs(y2-y1))==1,则认为其是连续的轮廓点 CHAIN_APPROX_SIMPLE: 仅保存轮廓的拐点信息到contours,拐点与拐点之间直线段上的信息点不予保留 CHAIN_APPROX_TC89_L1: 采用Teh-Chin chain近似算法 CHAIN_APPROX_TC89_KCOS:采用Teh-Chin chain近似算法 offset:偏移量,所有的轮廓信息相对于原始图像的偏移量,相当于在每一个检测出的轮廓点上加上该偏移量(在图片裁剪时比较有用) 返回值: contours:返回的轮廓点集合,一个list,每一个元素是一个轮廓,轮廓是一个N*1*2的ndarray hierarchy: 轮廓之间的层次关系,每一个元素对应contours中相应索引轮廓的层次关系,是一个N*4的array,hierarchy[i][0]~hierarchy[i][3]分别表示第i个轮廓的后一个轮廓,
前一个轮廓,第一个内嵌轮廓(子轮廓),父轮廓的索引编号,如果当前轮廓没有对应的后一个轮廓、前一个轮廓、内嵌轮廓或父轮廓,则hierarchy[i][0]~hierarchy[i][3]的相应位被设置为默认值-1。
opencv还提供drawContours()函数来绘制检测到的轮廓,其对应参数如下:
image=cv2.drawContours(image, contours, contourIdx, color, thickness=None, lineType=None, hierarchy=None, maxLevel=None, offset=None

    image: 绘制的轮廓的图像矩阵
    contours: 所有的轮廓集合(findContours()返回值)
    contourIdx: 轮廓集合的索引,表示指定一个轮廓进行绘制;若为负数,表示绘制所有轮廓
    color: 绘制使用的颜色
    thickness:线的粗细
    lineType: 线的类型,包括FILLED,LINE_4,LINE_8,LINE_AA
    hierarchy: 轮廓的层次关系(findContours()返回值)
    maxLevel: 0表示只有指定的轮廓被绘制,1表示绘制指定的轮廓和其第一层内嵌轮廓,2表示绘制指定轮廓和其所有的内嵌轮廓(只有hierarchy部位None时,才起作用)
    offset: 绘制轮廓时的偏移量
一般轮廓寻找和拟合,能解决一些简单的目标定位问题,其大致流程如下:
-
对图像边缘检测或阈值分割得到二值图(适当的形态学处理)
-
利用findContours()函数寻找二值图中多个轮廓
-
对于每一个轮廓采用boundingRect(), minAreaRect()等进行拟合得到目标位置框
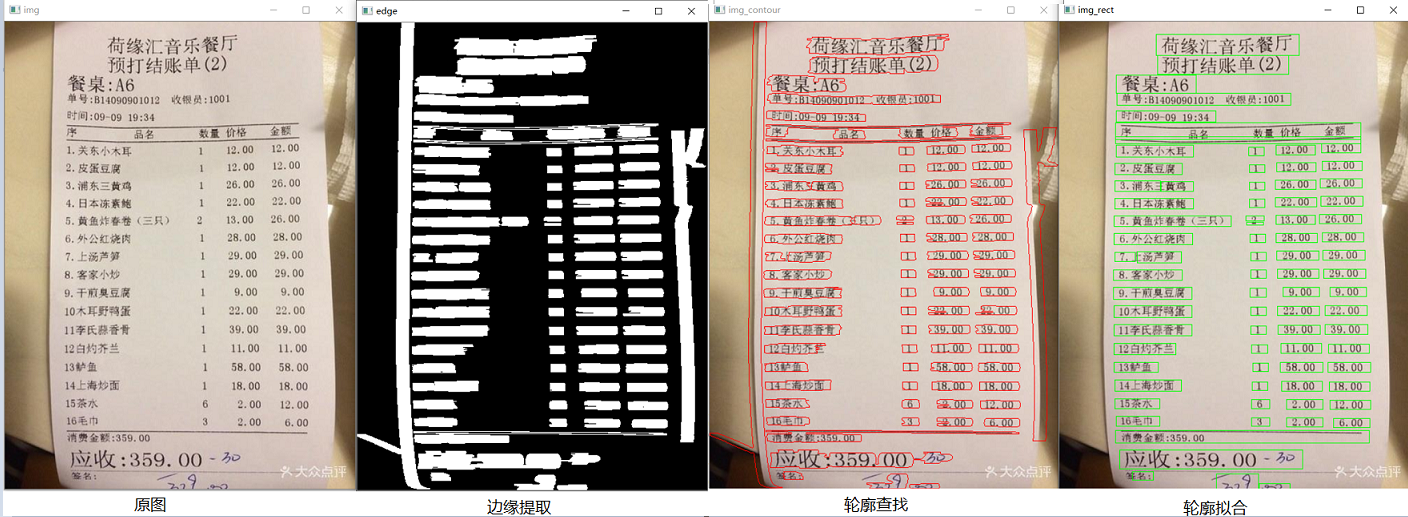
findContours()函数使用示例代码及结果如下:


#coding:utf-8

import cv2

img = cv2.imread(r"D:data
eceipt.jpg")
img1 = img.copy()
img2 = img.copy()
img_gray = cv2.cvtColor(img, cv2.COLOR_BGR2GRAY)
img_gaussian = cv2.GaussianBlur(img_gray, (3, 3), 1)
edge = cv2.Canny(img_gaussian, 100, 300)
kernel = cv2.getStructuringElement(cv2.MORPH_RECT, (10, 1))
edge = cv2.dilate(edge, kernel, iterations=2) #横向的形态学膨胀
# thre, edge = cv2.threshold(img_gaussian, 0, 255, cv2.THRESH_OTSU+cv2.THRESH_BINARY)

#寻找轮廓
contours, hierarchy = cv2.findContours(edge, cv2.RETR_EXTERNAL, cv2.CHAIN_APPROX_SIMPLE)
cv2.drawContours(img1, contours, -1, (0,0,255))

#轮廓拟合
num = len(contours)
for i in range(num):
    area = cv2.contourArea(contours[i], oriented=False)
    if 30 < area < 8000:  #限定轮廓的面积
        rect = cv2.boundingRect(contours[i])
        print(rect)
        cv2.rectangle(img2, (rect[0], rect[1]), (rect[0]+rect[2], rect[1]+rect[3]), (0, 255, 0))


# cv2.imshow("img_gray", img_gray)
cv2.imshow("img", img)
cv2.imshow("img_contour", img1)
cv2.imshow("img_rect", img2)
cv2.imshow("edge", edge)
cv2.waitKey(0)
cv2.destroyAllWindows()
2. 轮廓周长和面积
opencv提供函数arcLength()来计算点集所围区域的周长,其参数如下:
retval=    cv2.arcLength(curve, closed)
    curve: 坐标点集,n*2的array
    closed: 点集所围区域是否时封闭的
opencv提供函数contourArea() 来计算点集所围区域的面积,其参数如下:
retval=cv2.contourArea(contour, oriented=False)
    contour: 组成轮廓的坐标点集
    oriented: 为True时,返回的面积会带有符号,正数表示轮廓点顺时针排列,负数表示逆时针排列;为False时,返回面积的绝对值,不带符号
arcLength() 和contourArea()函数使用示例如下:
#coding:utf-8
import cv2
import numpy as np

img = np.ones((400, 400,3), dtype=np.uint8)*255
points = np.array([[120, 120],[150, 170],[120, 220],[220,220],[200,170],[220,120]], np.int32)

length1 = cv2.arcLength(points, False)  #首尾不相连
length2 = cv2.arcLength(points, True)  #首尾相连
print(length1, length2)  #324.3223342895508 424.3223342895508

area1 = cv2.contourArea(points, oriented=True)  #返回点集排列顺序
area2 = cv2.contourArea(points, oriented=False)
print(area1, area2)  #-7500.0 7500.0


rows, cols = points.shape
for i in range(rows):
    point1 = tuple(points[i])
    point2 = tuple(points[(i+1)%rows])
    cv2.circle(img, point1, radius=2, color=(55, 55, 55), thickness=2)
    cv2.line(img, point1, point2, color=(0, 255, 0), thickness=1, lineType=cv2.LINE_4)

cv2.imshow("img", img)
cv2.waitKey(0)
cv2.destroyAllWindows()

opencv提供函数pointPolygonTest()来计算坐标点和一个轮廓的位置关系,其参数如下:
retval=cv.pointPolygonTest(contour, pt, measureDist)
    contour: 组成轮廓的点集
    pt: 坐标点
    measureDist: 为False时,返回值为1,-1,0(1表示点在轮廓内,-1表示点在轮廓外面,0在轮廓边缘上);为True时,返回坐标点离轮廓边缘的最小距离(带符号,分别表示轮廓内和轮廓外)
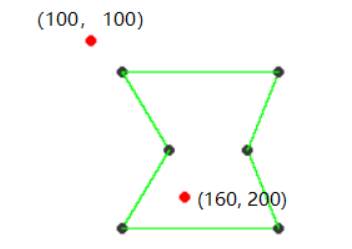
pointPolygonTest()函数的使用示例代码如下:
#coding:utf-8
import cv2
import numpy as np

img = np.ones((400, 400,3), dtype=np.uint8)*255
points = np.array([[120, 120],[150, 170],[120, 220],[220,220],[200,170],[220,120]], np.int32)

p1 = (100, 100)
p1_ret = cv2.pointPolygonTest(points, p1, measureDist=False)
p1_ret2 = cv2.pointPolygonTest(points, p1, measureDist=True)
print(p1_ret, p1_ret2) # -1.0 -28.284271247461902

p2 = (160, 200)
p2_ret = cv2.pointPolygonTest(points, p2, measureDist=False)
p2_ret2 = cv2.pointPolygonTest(points, p2, measureDist=True)
print(p2_ret, p2_ret2)  #1.0 20.0

cv2.circle(img, p1, radius=2, color=(0, 0, 255), thickness=2)
cv2.circle(img, p2, radius=2, color=(0, 0, 255), thickness=2)

rows, cols = points.shape
for i in range(rows):
    point1 = tuple(points[i])
    point2 = tuple(points[(i+1)%rows])
    cv2.circle(img, point1, radius=2, color=(55, 55, 55), thickness=2)
    cv2.line(img, point1, point2, color=(0, 255, 0), thickness=1, lineType=cv2.LINE_4)

cv2.imshow("img", img)
cv2.waitKey(0)
cv2.destroyAllWindows()
4. 轮廓的凸包缺陷
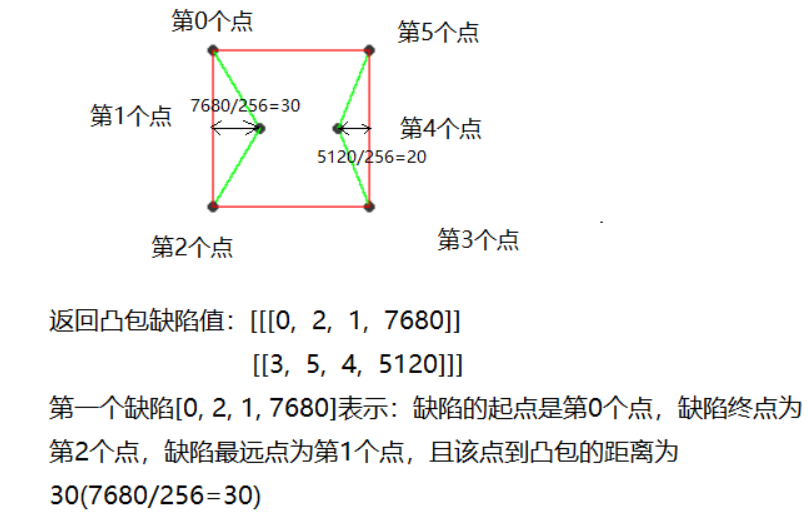
convexHull()函数能检测出点集的最小凸包,opencv还提供了函数convexityDefects()来检测凸包的缺陷,这里缺陷指凸包的内陷处,如下图所示:

convexityDefects()函数的参数如下:
convexityDefects=cv2.convexityDefects(contour, convexhull)
    contour: 组成轮廓的点集(有序的点集)
    convexhull: convexHull()的返回值,代表组成凸包的的坐标点集索引

返回值:
    convexityDefects:n*1*4的array,每一个元素代表一个缺陷,缺陷包括四个值:缺陷的起点,终点和最远点的索引,最远点到凸包的距离 (返回的距离值放大了256倍,所以除以256才是实际的距离)
convexityDefects()函数使用代码和结果如下:
#coding:utf-8

import cv2
import numpy as np
img = np.ones((400, 400,3), dtype=np.uint8)*255
points = np.array([[120, 120],[150, 170],[120, 220],[220,220],[200,170],[220,120]], np.int32)
hull = cv2.convexHull(points,returnPoints=False)  # 返回索引
defects = cv2.convexityDefects(points, hull)
print(hull)
print(defects)
rows, cols = points.shape
for i in range(rows):
    point1 = tuple(points[i])
    point2 = tuple(points[(i+1)%rows])
    cv2.circle(img, point1, radius=2, color=(55, 55, 55), thickness=2)
    cv2.line(img, point1, point2, color=(0, 255, 0), thickness=1, lineType=cv2.LINE_4)
rows2, _ = hull.shape
for j in range(rows2):
    index1 = hull[j][0]
    index2 = hull[(j+1)%rows2][0]
    point1 = tuple(points[index1])
    point2 = tuple(points[index2])
    cv2.line(img, point1, point2, color=(0, 0, 255), thickness=1, lineType=cv2.LINE_4)


cv2.imshow("img", img)
cv2.waitKey(0)
cv2.destroyAllWindows()