CTPN文字检测网络,是在2016年的论文Detecting Text in Natural Image with Connectionist Text Proposal Network中提出,其在Fast-rcnn的基础上进行改进,提出了一种适合检测文字的神经网络,算是一篇开创性的论文,影响了后面文本检测算法的方向。其对横向文本的检测能力很好,目前也常用于文档,合同和发票等领域的的文本检测。
关于CTPN文字检测方法,可以从下面五个方面来进行理解:网络结构,anchor的正负样本分配,标注数据前处理,loss函数,文本线构造算法
1. 网络结构
原始论文中CTPN的结构如下,网络最后输出包括三部分,scores表示是否文文本区域的置信度,vertical coordinates表示每一个box的中心点x坐标和高度,side-refinement表示对于左右两侧边界处box的x坐标偏移值
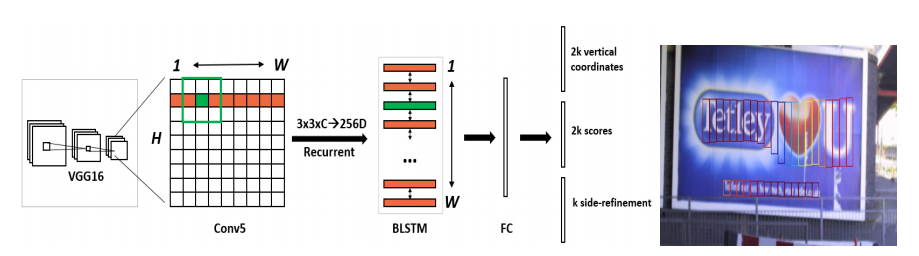
目前很多CTPN实现代码,网络输出都只包括两部分,scores和boxes两部分,scores表示是否为文本区域的置信度,boxes表示对box的中心点x坐标,y坐标,高度和宽度(和通用目标检测一样)。相比于原始论文方法,这种方式对于网络来说,学习起来困难一点,但对于每一个box都进行更见准确的偏移修正,结果应该会更加精确。实际工作中,我主要也使用这种方法,其结构如下:
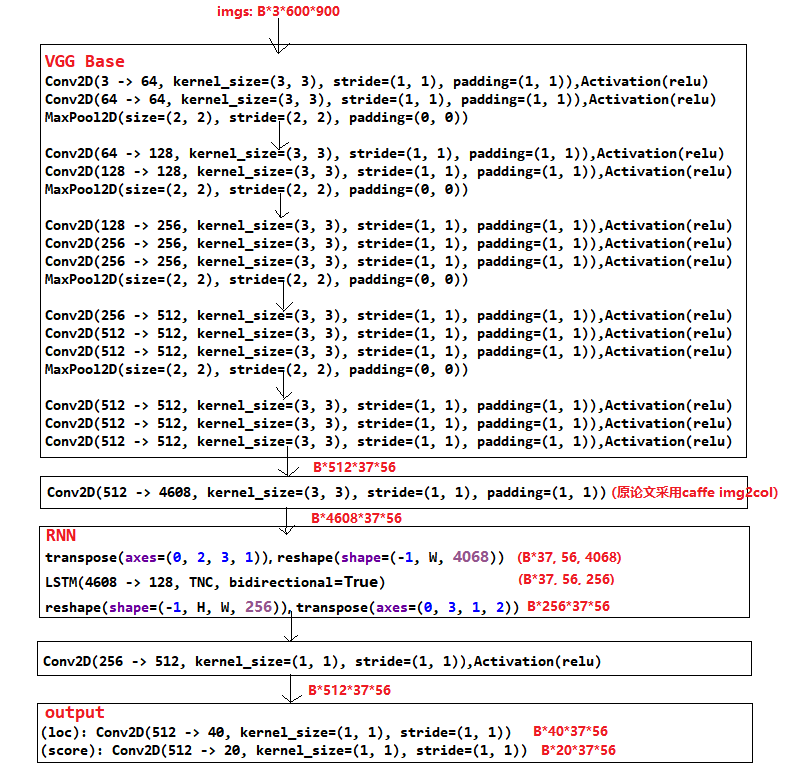
网络结构的数据流程图如下:
1.尺寸为(1, 3, 600, 900)的图片经过vgg_base提取特征,得到尺寸为(1, 512, 37, 56), 再经过一层卷积后尺寸为(1, 512*9, 37, 56)
2. 尺寸为(1, 512*9, 37, 56)的特征图经过RNN,输出尺寸为(1, 256, 37, 56), 再经过一层卷积后尺寸为(1, 512, 37, 56)
3尺寸为(1, 512, 37, 56)的特征图,分别经过loc和score两个分支卷积,经过loc分支得到(1, 40, 37, 56),这里的通道数40表示10个anchor,每个anchor包括(center_x, centert_y, w, h); 经过score分支得到(1, 20, 37, 56),20表示10个anchor,每个anchor包括文本区域和背景两个类别
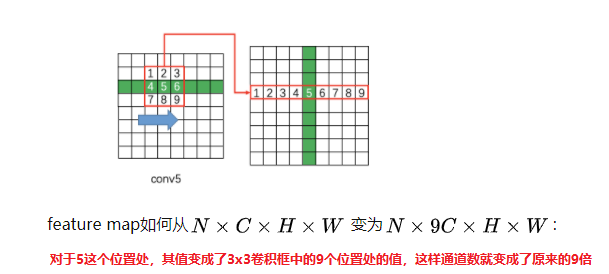
对于连接vgg_base和RNN的那个卷积需要注意下,原始论文中采用caffe的img2col, 其过程如下:
img2col参考代码:


#pytorch实现im2col
class Im2col(nn.Module):
    def __init__(self, kernel_size, stride, padding):
        super(Im2col, self).__init__()
        self.kernel_size = kernel_size
        self.stride = stride
        self.padding = padding

    def forward(self, x):
        height = x.shape[2]
        x = F.unfold(x, self.kernel_size, padding=self.padding, stride=self.stride)
        x = x.reshape((x.shape[0], x.shape[1], height, -1))
        return x
2. anchor的正负样本分配
anchor设置
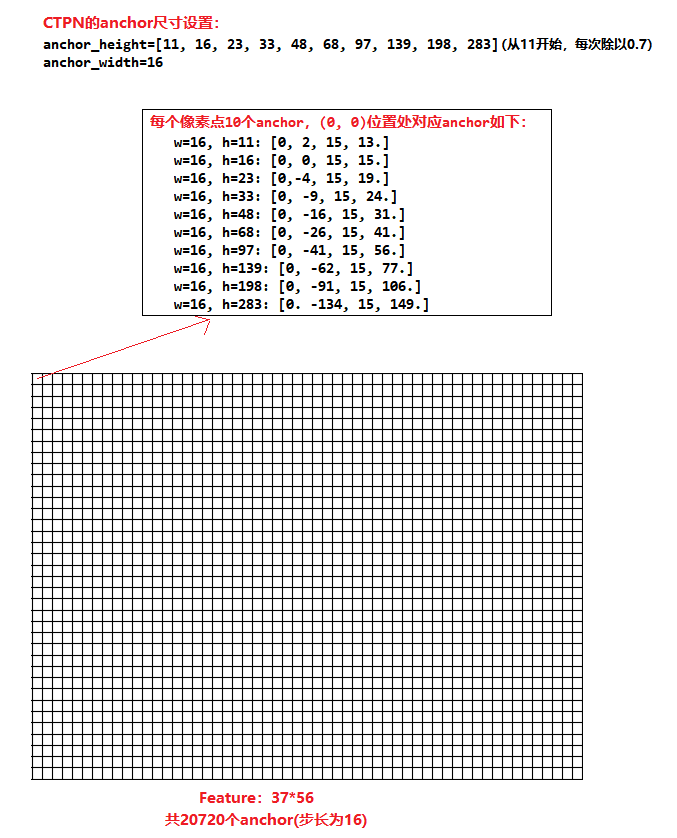
CTPN的anchor共设置了10中比例的anchor,这些anchor的宽度都为16, 高度从11一直到283。之所以将anchor的宽度设置为16,是因为CTPN网络将600*900的图片提取特征后,最后输出的特征图尺寸为37*56,缩小了16倍,特征图的感受野为16,即特征图上一个像素点对应原始图片上一个16*16的区域。
CTPN的anchor设置如下图所示,特征图每个像素点处设置10个anchor,总共20720个anchor:
产生anchor的代码如下:
#coding:utf-8
import numpy as np
from gluoncv.nn.coder import SigmoidClassEncoder, NumPyNormalizedBoxCenterEncoder
import mxnet as mx
from mxnet import gluon
try:
    import cython_bbox
except ImportError:
    cython_bbox = None


class AnchorGenerator(gluon.HybridBlock):

    def __init__(self, anchor_height=[11, 16, 23, 33, 48, 68, 97, 139, 198, 283], anchor_width=16,
                 stride=16, img_size=(), alloc_size=(128, 128), clip=False):
        super(AnchorGenerator, self).__init__()
        # anchor_height = [11, 16, 22, 32, 46, 66, 94, 134, 191, 273] #原始论文中采用这个(from 11 to 273, divide 0.7 each time)
        self.anchor_height = anchor_height
        self.anchor_width = anchor_width
        self.stride = stride
        self.alloc_size = alloc_size
        self._im_size = img_size
        self.base_size = stride
        anchors = self.generate_anchor()
        self.anchors = self.params.get_constant('anchor', anchors)
        self._clip=clip

    def generate_anchor(self):

        base_anchors = self.generate_base_anchors()
        # print(base_anchors)
        # propagete to all locations by shifting offsets
        height, width = self.alloc_size
        offset_x = np.arange(0, width * self.stride, self.stride)
        offset_y = np.arange(0, height * self.stride, self.stride)
        offset_x, offset_y = np.meshgrid(offset_x, offset_y)
        offsets = np.stack((offset_x.ravel(), offset_y.ravel(),
                            offset_x.ravel(), offset_y.ravel()), axis=1)
        # broadcast_add (1, N, 4) + (M, 1, 4)
        anchors = (base_anchors.reshape((1, -1, 4)) + offsets.reshape((-1, 1, 4)))  # (37*56)*10*4
        anchors = anchors.reshape((1, 1, height, width, -1)).astype(np.float32)  # (1, 1, 37, 56, 40)
        # print(anchors.shape)
        return mx.nd.array(anchors)

    def generate_base_anchors(self):
        base_anchor = np.array([1, 1, self.base_size, self.base_size], dtype=np.float) - 1
        anchors = np.zeros((len(self.anchor_height), 4), np.float)
        for i, h in enumerate(self.anchor_height):
            anchors[i] = self.scale_anchor(base_anchor, h, self.anchor_width)
        return anchors

    def scale_anchor(self, base_anchor, h, w):
        center_x = (base_anchor[0]+base_anchor[2])*0.5
        center_y = (base_anchor[1]+base_anchor[3])*0.5
        scaled_anchor = np.zeros_like(base_anchor, dtype=np.int32)   #注意此处的整型
        scaled_anchor[0] = center_x - w/2
        scaled_anchor[2] = center_x + w/2
        scaled_anchor[1] = center_y - h/2
        scaled_anchor[3] = center_y + h/2
        return scaled_anchor

    def hybrid_forward(self, F, x, anchors):
        a = F.slice_like(anchors, x * 0, axes=(2, 3))
        a = a.reshape((1, -1, 4))

        if self._clip:
            cx, cy, cw, ch = a.split(axis=-1, num_outputs=4)
            H, W = self._im_size
            a = F.concat(*[cx.clip(0, W), cy.clip(0, H), cw.clip(0, W), ch.clip(0, H)], dim=-1)
        return a.reshape((1, -1, 4))


if __name__ == "__main__":
    import cv2
    import random
    ag = AnchorGenerator()
    print(ag.anchors.shape)
    x = mx.nd.uniform(shape=(1, 3, 37, 56))
    ag.initialize()
    anchor = ag(x)
    img = np.ones(shape=(600, 900, 3), dtype=np.uint8)*255
    for i in range(0, 2000): #只画出2000个anchor
        print(anchor[0, i, :])
        box = anchor[0, i,:]
        box = box.asnumpy()
        color = (random.randint(0, 255), random.randint(0, 255),random.randint(0, 255))
        cv2.rectangle(img, (int(box[0]), int(box[1])), (int(box[2]), int(box[3])), color, 2)

    cv2.imshow("img", img)
    cv2.waitKey(0)
    cv2.destroyAllWindows()
正负样本分配
CTPN采用了Fast-Rcnn的RPN网路一样的样本分配规则,即根据anchor和gt_box的IOU,挑选出256个anchor作为样本给RPN网络学习。需要注意的是挑选的anchor样本数量,原始Fast-Rcnn中挑选出256个样本,正负样本各一半,对于CTPN,原始文字标注框需要切割成宽度为16的小框,样本数会很多,所以可以根据自己数据的特点,自己设置挑选anchor样本的总数。这里还是以挑选256个anchor为例,anchor挑选流程如下:
1. 去掉anchor中坐标超出图片边界的(图片为600*900)
2. 计算所有anchor和gt_box的IOU,和gt_box具有最大IOU的anchor为正样本(无论是否满足IOU>0.7),剩余的anchor, IOU>0.7的为正样本,0<IOU<0.3的为负样本
3. 挑选出256个样本,正负样本各128个。(若正样本不够128个时,有多少取多少,若正本超过128个,随机选取128个正样本,多余的标注未忽略样本;负样本一般会多余128个,随机选取128个负样本,多余的标注未忽略样本)
(最后会出现两种情况,一是正负样本各128个,总共256个样本;二是正样本少于128个(如50个),负样本128个,总样本少于256个)
3. 标注数据前处理
由于原始数据的标签都是一个大的文本框,需要拆分为宽度为16的小框,这样才能用来训练CTPN网络,所以需要对标注数据进行预处理。大致步骤如下:
1.找到原始标注框big_box的中心点,然后向两边按8的步长进行扩充,宽度16为一个small_box,直到big_box两边的边界(对于靠近图片边界处,若小于16,不够组成一个small_box的舍弃掉)
2.对于划分后box的上下边界不太好确定,可以在一个全黑的mask中把big_box画上去(白色),然后从上往下和从下往上找到第一个白色像素点的位置作为该anchor的上下边界
划分成宽度为16的small_box如下:
参考代码如下:(参考:https://www.cnblogs.com/skyfsm/p/10054386.html)
#coding:utf-8
import os
import cv2
import math
import numpy as np

def get_line_func(point1, point2):
    assert point2[0]-point1[0]!=0
    a = (point2[1]-point1[1])/(point2[0]-point1[0])
    b = point2[1]-a*point2[0]
    return a, b

def get_top_bottom1(top_a, top_b, bottom_a, bottom_b, left_x, right_x):
    top_y = math.ceil(max(top_a *left_x + top_b, top_a * right_x + top_b))
    bottom_y = math.floor(min(bottom_a * left_x + bottom_b, bottom_a * right_x + bottom_b))
    return top_y, bottom_y

def get_top_bottom(height, width, points, left_x, right_x):
    #在一个全黑的mask中把文本框label画上去(白色),然后从上往下和从下往上找到第一个白色像素点的位置作为该anchor的上下边界;
    mask = np.zeros((height, width), dtype=np.uint8)
    points = np.array([int(i) for i in points])
    min_y = min(points[1::2])
    max_y = max(points[1::2])
    points = points.reshape(4, 2)
    for i in range(4):
        cv2.line(mask, (points[i][0], points[i][1]), (points[(i + 1) % 4][0], points[(i + 1) % 4][1]), 255,  2)
    flag = False
    top_y, bottom_y = 0, 0
    for y in range(min_y, min(max_y+1, height)):
    # for y in range(0, height):
        for x in range(left_x, min(right_x+1, width)):
            if mask[y, x] == 255:
                top_y = y
                flag=True
                break
        if flag:
            break

    flag = False
    for y in range(min(max_y, height-1), min_y-1, -1):
    # for y in range(height-1, -1, -1):
        for x in range(left_x, min(right_x + 1, width)):
            if mask[y, x] == 255:
                bottom_y = y
                flag = True
                break
        if flag:
            break

    # cv2.imshow("mask", mask)
    # cv2.waitKey(0)
    # cv2.destroyAllWindows()

    return top_y, bottom_y


def make_ctpn_data(img_file, anno_file, save_dir):
    try:
        img = cv2.imread(img_file)
        height, width = img.shape[:2]
        total_box_list = []
        with open(anno_file, "r", encoding="utf-8") as f:
            lines = f.readlines()
            for line in lines:
                small_box_list = []
                line_list = line.strip().split(",")
                points = [float(i) for i in line_list[:8]]

                validate_clockwise_points(points)  #验证坐标是否为逆时针方向排序,否则报错

                left_x = min(points[0], points[2])
                right_x = max(points[4], points[6])
                center_x = int((left_x + right_x)/2)
                l_temp, r_temp = center_x-8, center_x+8
                # top_line_a, top_line_b = get_line_func(points[:2], points[6:])  #原始big box上边界直线方程
                # bottom_line_a, bottom_line_b = get_line_func(points[2:4], points[4:6]) #原始big box下边界直线方程
                # top_y, bottom_y = get_top_bottom(top_line_a, top_line_b, bottom_line_a, bottom_line_b,l_temp, r_temp)
                top_y, bottom_y = get_top_bottom(height, width, points, l_temp, r_temp)
                small_box_list.append([center_x-8, top_y, center_x+8, bottom_y, 0])
                while l_temp-16 >= left_x:
                    top_y, bottom_y = get_top_bottom(height, width, points, l_temp-16, l_temp)
                    small_box_list.insert(0, [l_temp-16, top_y, l_temp, bottom_y, 0])  #0表示是中间box,没有偏移值
                    l_temp = l_temp -16
                if l_temp - 16 >= 0 and l_temp > left_x:
                    top_y, bottom_y = get_top_bottom(height, width, points, l_temp - 16, l_temp)
                    small_box_list.insert(0, [l_temp-16, top_y, l_temp, bottom_y, (left_x-(l_temp-16))]) # 左边边界处的box,计算偏移值
                else:
                    # 边界处小于16像素的舍弃掉
                    small_box_list[0][-1] = left_x-(l_temp-16)           # 左边边界处的box,计算偏移值
                while r_temp + 16 <= right_x:
                    top_y, bottom_y = get_top_bottom(height, width, points, r_temp, r_temp+16)
                    small_box_list.append([r_temp, top_y, r_temp+16, bottom_y, 0])
                    r_temp += 16
                if r_temp + 16 <= width-1 and r_temp < right_x:
                    top_y, bottom_y = get_top_bottom(height, width, points, r_temp, r_temp+16)
                    small_box_list.append([r_temp, top_y, r_temp+16, bottom_y, (right_x-r_temp)]) # 右边边界处的box,计算偏移值
                else:
                    # 边界处小于16像素的舍弃掉
                    small_box_list[-1][-1] = right_x-r_temp  # 右边边界处的box,计算偏移值
                # print(small_box_list)
                total_box_list.extend(small_box_list)
    except Exception as e:
        print(e)
        print(anno_file)
        return
    name = os.path.basename(anno_file)
    with open(os.path.join(save_dir, name), "w", encoding="utf-8") as f:
        for box in total_box_list:
            box = [str(i) for i in box]
            f.write(",".join(box)+"
")


def validate_clockwise_points(points):  #顺时针排序时报错
    """
    Validates that the points that the 4 points that dlimite a polygon are in counter_clockwise order.
    """

    #鞋带定理(Shoelace Theorem)能根据多边形的顶点坐标,计算任意多边形的面积,坐标顺时针排列时为负数,逆时针排列时为正数

    if len(points) != 8:
        raise Exception("Points list not valid." + str(len(points)))

    point = [
        [int(points[0]), int(points[1])],
        [int(points[2]), int(points[3])],
        [int(points[4]), int(points[5])],
        [int(points[6]), int(points[7])]
    ]
    edge = [
        (point[1][0] - point[0][0]) * (point[1][1] + point[0][1]),
        (point[2][0] - point[1][0]) * (point[2][1] + point[1][1]),
        (point[3][0] - point[2][0]) * (point[3][1] + point[2][1]),
        (point[0][0] - point[3][0]) * (point[0][1] + point[3][1])
    ]

    summatory = edge[0] + edge[1] + edge[2] + edge[3]
    if summatory < 0:
        raise Exception("Points are not counter_clockwise.")

        #转换为逆时针方向
        # print('points in wrong direction')
        # poly = np.array(points).reshape((4, 2))
        # poly = poly[(0, 3, 2, 1), :]


if __name__ == "__main__":
    img_dir = r"E:dataimage_9000"
    src_label_dir = r"E:data	xt_9000"
    dst_label_dir = r"E:data	xt_ctpn"
    for file in os.listdir(img_dir):
        if file.endswith(".jpg"):
            img_file = os.path.join(img_dir, file)
            name, _ = os.path.splitext(file)
            # anno_file = os.path.join(src_label_dir, file.replace(".jpg", ".txt"))
            anno_file = os.path.join(src_label_dir, name+".txt")
            make_ctpn_data(img_file, anno_file, dst_label_dir)
4. loss函数
原始论文中的loss包括了三部分的loss,文本区域的分类损失cls_loss, box的中心点x和高度损失vertical_loss, box两侧的偏差损失side_refinment_loss。分类损失采用交叉熵,box回归损失采用smoothL1.
目前的CTPN实现代码里,对于box,直接回归box的中心点,高度和宽度,损失包括分类损失和box回归损失,分类损失采用交叉熵,box回归损失采用smoothL1.
5. 文本线构造算法
文本线构造算法主要分为两部分,首先是文本框连接,即将网络输出的box进行合并成一个大box,二是文本框矫正,即对这个box上下边界进行修正,并通过修正后的平行四边形得到最终的矩形
文本框连接
看下这篇文章https://zhuanlan.zhihu.com/p/34757009, 再结合代码应该就能理解,步骤搬运过来如下:

文本框修正
看下这篇文章https://zhuanlan.zhihu.com/p/137540923, 再结合代码应该就能理解, 步骤搬运过来如下:

参考文章:
https://zhuanlan.zhihu.com/p/34757009
https://zhuanlan.zhihu.com/p/137540923
https://www.cnblogs.com/skyfsm/p/9776611.html