一、下载percona-toolkit工具包
percona-toolkit是一组高级命令行工具的集合,可以查看当前服务的摘要信息,磁盘检测,分析慢查询日志,查找重复索引,实现表同步等等。
[root@push-5-221 src]# cd /usr/local/src/
[root@push-5-221 src]# wget https://www.percona.com/downloads/percona-toolkit/3.0.12/binary/redhat/7/x86_64/percona-toolkit-3.0.12-1.el7.x86_64.rpm
二、安装rpm包
root@push-5-221 src]# rpm -ivh percona-toolkit-3.0.12-1.el7.x86_64.rpm
警告:percona-toolkit-3.0.12-1.el7.x86_64.rpm: 头V4 DSA/SHA1 Signature, 密钥 ID cd2efd2a: NOKEY
错误:依赖检测失败:
        perl(DBI) >= 1.13 被 percona-toolkit-3.0.12-1.el7.x86_64 需要
        perl(DBD::mysql) >= 1.0 被 percona-toolkit-3.0.12-1.el7.x86_64 需要
        perl(IO::Socket::SSL) 被 percona-toolkit-3.0.12-1.el7.x86_64 需要
        perl(Digest::MD5) 被 percona-toolkit-3.0.12-1.el7.x86_64 需要
        perl(Term::ReadK
显示需要一些依赖包,安装相应依赖包
[root@push-5-221 src]# yum install -y perl-DBI perl-DBD-MySQL perl-Digest-MD5 perl-IO-Socket-SSL perl-TermReadKey
再次安装
[root@push-5-221 src]# rpm -ivh percona-toolkit-3.0.12-1.el7.x86_64.rpm
警告:percona-toolkit-3.0.12-1.el7.x86_64.rpm: 头V4 DSA/SHA1 Signature, 密钥 ID cd2efd2a: NOKEY
准备中...                          ################################# [100%]
正在升级/安装...
   1:percona-toolkit-3.0.12-1.el7     ################################# [100%]
[root@push-5-221 src]#
安装成功,验证
[root@push-5-221 src]# pt-online-schema-change --version
pt-online-schema-change 3.0.12
三、工具命令的使用
1、pt-heartbeat
#用于监控mysql复制架构的延迟。
#主要是通过在主库上的--update线程持续更新指定表上的一个时间戳,从库上--monitor线程或者--check线程检查主库更新的时间戳并与当前系统时间对比,得到延迟值。
2、pt-query-digest
#用于分析mysql服务器的慢查询日志,并格式化输出以便于查看和分析。
3、pt-diskstats
#类似于iostat,打印磁盘io统计信息,但是这个工具是交互式并且比iostat更详细。可以分析从远程机器收集的数据。
4、pt-slave-find
#连接mysql主服务器并查找其所有的从,然后打印出所有从服务器的层级关系。
[root@push-5-221 src]# pt-slave-find --host=127.0.0.1 --user=root --password=xxxxxxx
127.0.0.1
Version         5.7.26-log
Server ID       2213306
Uptime          21+19:54:53 (started 2019-06-12T13:16:24)
Replication     Is not a slave, has 1 slaves connected, is not read_only
Filters
Binary logging  ROW
Slave status
Slave mode      STRICT
Auto-increment  increment 1, offset 1
InnoDB version  5.7.26
+- 172.28.5.222
   Version         5.7.26-log
   Server ID       2223306
   Uptime          21+19:07:10 (started 2019-06-12T14:04:07)
   Replication     Is not a slave, has 1 slaves connected, is not read_only
   Filters
   Binary logging  ROW
   Slave status
   Slave mode      STRICT
   Auto-increment  increment 1, offset 1
   InnoDB version  5.7.26
   +- 172.28.5.223
      Version         5.7.26-log
      Server ID       2233306
      Uptime          21+19:02:48 (started 2019-06-12T14:08:29)
      Replication     Is not a slave, has 1 slaves connected, is not read_only
      Filters
      Binary logging  ROW
      Slave status
      Slave mode      STRICT
      Auto-increment  increment 1, offset 1
      InnoDB version  5.7.26
[root@push-5-221 src]#
5、pt-stalk
#用于收集mysql数据库故障时的相关信息便于后续诊断处理。
6、pt-kill
#Kill掉符合指定条件mysql语句
7、pt-upgrade
#该命令主要用于对比不同mysql版本下SQL执行的差异,通常用于升级前进行对比。
#会生成SQL文件或单独的SQL语句在每个服务器上执行的结果、错误和警告信息等。
8、pt-online-schema-change
#功能为支持在线变更表构,且不锁定原表,不阻塞原表的DML操作。
#该特性与Oracle的dbms_redefinition在线重定义表原理基本类似。
9、pt-mysql-summary
#对连接的mysql服务器生成一份详细的配置情况以及sataus信息
#在尾部也提供当前实例的的配置文件的信息
四、pt-heartbeat 监控主从同步原理
1、主库上存在一个用于检查延迟的表heartbeat,可手动或自动创建, pt-heartbeat使用--update参数连接到主库上并持续(根据设定的--interval参数)使用一个时间戳更新到表heartbeat
2、pt-heartbeat使用--monitor 或--check连接到从库,检查从主库同步过来的时间戳,并与当前系统时间戳进行比对产生一个差值,该值则用于判断延迟。(注,前提条件是主库与从库应保持时间同步)
五、实际操作pt-heartbeat 监控主从同步
1、主库上手工创建一个heartbeat数据库
mysql> create database heartbeat default CHARACTER set utf8;
Query OK, 1 row affected (0.16 sec)
2、利用pt-heartbeat的--create-table 参数在主库上添加heartbeat表
[root@push-5-221 ~]# pt-heartbeat -S /var/lib/mysql/3306/mysql.sock -uroot -pxxxxxxxx -D heartbeat --create-table --update
*******************************************************************
 Using the default of SSL_verify_mode of SSL_VERIFY_NONE for client
 is deprecated! Please set SSL_verify_mode to SSL_VERIFY_PEER
 possibly with SSL_ca_file|SSL_ca_path for verification.
 If you really don't want to verify the certificate and keep the
 connection open to Man-In-The-Middle attacks please set
 SSL_verify_mode explicitly to SSL_VERIFY_NONE in your application.
*******************************************************************
  at /usr/bin/pt-heartbeat line 4515.
*******************************************************************
 Using the default of SSL_verify_mode of SSL_VERIFY_NONE for client
 is deprecated! Please set SSL_verify_mode to SSL_VERIFY_PEER
 possibly with SSL_ca_file|SSL_ca_path for verification.
 If you really don't want to verify the certificate and keep the
 connection open to Man-In-The-Middle attacks please set
 SSL_verify_mode explicitly to SSL_VERIFY_NONE in your application.
*******************************************************************
  at /usr/bin/pt-heartbeat line 4515.

# A software update is available:
ctrl+c 退出,进入mysql查看heartbeat表
[root@push-5-221 ~]# mysql -S /var/lib/mysql/3306/mysql.sock -uroot -p
Enter password:
Welcome to the MySQL monitor.  Commands end with ; or g.
Your MySQL connection id is 1447890
Server version: 5.7.26-log MySQL Community Server (GPL)

Copyright (c) 2000, 2019, Oracle and/or its affiliates. All rights reserved.

Oracle is a registered trademark of Oracle Corporation and/or its
affiliates. Other names may be trademarks of their respective
owners.

Type 'help;' or 'h' for help. Type 'c' to clear the current input statement.

mysql> use heartbeat;
Reading table information for completion of table and column names
You can turn off this feature to get a quicker startup with -A

Database changed
mysql> select * from heartbeat;
+----------------------------+-----------+-------------------+-----------+-----------------------+---------------------+
| ts                         | server_id | file              | position  | relay_master_log_file | exec_master_log_pos |
+----------------------------+-----------+-------------------+-----------+-----------------------+---------------------+
| 2019-07-04T11:12:07.006920 |   2213306 | master-221.000022 | 643873543 | NULL                  |                NULL |
+----------------------------+-----------+-------------------+-----------+-----------------------+---------------------+
1 row in set (0.00 sec)

mysql>
3、启动pt-heartbeat守护进程,定时更新heartbeat表,定期update(默认1S)最新的timestamp信息到ts字段中
[root@push-5-221 ~]# pt-heartbeat -S /var/lib/mysql/3306/mysql.sock -uroot -pxxxxxxxxxxx -D heartbeat --update --daemonize
[root@push-5-221 ~]#
4、查看heartbeat表,不停查询,此时发现ts时间戳每秒会更新一次
mysql> select * from heartbeat;
+----------------------------+-----------+-------------------+-----------+-----------------------+---------------------+
| ts                         | server_id | file              | position  | relay_master_log_file | exec_master_log_pos |
+----------------------------+-----------+-------------------+-----------+-----------------------+---------------------+
| 2019-07-04T11:20:06.001140 |   2213306 | master-221.000022 | 659484111 | NULL                  |                NULL |
+----------------------------+-----------+-------------------+-----------+-----------------------+---------------------+
1 row in set (0.00 sec)

mysql> select * from heartbeat;
+----------------------------+-----------+-------------------+-----------+-----------------------+---------------------+
| ts                         | server_id | file              | position  | relay_master_log_file | exec_master_log_pos |
+----------------------------+-----------+-------------------+-----------+-----------------------+---------------------+
| 2019-07-04T11:20:08.064020 |   2213306 | master-221.000022 | 659558141 | NULL                  |                NULL |
+----------------------------+-----------+-------------------+-----------+-----------------------+---------------------+
1 row in set (0.00 sec)

mysql> select * from heartbeat;
+----------------------------+-----------+-------------------+-----------+-----------------------+---------------------+
| ts                         | server_id | file              | position  | relay_master_log_file | exec_master_log_pos |
+----------------------------+-----------+-------------------+-----------+-----------------------+---------------------+
| 2019-07-04T11:20:10.097910 |   2213306 | master-221.000022 | 659633844 | NULL                  |                NULL |
+----------------------------+-----------+-------------------+-----------+-----------------------+---------------------+
1 row in set (0.00 sec)
5、运行pt-hearbeat守护进程连接从库执行监控命令
[root@push-5-221 ~]# pt-heartbeat -uroot -pxxxxxxxxx -h172.28.5.222 --port=3307 -D heartbeat --monitor
*******************************************************************
 Using the default of SSL_verify_mode of SSL_VERIFY_NONE for client
 is deprecated! Please set SSL_verify_mode to SSL_VERIFY_PEER
 possibly with SSL_ca_file|SSL_ca_path for verification.
 If you really don't want to verify the certificate and keep the
 connection open to Man-In-The-Middle attacks please set
 SSL_verify_mode explicitly to SSL_VERIFY_NONE in your application.
*******************************************************************
  at /usr/bin/pt-heartbeat line 4515.
*******************************************************************
 Using the default of SSL_verify_mode of SSL_VERIFY_NONE for client
 is deprecated! Please set SSL_verify_mode to SSL_VERIFY_PEER
 possibly with SSL_ca_file|SSL_ca_path for verification.
 If you really don't want to verify the certificate and keep the
 connection open to Man-In-The-Middle attacks please set
 SSL_verify_mode explicitly to SSL_VERIFY_NONE in your application.
*******************************************************************
  at /usr/bin/pt-heartbeat line 4515.

# A software update is available:
0.00s [  0.00s,  0.00s,  0.00s ]
0.00s [  0.00s,  0.00s,  0.00s ]
0.00s [  0.00s,  0.00s,  0.00s ]
0.00s [  0.00s,  0.00s,  0.00s ]
0.00s [  0.00s,  0.00s,  0.00s ]
0.00s [  0.00s,  0.00s,  0.00s ]
0.00s [  0.00s,  0.00s,  0.00s ]
0.00s [  0.00s,  0.00s,  0.00s ]
0.00s [  0.00s,  0.00s,  0.00s ]
0.00s [  0.00s,  0.00s,  0.00s ]
0.00s [  0.00s,  0.00s,  0.00s ]
0.00s [  0.00s,  0.00s,  0.00s ]
0.00s [  0.00s,  0.00s,  0.00s ]
0.00s [  0.00s,  0.00s,  0.00s ]
0.00s [  0.00s,  0.00s,  0.00s ]
0.00s [  0.00s,  0.00s,  0.00s ]
0.00s [  0.00s,  0.00s,  0.00s ]
0.00s [  0.00s,  0.00s,  0.00s ]
0.00s [  0.00s,  0.00s,  0.00s ]
0.00s [  0.00s,  0.00s,  0.00s ]
0.00s [  0.00s,  0.00s,  0.00s ]
0.00s [  0.00s,  0.00s,  0.00s ]
0.00s [  0.00s,  0.00s,  0.00s ]
0.00s [  0.00s,  0.00s,  0.00s ]
0.00s [  0.00s,  0.00s,  0.00s ]
^C
监控数据会每秒刷新一次,可以看到目前主从同步良好,没有延迟。
6、重启主库更新进程
[root@push-5-221 ~]# pt-heartbeat --stop
Successfully created file /tmp/pt-heartbeat-sentinel
[root@push-5-221 ~]# rm -rf /tmp/pt-heartbeat-sentinel
[root@push-5-221 ~]# pt-heartbeat -S /var/lib/mysql/3306/mysql.sock -uroot -pxxxxxxxxxxx -D heartbeat --update --interval=1 --daemonize
[root@push-5-221 ~]#
7、使用守护进程监控从库,并输出到日志文件
[root@push-5-221 ~]# pt-heartbeat -uroot -pxxxxxxxxxxx -h172.28.5.222 --port=3307 -D heartbeat --monitor --daemonize --log=/tmp/mysql-slave-sync.log
[root@push-5-221 ~]#
8、实时查看日志
[root@push-5-221 ~]# tail -f /tmp/mysql-slave-sync.log
0.00s [  0.00s,  0.00s,  0.00s ]
0.00s [  0.00s,  0.00s,  0.00s ]
0.00s [  0.00s,  0.00s,  0.00s ]
0.00s [  0.00s,  0.00s,  0.00s ]
0.00s [  0.00s,  0.00s,  0.00s ]
0.00s [  0.00s,  0.00s,  0.00s ]
0.00s [  0.00s,  0.00s,  0.00s ]
0.00s [  0.00s,  0.00s,  0.00s ]
0.00s [  0.00s,  0.00s,  0.00s ]
0.00s [  0.00s,  0.00s,  0.00s ]
0.00s [  0.00s,  0.00s,  0.00s ]
0.00s [  0.00s,  0.00s,  0.00s ]
0.00s [  0.00s,  0.00s,  0.00s ]
9、测试验证
1、登录从库,停掉slave
[root@push-5-222 ~]# mysql -uroot -p -S /var/lib/mysql/3307/mysql.sock
Enter password:
Welcome to the MySQL monitor.  Commands end with ; or g.
Your MySQL connection id is 207570
Server version: 5.7.26 MySQL Community Server (GPL)

Copyright (c) 2000, 2019, Oracle and/or its affiliates. All rights reserved.

Oracle is a registered trademark of Oracle Corporation and/or its
affiliates. Other names may be trademarks of their respective
owners.

Type 'help;' or 'h' for help. Type 'c' to clear the current input statement.

mysql> stop slave;
Query OK, 0 rows affected (0.07 sec)
2、查看日志
[root@push-5-221 ~]# tail -f /tmp/mysql-slave-sync.log
25.00s [  5.42s,  1.08s,  0.36s ]
26.00s [  5.85s,  1.17s,  0.39s ]
27.00s [  6.30s,  1.26s,  0.42s ]
28.00s [  6.77s,  1.35s,  0.45s ]
29.00s [  7.25s,  1.45s,  0.48s ]
30.00s [  7.75s,  1.55s,  0.52s ]
31.00s [  8.27s,  1.65s,  0.55s ]
32.00s [  8.80s,  1.76s,  0.59s ]
33.00s [  9.35s,  1.87s,  0.62s ]
34.00s [  9.92s,  1.98s,  0.66s ]
35.00s [ 10.50s,  2.10s,  0.70s ]
36.00s [ 11.10s,  2.22s,  0.74s ]
37.00s [ 11.72s,  2.34s,  0.78s ]
此时已经出现了延迟
3、再次启动从库,同步数据
mysql> start slave;
Query OK, 0 rows affected (0.01 sec)

mysql>
此时监控同步延迟马上减小到0,表示同步成功,没有延迟。
504.00s [ 474.50s, 354.50s, 141.40s ]
505.00s [ 475.50s, 355.50s, 141.96s ]
506.00s [ 476.50s, 356.50s, 142.52s ]
507.00s [ 477.50s, 357.50s, 143.09s ]
508.00s [ 478.50s, 358.50s, 143.65s ]
509.00s [ 479.50s, 359.50s, 144.22s ]
510.00s [ 480.50s, 360.50s, 144.78s ]
511.00s [ 481.50s, 361.50s, 145.35s ]
512.00s [ 482.50s, 362.50s, 145.92s ]
513.00s [ 483.50s, 363.50s, 146.49s ]
514.00s [ 484.50s, 364.50s, 147.06s ]
515.00s [ 485.50s, 365.50s, 147.63s ]
516.00s [ 486.50s, 366.50s, 148.21s ]
517.00s [ 487.50s, 367.50s, 148.78s ]
518.00s [ 488.50s, 368.50s, 149.36s ]
519.00s [ 489.50s, 369.50s, 149.93s ]
520.00s [ 490.50s, 370.50s, 150.51s ]
521.00s [ 491.50s, 371.50s, 151.09s ]
522.00s [ 492.50s, 372.50s, 151.67s ]
523.00s [ 493.50s, 373.50s, 152.25s ]
524.00s [ 494.50s, 374.50s, 152.83s ]
443.00s [ 494.13s, 375.23s, 153.33s ]
327.02s [ 491.82s, 375.56s, 153.69s ]
0.00s [ 484.03s, 374.81s, 153.69s ]
0.00s [ 476.23s, 374.05s, 153.69s ]
0.00s [ 468.42s, 373.28s, 153.69s ]
0.00s [ 460.58s, 372.52s, 153.69s ]
0.00s [ 452.73s, 371.75s, 153.69s ]
0.00s [ 444.87s, 370.97s, 153.69s ]
0.00s [ 436.98s, 370.20s, 153.69s ]
0.00s [ 429.08s, 369.42s, 153.69s ]
0.00s [ 421.17s, 368.63s, 153.69s ]
0.00s [ 413.23s, 367.85s, 153.69s ]
0.00s [ 405.28s, 367.06s, 153.69s ]
0.00s [ 397.32s, 366.26s, 153.69s ]
0.00s [ 389.33s, 365.47s, 153.69s ]
六、利用Zabbix监控Mysql主从同步
1、使用pt-heartbeat 的--check选项参数,可以返回当前从库的同步延迟数据
[root@push-5-221 zabbix]# pt-heartbeat -uroot -pxxxxxxxxx -h172.28.5.222 --port=3307 -D heartbeat --check
0.00
[root@push-5-221 zabbix]#
2、利用这个返回的延迟数,可以自定义一个zabbix监控项
[root@push-5-221 ~]# vim /usr/local/zabbix/conf/zabbix_agentd.conf
在zabbix_agentd.conf配置文件中添加一个监控项
UserParameter=hlsms.check_mysql_slave_status, pt-heartbeat -uroot -pxxxxxxxxxx -h172.28.5.222 --port=3307 -D heartbeat --check 2>/dev/null
3、启动zabbix_agent服务,使新加监控项生效
[root@push-5-221 ~]# killall zabbix_agentd
[root@push-5-221 ~]# zabbix_agentd -c /usr/local/zabbix/conf/zabbix_agentd.conf
[root@push-5-221 ~]#
4、在zabbix服务器端利用zabbix_get命令检验监控项
[root@zabbix_server mysh]# zabbix_get -s 172.28.5.221 -p 10050 -k "hlsms.check_mysql_slave_status"
0.00
成功返回最新同步延迟数据
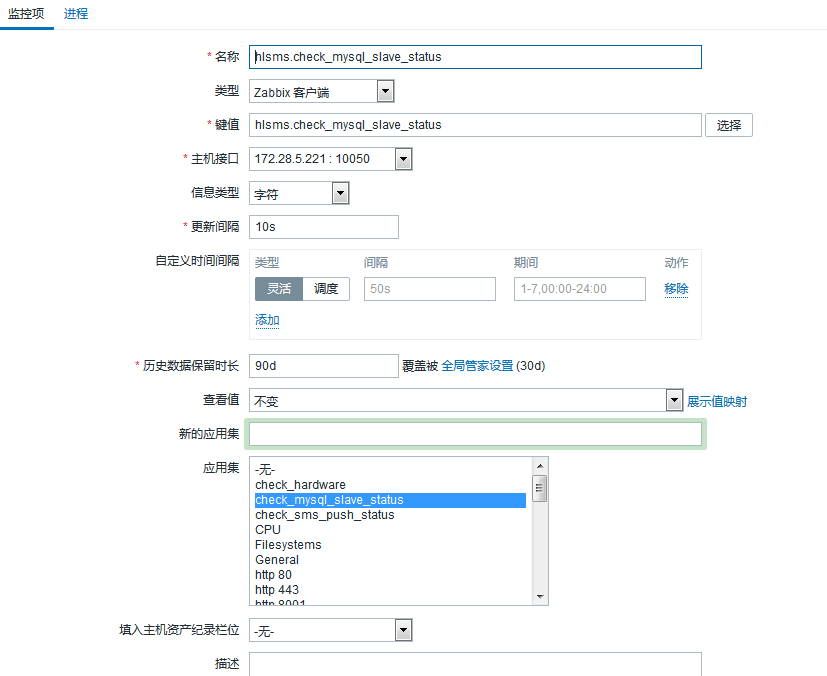
5、在zabbix管控台在主库的主机下新建一个监控项hlsms.check_mysql_slave_status,每10秒监控一次
6、在主库主机上打开最新数据,查看是否有hlsms.check_mysql_slave_status返回的数据
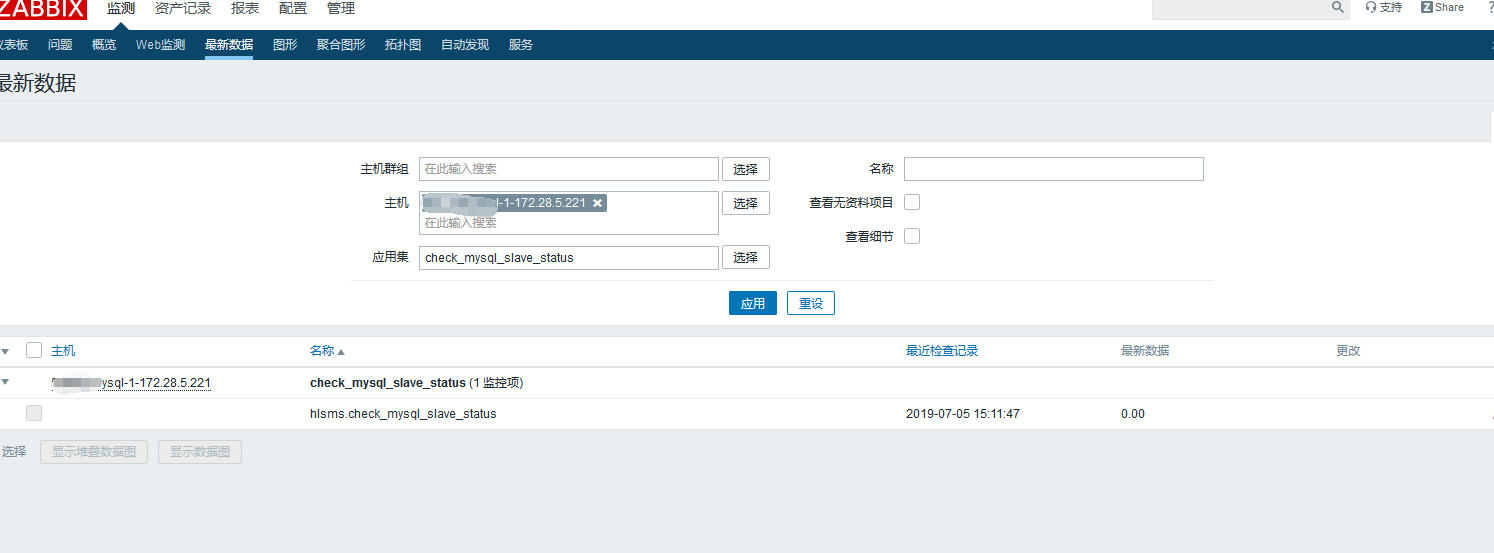
可以看到已经有数据获取到了,正常情况下同步成功没有延迟返回时0.00,有延迟会返回x.00,x表示延迟了多少秒。
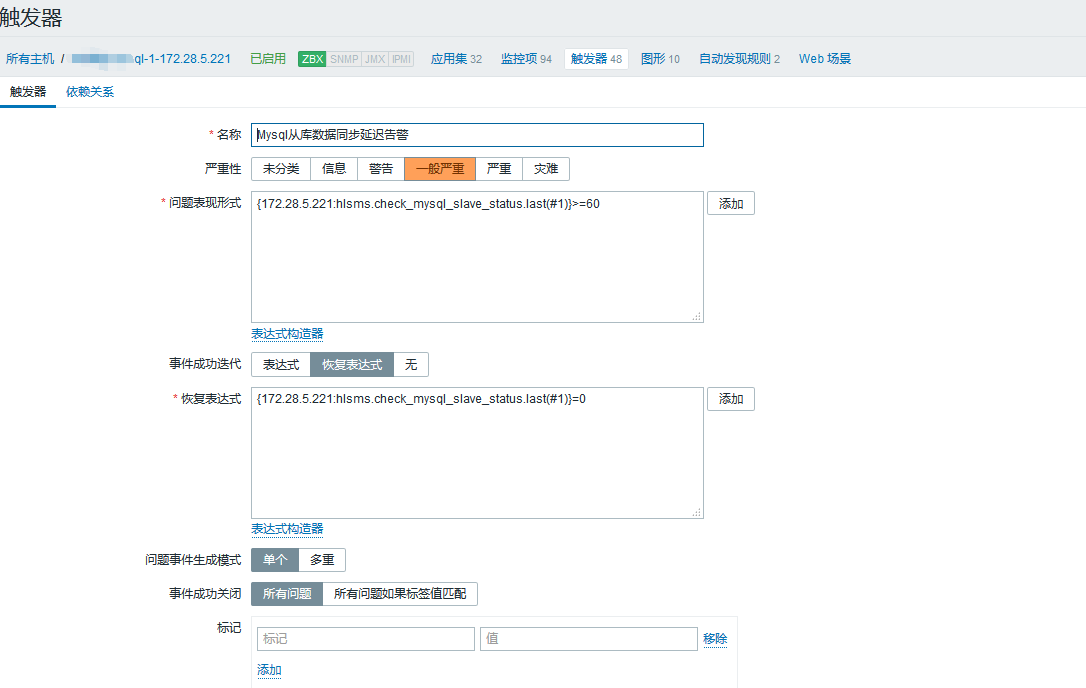
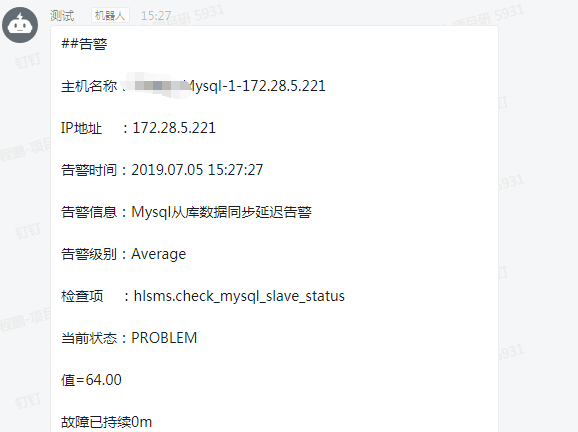
7、创建触发器,当同步延迟达到60秒,发送告警,当同步延迟为0时,恢复。
8、测试zabbix监控项
停掉从库
mysql> stop slave;
Query OK, 0 rows affected (0.06 sec)

mysql>
此时刷新主库主机最新数据hlsms.check_mysql_slave_status监控项
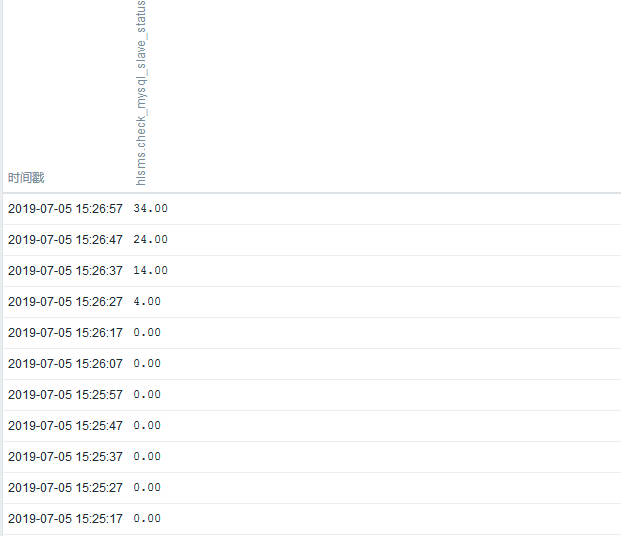
可以看到已经获取到了最新延迟,等到了60后,产生告警

告警成功,再次连接从库,启动同步线程
mysql> start slave;
Query OK, 0 rows affected (0.02 sec)

mysql>
当完全同步后,返回延迟数据为0,
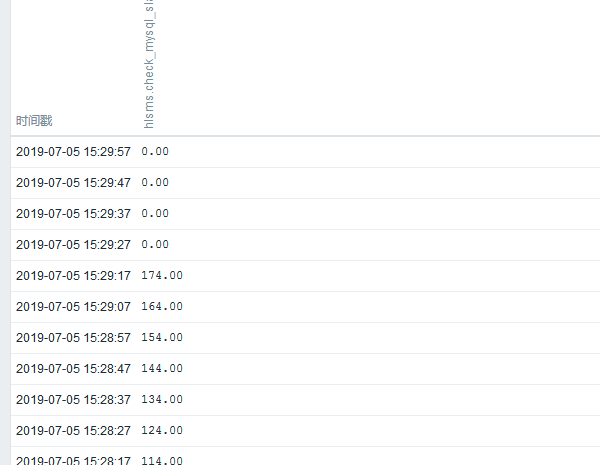
告警随之恢复
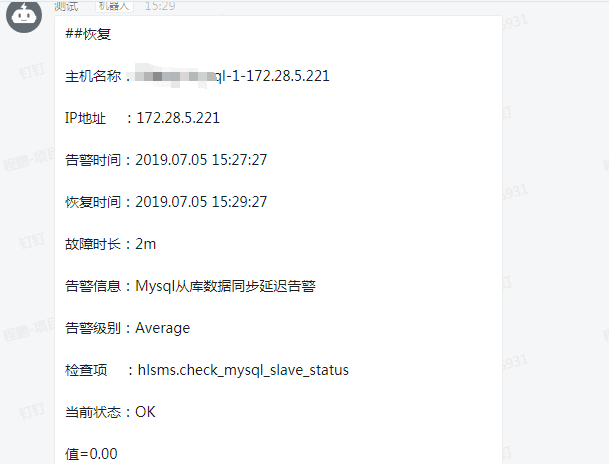
至此,zabbix监控Mysql主从状态配置成功。