Apache Flume是Cloudera提供的一个高可用的,高可靠的,分布式的海量日志采集、聚合和传输的软件。Flume的核心是把数据从数据源(source)收集过来,再将收集到的数据送到指定的目的地(sink)。为了保证输送的过程一定成功,在送到目的地(sink)之前,会先缓存数据(channel),待数据真正到达目的地(sink)后,flume在删除自己缓存的数据。
Flume支持定制各类数据发送方,用于收集各类型数据;同时,Flume支持定制各种数据接受方,用于最终存储数据。一般的采集需求,通过对flume的简单配置即可实现。针对特殊场景也具备良好的自定义扩展能力。因此,flume可以适用于大部分的日常数据采集场景。
当前Flume有两个版本。Flume 0.9X版本的统称Flume OG(original generation),Flume1.X版本的统称Flume NG(next generation)。由于Flume NG经过核心组件、核心配置以及代码架构重构,与Flume OG有很大不同,使用时请注意区分。改动的另一原因是将Flume纳入 apache 旗下,Cloudera Flume 改名为 Apache Flume。
1. 运行机制
Flume系统中核心的角色是agent,agent本身是一个Java进程,一般运行在日志收集节点。
每一个agent相当于一个数据传递员,内部有三个组件:
Source:采集源,用于跟数据源对接,以获取数据;
Sink:下沉地,采集数据的传送目的,用于往下一级agent传递数据或者往最终存储系统传递数据;
Channel:agent内部的数据传输通道,用于从source将数据传递到sink;
在整个数据的传输的过程中,流动的是event,它是Flume内部数据传输的最基本单元。event将传输的数据进行封装。如果是文本文件,通常是一行记录,event也是事务的基本单位。event从source,流向channel,再到sink,本身为一个字节数组,并可携带headers(头信息)信息。event代表着一个数据的最小完整单元,从外部数据源来,向外部的目的地去。
一个完整的event包括:event headers、event body、event信息,其中event信息就是flume收集到的日记记录。
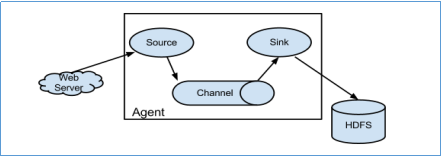
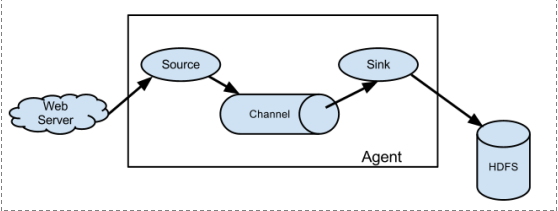
2. Flume采集系统结构图
2.1. 简单结构
单个agent采集数据
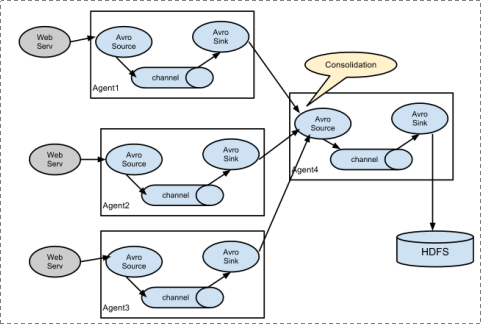
2.2. 复杂结构
3. Flume安装部署
Flume的安装非常简单,上传安装包到数据源所在节点上,然后解压 tar -zxvf apache-flume-1.8.0-bin.tar.gz,然后进入flume的目录,修改conf下的flume-env.sh,在里面配置JAVA_HOME
根据数据采集需求配置采集方案,描述在配置文件中(文件名可任意自定义),指定采集方案配置文件,在相应的节点上启动flume agent
先用一个最简单的例子来测试一下程序环境是否正常
1、先在flume的conf目录下新建一个文件
vim netcat-logger.conf
 1 # 定义这个agent中各组件的名字
 2 a1.sources = r1
 3 a1.sinks = k1
 4 a1.channels = c1
 5
 6 # 描述和配置source组件:r1
 7 a1.sources.r1.type = netcat
 8 a1.sources.r1.bind = localhost
 9 a1.sources.r1.port = 44444
10
11 # 描述和配置sink组件:k1
12 a1.sinks.k1.type = logger
13
14 # 描述和配置channel组件,此处使用是内存缓存的方式
15 a1.channels.c1.type = memory
16 a1.channels.c1.capacity = 1000
17 a1.channels.c1.transactionCapacity = 100
18
19 # 描述和配置source  channel   sink之间的连接关系
20 a1.sources.r1.channels = c1
21 a1.sinks.k1.channel = c1
2、启动agent去采集数据
1 bin/flume-ng agent -c conf -f conf/netcat-logger.conf -n a1 -Dflume.root.logger=INFO,console
-c conf 指定flume自身的配置文件所在目录
-f conf/netcat-logger.con 指定我们所描述的采集方案
-n a1 指定我们这个agent的名字
3、测试
先要往agent采集监听的端口上发送数据,让agent有数据可采。
随便在一个能跟agent节点联网的机器上:
telnet anget-hostname port (telnet localhost 44444)
telnet 通了之后可以通过发送数据来进行查看是否成功,成功的情况下是你在这边发送数据,任务启动那边可以马上看得到输出。
4.Flume简单案例
1. 采集目录到HDFS
采集需求:服务器的某特定目录下,会不断产生新的文件,每当有新文件出现,就需要把文件采集到HDFS中去
根据需求,首先定义以下3大要素
-
- 采集源,即source——监控文件目录 : spooldir
- 下沉目标,即sink——HDFS文件系统 : hdfs sink
- source和sink之间的传递通道——channel,可用file channel 也可以用内存channel
配置文件编写:
 1 # Name the components on this agent
 2 a1.sources = r1
 3 a1.sinks = k1
 4 a1.channels = c1
 5
 6 # Describe/configure the source
 7 ##注意:不能往监控目录中重复丢同名文件
 8 a1.sources.r1.type = spooldir #监控模式,这里为监控文件夹目录
 9 a1.sources.r1.spoolDir = /root/logs #监控的目录
10 a1.sources.r1.fileHeader = true   #可配置为true或者false,表示在flume读取数据之后,是否在封装出来的event中将文件名添加到event的header中。
11
12 # Describe the sink
13 a1.sinks.k1.type = hdfs
14 a1.sinks.k1.hdfs.path = /flume/events/%y-%m-%d/%H%M/
15 a1.sinks.k1.hdfs.filePrefix = events-
16 a1.sinks.k1.hdfs.round = true    #按照时间滚动文件夹
17 a1.sinks.k1.hdfs.roundValue = 10   #多长时间创建一个新文件夹
18 a1.sinks.k1.hdfs.roundUnit = minute #定义时间的单位
19 a1.sinks.k1.hdfs.rollInterval = 3 #多久生成一个新文件秒为单位。设置为0表示不会因为时间间隔截断文件
20 a1.sinks.k1.hdfs.rollSize = 20   #文件字节数超过20截断一个文件。设置为0就不因为文件大小截断文件
21 a1.sinks.k1.hdfs.rollCount = 5   #每5个event截断一个文件。设置为0就不因为event数量截断文件
22 a1.sinks.k1.hdfs.batchSize = 1   #积攒到多少event后flush到hdfs一次
23 a1.sinks.k1.hdfs.useLocalTimeStamp = true  #使用本地时间戳
24 #生成的文件类型,默认是Sequencefile,可用DataStream,则为普通文本
25 a1.sinks.k1.hdfs.fileType = DataStream
26
27 # Use a channel which buffers events in memory
28 a1.channels.c1.type = memory
29 a1.channels.c1.capacity = 1000 #默认通道允许的最大的event数量
30 a1.channels.c1.transactionCapacity = 100 #每次最大可从source拿到或者传输到sink的数量
31
32 # Bind the source and sink to the channel
33 a1.sources.r1.channels = c1
34 a1.sinks.k1.channel = c1
启动命令:bin/flume-ng agent -c ./conf -f ./conf/spool-hdfs.conf -n a1 -Dflume.root.logger=INFO,console
2. 采集文件到HDFS
采集需求:比如业务系统使用log4j生成的日志,日志内容不断增加,需要把追加到日志文件中的数据实时采集到hdfs
根据需求,首先定义以下3大要素
-
- 采集源,即source——监控文件内容更新 : exec ‘tail -F file’
- 下沉目标,即sink——HDFS文件系统 : hdfs sink
- Source和sink之间的传递通道——channel,可用file channel 也可以用 内存channel
 1 # Name the components on this agent
 2 a1.sources = r1
 3 a1.sinks = k1
 4 a1.channels = c1
 5
 6 # Describe/configure the source
 7 a1.sources.r1.type = exec #监控模式,监控某个具体文件
 8 a1.sources.r1.command = tail -F /root/logs/test.log #被监控的文件,监控新增的数据
 9 a1.sources.r1.channels = c1
10
11 # Describe the sink
12 a1.sinks.k1.type = hdfs
13 a1.sinks.k1.hdfs.path = /flume/tailout/%y-%m-%d/%H%M/
14 a1.sinks.k1.hdfs.filePrefix = events-
15 a1.sinks.k1.hdfs.round = true
16 a1.sinks.k1.hdfs.roundValue = 10
17 a1.sinks.k1.hdfs.roundUnit = minute
18 a1.sinks.k1.hdfs.rollInterval = 3
19 a1.sinks.k1.hdfs.rollSize = 20
20 a1.sinks.k1.hdfs.rollCount = 5
21 a1.sinks.k1.hdfs.batchSize = 1
22 a1.sinks.k1.hdfs.useLocalTimeStamp = true
23 #生成的文件类型,默认是Sequencefile,可用DataStream,则为普通文本
24 a1.sinks.k1.hdfs.fileType = DataStream
25
26 # Use a channel which buffers events in memory
27 a1.channels.c1.type = memory
28 a1.channels.c1.capacity = 1000
29 a1.channels.c1.transactionCapacity = 100
30
31 # Bind the source and sink to the channel
32 a1.sources.r1.channels = c1
33 a1.sinks.k1.channel = c1
启动命令:bin/flume-ng agent -c ./conf -f ./conf/exec-hdfs.conf -n a1 -Dflume.root.logger=INFO,console
5. Flume的load-balance、failover
负载均衡是用于解决一台机器(一个进程)无法解决所有请求而产生的一种算法。Load balancing Sink Processor能够实现load balance功能,如下图Agent1是一个路由节点,负责将Channel暂存的Event均衡到对应的多个Sink组件上,而每个Sink组件分别连接到一个独立的Agent上,示例配置,如下所示:
#agent1 name
agent1.channels = c1
agent1.sources = r1
agent1.sinks = k1 k2

#set gruop
agent1.sinkgroups = g1

#set channel
agent1.channels.c1.type = memory
agent1.channels.c1.capacity = 1000
agent1.channels.c1.transactionCapacity = 100

agent1.sources.r1.channels = c1
agent1.sources.r1.type = exec
agent1.sources.r1.command = tail -F /root/logs/123.log

# set sink1
agent1.sinks.k1.channel = c1
agent1.sinks.k1.type = avro
agent1.sinks.k1.hostname = node-2
agent1.sinks.k1.port = 52020

# set sink2
agent1.sinks.k2.channel = c1
agent1.sinks.k2.type = avro
agent1.sinks.k2.hostname = node-3
agent1.sinks.k2.port = 52020

#set sink group
agent1.sinkgroups.g1.sinks = k1 k2

#set failover
agent1.sinkgroups.g1.processor.type = load_balance
agent1.sinkgroups.g1.processor.backoff = true            #如果开启,则将失败的sink放入黑名单

agent1.sinkgroups.g1.processor.selector = round_robin  #另外还支持random
agent1.sinkgroups.g1.processor.selector.maxTimeOut=10000#在黑名单放置的超时时间,超时结束时,若仍然无法接收,则超时时间呈指数增长
启动代码:bin/flume-ng agent -c conf -f conf/exec-avro.conf -n agent1 -Dflume.root.logger=INFO,console
Failover Sink Processor能够实现failover功能,具体流程类似load balance,但是内部处理机制与load balance完全不同。
Failover Sink Processor维护一个优先级Sink组件列表,只要有一个Sink组件可用,Event就被传递到下一个组件。故障转移机制的作用是将失败的Sink降级到一个池,在这些池中它们被分配一个冷却时间,随着故障的连续,在重试之前冷却时间增加。一旦Sink成功发送一个事件,它将恢复到活动池。 Sink具有与之相关的优先级,数量越大,优先级越高。
例如,具有优先级为100的sink在优先级为80的Sink之前被激活。如果在发送事件时汇聚失败,则接下来将尝试下一个具有最高优先级的Sink发送事件。如果没有指定优先级,则根据在配置中指定Sink的顺序来确定优先级。
示例配置如下所示
 1 #agent1 name
 2 agent1.channels = c1
 3 agent1.sources = r1
 4 agent1.sinks = k1 k2
 5
 6 #set gruop
 7 agent1.sinkgroups = g1
 8
 9 #set channel
10 agent1.channels.c1.type = memory
11 agent1.channels.c1.capacity = 1000
12 agent1.channels.c1.transactionCapacity = 100
13
14 agent1.sources.r1.channels = c1
15 agent1.sources.r1.type = exec
16 agent1.sources.r1.command = tail -F /root/logs/456.log
17
18 # set sink1
19 agent1.sinks.k1.channel = c1
20 agent1.sinks.k1.type = avro
21 agent1.sinks.k1.hostname = node-2
22 agent1.sinks.k1.port = 52020
23
24 # set sink2
25 agent1.sinks.k2.channel = c1
26 agent1.sinks.k2.type = avro
27 agent1.sinks.k2.hostname = node-3
28 agent1.sinks.k2.port = 52020
29
30 #set sink group
31 agent1.sinkgroups.g1.sinks = k1 k2
32
33 #set failover
34 agent1.sinkgroups.g1.processor.type = failover
35 agent1.sinkgroups.g1.processor.priority.k1 = 10  #优先级值越大优先级越高
36 agent1.sinkgroups.g1.processor.priority.k2 = 1
37 agent1.sinkgroups.g1.processor.maxpenalty = 10000 #失败时Sink最大的回退期
启动代码:bin/flume-ng agent -c conf -f conf/exec-avro.conf -n agent1 -Dflume.root.logger=INFO,console
6. Flume拦截器实战案例
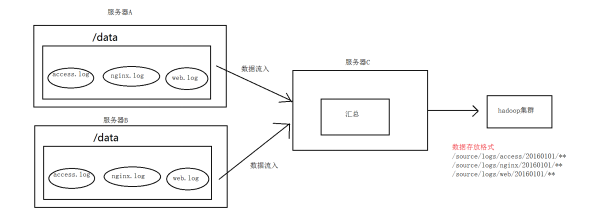
6.1. 日志的采集和汇总
6.1.1. 案例场景
A、B两台日志服务机器实时生产日志主要类型为access.log、nginx.log、web.log
现在要求:
把A、B 机器中的access.log、nginx.log、web.log 采集汇总到C机器上然后统一收集到hdfs中。
但是在hdfs中要求的目录为:
/source/logs/access/20160101/**
/source/logs/nginx/20160101/**
/source/logs/web/20160101/**
6.1.2. 案例场景
6.1.3.定义静态拦截器
 1 # Name the components on this agent
 2 a1.sources = r1 r2 r3
 3 a1.sinks = k1
 4 a1.channels = c1
 5
 6 # Describe/configure the source
 7 a1.sources.r1.type = exec
 8 a1.sources.r1.command = tail -F /root/logs/access.log
 9 a1.sources.r1.interceptors = i1               #设置拦截器
10 a1.sources.r1.interceptors.i1.type = static        #指定拦截器类型,static类型的拦截器就是往采集到的数据的event header里面插入下面定义的键值队
11 a1.sources.r1.interceptors.i1.key = type          #事件头的key
12 a1.sources.r1.interceptors.i1.value = access        #key的value
13
14 a1.sources.r2.type = exec
15 a1.sources.r2.command = tail -F /root/logs/nginx.log
16 a1.sources.r2.interceptors = i2
17 a1.sources.r2.interceptors.i2.type = static
18 a1.sources.r2.interceptors.i2.key = type
19 a1.sources.r2.interceptors.i2.value = nginx
20
21 a1.sources.r3.type = exec
22 a1.sources.r3.command = tail -F /root/logs/web.log
23 a1.sources.r3.interceptors = i3
24 a1.sources.r3.interceptors.i3.type = static
25 a1.sources.r3.interceptors.i3.key = type
26 a1.sources.r3.interceptors.i3.value = web
27
28 # Describe the sink
29 a1.sinks.k1.type = avro
30 a1.sinks.k1.hostname = node-2
31 a1.sinks.k1.port = 41414
32
33 # Use a channel which buffers events in memory
34 a1.channels.c1.type = memory
35 a1.channels.c1.capacity = 2000
36 a1.channels.c1.transactionCapacity = 100
37
38 # Bind the source and sink to the channel
39 a1.sources.r1.channels = c1
40 a1.sources.r2.channels = c1
41 a1.sources.r3.channels = c1
42 a1.sinks.k1.channel = c1
6.1.4 定义时间拦截器
 1 #定义agent名, source、channel、sink的名称
 2 a1.sources = r1
 3 a1.sinks = k1
 4 a1.channels = c1
 5
 6 #定义source
 7 a1.sources.r1.type = avro
 8 a1.sources.r1.bind = node-2
 9 a1.sources.r1.port =41414
10
11 #添加时间拦截器
12 a1.sources.r1.interceptors = i1
13 a1.sources.r1.interceptors.i1.type = org.apache.flume.interceptor.TimestampInterceptor$Builder  #设置拦截器类型为时间戳类型,读取文件时把时间戳写入到event header上
14
15 #定义channels
16 a1.channels.c1.type = memory
17 a1.channels.c1.capacity = 20000
18 a1.channels.c1.transactionCapacity = 10000
19
20 #定义sink
21 a1.sinks.k1.type = hdfs
22 a1.sinks.k1.hdfs.path=hdfs://node-1:9000/source/logs/%{type}/%Y%m%d
23 a1.sinks.k1.hdfs.filePrefix =events
24 a1.sinks.k1.hdfs.fileType = DataStream
25 a1.sinks.k1.hdfs.writeFormat = Text
26 #时间类型
27 #a1.sinks.k1.hdfs.useLocalTimeStamp = true
28 #生成的文件不按条数生成
29 a1.sinks.k1.hdfs.rollCount = 0
30 #生成的文件不按时间生成
31 a1.sinks.k1.hdfs.rollInterval = 20
32 #生成的文件按大小生成
33 a1.sinks.k1.hdfs.rollSize  = 10485760
34 #批量写入hdfs的个数
35 a1.sinks.k1.hdfs.batchSize = 20
36 flume操作hdfs的线程数(包括新建,写入等)
37 a1.sinks.k1.hdfs.threadsPoolSize=10
38 #操作hdfs超时时间
39 a1.sinks.k1.hdfs.callTimeout=30000
40
41 #组装source、channel、sink
42 a1.sources.r1.channels = c1
43 a1.sinks.k1.channel = c1
启动代码: bin/flume-ng agent -c conf -f conf/avro_source_hdfs_sink.conf -name a1 -Dflume.root.logger=DEBUG,console
7. Flume自定义拦截器
7.1. 案例背景介绍
Flume是Cloudera提供的一个高可用的,高可靠的,分布式的海量日志采集、聚合和传输的系统,Flume支持在日志系统中定制各类数据发送方,用于收集数据;同时,Flume提供对数据进行简单处理,并写到各种数据接受方(可定制)的能力。Flume有各种自带的拦截器,比如: TimestampInterceptor、HostInterceptor、RegexExtractorInterceptor等,通过使用不同的拦截器,实现不同的功能。但是以上的这些拦截器,不能改变原有日志数据的内容或者对日志信息添加一定的处理逻辑,当一条日志信息有几十个甚至上百个字段的时候,在传统的Flume处理下,收集到的日志还是会有对应这么多的字段,也不能对你想要的字段进行对应的处理。
7.2. 自定义拦截器
根据实际业务的需求,为了更好的满足数据在应用层的处理,通过自定义Flume拦截器,过滤掉不需要的字段,并对指定字段加密处理,将源数据进行预处理。减少了数据的传输量,降低了存储的开销。
7.3. 功能实现
本技术方案核心包括二部分:
- 编写java代码,自定义拦截器
内容包括:
- 定义一个类CustomParameterInterceptor实现Interceptor接口。
- 在CustomParameterInterceptor类中定义变量,这些变量是需要到 Flume的配置文件中进行配置使用的。每一行字段间的分隔符(fields_separator)、通过分隔符分隔后,所需要列字段的下标(indexs)、多个下标使用的分隔符(indexs_separator)、多个下标使用的分隔符(indexs_separator)。
- 添加CustomParameterInterceptor的有参构造方法。并对相应的变量进行处理。将配置文件中传过来的unicode编码进行转换为字符串。
- 写具体的要处理的逻辑intercept()方法,一个是单个处理的,一个是批量处理。
- 接口中定义了一个内部接口Builder,在configure方法中,进行一些参数配置。并给出,在flume的conf中没配置一些参数时,给出其默认值。通过其builder方法,返回一个CustomParameterInterceptor对象。
- 定义一个静态类,类中封装MD5加密方法
- 通过以上步骤,自定义拦截器的代码开发已完成,然后打包成jar, 放到Flume的根目录下的lib中
定义Flume配置信息
 1 #定义agent名, source、channel、sink的名称
 2 a1.channels = c1
 3 a1.sources = r1
 4 a1.sinks = s1
 5
 6 #定义channel
 7 a1.channels.c1.type = memory
 8 a1.channels.c1.capacity=100000
 9 a1.channels.c1.transactionCapacity=50000
10
11 #定义source
12 a1.sources.r1.channels = c1
13 a1.sources.r1.type = spooldir
14 a1.sources.r1.spoolDir = /root/data/
15 a1.sources.r1.batchSize= 50
16 a1.sources.r1.inputCharset = UTF-8
17 #定义拦截器
18 a1.sources.r1.interceptors =i1 i2
19 #指定拦截器调用的类
20 a1.sources.r1.interceptors.i1.type =cn.zhoucheng.interceptor.CustomParameterInterceptor$Builder
21 #定义原始字段分隔符
22 a1.sources.r1.interceptors.i1.fields_separator=\u0009
23 #定义取字段的下标
24 a1.sources.r1.interceptors.i1.indexs =0,1,3,5,6
25 #指定字段索引之间的分隔符,就是采到数据用什么拼接
26 a1.sources.r1.interceptors.i1.indexs_separator =\u002c
27 #指定需要加密的下标
28 a1.sources.r1.interceptors.i1.encrypted_field_index =0
29
30 a1.sources.r1.interceptors.i2.type = org.apache.flume.interceptor.TimestampInterceptor$Builder
31
32
33 #sink
34 a1.sinks.s1.channel = c1
35 a1.sinks.s1.type = hdfs
36 a1.sinks.s1.hdfs.path =hdfs://192.168.200.101:9000/flume/%Y%m%d
37 a1.sinks.s1.hdfs.filePrefix = event
38 a1.sinks.s1.hdfs.fileSuffix = .log
39 a1.sinks.s1.hdfs.rollSize = 10485760
40 a1.sinks.s1.hdfs.rollInterval =20
41 a1.sinks.s1.hdfs.rollCount = 0
42 a1.sinks.s1.hdfs.batchSize = 1500
43 a1.sinks.s1.hdfs.round = true
44 a1.sinks.s1.hdfs.roundUnit = minute
45 a1.sinks.s1.hdfs.threadsPoolSize = 25
46 a1.sinks.s1.hdfs.useLocalTimeStamp = true
47 a1.sinks.s1.hdfs.minBlockReplicas = 1
48 a1.sinks.s1.hdfs.fileType =DataStream
49 a1.sinks.s1.hdfs.writeFormat = Text
50 a1.sinks.s1.hdfs.callTimeout = 60000
51 a1.sinks.s1.hdfs.idleTimeout =60
启动:
bin/flume-ng agent -c conf -f conf/spool-interceptor-hdfs.conf -name a1 -Dflume.root.logger=DEBUG,console
8. Flume高阶自定义组件
8.1. Flume自定义Source
8.1.1. 自定义Source说明
Source是负责接收数据到Flume Agent的组件。Source组件可以处理各种类型、各种格式的日志数据,包括avro、thrift、exec、jms、spooling directory、netcat、sequence generator、syslog、http、legacy。官方提供的source类型已经很多,但是有时候并不能满足实际开发当中的需求,此时我们就需要根据实际需求自定义某些source。
如:实时监控MySQL,从MySQL中获取数据传输到HDFS或者其他存储框架,所以此时需要我们自己实现MySQLSource。
官方也提供了自定义source的接口:
官网说明:https://flume.apache.org/FlumeDeveloperGuide.html#source
8.1.2. 自定义Source原理
根据官方说明自定义mysqlsource需要继承AbstractSource类并实现Configurable和PollableSource接口。
实现相应方法:
getBackOffSleepIncrement() //暂不用
getMaxBackOffSleepInterval() //暂不用
configure(Context context) //初始化context
process() //获取数据(从mysql获取数据,业务处理比较复杂,所以我们定义一个专门的类——QueryMysql来处理跟mysql的交互),封装成event并写入channel,这个方法被循环调用
stop() //关闭相关的资源
8.1.3.实现步骤
1.创建MySQL数据库,以及表。并初始化数据。
2.创建maven工程导入pom依赖
 1 <dependencies>
 2     <dependency>
 3         <groupId>org.apache.flume</groupId>
 4         <artifactId>flume-ng-core</artifactId>
 5         <version>1.8.0</version>
 6         <scope>provided</scope>
 7     </dependency>
 8
 9     <dependency>
10         <groupId>mysql</groupId>
11         <artifactId>mysql-connector-java</artifactId>
12         <version>5.1.38</version>
13     </dependency>
14     <dependency>
15         <groupId>org.apache.commons</groupId>
16         <artifactId>commons-lang3</artifactId>
17         <version>3.6</version>
18     </dependency>
19 </dependencies>
3.定义QueryMysql工具类


  1 package cn.itcast.flumesource;
  2
  3 import org.apache.flume.Context;
  4 import org.apache.flume.conf.ConfigurationException;
  5 import org.apache.http.ParseException;
  6 import org.slf4j.Logger;
  7 import org.slf4j.LoggerFactory;
  8
  9 import java.sql.*;
 10 import java.util.ArrayList;
 11 import java.util.List;
 12 import java.util.Properties;
 13
 14 public class QueryMySql {
 15     private static final Logger LOG = LoggerFactory.getLogger(QueryMySql.class);
 16
 17     private int runQueryDelay, //两次查询的时间间隔
 18             startFrom,            //开始id
 19             currentIndex,         //当前id
 20             recordSixe = 0,      //每次查询返回结果的条数
 21             maxRow;                //每次查询的最大条数
 22
 23
 24     private String table,       //要操作的表
 25             columnsToSelect,     //用户传入的查询的列
 26             customQuery,          //用户传入的查询语句
 27             query,                 //构建的查询语句
 28             defaultCharsetResultSet;//编码集
 29
 30     //上下文,用来获取配置文件
 31     private Context context;
 32
 33     //为定义的变量赋值(默认值),可在flume任务的配置文件中修改
 34     private static final int DEFAULT_QUERY_DELAY = 10000;
 35     private static final int DEFAULT_START_VALUE = 0;
 36     private static final int DEFAULT_MAX_ROWS = 2000;
 37     private static final String DEFAULT_COLUMNS_SELECT = "*";
 38     private static final String DEFAULT_CHARSET_RESULTSET = "UTF-8";
 39
 40     private static Connection conn = null;
 41     private static PreparedStatement ps = null;
 42     private static String connectionURL, connectionUserName, connectionPassword;
 43
 44     //加载静态资源
 45     static {
 46         Properties p = new Properties();
 47         try {
 48             p.load(QueryMySql.class.getClassLoader().getResourceAsStream("jdbc.properties"));
 49             connectionURL = p.getProperty("dbUrl");
 50             connectionUserName = p.getProperty("dbUser");
 51             connectionPassword = p.getProperty("dbPassword");
 52             Class.forName(p.getProperty("dbDriver"));
 53         } catch (Exception e) {
 54             LOG.error(e.toString());
 55         }
 56     }
 57
 58     //获取JDBC连接
 59     private static Connection InitConnection(String url, String user, String pw) {
 60         try {
 61             Connection conn = DriverManager.getConnection(url, user, pw);
 62             if (conn == null)
 63                 throw new SQLException();
 64             return conn;
 65         } catch (SQLException e) {
 66             e.printStackTrace();
 67         }
 68         return null;
 69     }
 70
 71     //构造方法
 72     QueryMySql(Context context) throws ParseException {
 73         //初始化上下文
 74         this.context = context;
 75
 76         //有默认值参数:获取flume任务配置文件中的参数,读不到的采用默认值
 77         this.columnsToSelect = context.getString("columns.to.select", DEFAULT_COLUMNS_SELECT);
 78         this.runQueryDelay = context.getInteger("run.query.delay", DEFAULT_QUERY_DELAY);
 79         this.startFrom = context.getInteger("start.from", DEFAULT_START_VALUE);
 80         this.defaultCharsetResultSet = context.getString("default.charset.resultset", DEFAULT_CHARSET_RESULTSET);
 81
 82         //无默认值参数:获取flume任务配置文件中的参数
 83         this.table = context.getString("table");
 84         this.customQuery = context.getString("custom.query");
 85         connectionURL = context.getString("connection.url");
 86         connectionUserName = context.getString("connection.user");
 87         connectionPassword = context.getString("connection.password");
 88         conn = InitConnection(connectionURL, connectionUserName, connectionPassword);
 89
 90         //校验相应的配置信息,如果没有默认值的参数也没赋值,抛出异常
 91         checkMandatoryProperties();
 92         //获取当前的id
 93         currentIndex = getStatusDBIndex(startFrom);
 94         //构建查询语句
 95         query = buildQuery();
 96     }
 97
 98     //校验相应的配置信息(表,查询语句以及数据库连接的参数)
 99     private void checkMandatoryProperties() {
100         if (table == null) {
101             throw new ConfigurationException("property table not set");
102         }
103         if (connectionURL == null) {
104             throw new ConfigurationException("connection.url property not set");
105         }
106         if (connectionUserName == null) {
107             throw new ConfigurationException("connection.user property not set");
108         }
109         if (connectionPassword == null) {
110             throw new ConfigurationException("connection.password property not set");
111         }
112     }
113
114     //构建sql语句
115     private String buildQuery() {
116         String sql = "";
117         //获取当前id
118         currentIndex = getStatusDBIndex(startFrom);
119         LOG.info(currentIndex + "");
120         if (customQuery == null) {
121             sql = "SELECT " + columnsToSelect + " FROM " + table;
122         } else {
123             sql = customQuery;
124         }
125         StringBuilder execSql = new StringBuilder(sql);
126         //以id作为offset
127         if (!sql.contains("where")) {
128             execSql.append(" where ");
129             execSql.append("id").append(">").append(currentIndex);
130             return execSql.toString();
131         } else {
132             int length = execSql.toString().length();
133             return execSql.toString().substring(0, length - String.valueOf(currentIndex).length()) + currentIndex;
134         }
135     }
136
137     //执行查询
138     List<List<Object>> executeQuery() {
139         try {
140             //每次执行查询时都要重新生成sql,因为id不同
141             customQuery = buildQuery();
142             //存放结果的集合
143             List<List<Object>> results = new ArrayList<>();
144             if (ps == null) {
145                 //
146                 ps = conn.prepareStatement(customQuery);
147             }
148             ResultSet result = ps.executeQuery(customQuery);
149             while (result.next()) {
150                 //存放一条数据的集合(多个列)
151                 List<Object> row = new ArrayList<>();
152                 //将返回结果放入集合
153                 for (int i = 1; i <= result.getMetaData().getColumnCount(); i++) {
154                     row.add(result.getObject(i));
155                 }
156                 results.add(row);
157             }
158             LOG.info("execSql:" + customQuery + "
resultSize:" + results.size());
159             return results;
160         } catch (SQLException e) {
161             LOG.error(e.toString());
162             // 重新连接
163             conn = InitConnection(connectionURL, connectionUserName, connectionPassword);
164         }
165         return null;
166     }
167
168     //将结果集转化为字符串,每一条数据是一个list集合,将每一个小的list集合转化为字符串
169     List<String> getAllRows(List<List<Object>> queryResult) {
170         List<String> allRows = new ArrayList<>();
171         if (queryResult == null || queryResult.isEmpty())
172             return allRows;
173         StringBuilder row = new StringBuilder();
174         for (List<Object> rawRow : queryResult) {
175             Object value = null;
176             for (Object aRawRow : rawRow) {
177                 value = aRawRow;
178                 if (value == null) {
179                     row.append(",");
180                 } else {
181                     row.append(aRawRow.toString()).append(",");
182                 }
183             }
184             allRows.add(row.toString());
185             row = new StringBuilder();
186         }
187         return allRows;
188     }
189
190     //更新offset元数据状态,每次返回结果集后调用。必须记录每次查询的offset值,为程序中断续跑数据时使用,以id为offset
191     void updateOffset2DB(int size) {
192         //以source_tab做为KEY,如果不存在则插入,存在则更新(每个源表对应一条记录)
193         String sql = "insert into flume_meta(source_tab,currentIndex) VALUES('"
194                 + this.table
195                 + "','" + (recordSixe += size)
196                 + "') on DUPLICATE key update source_tab=values(source_tab),currentIndex=values(currentIndex)";
197         LOG.info("updateStatus Sql:" + sql);
198         execSql(sql);
199     }
200
201     //执行sql语句
202     private void execSql(String sql) {
203         try {
204             ps = conn.prepareStatement(sql);
205             LOG.info("exec::" + sql);
206             ps.execute();
207         } catch (SQLException e) {
208             e.printStackTrace();
209         }
210     }
211
212     //获取当前id的offset
213     private Integer getStatusDBIndex(int startFrom) {
214         //从flume_meta表中查询出当前的id是多少
215         String dbIndex = queryOne("select currentIndex from flume_meta where source_tab='" + table + "'");
216         if (dbIndex != null) {
217             return Integer.parseInt(dbIndex);
218         }
219         //如果没有数据,则说明是第一次查询或者数据表中还没有存入数据,返回最初传入的值
220         return startFrom;
221     }
222
223     //查询一条数据的执行语句(当前id)
224     private String queryOne(String sql) {
225         ResultSet result = null;
226         try {
227             ps = conn.prepareStatement(sql);
228             result = ps.executeQuery();
229             while (result.next()) {
230                 return result.getString(1);
231             }
232         } catch (SQLException e) {
233             e.printStackTrace();
234         }
235         return null;
236     }
237
238     //关闭相关资源
239     void close() {
240         try {
241             ps.close();
242             conn.close();
243         } catch (SQLException e) {
244             e.printStackTrace();
245         }
246     }
247
248     int getCurrentIndex() {
249         return currentIndex;
250     }
251
252     void setCurrentIndex(int newValue) {
253         currentIndex = newValue;
254     }
255
256     int getRunQueryDelay() {
257         return runQueryDelay;
258     }
259
260     String getQuery() {
261         return query;
262     }
263
264     String getConnectionURL() {
265         return connectionURL;
266     }
267
268     private boolean isCustomQuerySet() {
269         return (customQuery != null);
270     }
271
272     Context getContext() {
273         return context;
274     }
275
276     public String getConnectionUserName() {
277         return connectionUserName;
278     }
279
280     public String getConnectionPassword() {
281         return connectionPassword;
282     }
283
284     String getDefaultCharsetResultSet() {
285         return defaultCharsetResultSet;
286     }
287 }
4.定义MySqlSource主类
 1 package cn.itcast.flumesource;
 2
 3 import org.apache.flume.Context;
 4 import org.apache.flume.Event;
 5 import org.apache.flume.EventDeliveryException;
 6 import org.apache.flume.PollableSource;
 7 import org.apache.flume.conf.Configurable;
 8 import org.apache.flume.event.SimpleEvent;
 9 import org.apache.flume.source.AbstractSource;
10 import org.slf4j.Logger;
11
12 import java.util.ArrayList;
13 import java.util.HashMap;
14 import java.util.List;
15
16 import static org.slf4j.LoggerFactory.*;
17
18 public class MySqlSource extends AbstractSource implements Configurable, PollableSource {
19
20     //打印日志
21     private static final Logger LOG = getLogger(MySqlSource.class);
22     //定义sqlHelper
23     private QueryMySql sqlSourceHelper;
24
25
26     @Override
27     public long getBackOffSleepIncrement() {
28         return 0;
29     }
30
31     @Override
32     public long getMaxBackOffSleepInterval() {
33         return 0;
34     }
35
36     @Override
37     public void configure(Context context) {
38         //初始化
39         sqlSourceHelper = new QueryMySql(context);
40     }
41
42     @Override
43     public PollableSource.Status process() throws EventDeliveryException {
44         try {
45             //查询数据表
46             List<List<Object>> result = sqlSourceHelper.executeQuery();
47             //存放event的集合
48             List<Event> events = new ArrayList<>();
49             //存放event头集合
50             HashMap<String, String> header = new HashMap<>();
51             //如果有返回数据,则将数据封装为event
52             if (!result.isEmpty()) {
53                 List<String> allRows = sqlSourceHelper.getAllRows(result);
54                 Event event = null;
55                 for (String row : allRows) {
56                     event = new SimpleEvent();
57                     event.setBody(row.getBytes());
58                     event.setHeaders(header);
59                     events.add(event);
60                 }
61                 //将event写入channel
62                 this.getChannelProcessor().processEventBatch(events);
63                 //更新数据表中的offset信息
64                 sqlSourceHelper.updateOffset2DB(result.size());
65             }
66             //等待时长
67             Thread.sleep(sqlSourceHelper.getRunQueryDelay());
68             return Status.READY;
69         } catch (InterruptedException e) {
70             LOG.error("Error procesing row", e);
71             return Status.BACKOFF;
72         }
73     }
74
75     @Override
76     public synchronized void stop() {
77         LOG.info("Stopping sql source {} ...", getName());
78         try {
79             //关闭资源
80             sqlSourceHelper.close();
81         } finally {
82             super.stop();
83         }
84     }
85 }
5.功能测试
使用maven对工程进行打包,需要将mysql的依赖包一起打到jar包里,然后将打包好的jar包放到flume的lib目录下。
编辑flume的配置文件如下:
 1 a1.sources = r1
 2 a1.sinks = k1
 3 a1.channels = c1
 4
 5 # Describe/configure the source
 6 a1.sources.r1.type = cn.itcast.flumesource.MySqlSource
 7 a1.sources.r1.connection.url = jdbc:mysql://node-1:3306/mysqlsource
 8 a1.sources.r1.connection.user = root
 9 a1.sources.r1.connection.password = hadoop
10 a1.sources.r1.table = student
11 a1.sources.r1.columns.to.select = *
12 a1.sources.r1.incremental.column.name = id
13 a1.sources.r1.incremental.value = 0
14 a1.sources.r1.run.query.delay=3000
15
16 # Describe the sink
17 a1.sinks.k1.type = logger
18
19 # Describe the channel
20 a1.channels.c1.type = memory
21 a1.channels.c1.capacity = 1000
22 a1.channels.c1.transactionCapacity = 100
23
24 # Bind the source and sink to the channel
25 a1.sources.r1.channels = c1
26 a1.sinks.k1.channel = c1
启动flume并查看结果:
bin/flume-ng agent -c conf -f conf/mysqlsource.conf -n a1 -Dflume.root.logger=INFO,console
8.2 Flume自定义Sink
8.2.1. 自定义Sink说明
同自定义source类似,对于某些sink如果没有我们想要的,我们也可以自定义sink实现将数据保存到我们想要的地方去,例如kafka,或者mysql,或者文件等等都可以
需求:从网络端口当中发送数据,自定义sink,使用sink从网络端口接收数据,然后将数据保存到本地文件当中去。
8.2.2. 自定义Sink原理实现
 1 public class MySink extends AbstractSink implements Configurable {
 2     private Context context ;
 3     private String filePath = "";
 4     private String fileName = "";
 5     private File fileDir;
 6
 7     //这个方法会在初始化调用,主要用于初始化我们的Context,获取我们的一些配置参数
 8     @Override
 9     public void configure(Context context) {
10         try {
11             this.context = context;
12             filePath = context.getString("filePath");
13             fileName = context.getString("fileName");
14             fileDir = new File(filePath);
15             if(!fileDir.exists()){
16                 fileDir.mkdirs();
17             }
18         } catch (Exception e) {
19             e.printStackTrace();
20         }
21     }
22     //这个方法会被反复调用
23     @Override
24     public Status process() throws EventDeliveryException {
25         Event event = null;
26         Channel channel = this.getChannel();
27         Transaction transaction = channel.getTransaction();
28         transaction.begin();
29         while(true){
30             event = channel.take();
31             if(null != event){
32                 break;
33             }
34         }
35         byte[] body = event.getBody();
36         String line = new String(body);
37         try {
38             FileUtils.write(new File(filePath+File.separator+fileName),line,true);
39             transaction.commit();
40         } catch (IOException e) {
41             transaction.rollback();
42             e.printStackTrace();
43             return Status.BACKOFF;
44         }finally {
45             transaction.close();
46         }
47         return Status.READY;
48     }
49 }
8.2.3 功能测试
将代码使用打包插件,打成jar包,注意一定要将commons-langs这个依赖包打进去,放到flume的lib目录下
开发flume的配置文件:
 1 a1.sources = r1
 2 a1.sinks = k1
 3 a1.channels = c1
 4 # Describe/configure the source
 5 a1.sources.r1.type = netcat
 6 a1.sources.r1.bind = node-1
 7 a1.sources.r1.port = 5678
 8 a1.sources.r1.channels = c1
 9 # Describe the sink
10 a1.sinks.k1.type = cn.itcast.flumesink.MySink
11 a1.sinks.k1.filePath=/export/servers
12 a1.sinks.k1.fileName=filesink.txt
13 # Use a channel which buffers events in memory
14 a1.channels.c1.type = memory
15 a1.channels.c1.capacity = 1000
16 a1.channels.c1.transactionCapacity = 100
17 # Bind the source and sink to the channel
18 a1.sources.r1.channels = c1
19 a1.sinks.k1.channel = c1
启动flume,并且使用telnet测试:
bin/flume-ng agent -c conf -f conf/filesink.conf -n a1 -Dflume.root.logger=INFO,console
Telnet node-1 5678 连接到机器端口上输入数据。
岁月静好,负重前行。莫叫人间忽晚,山河已秋