最近项目中需要用到junit单元测试,就在慕课网进行了学习,老师讲的很清晰,适合入门。
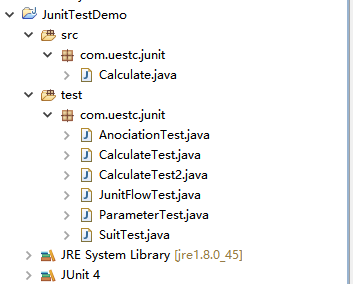
1.代码结构
2.JUnit简单测试
1.被测试类
public class Calculate {
    public int add(int a, int b) {
        return a + b;
    }

    public int subtract(int a, int b) {
        return a - b;
    }

    public int multiply(int a, int b) {
        return a * b;
    }

    public int divide(int a, int b) {
        return a / b;
    }
}
测试类与测试方法
import static org.junit.Assert.*;

import org.junit.Test;

public class CalculateTest2 {
    /*
     * 1.测试方法上必须使用@Test进行修饰
     * 2.测试方法必须使用public void 进行修饰,并且不带参数
     * 3.新建一个源代码目录存放测试代码,命名为test
     * 4.测试类的包应和被测试类的包保持一致
     * 5.测试单元中的每个方法必须可以独立测试,测试方法间不能有任何的依赖
     * 6.测试类建议使用Test作为类名的后缀,测试方法建议使用test作为方法名的前缀。
     */
    /*
     * 1.Failures一般由测试使用的断言方法判断失败引起的,表示测试点发现了问题,程序输出的结果与我们预期不一样。
     * 2.Error是由代码异常引起的,它可以产生于测试代码本身的错误,也可以是被测试代码中的一个隐藏bug。
     * 3.测试用例不是证明你是对的,而是用来证明你没有错,对程序员的逻辑错误无能为力。
     */
    @Test
    public void testAdd() {
        assertEquals(5, new Calculate().add(2, 3));
    }

    @Test
    public void testSubtract() {
        assertEquals(3, new Calculate().subtract(7, 4));
    }

    @Test
    public void testMultiply() {
        assertEquals(8, new Calculate().multiply(2, 4));
    }

    @Test
    public void testDivide() {
        assertEquals(9, new Calculate().divide(18, 2));
    }

}
3.JUnit常用注解
import static org.junit.Assert.*;

import org.junit.Ignore;
import org.junit.Test;

public class AnociationTest {
    /*
     * @Test:将一个普通方法修饰为一个测试方法
     *     @Test(expected=XX.class)
     *     @Test(timeout=XXms) 超过时间即停止运行,并表明测试不成功。
     * @BeforeClass:它会在所有的方法运行前被执行,static修饰
     * @AfterClass:它会在所有的方法运行后被执行,static修饰
     * @Before:它会在每个测试方法运行前被执行一次
     * @After:它会在每个测试方法运行后被执行一次
     * @Ignore:它修饰的测试方法会被测试运行器忽略,不被执行。
     * @RunWith:可以更改测试运行器,定制个人运行器,继承org.junit.Runner
     */

    @Test(expected=ArithmeticException.class)
    public void testDivide(){
        assertEquals(2, new Calculate().divide(3, 0));
    }

    @Ignore
    @Test(timeout=2000)
    public void testWhile() {
        while(true){
            System.out.println("run forever...");
        }
    }

    @Test(timeout = 3000)
    public void testReadFile(){
        try {
            Thread.sleep(2000);
        } catch (InterruptedException e) {
            e.printStackTrace();
        }
    }

}
4.JUnit运行流程
import org.junit.After;
import org.junit.AfterClass;
import org.junit.Before;
import org.junit.BeforeClass;
import org.junit.Test;

public class JunitFlowTest {

    /*
     * 1.@BeforeClass修饰的方法会在所有方法被调用前被执行,该方法是静态的,所以当测试类被加载后接着就会运行它,
     *   而且该方法在内存中只会存在一份实例,它适合加载配置文件。
     * 2.@AfterClass修饰的方法通常用于对资源的清理,如关闭数据库的连接。
     * 3.@Before和@After会在每个测试方法的前后各执行一次。
     */

    @BeforeClass
    public static void setUpBeforeClass() throws Exception {
        System.out.println("this is beforeClasss...");
    }

    @AfterClass
    public static void tearDownAfterClass() throws Exception {
        System.out.println("this is afterClass...");
    }

    @Before
    public void setUp() throws Exception {
        System.out.println("this is before...");
    }

    @After
    public void tearDown() throws Exception {
        System.out.println("this is after...");
    }

    @Test
    public void test1() {
        System.out.println("this is test1...");
    }
    @Test
    public void test2() {
        System.out.println("this is test2...");
    }

}
5.JUnit测试套件
import org.junit.runner.RunWith;
import org.junit.runners.Suite;

@RunWith(Suite.class)
@Suite.SuiteClasses({CalculateTest.class, CalculateTest2.class, JunitFlowTest.class})
public class SuitTest {
    /*
     * 1.测试套件批量运行测试类
     * 2.写一个作为测试套件的入口类,该类为空类,更改测试运行器Suite.class
     * 3.将多个测试类作为数组传到Suite.SuiteClasses({})中
     */
}
6.JUnit参数化设置
import static org.junit.Assert.*;

import java.util.Arrays;
import java.util.Collection;

import org.junit.Test;
import org.junit.runner.RunWith;
import org.junit.runners.Parameterized;
import org.junit.runners.Parameterized.Parameters;

@RunWith(Parameterized.class)
public class ParameterTest {
    /*
     * 1.junit的参数化设置,多组数据同时测试,提高代码可重用度
     * 2.更改默认的测试运行器为@RunWith(Parameterized.class)
     * 3.声明变量存放预期值和返回值
     * 4.声明一个返回值为Collection的公共静态方法,并使用@Parameters进行修饰
     * 5.为测试类声明一个含参的公共函数,最后书写测试方法。
     */
    int expected = 0;
    int input1 = 0;
    int input2 = 0;

    @Parameters
    public static Collection<Object[]> t() {
        return Arrays.asList(new Object[][] {
            {3,1,2},
            {4,2,2}
        });
    }
    public ParameterTest(int expected, int input1,int input2) {
        this.expected = expected;
        this.input1 = input1;
        this.input2 = input2;
    }
    @Test
    public void testAdd() {
        assertEquals(expected, new Calculate().add(input1, input2));
    }
}
由于是入门,直接看代码和其中的注解就能明白用法,主要还要在项目中进行提高。