## 场景
由于小程序上线的需要,后台服务需要多版本并存。这里我们通过使用自定义的HTTP Header头来实现。
nginx接收到的头部为:
miniversion: 1.0
接收到此请求将会跳转到新的url中。
核心:客户端自定义的http header,在nginx的配置文件里能直接读取到。
条件:header必须用减号“-”分隔单词,nginx里面会转换为对应的下划线“_”连接的小写单词。
这里面不建议使用“_”,会被nginx忽略掉。
所以我们为了省事,使用的是小写字母全拼。可以使用"-" 会被转化成“_”。多一事不如少一事,所以还是使用小写字母。
## 修改nginx配置
主要的配置文件如下:
       server
        {
        listen       80;
        server_name  camp.h5.cc camp.cc camp.boss.cc;
        index index.jsp index.htm index.html index.do login.vm;
        charset utf-8;
        underscores_in_headers on;
        location ~ / {
                if ($http_miniversion = "1.0") {
                        proxy_pass http://Tall;

}


                        proxy_set_header  Host $host;
                        proxy_set_header  X-Real-IP  $remote_addr;
                        proxy_set_header X-Forwarded-For $proxy_add_x_forwarded_for;
                        proxy_pass http://127.0.0.1:8080;
                }
        access_log  /data/logs/cc_com_access wwwlog;
        error_log   /data/logs/cc_com_error ;
        }
这里的自定义header前,需要加上http_下才能识别整个变量。
这里的Tall是我们的新版本,127.0.0.1,是我配置的一个配合测试的站点。
此站点的nginx配置文件如下:
cat mytest.com
server {
    listen 8080;
    server_name localhost;

    root /var/www/html;
    index wx.html;

    location / {
        try_files $uri $uri/ =404;
    }
}
underscores_in_headers on:
nginx是支持读取非nginx标准的用户自定义header的,但是需要在http或者server下开启header的下划线支持:
比如我们自定义header为wx_unionid,获取该header时需要这样:$http_wx_unionid(一律采用小写,而且前面多了个http_)
这里必须强调的一点是我们必须配置:
proxy_set_header  Host $host;
proxy_set_header  X-Real-IP  $remote_addr;
proxy_set_header X-Forwarded-For $proxy_add_x_forwarded_for;
否则会导致自定义header头无效。
## 测试
echo "<h1>微信小程序测试平台</h1>" > /var/www/html/wx.html
这里如果我们直接使用浏览器,进行访问,不传递.http header;结果如下:

这里我们使用postman进行参数传递的测试:
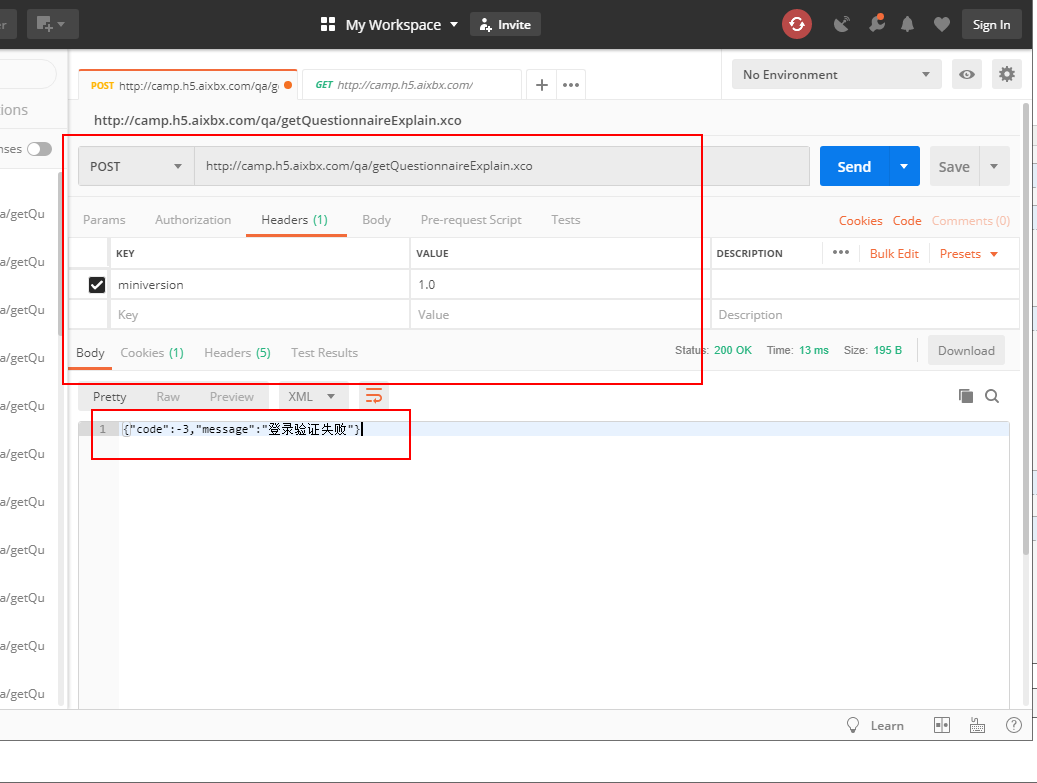
可以看到,访问到的是服务器的正常页面。
## 附录
nginx的主配置文件,仅供参考。
user www www;
worker_processes 8;
error_log  /usr/local/nginx/logs/nginx_error.log  crit;
pid        /usr/local/nginx/nginx.pid;

#google_perftools_profiles /var/tmp/tcmalloc;

worker_rlimit_nofile 65535;

events
{
         use epoll;
         worker_connections 65535;
}

http
{
        include                                 mime.types;
        default_type                            application/octet-stream;
        charset                                 utf-8;
    server_tokens                off;
        server_names_hash_bucket_size           128;
        client_header_buffer_size               4k;
        large_client_header_buffers             4 4k;
        #client_max_body_size                    200m;
        client_max_body_size                    1024m;
        sendfile                                on;
        tcp_nopush                              on;
        tcp_nodelay                             on;
        keepalive_timeout                       60;
        open_file_cache                         max=204800 inactive=20s;
        open_file_cache_min_uses                1;
        open_file_cache_valid                   30s;
        #proxy_connect_timeout                   300;
        #proxy_send_timeout                      300;
        #proxy_read_timeout                      300;
    proxy_connect_timeout                   600;
    proxy_send_timeout                      600;
    proxy_read_timeout                      600;

        proxy_buffer_size                       16k;
        proxy_buffers                           4 64k;
        proxy_busy_buffers_size                 128k;
        proxy_temp_file_write_size              128k;
        gzip                                    on;
        gzip_min_length                         1k;
        gzip_buffers                            4 16k;
        gzip_http_version                       1.1;
        gzip_comp_level                         2;
        gzip_types                              text/plain application/x-javascript text/css application/xml;
        gzip_vary                               on;
        # fastcgi_connect_timeout                 300;
        # fastcgi_send_timeout                    300;
        # fastcgi_read_timeout                    300;
    fastcgi_connect_timeout                 600;
    fastcgi_send_timeout                    600;
    fastcgi_read_timeout                    600;

        fastcgi_buffer_size                     4k;
        fastcgi_buffers 8                       4k;
        fastcgi_busy_buffers_size               8k;
        fastcgi_temp_file_write_size            8k;
        fastcgi_cache_valid                     200 302 1h;
        fastcgi_cache_valid                     301 1d;
        fastcgi_cache_valid                     any 1m;
        fastcgi_cache_min_uses                  1;
        fastcgi_cache_use_stale                 error timeout invalid_header http_500;
        fastcgi_param                           SERVER_NAME     $host;
        server_name_in_redirect                 off;
        #add_header                              "X-UA-Compatible" "IE=EmulateIE8";
        upstream Tall {
        server   192.168.150.13:9010;
                }
        log_format  wwwlog  '$remote_addr - $remote_user [$time_local] "$request" '
        log_format  wwwlog  '$remote_addr - $remote_user [$time_local] "$request" '
        '$status $body_bytes_sent "$http_referer" '
        '"$http_user_agent" $http_x_forwarded_for';
include   vhosts/Tall/*;
include   vhosts/Ts/*;
include   vhosts/Tip/*;
}
参考链接:
http://www.ttlsa.com/nginx/nginx-proxy_set_header/
https://www.cnblogs.com/xiao987334176/p/11263649.html
最后付HTTPS完整配置文件,因为小程序需使用HTTPS
        server
        {
        listen       80;
        server_name  camp.h5.aixbx.com camp.aixbx.service camp.boss.aixbx.com;
        index index.jsp index.htm index.html index.do login.vm;
        charset utf-8;
        underscores_in_headers on;
        location ~ / {
        return 301 https://camp.h5.aixbx.com$request_uri;

}
        }
        server
        {
        listen       443 ssl;
        server_name  camp.h5.aixbx.com;
        index index.jsp index.htm index.html index.do login.vm;
        charset utf-8;
        underscores_in_headers on;
        ssl_certificate         /etc/pki/ssl/camp.h5.aixbx.com_nginx/camp.h5.aixbx.com.pem;
        ssl_certificate_key     /etc/pki/ssl/camp.h5.aixbx.com_nginx/camp.h5.aixbx.com.key;
        location ~ / {
                if ($http_miniversion = "1.0") {
                        proxy_pass http://Tall;

}


                        proxy_set_header  Host $host;
                        proxy_set_header  X-Real-IP  $remote_addr;
                        proxy_set_header X-Real-PORT $remote_port;
                        proxy_set_header X-Forwarded-For $proxy_add_x_forwarded_for;
                        proxy_pass http://127.0.0.1:8080;
                }
        access_log  /data/logs/aixbx_com_access wwwlog;
        error_log   /data/logs/aixbx_com_error ;
        }
最后还赠送centos 6下的nginx启动脚本,根据yum安装之后生成的启动脚本进行修改的。不知道为啥还用6,咱也不敢问。
#!/bin/sh
#
# nginx - this script starts and stops the nginx daemon
#
# chkconfig:   - 85 15
# description:  Nginx is an HTTP(S) server, HTTP(S) reverse
#               proxy and IMAP/POP3 proxy server
# processname: nginx
# config:      /etc/nginx/nginx.conf
# config:      /etc/sysconfig/nginx
# pidfile:     /var/run/nginx.pid

# Source function library.
. /etc/rc.d/init.d/functions

# Source networking configuration.
. /etc/sysconfig/network

# Check that networking is up.
[ "$NETWORKING" = "no" ] && exit 0

nginx="/usr/local/nginx/sbin/nginx"
prog=$(basename $nginx)

sysconfig="/etc/sysconfig/$prog"
lockfile="/var/lock/subsys/nginx"
pidfile="/usr/local/nginx/${prog}.pid"

NGINX_CONF_FILE="/usr/local/nginx/conf/nginx.conf"

[ -f $sysconfig ] && . $sysconfig


start() {
    [ -x $nginx ] || exit 5
    [ -f $NGINX_CONF_FILE ] || exit 6
    echo -n $"Starting $prog: "
    daemon $nginx -c $NGINX_CONF_FILE
    retval=$?
    echo
    [ $retval -eq 0 ] && touch $lockfile
    return $retval
}

stop() {
    echo -n $"Stopping $prog: "
    killproc -p $pidfile $prog
    retval=$?
    echo
    [ $retval -eq 0 ] && rm -f $lockfile
    return $retval
}

restart() {
    configtest_q || return 6
    stop
    start
}

reload() {
    configtest_q || return 6
    echo -n $"Reloading $prog: "
    killproc -p $pidfile $prog -HUP
    echo
}

configtest() {
    $nginx -t -c $NGINX_CONF_FILE
}

configtest_q() {
    $nginx -t -q -c $NGINX_CONF_FILE
}

rh_status() {
    status $prog
}

rh_status_q() {
    rh_status >/dev/null 2>&1
}

# Upgrade the binary with no downtime.
upgrade() {
    local oldbin_pidfile="${pidfile}.oldbin"

    configtest_q || return 6
    echo -n $"Upgrading $prog: "
    killproc -p $pidfile $prog -USR2
    retval=$?
    sleep 1
    if [[ -f ${oldbin_pidfile} && -f ${pidfile} ]];  then
        killproc -p $oldbin_pidfile $prog -QUIT
        success $"$prog online upgrade"
        echo
        return 0
    else
        failure $"$prog online upgrade"
        echo
        return 1
    fi
}

# Tell nginx to reopen logs
reopen_logs() {
    configtest_q || return 6
    echo -n $"Reopening $prog logs: "
    killproc -p $pidfile $prog -USR1
    retval=$?
    echo
    return $retval
}

case "$1" in
    start)
        rh_status_q && exit 0
        $1
        ;;
    stop)
        rh_status_q || exit 0
        $1
        ;;
    restart|configtest|reopen_logs)
        $1
        ;;
    force-reload|upgrade)
        rh_status_q || exit 7
        upgrade
        ;;
    reload)
        rh_status_q || exit 7
        $1
        ;;
    status|status_q)
        rh_$1
        ;;
    condrestart|try-restart)
        rh_status_q || exit 7
        restart
        ;;
    *)
        echo $"Usage: $0 {start|stop|reload|configtest|status|force-reload|upgrade|restart|reopen_logs}"
        exit 2
esac
## 通过get参数判断转发
nginx 获取请求头,URL参数
获取url参数
在 ngx_lua 中访问 Nginx 内置变量 ngx.var.arg_PARAMETER 即可获得GET参数PARAMETER的内容。
在 nginx配置中,通过$arg_PARAMETER 即可获得GET参数PARAMETER的内容。
获取请求头
在 ngx_lua 中访问 Nginx 内置变量 ngx.var.http_HEADER 即可获得请求头HEADER的内容。
在 nginx配置中,通过$http_HEADER 即可获得请求头HEADER的内容。
if ($arg_miniversion = "1.1"){
                      proxy_pass http://127.0.0.1:20032;
}
## Nginx返回大长度的JSON数据被截断
1. 添加nginx参数,增加缓存字符串大小,在http字段中
proxy_buffer_size                       512k;
proxy_buffers                           16 512k;
proxy_busy_buffers_size                 512k;
proxy_temp_file_write_size              512k;
2. 遇到全新问题,原因是大文件会先缓存到/proxy-temp文件夹下面,然后再返回
Permission denied while reading upstream
修改文件夹的权限为nginx的用户,根据你项目的实际情况来修改
chown -R www:www /usr/local/nginx/proxy-temp