NSTextView和Attribued String
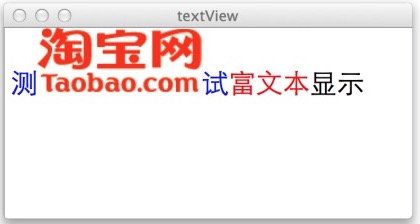
第一次接触苹果系的富文本编程是在写Mac平台上的一个输入框的时候,输入框中的文字可以设置各种样式,并可以在文字中间插入图片,好在Mac的AppKit中提供了NSTextView这个支持富文本编辑器控件。此控件背后是通过什么方式来描述富文本的呢?答案是NSAttributedString,很多编程语言都提供了AttributedString的概念。NSAttributedString比NSString多了一个Attribute的概念,一个NSAttributedString的对象包含很多的属性,每一个属性都有其对应的字符区域,在这里是使用NSRange来进行描述的。下面是一个NSTextView显示富文本的例子
NSMutableAttributedString *attributedString = [[[NSMutableAttributedString alloc] initWithString:@"测试富文本显示"] autorelease];
// 为所有文本设置字体
[attributedString addAttribute:NSFontAttributeName value:[NSFont systemFontOfSize:24] range:NSMakeRange(0, [attributedString length])];
// 将“测试”两字字体颜色设置为蓝色
[attributedString addAttribute:NSForegroundColorAttributeName value:[NSColor blueColor] range:NSMakeRange(0, 2)];
// 将“富文本”三个字字体颜色设置为红色
[attributedString addAttribute:NSForegroundColorAttributeName value:[NSColor redColor] range:NSMakeRange(2, 3)];

// 在“测”和“试”两字之间插入一张图片
NSString *imageName = @"taobao.png";
NSFileWrapper *imageFileWrapper = [[[NSFileWrapper alloc] initRegularFileWithContents:[[NSImage imageNamed:imageName] TIFFRepresentation]] autorelease];
imageFileWrapper.filename = imageName;
imageFileWrapper.preferredFilename = imageName;

NSTextAttachment *imageAttachment = [[[NSTextAttachment alloc] initWithFileWrapper:imageFileWrapper] autorelease];
NSAttributedString *imageAttributedString = [NSAttributedString attributedStringWithAttachment:imageAttachment];
[attributedString insertAttributedString:imageAttributedString atIndex:1];

/*
其实插入图片附件之后 attributedString的长度增加了1 变成了8,所以可以预见其实图片附件属性对应的内容应该是一个长度的字符
Printing description of attributedString:
测{
    NSColor = "NSCalibratedRGBColorSpace 0 0 1 1";
    NSFont = ""LucidaGrande 24.00 pt. P [] (0x10051bfd0) fobj=0x101e687f0, spc=7.59"";
}{
    NSAttachment = "<NSTextAttachment: 0x101e0c9c0> "taobao.png"";
}试{
    NSColor = "NSCalibratedRGBColorSpace 0 0 1 1";
    NSFont = ""LucidaGrande 24.00 pt. P [] (0x10051bfd0) fobj=0x101e687f0, spc=7.59"";
}富文本{
    NSColor = "NSCalibratedRGBColorSpace 1 0 0 1";
    NSFont = ""LucidaGrande 24.00 pt. P [] (0x10051bfd0) fobj=0x101e687f0, spc=7.59"";
}显示{
    NSFont = ""LucidaGrande 24.00 pt. P [] (0x10051bfd0) fobj=0x101e687f0, spc=7.59"";
}
*/


[_textView insertText:attributedString];
还有就是NSAttributedString提供对所有属性进行遍历的方法,也提供了计算在特定size下渲染实际所占的区域(boundingRectWithSize:options:) 这些这里就不介绍了。 从上面的代码可以看出其实Mac下的富文本的渲染并不是很复杂,只要将Attributed String理解和使用好,其余的事情都交给NSTextView来做了,你完全不用考虑其底层是如何取渲染的。但是在iOS平台上就没有这么幸运了,虽然iOS从3。2开始也提供了NSAttributedString,但是并没有类似NSTextView这样的控件直接来渲染Attributed String。 这个时候你就得使用Core Text了。
Core Text
下面讨论的Core Text相关编程都是特指在iOS平台下。 Core Text是和Core Graphics配合使用的,一般是在UIView的drawRect方法中的Graphics Context上进行绘制的。 且Core Text真正负责绘制的是文本部分,图片还是需要自己去手动绘制,所以你必须关注很多绘制的细节部分。
一.Core Text知识准备
在进入任何一个新的编程领域之前,我们肯定要先接触相关的领域模型的知识。比如你软件是进行科学计算的,那么你就必须理解大量的数学原理;如果你的软件是搞银行系统,那么你就得事先了解相关的银行的业务知识。这些都是不可避免的事情。通常情况下领域知识具有较高的通用性。但在特定的环境下,某些知识点也会被特殊处理。 Core Text是用来进行文字精细排版的,所以了解文字相关的知识也不可避免。
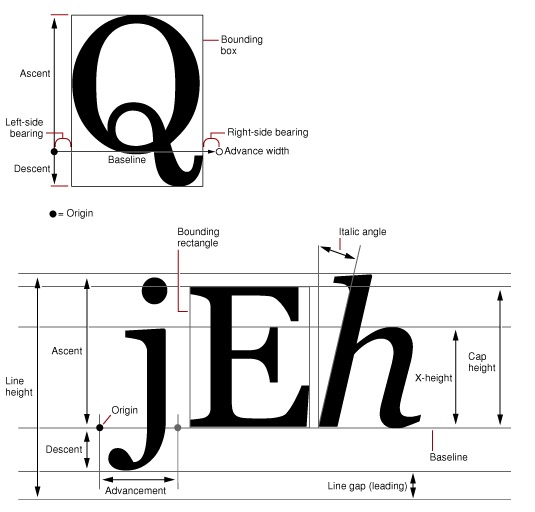
1.字符(Character)和字形(Glyphs)
排版系统中文本显示的一个重要的过程就是字符到字形的转换,字符是信息本身的元素,而字形是字符的图形表征,字符还会有其它表征比如发音。 字符在计算机中其实就是一个编码,某个字符集中的编码,比如Unicode字符集,就囊括了大都数存在的字符。 而字形则是图形,一般都存储在字体文件中,字形也有它的编码,也就是它在字体中的索引。 一个字符可以对应多个字形(不同的字体,或者同种字体的不同样式:粗体斜体等);多个字符也可能对应一个字形,比如字符的连写( Ligatures)。

- 下面就来详情看看字形的各个参数也就是所谓的字形度量Glyph Metrics
-
bounding box(边界框 bbox),这是一个假想的框子,它尽可能紧密的装入字形。
-
baseline(基线),一条假想的线,一行上的字形都以此线作为上下位置的参考,在这条线的左侧存在一个点叫做基线的原点,
-
ascent(上行高度)从原点到字体中最高(这里的高深都是以基线为参照线的)的字形的顶部的距离,ascent是一个正值
-
descent(下行高度)从原点到字体中最深的字形底部的距离,descent是一个负值(比如一个字体原点到最深的字形的底部的距离为2,那么descent就为-2)
-
linegap(行距),linegap也可以称作leading(其实准确点讲应该叫做External leading),行高lineHeight则可以通过 ascent + |descent| + linegap 来计算。
一些Metrics专业知识还可以参考Free Type的文档 Glyph metrics,其实iOS就是使用Free Type库来进行字体渲染的。 -
以上图片和部分概念来自苹果文档 Querying Font Metrics ,Text Layout
2.坐标系
首先不得不说 苹果编程中的坐标系花样百出,经常让开发者措手不及。 传统的Mac中的坐标系的原点在左下角,比如NSView默认的坐标系,原点就在左下角。但Mac中有些View为了其实现的便捷将原点变换到左上角,像NSTableView的坐标系坐标原点就在左上角。iOS UIKit的UIView的坐标系原点在左上角。
往底层看,Core Graphics的context使用的坐标系的原点是在左下角。而在iOS中的底层界面绘制就是通过Core Graphics进行的,那么坐标系列是如何变换的呢? 在UIView的drawRect方法中我们可以通过UIGraphicsGetCurrentContext()来获得当前的Graphics Context。drawRect方法在被调用前,这个Graphics Context被创建和配置好,你只管使用便是。如果你细心,通过CGContextGetCTM(CGContextRef c)可以看到其返回的值并不是CGAffineTransformIdentity,通过打印出来看到值为
Printing description of contextCTM:
(CGAffineTransform) contextCTM = {
        a = 1
        b = 0
        c = 0
        d = -1
        tx = 0
        ty = 460
}
-
这是非retina分辨率下的结果,如果是如果是retina上面的a,d,ty的值将会乘2,如果是iPhone 5,ty的值会再大些。 但是作用都是一样的就是将上下文空间坐标系进行了flip,使得原本左下角原点变到左上角,y轴正方向也变换成向下。
-
上面说了一大堆,下面进入正题,Core Text一开始便是定位于桌面的排版系统,使用了传统的原点在左下角的坐标系,所以它在绘制文本的时候都是参照左下角的原点进行绘制的。 但是iOS的UIView的drawRect方法的context被做了次flip,如果你啥也不做处理,直接在这个context上进行Core Text绘制,你会发现文字是镜像且上下颠倒。
- 所以在UIView的drawRect方法中的context上进行Core Text绘制之前需要对context进行一次Flip。
- 这里再提及一个函数CGContextSetTextMatrix,它可以用来为每一个显示的字形单独设置变形矩阵。
3.NSMutableAttributedString 和 CFMutableAttributedStringRef
Core Foundation和Foundation中的有些数据类型只需要简单的强制类型转换就可以互换使用,这类类型我们叫他们为Toll-Free Bridged Types。
CFMutableAttributedStringRef和NSMutableAttributedString就是其中的一对,Core Foundation的接口基本是C的接口,功能强大,但是使用起来没有Foundation中提供的Objc的接口简单好使,所以很多时候我们可以使用高层接口组织数据,然后将其传给低层函数接口使用。
二.Core Text对象模型
这节主要来看看Core Text绘制的一些细节问题了,首先是Core Text绘制的流程:
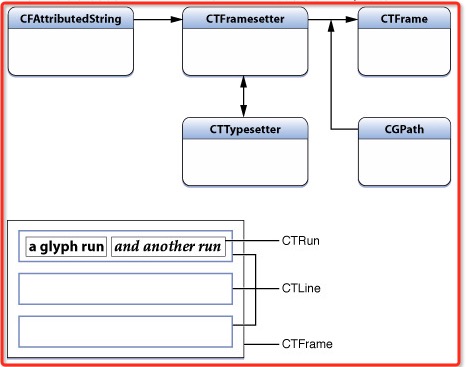
- framesetter framesetter对应的类型是 CTFramesetter,通过CFAttributedString进行初始化,它作为CTFrame对象的生产工厂,负责根据path生产对应的CTFrame
- CTFrame CTFrame是可以通过CTFrameDraw函数直接绘制到context上的,当然你可以在绘制之前,操作CTFrame中的CTLine,进行一些参数的微调
- CTLine 可以看做Core Text绘制中的一行的对象 通过它可以获得当前行的line ascent,line descent ,line leading,还可以获得Line下的所有Glyph Runs
- CTRun 或者叫做 Glyph Run,是一组共享想相同attributes(属性)的字形的集合体
上面说了这么多对也没一个东西和图片绘制有关系,其实吧,Core Text本身并不支持图片绘制,图片的绘制你还得通过Core Graphics来进行。只是Core Text可以通过CTRun的设置为你的图片在文本绘制的过程中留出适当的空间。这个设置就使用到CTRunDelegate了,看这个名字大概就可以知道什么意思了,CTRunDelegate作为CTRun相关属性或操作扩展的一个入口,使得我们可以对CTRun做一些自定义的行为。为图片留位置的方法就是加入一个空白的CTRun,自定义其ascent,descent,width等参数,使得绘制文本的时候留下空白位置给相应的图片。然后图片在相应的空白位置上使用Core Graphics接口进行绘制。
使用CTRunDelegateCreate可以创建一个CTRunDelegate,它接收两个参数,一个是callbacks结构体,一个是所有callback调用的时候需要传入的对象。 callbacks的结构体为CTRunDelegateCallbacks,主要是包含一些回调函数,比如有返回当前run的ascent,descent,width这些值的回调函数,至于函数中如何鉴别当前是哪个run,可以在CTRunDelegateCreate的第二个参数来达到目的,因为CTRunDelegateCreate的第二个参数会作为每一个回调调用时的入参。
三.Core Text实战
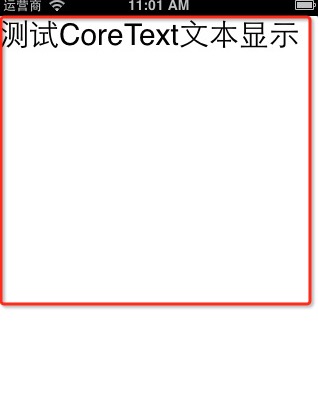
这里使用Core Text实现一个和之前NSTextView显示类似的图文混排的例子。
void RunDelegateDeallocCallback( void* refCon ){
}
CGFloat RunDelegateGetAscentCallback( void *refCon ){
NSString *imageName = (NSString *)refCon;
return [UIImage imageNamed:imageName].size.height;
}
CGFloat RunDelegateGetDescentCallback(void *refCon){
return 0;
}
CGFloat RunDelegateGetWidthCallback(void *refCon){
NSString *imageName = (NSString *)refCon;
return [UIImage imageNamed:imageName].size.width;
}
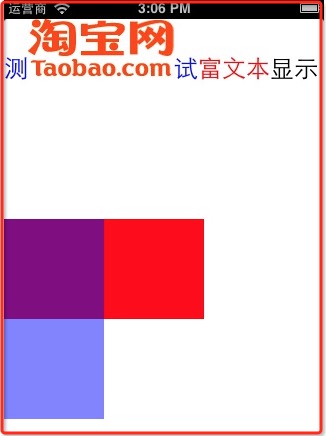
- (void)drawRect:(CGRect)rect
{
CGContextRef context = UIGraphicsGetCurrentContext();
//这四行代码只是简单测试drawRect中context的坐标系
CGContextSetRGBFillColor (context, 1, 0, 0, 1);
CGContextFillRect (context, CGRectMake (0, 200, 200, 100 ));
CGContextSetRGBFillColor (context, 0, 0, 1, .5);
CGContextFillRect (context, CGRectMake (0, 200, 100, 200));
CGContextSetTextMatrix(context, CGAffineTransformIdentity);//设置字形变换矩阵为CGAffineTransformIdentity,也就是说每一个字形都不做图形变换
CGAffineTransform flipVertical = CGAffineTransformMake(1,0,0,-1,0,self.bounds.size.height);
CGContextConcatCTM(context, flipVertical);//将当前context的坐标系进行flip
NSMutableAttributedString *attributedString = [[[NSMutableAttributedString alloc] initWithString:@"测试富文本显示"] autorelease];
//为所有文本设置字体
//[attributedString addAttribute:NSFontAttributeName value:[UIFont systemFontOfSize:24] range:NSMakeRange(0, [attributedString length])]; // 6.0+
UIFont *font = [UIFont systemFontOfSize:24];
CTFontRef fontRef = CTFontCreateWithName((CFStringRef)font.fontName, font.pointSize, NULL);
[attributedString addAttribute:(NSString *)kCTFontAttributeName value:(id)fontRef range:NSMakeRange(0, [attributedString length])];
//将“测试”两字字体颜色设置为蓝色
//[attributedString addAttribute:NSForegroundColorAttributeName value:[UIColor blueColor] range:NSMakeRange(0, 2)]; //6.0+
[attributedString addAttribute:(NSString *)kCTForegroundColorAttributeName value:(id)[UIColor blueColor].CGColor range:NSMakeRange(0, 2)];
//将“富文本”三个字字体颜色设置为红色
//[attributedString addAttribute:NSForegroundColorAttributeName value:[UIColor redColor] range:NSMakeRange(2, 3)]; //6.0+
[attributedString addAttribute:(NSString *)kCTForegroundColorAttributeName value:(id)[UIColor redColor].CGColor range:NSMakeRange(2, 3)];
//为图片设置CTRunDelegate,delegate决定留给图片的空间大小
NSString *taobaoImageName = @"taobao.png";
CTRunDelegateCallbacks imageCallbacks;
imageCallbacks.version = kCTRunDelegateVersion1;
imageCallbacks.dealloc = RunDelegateDeallocCallback;
imageCallbacks.getAscent = RunDelegateGetAscentCallback;
imageCallbacks.getDescent = RunDelegateGetDescentCallback;
imageCallbacks.getWidth = RunDelegateGetWidthCallback;
CTRunDelegateRef runDelegate = CTRunDelegateCreate(&imageCallbacks, taobaoImageName);
NSMutableAttributedString *imageAttributedString = [[NSMutableAttributedString alloc] initWithString:@" "];//空格用于给图片留位置
[imageAttributedString addAttribute:(NSString *)kCTRunDelegateAttributeName value:(id)runDelegate range:NSMakeRange(0, 1)];
CFRelease(runDelegate);
[imageAttributedString addAttribute:@"imageName" value:taobaoImageName range:NSMakeRange(0, 1)];
[attributedString insertAttributedString:imageAttributedString atIndex:1];
CTFramesetterRef ctFramesetter = CTFramesetterCreateWithAttributedString((CFMutableAttributedStringRef)attributedString);
CGMutablePathRef path = CGPathCreateMutable();
CGRect bounds = CGRectMake(0.0, 0.0, self.bounds.size.width, self.bounds.size.height);
CGPathAddRect(path, NULL, bounds);
CTFrameRef ctFrame = CTFramesetterCreateFrame(ctFramesetter,CFRangeMake(0, 0), path, NULL);
CTFrameDraw(ctFrame, context);
CFArrayRef lines = CTFrameGetLines(ctFrame);
CGPoint lineOrigins[CFArrayGetCount(lines)];
CTFrameGetLineOrigins(ctFrame, CFRangeMake(0, 0), lineOrigins);
for (int i = 0; i < CFArrayGetCount(lines); i++) {
CTLineRef line = CFArrayGetValueAtIndex(lines, i);
CGFloat lineAscent;
CGFloat lineDescent;
CGFloat lineLeading;
CTLineGetTypographicBounds(line, &lineAscent, &lineDescent, &lineLeading);
CFArrayRef runs = CTLineGetGlyphRuns(line);
for (int j = 0; j < CFArrayGetCount(runs); j++) {
CGFloat runAscent;
CGFloat runDescent;
CGPoint lineOrigin = lineOrigins[i];
CTRunRef run = CFArrayGetValueAtIndex(runs, j);
NSDictionary* attributes = (NSDictionary*)CTRunGetAttributes(run);
CGRect runRect;
runRect.size.width = CTRunGetTypographicBounds(run, CFRangeMake(0,0), &runAscent, &runDescent, NULL);
runRect=CGRectMake(lineOrigin.x + CTLineGetOffsetForStringIndex(line, CTRunGetStringRange(run).location, NULL), lineOrigin.y - runDescent, runRect.size.width, runAscent + runDescent);
NSString *imageName = [attributes objectForKey:@"imageName"];
//图片渲染逻辑
if (imageName) {
UIImage *image = [UIImage imageNamed:imageName];
if (image) {
CGRect imageDrawRect;
imageDrawRect.size = image.size;
imageDrawRect.origin.x = runRect.origin.x + lineOrigin.x;
imageDrawRect.origin.y = lineOrigin.y;
CGContextDrawImage(context, imageDrawRect, image.CGImage);
}
}
}
}
CFRelease(ctFrame);
CFRelease(path);
CFRelease(ctFramesetter);
}