场景:户扫描微信公众号的二维码,关注后自动登录网站,若已关注则直接登录。
逻辑:
- 系统生成带参数的临时二维码:参数 scene_str 自定义为唯一值(可以是uuid),临时二维码的生成方式参照官方接口的开发文档
- 用户使用微信扫描该二维码,关注后微信服务器会将关注事件的响应数据返回给我们的应用服务器:微信通过我们在公众号配置的“服务器地址(URL)”,将响应数据返回给我们的应用服务器,响应数据包括 参数 scene_str 和 openid
- 应用服务器将接收到的openid再次向微信服务器发起请求,获取该用户的信息(昵称、头像、地域、unionid(若绑定了微信开放平台,则有此参数))
- 将返回的信息存储到数据库,用于登录:特别是 scene_str 也要记录,因为需要根据这个唯一值来判断当前是谁在扫描关注并登录
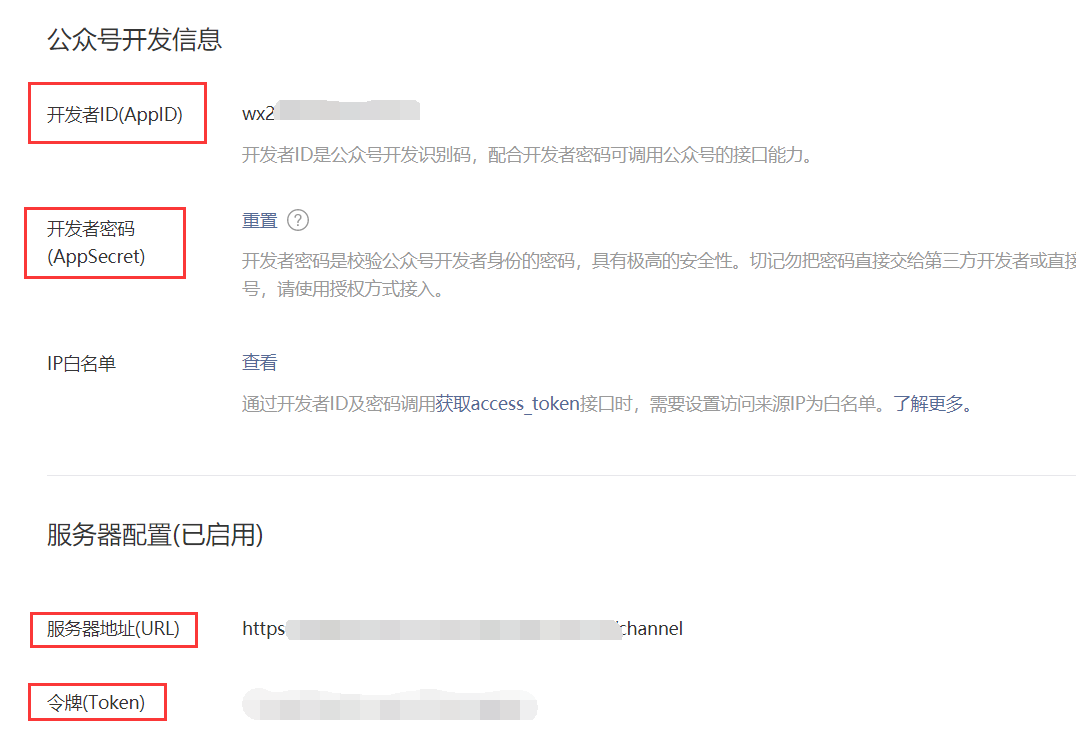
准备工作:登录微信公众号平台,在基本配置下获取 AppID,AppSecret,“服务器地址(URL)”即“回调函数”,令牌Token。如下图:
本人用的开发框架是 springboot,代码如下:
- 后台代码:
- HttpClientKit.java:封装https请求,调用微信接口
 View Code
package com.ht.website.utils;

import java.io.BufferedReader;
import java.io.InputStream;
import java.io.InputStreamReader;
import java.io.OutputStream;
import java.net.URL;
import java.security.cert.CertificateException;
import java.security.cert.X509Certificate;

import javax.net.ssl.HttpsURLConnection;
import javax.net.ssl.SSLContext;
import javax.net.ssl.SSLSocketFactory;
import javax.net.ssl.TrustManager;
import javax.net.ssl.X509TrustManager;

import com.alibaba.fastjson.JSONObject;

public class HttpClientKit {

    /**
     * https请求信任管理器
     * @author Timely-03
     */
    private static class TrustAnyTrustManager implements X509TrustManager {

        public X509Certificate[] getAcceptedIssuers() {
            return null;
        }

        public void checkClientTrusted(X509Certificate[] chain, String authType) throws CertificateException {

        }

        public void checkServerTrusted(X509Certificate[] chain, String authType) throws CertificateException {

        }
    }

    /**
     * 发送https请求
     */
    private static JSONObject https(String requestUrl, String requestMethod, String submitData) {
        HttpsURLConnection httpsURLCon = null;

        try {
            // 设置https访问模式,采用SSL加密
            TrustManager[] tm = { new TrustAnyTrustManager() };

            // 创建SSLContext对象,并使用我们指定的信任管理器初始化
            SSLContext sslContext = SSLContext.getInstance("SSL", "SunJSSE");
            sslContext.init(null, tm, new java.security.SecureRandom());

            // 从sslContext获取SSLSocketFactory
            SSLSocketFactory ssf = sslContext.getSocketFactory();
            URL url = new URL(requestUrl);
            httpsURLCon = (HttpsURLConnection) url.openConnection();
            httpsURLCon.setSSLSocketFactory(ssf);
            httpsURLCon.setDoInput(true);
            httpsURLCon.setDoOutput(true);
            httpsURLCon.setUseCaches(false);
            httpsURLCon.setRequestMethod(requestMethod);// 设置请求方式get;post

            if ("GET".equalsIgnoreCase(requestMethod)) {
                httpsURLCon.connect();
            }

            // 当需要有数据提交给微信接口时
            if (submitData != null) {
                OutputStream outputStream = httpsURLCon.getOutputStream();
                outputStream.write(submitData.getBytes(WSConst.ENCODE_UTF_8));
                outputStream.close();
            }

            // 从输入流读取返回内容
            InputStream inputStream = httpsURLCon.getInputStream();
            InputStreamReader inputStreamReader = new InputStreamReader(inputStream, WSConst.ENCODE_UTF_8);
            BufferedReader bufferedReader = new BufferedReader(inputStreamReader);
            String str = null;
            StringBuffer buffer = new StringBuffer();
            while ((str = bufferedReader.readLine()) != null) {
                buffer.append(str);
            }

            // 释放资源
            bufferedReader.close();
            inputStreamReader.close();
            inputStream.close();
            inputStream = null;
            httpsURLCon.disconnect();

            return JSONObject.parseObject(buffer.toString());

        } catch (Exception e) {
            throw new RuntimeException(e);
        } finally {
            if (httpsURLCon != null) {
                httpsURLCon.disconnect();
            }
        }
    }

    /**
     * 发送https请求,请求方法:POST
     * @param requestUrl 请求地址,比如:https://api.weixin.qq.com/cgi-bin/template/api_set_industry?access_token=
     * @param submitData 提交参数
     * @return 返回请求结果字符串
     */
    public static JSONObject httpsPost(String requestUrl, String submitData) {
        return https(requestUrl, "POST", submitData);
    }

    /**
     * 发送https请求,请求方法:GET
     * @param requestUrl 请求地址,比如:https://api.weixin.qq.com/cgi-bin/template/api_set_industry?access_token=
     * @param submitData 提交参数
     * @return 返回请求结果字符串
     */
    public static JSONObject httpsGet(String requestUrl, String submitData) {
        return https(requestUrl, "GET", submitData);
    }

}
- application.properties:配置微信appid,appSecret
View Codeserver.port=8088 ##############数据连接开始 #mysql spring.datasource.url=jdbc:mysql://10.10.10.10:3306/database_wc?useUnicode=true&characterEncoding=utf8 spring.datasource.driver-class-name=com.mysql.jdbc.Driver spring.datasource.username=root spring.datasource.password=123456 spring.datasource.dbcp2.validation-query=SELECT 1 spring.datasource.dbcp2.time-between-eviction-runs-millis=3600000 ##############数据库连接结束 ##############前端模板开始 spring.thymeleaf.suffix=.html spring.thymeleaf.cache=false spring.thymeleaf.prefix=/ ##############前端模板结束 ##############日志配置开始 logging.level.root=INFO logging.level.org.springframework.web=INFO ##############日志配置结束 ##############微信配置参数开始 proconfig.wechatAppId = wx21abcdbafe0aaac proconfig.wechatAppSecret = e472b01d2fdsadfsafdsafdsafad ##############微信配置参数结束
- WSConfig.java:获取配置文件配置信息
View Codepackage com.ht.website.utils; import org.springframework.boot.context.properties.ConfigurationProperties; /** * 配置文件类,获取对应配置文件中以 proconfig 开头的属性值 * @author Timely-03 */ @ConfigurationProperties(prefix = "proconfig") public class WSConfig { //微信AppId private String wechatAppId; //微信AppSecret private String wechatAppSecret; public String getWechatAppId() { return wechatAppId; } public void setWechatAppId(String wechatAppId) { this.wechatAppId = wechatAppId; } public String getWechatAppSecret() { return wechatAppSecret; } public void setWechatAppSecret(String wechatAppSecret) { this.wechatAppSecret = wechatAppSecret; } }
- WeChatAccessToken.java:定时获取微信access_token的类,这里用的Springboot的cache 和 定时器来管理access_token
View Codepackage com.ht.website.wechat; import org.slf4j.Logger; import org.slf4j.LoggerFactory; import org.springframework.beans.factory.annotation.Autowired; import org.springframework.cache.annotation.CachePut; import org.springframework.cache.annotation.Cacheable; import org.springframework.scheduling.annotation.Scheduled; import org.springframework.stereotype.Service; import com.alibaba.fastjson.JSONObject; import com.ht.website.utils.HttpClientKit; import com.ht.website.utils.WSConfig; /** * 微信 access_token 生成并缓存 * 1.调用微信接口,获取access_token * 2.存入缓存,缓存名称为“accesstoken” * 3.定时获取access_token,更新“accesstoken”缓存 * @author Timely-03 * */ @Service public class WeChatAccessToken { private static final Logger _log = LoggerFactory.getLogger(WeChatAccessToken.class); // 获取access_token url private static final String _URL_GET_ACCESS_TOKEN = "https://api.weixin.qq.com/cgi-bin/token?grant_type=client_credential&appid=APPID&secret=APPSECRET"; // 记录更新 private int _fixedRateCount = 0; // 属性配置 ProConfig @Autowired private WSConfig _wsConfig; /** * 缓存 token * @return token信息 */ @Cacheable(cacheNames= "accesstokencache") public String getAccessToken() { return getAccessTokenStr(); } /** * 更新缓存token,定时更新(100分钟更新一次) * @return token信息 */ @CachePut(cacheNames = "accesstokencache") @Scheduled(fixedRate = 100*60*1000) public String updateAccessToken() { return getAccessTokenStr(); } /** * 获取access_token字符串 * @return 获取{"access_token":"ACCESS_TOKEN","expires_in":7200}中的access_token */ private String getAccessTokenStr() { // 调用接口,获取access_token JSONObject accessTokenInfo = getAccessTokenInfo(); if (accessTokenInfo == null) { return null; } return accessTokenInfo.containsKey("access_token") ? accessTokenInfo.getString("access_token") : null; } /** * 调用微信接口,获取access_token * @return 正常情况下返回:{"access_token":"ACCESS_TOKEN","expires_in":7200}<br/>错误时返回错误码:{"errcode":40013,"errmsg":"invalid appid"} */ private JSONObject getAccessTokenInfo() { // 微信appId String appId = _wsConfig.getWechatAppId(); // 微信 appSecret String appSecret = _wsConfig.getWechatAppSecret(); if (appId.isEmpty() || appSecret.isEmpty()) { return null; } _fixedRateCount++; _log.info("fixedRateCount = " + _fixedRateCount); //调用微信接口url,返回access_token信息 JSONObject responseJson = HttpClientKit.httpsGet(_URL_GET_ACCESS_TOKEN.replace("APPID", appId).replace("APPSECRET", appSecret), null); if (responseJson.containsKey("access_token") == false) { _log.info("定时刷新access_token失败,微信返回的信息是" + responseJson.toJSONString()); } return responseJson; } }
- WeChatService.java:调用微信接口服务类
View Codepackage com.ht.website.wechat; import org.slf4j.Logger; import org.slf4j.LoggerFactory; import org.springframework.beans.factory.annotation.Autowired; import org.springframework.stereotype.Service; import com.alibaba.fastjson.JSONObject; import com.ht.website.utils.HttpClientKit; import com.ht.website.utils.WSConst; @Service public class WeChatService { private static final Logger _log = LoggerFactory.getLogger(WeChatService.class); // 生成带参数的二维码 public static final String _URL_CREATE_QRCODE = "https://api.weixin.qq.com/cgi-bin/qrcode/create?access_token="; // 获取带参数的二维码 public static final String _URL_GET_QRCODE = "https://mp.weixin.qq.com/cgi-bin/showqrcode?ticket="; // 获取关注用户信息 public static final String _URL_GET_USERINFO = "https://api.weixin.qq.com/cgi-bin/user/info?access_token="; // 二维码业务类型:【QRLOGIN:登录二维码】 public static final String _QR_TYPE_LOGIN = "WSLOGIN-"; public static final String _QR_TYPE_LOGIN_SUPPLIER = "WSLOGIN-SUPPLIER-"; public static final String _QR_TYPE_LOGIN_CUSTOMER = "WSLOGIN-CUSTOMER-"; @Autowired private WeChatAccessToken _wechatAccessToken; /** * 获取带参数的 临时二维码(登录用) * 如果返回access_token过期,则重新调用一次获取access_token的方法,再用新的access_token去生成二维码 * @return */ public JSONObject getQRCodeInfoLogin(String scene_str) { // 生成临时二维码 JSONObject qrcodeInfo = getQrCodeInfo(scene_str); // 生成二维码返回消息:如果access_token过期,则执行一次获取access_token,并且重新生成临时二维码 if (WSConst.WECHAT_ERROR_CODE_40001.equals(qrcodeInfo.getString("errcode"))) { _wechatAccessToken.updateAccessToken(); // 生成临时二维码 qrcodeInfo = getQrCodeInfo(scene_str); } return qrcodeInfo; } /** * 获取带参数的 临时二维码 * @return */ private JSONObject getQrCodeInfo(String scene_str) { _log.info("access_token = " + _wechatAccessToken.getAccessToken()); // access_token验证 String accessToken = _wechatAccessToken.getAccessToken(); // 请求参数: scene(场景字符串) JSONObject scene = new JSONObject(); scene.put("scene_str", scene_str); // 长度:8 + 36 = 44 // 请求参数:action_info JSONObject actioninfo = new JSONObject(); actioninfo.put("scene", scene); // 获取二维码提交的参数 JSONObject param = new JSONObject(); param.put("expire_seconds", 120); // 二维码过期时间:120秒 param.put("action_name", "QR_STR_SCENE"); // 字符串形式的二维码参数 param.put("action_info", actioninfo); return HttpClientKit.httpsPost(_URL_CREATE_QRCODE + accessToken, param.toJSONString()); } /** * 通过openid,获取关注用户信息 * @param openid * @return * @throws Exception */ public JSONObject getUserInfoByOpenId(String openid) throws Exception { return HttpClientKit.httpsGet(_URL_GET_USERINFO + _wechatAccessToken.getAccessToken(), null); } }
- WeChatController.java:生成临时二维码,将二维码的 URL 返回到前端;接收微信的关注事件;登录验证
View Codepackage com.ht.website.controller; import java.io.InputStream; import java.util.List; import java.util.UUID; import javax.servlet.http.HttpServletRequest; import org.dom4j.Element; import org.dom4j.io.SAXReader; import org.slf4j.Logger; import org.slf4j.LoggerFactory; import org.springframework.beans.factory.annotation.Autowired; import org.springframework.stereotype.Controller; import org.springframework.ui.Model; import org.springframework.util.StringUtils; import org.springframework.web.bind.annotation.RequestMapping; import org.springframework.web.bind.annotation.RequestMethod; import org.springframework.web.bind.annotation.ResponseBody; import com.alibaba.fastjson.JSONObject; import com.ht.website.entity.WeChatUser; import com.ht.website.service.WeChatUserService; import com.ht.website.wechat.WeChatService; /** * 微信相关控制器 * @author Timely-03 */ @Controller @RequestMapping(value="/wechat") public class WeChatController { private static final Logger _log = LoggerFactory.getLogger(WeChatController.class); //微信接口服务类 @Autowired private WeChatService _weChatService; //微信用户服务类 @Autowired private WeChatUserService _weChatUserService; /** * 跳到login页面,并生成登录二维码的URL */ @RequestMapping(value = "/login",method = RequestMethod.GET) public String login(Model model, String eventKey) { // 带参数二维码的 scene_str:QRLOGIN-{UUID},此字符串会当作关注事件的eventKey返回,写入到数据库表的eventKey中 String scene_str = WeChatService._QR_TYPE_LOGIN + UUID.randomUUID(); // 获取登录二维码 JSONObject qrcodeInfo = _weChatService.getQRCodeInfoLogin(scene_str); if (qrcodeInfo.containsKey("ticket")) { model.addAttribute("qrcodeurl", WeChatService._URL_GET_QRCODE + qrcodeInfo.getString("ticket")); } model.addAttribute("eventKey", scene_str); _log.info("获取登录二维码:" + qrcodeInfo.toJSONString()); return "login"; } /** * 回调函数,配置在微信公众号的服务器地址URL中,接收微信的推送事件 * @param httpServletRequest * @throws Exception */ @RequestMapping(value = "/channel") public void channel(HttpServletRequest httpServletRequest) throws Exception { JSONObject callBackInfo = xmlToJson(httpServletRequest); //获取回调信息 //下面是返回的xml //<xml><ToUserName><![CDATA[gh_f6b4da984c87]]></ToUserName> //微信公众号的微信号 //<FromUserName><![CDATA[oJxRO1Y2NgWJ9gMDyE3LwAYUNdAs]]></FromUserName> //openid用于获取用户信息,做登录使用 //<CreateTime>20190531</CreateTime> //回调时间 //<MsgType><![CDATA[event]]></MsgType> //<Event><![CDATA[SCAN]]></Event> //<EventKey><![CDATA[lrfun.com.UxJkWC1531967386903]]></EventKey> //上面自定义的参数(scene_str) //<Ticket><![CDATA[gQF57zwAAAAAAAAAAS5odHRwOi8vd2VpeGluLnFxLmNvbS9xLzAyY2ljbjB3RGtkZWwxbExLY3hyMVMAAgTvM0NbAwSAOgkA]]></Ticket> //换取二维码的ticket //</xml> if (callBackInfo != null && StringUtils.isEmpty(callBackInfo.getString("FromUserName")) == false) { // 通过openid获取用户信息 JSONObject wechatUserInfo = _weChatService.getUserInfoByOpenId(callBackInfo.getString("FromUserName")); // 将数据写入到数据库中,前面自定义的参数(scene_str)也需记录到数据库中,后面用于检测匹配登录 // INSERT INTO wechat_user_info......(数据库操作) } } /** * 是否登录验证,如果在表中找到了当前的eventKey,则表示是当前用户的关注登录动作: * 1. eventKey在用户关注后,微信将关注的事件,通过配置的“服务器地址URL”推送出来,返回到channel方法中 * 2. channel方法将eventKey写入到用户表中 * 3. 前端用定时器,以1秒的频率不停的调用checkLogin请求,通过eventKey到用户表中检测是否存在这个eventKey的数据 */ @RequestMapping(value = "/checkLogin") @ResponseBody public JSONObject checkLogin(String eventKey) { JSONObject retObj = new JSONObject(); _log.info("eventKey = " + eventKey); // 取用户信息 List<WeChatUser> wechatUserList = _weChatUserService.getUserByEventKey(eventKey); if (wechatUserList.size() > 0) { retObj.put("errCode", "0"); retObj.put("errMsg", "登录成功!"); retObj.put("eventKey", eventKey); } else { retObj.put("errCode", "-1"); retObj.put("errMsg", "登录失败"); } return retObj; } // xml转为map private JSONObject xmlToJson(HttpServletRequest httpServletRequest) { JSONObject info = new JSONObject(); try { InputStream inputStream = httpServletRequest.getInputStream(); SAXReader reader = new SAXReader(); // 读取输入流 org.dom4j.Document document = reader.read(inputStream); Element root = document.getRootElement(); // 得到xml根元素 List<Element> elementList = root.elements(); // 得到根元素的所有子节点 // 遍历所有子节点 for (Element e : elementList) { info.put(e.getName(), e.getText()); } // 释放资源 inputStream.close(); inputStream = null; return info; } catch (Exception e) { e.getMessage(); } return null; } }
- HttpClientKit.java:封装https请求,调用微信接口
- 前端代码:
- login.html:显示登录二维码,定时请求后台
View Code<!DOCTYPE html> <!-- saved from url=(0058)http://www.17sucai.com/preview/1/2017-11-05/nav/index.html --> <html lang="zh"> <head> <meta http-equiv="Content-Type" content="text/html; charset=UTF-8"> <meta http-equiv="X-UA-Compatible" content="IE=edge,chrome=1"> <meta name="viewport" content="width=device-width, initial-scale=1.0"> <title>扫描登录</title> </head> <body> <!-- 内容 --> <div id="content" class="bg-color-gray"> <div class="login-container"> <div class="row padding-20"> <div class="col-sm-12"> <div class="padding-20"> <span id="loginMsg" style="font-size: 25px;">扫描二维码注册/登录</span> </div> <img th:src="${qrcodeurl}" /> <input type="hidden" id="eventKey" name="eventKey" th:value="${eventKey}"> <div class="padding-20"> <i class="glyphicon glyphicon-qrcode"></i> 微信扫描二维码 </div> </div> </div> </div> </div> <script type="text/javascript"> var wechatCheckLoginFunTimer = null; $(document).ready(function () { wechatCheckLoginFunTimer = setInterval("wechatCheckLogin()", 1000); }); function wechatCheckLogin(){ $.post("/wechat/checkLogin", {eventKey:$("input#eventKey").val()}, function(data){ if(data.errCode == "0"){ clearInterval(wechatCheckLoginFunTimer); $("#loginMsg").text(data.errMsg); //停顿1秒 setTimeout(function(){ window.location.href = "/user/loginSuccess?eventKey=" + data.eventKey; },1000) } else { $("input#eventKey").innerHTML = data.errMsg; } }, "JSON"); } </script> </body> </html>
扫描登录逻辑到此完成!
- login.html:显示登录二维码,定时请求后台
