一、使用vue-cli脚手架构建
 1 <!-- 全局安装vue-cli -->
 2 npm install -g vue-cli
 3 <!-- 设置vue webpack模板 -->
 4 vue init webpack my-project
 5 <!-- 进入项目 -->
 6 cd my-project
 7 <!-- 安装依赖 -->
 8 npm install
 9 <!-- 启动项目 -->
10 npm run dev
二、安装axios并统一处理请求接口(二次封装axios)
1.安装
npm install axios --save
2.获取当前域名
 1 export default function getBaseUrl (type) {
 2   let [baseUrl, protocol] = ['https://xxxxxxx', 'http://']
 3   // 判断协议
 4   if (location.protocol === 'https:') {
 5     protocol = 'https://'
 6   }
 7   if (location.hostname !== 'localhost') {
 8     baseUrl = protocol + location.hostname
 9   }
10   return baseUrl
11 }
3.封装axios
import axios from 'axios'
import qs from 'qs'
import getUrl from './baseUrl'
import i18n from '../../language'
// 配置axios的config
const language = 'mx'
let config = {
  // `baseURL` 将自动加在 `url` 前面,除非 `url` 是一个绝对 URL。
  // 它可以通过设置一个 `baseURL` 便于为 axios 实例的方法传递相对 URL
  baseURL: getUrl(),
  // `withCredentials` 表示跨域请求时是否需要使用凭证(登陆的时候会有cookie这个时候要用到)
  withCredentials: true,
  headers: {
    // 设置
    'Content-Type': 'application/x-www-form-urlencoded'
  },
  transformRequest: [function (data) {
    // 处理发送前的数据
    data = qs.stringify(data)
    return data
  }],
  data: {
    // 全局参数
    channelType: '6',
    channelTag: '6_7_0_0',
    language: language
  }
}
// 拦截请求
axios.interceptors.request.use((config) => {
  // console.log('请求前')
  if (channelType) {
    config.data.channelType = channelType
  }
  if (channelTag) {
    config.data.channelTag = channelTag
  }
  return config
}, error => {
  return Promise.reject(error)
})
// axios拦截响应
axios.interceptors.response.use((data) => {
  let resdata = data
  if (data.data.errCode === 3 && data.data.retCode === 3) {
  }
  return data
}, error => {
  return Promise.reject(error)
})

const get = (url, params) => {
  url = urlEncode(url, params)
  return axios.get(url, config)
}

const post = (url, params, con) => {
  return axios.post(url, params, config)
}

// 用来拼接get请求的时候的参数
let urlEncode = (url, data) => {
  if (typeof (url) === 'undefined' || url === null || url === '') return ''
  if (typeof (data) === 'undefined' || data === null || typeof (data) !== 'object') return url
  url += (url.indexOf('?') !== -1) ? '' : '?'
  for (let k in data) {
    url += ((url.indexOf('=') !== -1) ? '&' : '') + k + '=' + encodeURI(data[k])
  }
  return url
}

export {
  get,
  post
}
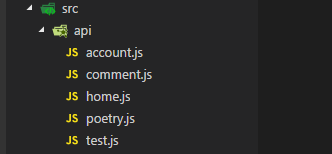
4.在src目录下新建api文件夹(该文件夹下我们放置我们所有的请求接口)如下图
三、引入vuex进行状态管理
在src目录下新建store文件夹,然后依次新建actions.js/getters.js/index.js/mutation-types.js/mutation.js/state.js
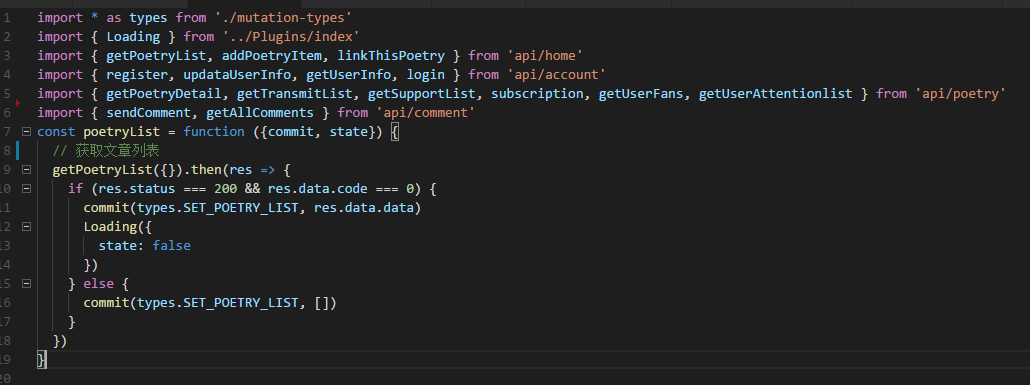
index.js
import Vue from 'vue'
import Vuex from 'vuex'

import * as actions from './actions'
import * as getters from './getters'
import state from './state'
import mutations from './mutations'
import createLogger from 'vuex/dist/logger'

Vue.use(Vuex)

const debug = process.env.NODE_ENV !== 'production'

export default new Vuex.Store({
  actions,
  getters,
  state,
  mutations,
  strict: debug,
  plugins: debug ? [createLogger()] : []
})
2.getter.js
const getPoetryList = state => state.poetryList
const getPoetryItem = state => state.poetryItem
const getUserInfo = state => state.userinfo
const getcommentlists = state => state.commentlist

export {
  getPoetryList,
  getPoetryItem,
  getUserInfo,
  getcommentlists
}
3.mutation-types.js
const SET_POETRY_LIST = 'SET_POETRY_LIST'
const SET_POETRY_ITEM = 'SET_POETRY_ITEM'
const SET_USER_INFO = 'SET_USER_INFO'
const SET_COMMENT_LIST = 'SET_COMMENT_LIST'

export {
  SET_POETRY_LIST,
  SET_POETRY_ITEM,
  SET_USER_INFO,
  SET_COMMENT_LIST
}
4.mutation.js
import * as types from './mutation-types'

const mutations = {
  [types.SET_POETRY_LIST] (state, list) {
    state.poetryList = list
  },
  [types.SET_POETRY_ITEM] (state, item) {
    state.poetryItem = item
  },
  [types.SET_USER_INFO] (state, userinfo) {
    state.userinfo = userinfo
  },
  [types.SET_COMMENT_LIST] (state, commentlist) {
    state.commentlist = commentlist
  }
}

export default mutations
5.actions.js(用来进行异步操作)
四、设置过滤器(这里是一个简单的时间过滤器)
在common目录下的js文件夹内新建filter.js
 1 const forMatDate = utc => {
 2   if (utc) {
 3     let date = new Date(utc)
 4     let y = date.getUTCFullYear()
 5     let M = date.getUTCMonth() + 1 >= 10 ? date.getUTCMonth() + 1 : `0${date.getUTCMonth() + 1}`
 6     let d = date.getUTCDate() >= 10 ? date.getUTCDate() : `0${date.getUTCDate()}`
 7     let h = date.getUTCHours() + 8 >= 10 ? date.getUTCHours() + 8 : `0${date.getUTCHours() + 8}`
 8     let m = date.getUTCMinutes() >= 10 ? date.getUTCMinutes() : `0${date.getUTCMinutes()}`
 9     let s = date.getUTCSeconds() >= 10 ? date.getUTCSeconds() : `0${date.getUTCSeconds()}`
10     return `${y}-${M}-${d} ${h}:${m}:${s}`
11   }
12 }
13
14 export {
15   forMatDate
16 }
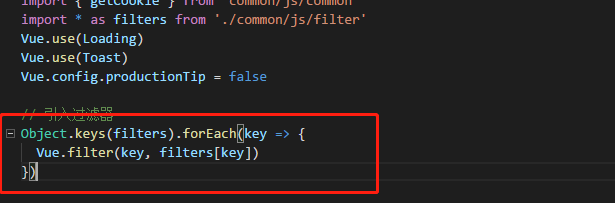
在main.js中设置过滤器
上面四个步骤,是一个vue项目的简单设置,当然不是很全面,但是对于我们这个项目却是足够了,至于里面用的的一些插件什么的,我们后面再一一介绍。。。。