1.注解介绍
1.1注解的本质
Oracle官方对注解的定义为:
Annotations, a form of metadata, provide data about a program that is not part of the program itself. Annotations have no direct effect on the operation of the code they annotate.
注解是元数据的一种形式,它提供有关程序的数据,该数据不属于程序本身。 注解对其注释的代码操作没有直接影响。
而在JDK的Annotation接口中有一行注释如此写到:
/**
* The common interface extended by all annotation types.
* ...
*/
public interface Annotation {...}
这说明其他注解都扩展自 Annotation 这个接口,也就是说注解的本质就是一个接口。
以 Spring Boot 中的一个注解为例:
        @Target({ElementType.TYPE})
        @Retention(RetentionPolicy.RUNTIME)
        @Documented
        @Indexed
        public @interface Component {
            String value() default "";
        }
它实际上相当于:
public interface Component extends Annotation{...}
而@interface 可以看成是一个语法糖。
1.2注解的要素
依然来看 @Component 这个例子:
@Target({ElementType.TYPE})
@Retention(RetentionPolicy.RUNTIME)
@Documented
@Indexed
public @interface Component {
String value() default "";
}
在注解定义上有几个注解@Target, @Retention, @Documented,被称为 元注解。
所谓元注解就是说明注解的注解
Java 中的元注解共有以下几个:
1.2.1 @Target
@Target顾名思义,这个注解标识了被修饰注解的作用对象。我们看看它的源码:
        @Documented
        @Retention(RetentionPolicy.RUNTIME)
        @Target(ElementType.ANNOTATION_TYPE)
        public @interface Target {
            /**
             * Returns an array of the kinds of elements an annotation type
             * can be applied to.
             * @return an array of the kinds of elements an annotation type
             * can be applied to
             */
            ElementType[] value();
        }
可以看到,这个注解的 value 值是一个数组,这也就意味着注解的作用对象可以有多个。 其取值范围都在ElementType这个枚举之中:
        public enum ElementType {
            /** 类、接口、枚举定义 */
            TYPE,
            /** 字段,包括枚举值 */
            FIELD,
            /** 方法 */
            METHOD,
            /** 参数 */
            PARAMETER,
            /** 构造方法 */
            CONSTRUCTOR,
            /** 局部变量 */
            LOCAL_VARIABLE,
            /** 元注解 */
            ANNOTATION_TYPE,
            /** 包定义 */
            PACKAGE...
        }
不同的值代表被注解可修饰的范围,例如TYPE只能修饰类、接口和枚举定义。这其中有个很特殊的值叫做 ANNOTATION_TYPE, 是专门表示元注解的。
在回过头来看 @Component 这个例子, Target 取值为 TYPE。熟悉 Spring Boot 的同学也一定知道,@Component 确实是不能放到方法或者属性前面的。
1.2.2@Retention
@Retention 注解指定了被修饰的注解的生命周期。定义如下:
        @Documented
        @Retention(RetentionPolicy.RUNTIME)
        @Target(ElementType.ANNOTATION_TYPE)
        public @interface Retention {
            /**
             * Returns the retention policy.
             * @return the retention policy
             */
            RetentionPolicy value();
        }
可以看到这个注解带一个 RetentionPolicy 的枚举值:
        public enum RetentionPolicy {
            SOURCE,
            CLASS,
            RUNTIME
        }
SOURCE表示注解编译时可见,编译完后就被丢弃。这种注解一般用于在编译器做一些事情;CLASS表示在编译完后写入 class 文件,但在类加载后被丢弃。这种注解一般用于在类加载阶段做一些事情;RUNTIME则表示注解会一直起作用。
1.2.3 @Documented
这个注解比较简单,表示是否添加到 java doc 中。
1.2.4 @Inherited
这个也比较简单,表示注解是否被继承。这个注解不是很常用。
注意:元注解只在定义注解时被使用!
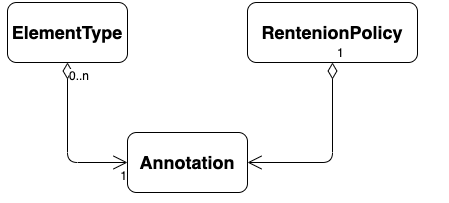
1.3 注解的构成
从上面的元注解可以了解到,一个注解可以关联多个 ElementType,但只能有一个 RetentionPolicy:
Java 中有三个常用的内置注解,其实相信大家都用过或者见过。不过在了解了注解的真实面貌以后,不妨重新认识一下吧!
1.4 Java内置注解
1.4.1 @Override
@Override它的定义为:
@Target(ElementType.METHOD)
@Retention(RetentionPolicy.SOURCE)
public @interface Override {
}
可见这个注解没有任何取值,只能修饰方法,而且RetentionPolicy 为 SOURCE,说明这是一个仅在编译阶段起作用的注解。
它的真实作用想必大家一定知道,就是在编译阶段,如果一个类的方法被 @Override 修饰,编译器会在其父类中查找是否有同签名函数,如果没有则编译报错。可见这确实是一个除了在编译阶段就没什么用的注解。
1.4.2 @Deprecated
@Deprecated它的定义为:
        @Documented
        @Retention(RetentionPolicy.RUNTIME)
        @Target(value={CONSTRUCTOR, FIELD, LOCAL_VARIABLE, METHOD, PACKAGE, PARAMETER, TYPE})
        public @interface Deprecated {
        }
这个注解也没有任何取值,能修饰所有的类型,永久存在。这个注解的作用是,告诉使用者被修饰的代码不推荐使用了,可能会在下一个软件版本中移除。这个注解仅仅起到一个通知机制,如果代码调用了被@Deprecated 修饰的代码,编译器在编译时输出一个编译告警。
1.4.3 @SuppressWarnings
@SuppressWarnings它的定义为:
        @Target({TYPE, FIELD, METHOD, PARAMETER, CONSTRUCTOR, LOCAL_VARIABLE})
        @Retention(RetentionPolicy.SOURCE)
        public @interface SuppressWarnings {
            /**
             * The set of warnings that are to be suppressed by the compiler in the
             * annotated element.  Duplicate names are permitted.  The second and
             * successive occurrences of a name are ignored.  The presence of
             * unrecognized warning names is <i>not</i> an error: Compilers must
             * ignore any warning names they do not recognize.  They are, however,
             * free to emit a warning if an annotation contains an unrecognized
             * warning name.
             *
             * <p> The string {@code "unchecked"} is used to suppress
             * unchecked warnings. Compiler vendors should document the
             * additional warning names they support in conjunction with this
             * annotation type. They are encouraged to cooperate to ensure
             * that the same names work across multiple compilers.
             * @return the set of warnings to be suppressed
             */
            String[] value();
        }
这个注解有一个字符串数组的值,需要我们使用注解的时候传递。可以在类型、属性、方法、参数、构造函数和局部变量前使用,声明周期是编译期。
这个注解的主要作用是压制编译告警的。
1.5注解的工作原理
这一块我就贴出来 不做详细的介绍
- 通过键值对的形式为注解属性赋值
- 编译器检查注解的使用范围,将注解信息写入元素属性表
- 运行时JVM将RUNTIME的所有注解属性取出来并最终存入map里
- JVM创建AnnotationInvocationHandler实例并传入到前面的map里
- JVM使用JDK动态代理为注解生成代理类,并初始化处理器
- 调用invoke方法,通过传入方法名返回注解对应的属性值
2.AOP介绍(AspectJ暂不讨论)
2.1 Spring AOP基本概念
- 是一种动态编译期增强性AOP的实现
- 与IOC进行整合,不是全面的切面框架
- 与动态代理相辅相成
- 有两种实现:基于jdk动态代理、cglib
2.2 Spring AOP与AspectJ区别
- Spring的AOP是基于动态代理的,动态增强目标对象,而AspectJ是静态编译时增强,需要使用自己的编译器来编译,还需要织入器
- 使用AspectJ编写的java代码无法直接使用javac编译,必须使用AspectJ增强的ajc增强编译器才可以通过编译,写法不符合原生Java的语法;而Spring AOP是符合Java语法的,也不需要指定编译器去编译,一切都由Spring 处理。
2.3 使用步骤
- 定义业务组件
- 定义切点(重点)
- 定义增强处理方法(切面方法)
这边用下面例子的AOP类来进行说明 (基于Spring AOP的)
    /**
     * @Author Song
     * @Date 2020/5/26 9:50
     * @Version 1.0
     */
    @Slf4j
    @Aspect
    @Component
    public class EagleEyeAspect {

        @Pointcut("@annotation(com.ctgu.song.plantfactory.v2.annotation.EagleEye)")
        public void eagleEye() {

        }


        @Around("eagleEye()")
        public Object around(ProceedingJoinPoint pjp) throws Throwable {
            long begin = System.currentTimeMillis();
            ServletRequestAttributes attributes = (ServletRequestAttributes) RequestContextHolder.getRequestAttributes();
            HttpServletRequest request = attributes.getRequest();
            Signature signature = pjp.getSignature();
            MethodSignature methodSignature = (MethodSignature) signature;
            Method method = methodSignature.getMethod();
            EagleEye eagleEye = method.getAnnotation(EagleEye.class);
            String desc = eagleEye.desc();
            log.info("============请求开始==========");
            log.info("请求链接:{}", request.getRequestURI().toString());
            log.info("接口描述:{}", desc);
            log.info("请求类型:{}", request.getMethod());
            log.info("请求方法:{}.{}", signature.getDeclaringTypeName(), signature.getName());
            log.info("请求IP:{}", request.getRemoteAddr());
            log.info("请求入参:{}", JSON.toJSONString(pjp.getArgs()));
            Object result = pjp.proceed();
            long end = System.currentTimeMillis();
            log.info("请求耗时:{}ms", end - begin);
            log.info("请求返回:{}", JSON.toJSONString(result));
            log.info("=============请求结束===========");
            return result;
        }
    }
这边先不看代码的具体内容,先简单介绍一下用到AOP中常用的注解
- @Aspect : 指定切面类;
- @Pointcut:公共切入点表达式
- 通知方法
- 前置通知(@Before) 目标方法执行之前,执行注解的内容
- 后置通知(@After)目标方法执行之后,执行注解的内容
- 返回通知 (@AfterReturning)目标方法返回后,执行注解的内容
- 异常通知 (@AfterThrowing)目标方法抛出异常后,执行注解的内容
- 环绕通知 (@Around)目标方法执行前后,分别执行一些代码
注意 定义好切片类后要将其加入Spring容器内才能使用哦 (可以使用@Component注解)
3. 具体实现(一个例子)
1.首先定义一个注解,代码如下
        /**
         * @Author Song
         * @Date 2020/5/26 9:44
         * @Version 1.0
         */

        @Retention(RetentionPolicy.RUNTIME)
        @Target(ElementType.METHOD)
        @Documented
        public @interface EagleEye {

            /**
             * @Retention(RetentionPolicy.RUNTIME)
             * 定义了注解的生命周期为运行时
             * <p>
             * @Target(ElementType.METHOD)
             * 定义了注解的作用域为方法
             * <p>
             * Documented
             * 标识该注解可以被JavaDoc记录
             * <p>
             * 定义注解名称为EagleEye(鹰眼,哈哈~~)
             * <p>
             * 定义一个元素desc,用来描述被修饰的方法
             * <p>
             * 接口描述
             *
             * @return
             */
            String desc() default "";
        }
2.定义切片内并写好自己想要增强的方法
直接贴代码了~~
        /**
         * @Author Song
         * @Date 2020/5/26 9:50
         * @Version 1.0
         */
        @Slf4j
        @Aspect
        @Component
        public class EagleEyeAspect {

            @Pointcut("@annotation(com.ctgu.song.plantfactory.v2.annotation.EagleEye)")
            public void eagleEye() {

            }


            @Around("eagleEye()")
            public Object around(ProceedingJoinPoint pjp) throws Throwable {
                long begin = System.currentTimeMillis();
                ServletRequestAttributes attributes = (ServletRequestAttributes) RequestContextHolder.getRequestAttributes();
                HttpServletRequest request = attributes.getRequest();
                Signature signature = pjp.getSignature();
                MethodSignature methodSignature = (MethodSignature) signature;
                Method method = methodSignature.getMethod();
                EagleEye eagleEye = method.getAnnotation(EagleEye.class);
                String desc = eagleEye.desc();
                log.info("============请求开始==========");
                log.info("请求链接:{}", request.getRequestURI().toString());
                log.info("接口描述:{}", desc);
                log.info("请求类型:{}", request.getMethod());
                log.info("请求方法:{}.{}", signature.getDeclaringTypeName(), signature.getName());
                log.info("请求IP:{}", request.getRemoteAddr());
                log.info("请求入参:{}", JSON.toJSONString(pjp.getArgs()));
                Object result = pjp.proceed();
                long end = System.currentTimeMillis();
                log.info("请求耗时:{}ms", end - begin);
                log.info("请求返回:{}", JSON.toJSONString(result));
                log.info("=============请求结束===========");
                return result;
            }
        }
在@Pointcut里通过@annotation来配置切点,代表我们的AOP切面会切到所有用EagleEye注解修饰的类。
然后使用@Around环绕通知在被注解的方法前后执行一些代码
Object result = pjp.proceed();
这行代码之前就是执行目标方法之前需要执行的代码 ,这行代码之后就是执行目标方法之后需要执行的代码
3. 注解的使用
只需要在需要被注解的方法上面使用自己的注解就行了 这里拿我自己项目中的一个Controller中的方法举例
@EagleEye(desc = "分页查询实验")
@GetMapping("/experiment")
@ApiOperation("分页查询实验")
public RsBody<Page<ExperimentVO2>> pageExperiment(ExperimentQueryDTO queryDTO) {
    log.info("请求分页查询实验的方法pageExperiment,请求参数为{}", queryDTO.toString());
    RsBody<Page<ExperimentVO2>> rsBody = new RsBody<>();
    IPage<Experiment> page = experimentV2Service.page(new Page<>(queryDTO.getCurrent() - 1, queryDTO.getSize()), new LambdaQueryWrapper<Experiment>()
    .like(queryDTO.getExperimentId() != null, Experiment::getExperimentId, queryDTO.getExperimentId())
    .eq(queryDTO.getExperimentStatus() != null, Experiment::getExperimentStatus, queryDTO.getExperimentStatus())
    .between(queryDTO.getStartTime() != null && queryDTO.getEndTime() != null, Experiment::getStartTime, queryDTO.getStartTime(), queryDTO.getEndTime())
    .orderBy(true, false, Experiment::getExperimentId));

    //组装Vo
    List<ExperimentVO2> experimentVOList = new ArrayList<>();
    for (Experiment experiment : page.getRecords()) {
        ExperimentVO2 experimentVO = new ExperimentVO2();
        experimentVO.setExperimentId(experiment.getExperimentId());
        PlantInfo byPlantId = plantService.findByPlantId(experiment.getPlantId());
        if (byPlantId != null) {
            experimentVO.setPlantName(byPlantId.getPlantName());
        } else {
            experimentVO.setPlantName("植物被删除");
        }
        experimentVO.setStartTime(experiment.getStartTime());
                    experimentVO.setEndTime(experiment.getEndTime());
        experimentVO.setExperimentPurpose(experiment.getExperimentPurpose());
        experimentVO.setExperimentDescription(experiment.getExperimentDescription());
        experimentVO.setExperimentAddress(experiment.getExperimentAddress());
        experimentVO.setExperimentPersonName(userService.findById(experiment.getExperimentPersonId()).getUserName());
        experimentVO.setCronType(experiment.getCronType());
        experimentVO.setExperimentStatus(experiment.getExperimentStatus());
        experimentVO.setExperimentResult(experiment.getExperimentResult());
        experimentVOList.add(experimentVO);
    }
    Page<ExperimentVO2> pageVo = new Page<ExperimentVO2>();
    pageVo.setPages(page.getPages());
    pageVo.setRecords(experimentVOList);
    pageVo.setTotal(page.getTotal());
    pageVo.setSize(page.getSize());
    pageVo.setCurrent(page.getCurrent());
    return rsBody.setBody(true).setData(pageVo);
}
4.测试情况
好的 万事俱备 让我们运行一下程序 并访问这个方法 (过程略过)

很有意思吧~~