SpringMVC详解
1. SpringMVC简介
MyBatis—Spring 项目
SpringMVC是一种基于Spring实现了Web MVC设计模式的请求驱动类型的轻量级Web框架,使用了MVC架构模式的思想,将web层进行职责解耦,并管理应用所需对象的生命周期,为简化日常开发,提供了很大便利。

SpringMVC提供了总开关DispatcherServlet;请求处理映射器(Handler Mapping)和处理适配器(Handler Adapter),视图解析器(View Resolver)进行视图管理;动作处理器Controller接口(包含ModelAndView,以及处理请求响应对象request和response),配置灵活,支持文件上传,数据简单转化等强大功能。
2.工作流程与介绍
3. Hello World
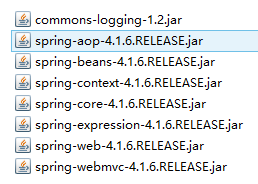
1.首先,导入SpringMVC需要的jar包。
2. 添加Web.xml配置文件中关于SpringMVC的配置
如果没有contextConfigLocation的话,会默认找WEB-INF下的 xxxx-servler.xml
<!--configure the setting of springmvcDispatcherServlet and configure the mapping-->
  <servlet>
      <servlet-name>springmvc</servlet-name>
      <servlet-class>org.springframework.web.servlet.DispatcherServlet</servlet-class>
      <init-param>
            <param-name>contextConfigLocation</param-name>
            <param-value>classpath:springmvc-servlet.xml</param-value>
        </init-param>
        <!-- <load-on-startup>1</load-on-startup> -->
  </servlet>

  <servlet-mapping>
      <servlet-name>springmvc</servlet-name>
      <url-pattern>/</url-pattern>
  </servlet-mapping>
- 在Resouces资源文件夹 下添加springmvc-servlet.xml配置文件
<?xml version="1.0" encoding="UTF-8"?>
<beans xmlns="http://www.springframework.org/schema/beans"
    xmlns:xsi="http://www.w3.org/2001/XMLSchema-instance"
    xmlns:context="http://www.springframework.org/schema/context"
    xmlns:mvc="http://www.springframework.org/schema/mvc"
    xsi:schemaLocation="http://www.springframework.org/schema/beans http://www.springframework.org/schema/beans/spring-beans.xsd
        http://www.springframework.org/schema/context http://www.springframework.org/schema/context/spring-context-4.1.xsd
        http://www.springframework.org/schema/mvc http://www.springframework.org/schema/mvc/spring-mvc-4.1.xsd">

    <!-- scan the package and the sub package -->
    <context:component-scan base-package="test.SpringMVC"/>

    <!-- don't handle the static resource -->
    <mvc:default-servlet-handler />

    <!-- if you use annotation you must configure following setting -->
    <mvc:annotation-driven />

    <!-- configure the InternalResourceViewResolver -->
    <bean class="org.springframework.web.servlet.view.InternalResourceViewResolver"
            id="internalResourceViewResolver">
        <!-- 前缀 -->
        <property name="prefix" value="/WEB-INF/jsp/" />
        <!-- 后缀 -->
        <property name="suffix" value=".jsp" />
    </bean>
</beans>
4.在WEB-INF文件夹下创建名为jsp的文件夹,用来存放jsp视图。创建一个hello.jsp,在body中添加“Hello World”。
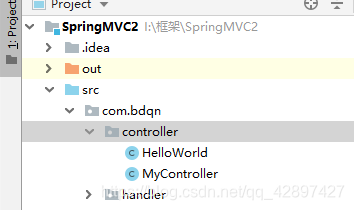
5.建立包及Controller,如下所示
6.编写Controller代码
@Controller
@RequestMapping("/bdqn")
public class mvcController {

    @RequestMapping("/hello")
    public String hello(){
        return "hello";
    }
}
7.启动服务器,键入 http://localhost:8080/项目名/bdqn/hello
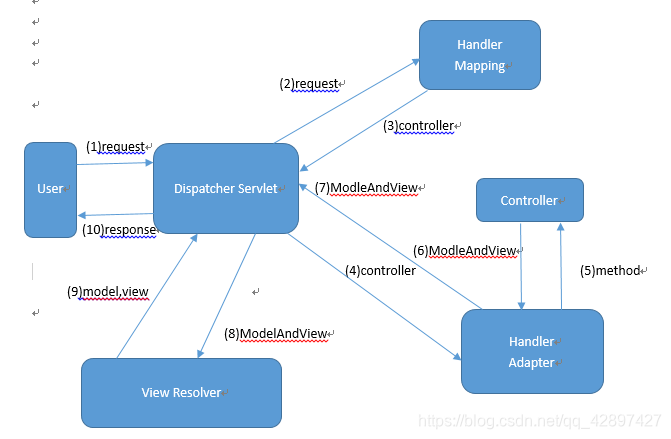
4.工作流程与介绍
配置解析
-
用户发送请求至前端控制器DispatcherServlet
-
DispatcherServlet收到请求调用HandlerMapping处理器映射器 HandlerMapping是map结构 key是url value是对应的controller或者说是handler
-
处理器映射器根据请求Url找到具体的Handler(后端控制器),生成处理器对象及处理器拦截器(如果有则生成)一并返回DispatcherServlet
-
DispatcherServlet调用HandlerAdapter处理器适配器去调用Handler
-
处理器适配器执行Handler,Handler执行完成给处理器适配器返回ModelAndView
-
处理器适配器向前端控制器返回 ModelAndView,ModelAndView 是SpringMVC 框架的一个底层对象,包括 Model 和 View 通过addObject(“list”,list) 封装模型, 和setviewName(“视图路径”) 视图
-
前端控制器请求视图解析器去进行视图解析
-
前端控制器请求视图解析器去进行视图解析,根据逻辑视图名来解析真正的视图。 视图解析器在web.xml中提前配置好前缀和后缀. 无需加上视图的绝对路径. 只需要相对就可以
-
前端控制器进行视图渲染 就是将模型数据(在 ModelAndView 对象中)填充到 request 域
-
前端控制器向用户响应结果
5. 配置注解介绍
-
DispatcherServlet是前置控制器,配置在web.xml文件中的。拦截匹配的请求,Servlet拦截匹配规则要自已定义,把拦截下来的请求,依据相应的规则分发到目标Controller来处理,是配置spring MVC的第一步。 DispatcherServlet的存在降低了组件之间的耦合性。
-
InternalResourceViewResolver 视图名称解析器
-
@Controller 负责注册一个bean 到spring 上下文中
-
@RequestMapping 注解为控制器指定可以处理哪些 URL 请求
-
@RequestBody
该注解用于读取Request请求的body部分数据,使用系统默认配置的HttpMessageConverter进行解析,然后把相应的数据绑定到要返回的对象上 ,再把HttpMessageConverter返回的对象数据绑定到 controller中方法的参数上 -
@ResponseBody 该注解用于将Controller的方法返回的对象,通过适当的HttpMessageConverter转换为指定格式后,写入到Response对象的body数据区
-
@ModelAttribute在方法定义上使用 @ModelAttribute 注解:Spring MVC 在调用目标处理方法前,会先逐个调用在方法级上标注了@ModelAttribute 的方法
-
@RequestParam 在处理方法入参处使用 @RequestParam 可以把请求参 数传递给请求方法
-
@PathVariable 绑定 URL 占位符到入参
-
@ExceptionHandler 注解到方法上,出现异常时会执行该方法
SpringMVC映射规则
在类上和方法上同时注解@RequestMapping,相当于地址栏里有两级的地址
import org.springframework.stereotype.Controller;
import org.springframework.web.bind.annotation.RequestMapping;
@Controller
@RequestMapping("one")
public class TestController {
    @RequestMapping("two")
    public String test(){
        return "index";
    }
}
地址结果为 http://localhost:8080/xx/one/two
Method类型选择接受
@RequestMapping注解括号里,有method属性作为对提价类型的选择接受
@RequestMapping(value="/getName",method={RequestMethod.GET, RequestMethod.POST})
//如果没有指定method,则默认为所有请求类型都接受
参数规则匹配
在响应请求的时候,对提交的参数规则进行验证,如果不符合设置的规则,则不接受请求
- param1=value1 - 请求中必须包含该参数和指定值
- param2 - 请求中必须包含该参数,值任意
- !param3 - 请求中必须不包含该参数
@RequestMapping(value="/getName",method=RequestMethod.GET,params={"id=250","name","!age")
//上述规则定义了,只能响应get请求,并且请求的参数必须包含id=250,必须包含name,不能包含age
//根据上述规则此地址合法:http://localhost:8080/xx?id=250&name=abc
参数绑定的含义
1.所谓的参数绑定,就是怎么样获取到前台页面传过来的值,通常是跟据参数名(key)来获取值;
- 绑定页面传值的key值到映射方法的参数上,如下程序所示
//页面端提交请求的程序
$.post("../hc.v",
   {
       name : "shoji",
       price : "8888"
   },
   function(d) {
       alert(d);
   }
)
//后台响应上面ajax的post请求的代码
//通过两段代码里“name”和“price”的相同,把“shouji”和“8888”传到hc方法里
//问号传值的方式同样适用    ?name=shoji&price=8888
@RequestMapping("hc")
public String hc(String name,String price){
    return "test";
}
2.用标准PO属性来进行绑定
- 页面端提交请求的js代码同上
//新建一个标准的PO,同时当前类的属性名应该跟前台代码里的KEY对应上
public class PO{
   private String name;//和key值一样
   private Stirng price;//和key值一样
   //省略各自的set get
}
//后台响应上面ajax的post请求的代码
//通过PO里的“name”和“price”属性名和前台js代码里的key相同,把“shouji”和“8888”传到hc方法里
//问号传值的方式同样适用    ?name=shoji&price=8888
@RequestMapping("hc")
public String hc(PO po){
    //po.getName() 取出shoujie
    //po.getPrice() 取出8888
    return "test";
}
- 用注解@RequestParam来绑定
- 页面端提交请求的js代码同上
//后台响应上面ajax的post请求的代码
//通过注解里的“name”和“price”参数名和前台js代码里的key相同,把“shouji”和“8888”传到hc方法里
//问号传值的方式同样适用    ?name=shoji&price=8888
@RequestMapping("hc")
public String hc(@RequestParam("name") String p1,@RequestParam("price") String p2){
   //p1 取出shoujie
   //p2 取出8888
   return "test";
}
文件上传
<!--
docBase - 网站跟目录的绝对路径
path - 在浏览器访问这个网站的网址
-->
<Context docBase="/网站文件夹在硬盘的绝对路径" path="/浏览器地址栏的路径" reloadable="当网站文件被改变时是否自动重启">
如:
<Context docBase="D:appsMy12306" path="/my12306" reloadable="true">
springMVC文件上传
- 导入jar包
commons-fileupload-1.2.1.jar commons-io-1.3.2.jar
- 在springmvc配置文件中配置上传解析器
<!--
id属性是bean的实例名,可以指定
class属性固定不变
property name="maxUploadSize",property name="defaultEncoding",名字固定,值可以指定
-->
   <bean id="multipartResolver" class="org.springframework.web.multipart.commons.CommonsMultipartResolver">
   <!-- 上传文件的最大值 -->
       <property name="maxUploadSize">
           <value>20971520</value>
       </property>
       <!-- 上传流的编码 -->
       <property name="defaultEncoding" value="UTF-8"/>
   </bean>
- 编写Controller代码
import java.io.File;
import java.io.FileNotFoundException;
import java.io.FileOutputStream;
import java.io.IOException;
import java.io.InputStream;
import java.io.OutputStream;
import java.util.Date;
import java.util.Iterator;

import javax.servlet.http.HttpServletRequest;

import org.springframework.stereotype.Controller;
import org.springframework.web.bind.annotation.RequestMapping;
import org.springframework.web.bind.annotation.RequestParam;
import org.springframework.web.multipart.MultipartFile;
import org.springframework.web.multipart.MultipartHttpServletRequest;
import org.springframework.web.multipart.commons.CommonsMultipartFile;
import org.springframework.web.multipart.commons.CommonsMultipartResolver;

/*
采用三种方式来接收上传文件,分别用三个方法试验
每个方法里,有程序执行时间记录
实际运用时,三者选其一
第一种最慢,第三种最快,一般选用第二种
*/
@Controller
public class FileController {
    /*
     * 通过流的方式上传文件
     *
     * @RequestParam("file") 将name=file控件得到的文件封装成CommonsMultipartFile 对象
     */
    @RequestMapping("fileUpload")
    public String fileUpload(@RequestParam("file") CommonsMultipartFile file) throws IOException {

        // 用来检测程序运行时间
        long startTime = System.currentTimeMillis();

        try {
            // 获取输出流
            OutputStream os = new FileOutputStream("E:/" + new Date().getTime() + file.getOriginalFilename());
            // 获取输入流 CommonsMultipartFile 中可以直接得到文件的流
            InputStream is = file.getInputStream();
            int temp;
            // 一个一个字节的读取并写入
            while ((temp = is.read()) != (-1)) {
                os.write(temp);
            }
            os.flush();
            os.close();
            is.close();
        } catch (FileNotFoundException e) {
            e.printStackTrace();
        }
        long endTime = System.currentTimeMillis();
        System.out.println("方法一的运行时间:" + String.valueOf(endTime - startTime) + "ms");
        return "/success";
    }

    /*
     * 采用file.Transto 来保存上传的文件
     */
    @RequestMapping("fileUpload2")
    public String fileUpload2(@RequestParam("file") CommonsMultipartFile file) throws IOException {
        long startTime = System.currentTimeMillis();

        String path = "E:/" + new Date().getTime() + file.getOriginalFilename();
        File newFile = new File(path);
        // 通过CommonsMultipartFile的方法直接写文件(注意这个时候)
        file.transferTo(newFile);

        long endTime = System.currentTimeMillis();
        System.out.println("方法二的运行时间:" + String.valueOf(endTime - startTime) + "ms");

        return "/success";
    }

    /*
     * 采用spring提供的上传文件的方法
     */
    @RequestMapping("springUpload")
    public String springUpload(HttpServletRequest request) throws IllegalStateException, IOException {
        long startTime = System.currentTimeMillis();

        // 将当前上下文初始化给 CommonsMutipartResolver (多部分解析器)
        CommonsMultipartResolver multipartResolver = new CommonsMultipartResolver(request.getSession().getServletContext());
        // 检查form中是否有enctype="multipart/form-data"
        if (multipartResolver.isMultipart(request)) {
            // 将request变成多部分request
            MultipartHttpServletRequest multiRequest = (MultipartHttpServletRequest) request;
            // 获取multiRequest 中所有的文件名
            Iterator iter = multiRequest.getFileNames();

            while (iter.hasNext()) {
                // 一次遍历所有文件
                MultipartFile file = multiRequest.getFile(iter.next().toString());
                if (file != null) {
                    String path = "E:/springUpload" + file.getOriginalFilename();
                    // 上传
                    file.transferTo(new File(path));
                }
            }
        }

        long endTime = System.currentTimeMillis();
        System.out.println("方法三的运行时间:" + String.valueOf(endTime - startTime) + "ms");
        return "/success";
    }

}
- 编写jsp页面代码
!-- 三个form分别对应controller里三个上传方法 -->
    <form name="Form1" action="fileUpload.v" method="post" enctype="multipart/form-data">
        <h1>采用流的方式上传文件</h1>
        <input type="file" name="file">
        <input type="submit" value="upload" />
    </form>

    <form name="Form2" action="fileUpload2.v" method="post" enctype="multipart/form-data">
        <h1>采用multipart提供的file.transfer方法上传文件</h1>
        <input type="file" name="file">
        <input type="submit" value="upload" />
    </form>

    <form name="Form3" action="springUpload.v" method="post" enctype="multipart/form-data">
        <h1>使用spring mvc提供的类的方法上传文件</h1>
        <input type="file" name="file">
        <input type="submit" value="upload" />
    </form>
Ajax和Controller的交互
1.导入jar包
jackson-annotations-2.9.2.jar jackson-core-2.9.2.jar jackson-databind-2.9.2.jar
2.在springmvc的配置文件中,加入json转换器
<!-- 加入到beans标签的标签体里 -->
<mvc:annotation-driven/>
传入key-value键值对,输出json
- 在ajax的提交请求里,传给后台的数据格式是kv对
//$.ajax $.post $.get 都是jquery的请求,需要引入jquery.js
//$.post和$.get都是$.ajax的简写方式
    $.ajax({
        type : "post",
        url : "../tm.v",
        contentType:"application/json; charset=utf-8",//请求成功后,后台返回的数据格式,即success : function(r)里“r”的格式
        data : "name=shoji&price=8888",//此处就是标题中提到的传入key-value键值对
        success : function(r) {
            //r 直接就是jsonObject
            alert(r.name);
        }
    })
2.在controller的方法返回值里,传给前台的数据格式是json
@RequestMapping("tm")
    @ResponseBody
    public BYQ tm(BYQ byq2){
        System.out.println(byq2.getName());
        System.out.println(byq2.getPrice());
        return byq2;
    }
传入json,输出json
2. 在ajax的提交请求里,传给后台的数据格式是json串
$.ajax({
        type : "post",
        url : "../tm.v",
        contentType:"application/json; charset=utf-8",
        data:'{"name":"shouji","price":"8888"}',//此处就是标题中提到的传入的json格式串
        success : function(r) {
            //r 直接就是jsonObject
            //如果返回的r是字符串,在调用r.price之前需要把字符串转为json对象,var jsonObject = JSON.parse(r);
            alert(r.price);
        }
    })
- 在controller的方法返回值里,传给前台的数据格式是json,并且在方法的参数里接收的也是json串
/@ResponseBody注解和方法的返回值被置为BYQ,是为了返回值是json格式
//@RequestBody注解和方法的参数是BYQ类型,是为了接收前台提交过了的json格式
   @RequestMapping("tm")
   @ResponseBody
   public BYQ tm(@RequestBody BYQ byq2){
       System.out.println(byq2.getName());
       System.out.println(byq2.getPrice());
       return byq2;
   }
利用周末的时间给大家讲了一下SpringMVC,自己学的也不是很好,还希望各位大佬多多指教!
如果小弟这篇教程给大哥们有帮助的话,希望大家关注下!这样才让我有写博客的动力!
人最大的改变就是做自己害怕的事情。