通配符介绍:
一般情况下,我们使用层次结构的方式来组织队列,比如A.B.C.D,这样便于归类和管理。
我们也可以使用通配符来配置或是操作多个队列。
通配符有三个:
- . 用来分隔路径;
- * 用来匹配路径中的一节
- > 用来匹配任意节的路径
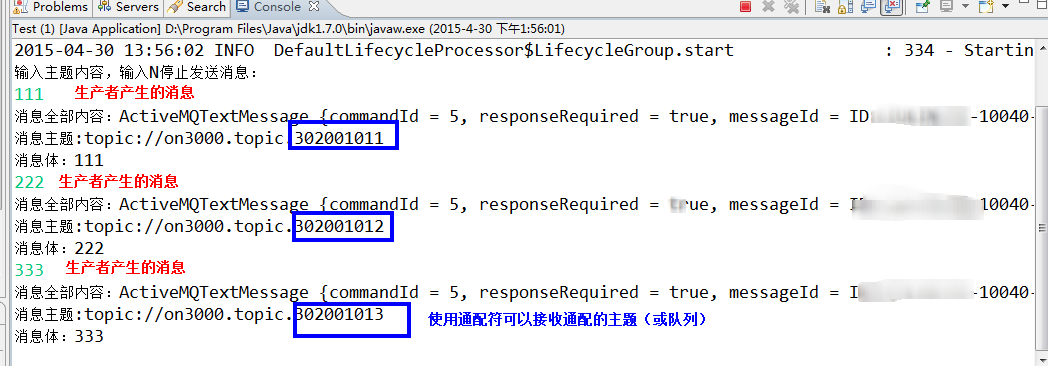
如果你发送了这样的一个主题:" rugby.>.", 这个消息仅会发送到命名为“rugby.>.”的主题,并不是所有以rugby开头的的主题。
这里有一种 方法,使消息生产者能将一条。
消息发送到多个目的地。通过使用 composite destination。《本小节暂不讲解》
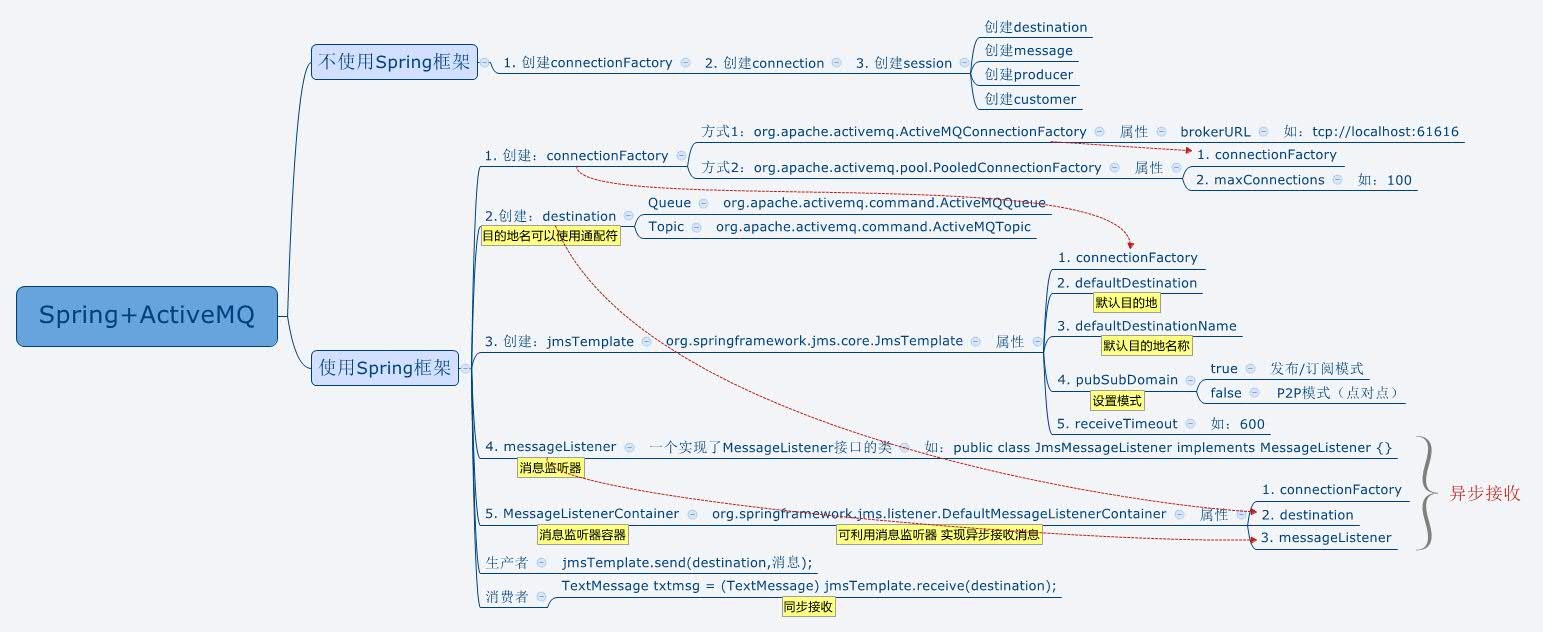
程序概要:
1. 消费者:异步接收,实现 MessageListener类;
2.从消息中获取 目的地名称: message.getJMSDestination().toString();
3.消费模式:发布/订阅模式;
4.目的地名称:采用通配符形式:on3000.topic.*;
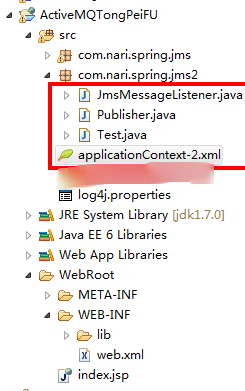
环境:
1.JmsMessageListener.java
2.Publisher.java
3.Test.java
4.applicationContext-2.xml
所使用的jar包
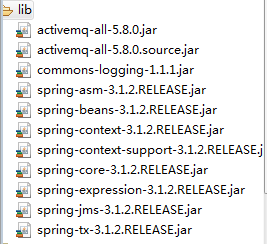
activemq-all-5.8.0.jar
源文件:
applicationContext-2.xml
activemq-all-5.8.0.source.jar
commons-logging-1.1.1.jar
spring-asm-3.1.2.RELEASE.jar
spring-beans-3.1.2.RELEASE.jar
spring-context-3.1.2.RELEASE.jar
spring-context-support-3.1.2.RELEASE.jar
spring-core-3.1.2.RELEASE.jar
spring-expression-3.1.2.RELEASE.jar
spring-jms-3.1.2.RELEASE.jar
spring-tx-3.1.2.RELEASE.jar
源文件:
JmsMessageListener.java 异步接收
package com.nari.spring.jms2;import javax.jms.JMSException;import javax.jms.Message;import javax.jms.MessageListener;import javax.jms.TextMessage;public class JmsMessageListener implements MessageListener {public void onMessage(Message message) {System.out.println("消息全部内容:" + message.toString());try {System.out.println("消息主题:" + message.getJMSDestination().toString());} catch (JMSException e1) {e1.printStackTrace();}TextMessage tm = (TextMessage) message;try {System.out.println("消息体:" + tm.getText());} catch (JMSException e) {e.printStackTrace();}}}
Publisher.java
package com.nari.spring.jms2;import java.util.Scanner;import javax.jms.Destination;import javax.jms.JMSException;import javax.jms.Message;import javax.jms.Session;import javax.jms.TextMessage;import org.apache.activemq.command.ActiveMQTopic;import org.springframework.jms.core.JmsTemplate;import org.springframework.jms.core.MessageCreator;public class Publisher {//下面两个field,在applicationContext-*.xml配置private JmsTemplate template;private Destination destination;public void sendMessage() {long keyValue = 302001011;boolean sendMsgFlag = true;int addIndex = 0;System.out.println("输入主题内容,输入N停止发送消息:");while (sendMsgFlag) {// 从终端输入信息Scanner cin = new Scanner(System.in);String text = cin.nextLine();if (text.equals("N")) {sendMsgFlag = false;}// 目的地地址为:topic://on3000.topic.*int startIndex = destination.toString().indexOf("//");int endIndex = destination.toString().indexOf("*");// 拼接新的主题:类似 on3000.topic.30200101112String subTopicDestination = destination.toString().substring(startIndex + 2, endIndex)+ Long.toString(keyValue + addIndex);//发送消息jmsTemplateSend(subTopicDestination, text);addIndex++;}}/*** 向指定主题发送指定消息** @param destinationString* :主题* @param strMessage* :消息内容*/protected void jmsTemplateSend(String destinationString,final String strMessage) {ActiveMQTopic topicDestination = new ActiveMQTopic(destinationString);template.send(topicDestination, new MessageCreator() {public Message createMessage(Session session) throws JMSException {TextMessage message = session.createTextMessage();message.setText(strMessage);return message;}});}public JmsTemplate getJmsTemplate() {return template;}public void setJmsTemplate(JmsTemplate template) {this.template = template;}public Destination getDestination() {return destination;}public void setDestination(Destination destination) {this.destination = destination;}}
Test.java
package com.nari.spring.jms2;import org.springframework.context.ApplicationContext;import org.springframework.context.support.ClassPathXmlApplicationContext;public class Test {public static void main(String[] args) {ApplicationContext context = new ClassPathXmlApplicationContext("applicationContext-2.xml");// applicationContext-*.xml初始化时,貌似会自动开启subscribe,下面两行注不注释掉都可以// DefaultMessageListenerContainer subscribe = (DefaultMessageListenerContainer)context.getBean("consumer");// subscribe.start();Publisher publisher = (Publisher) context.getBean("publisher");publisher.sendMessage();}}
配置文件:
applicationContext-2.xml
<?xml version="1.0" encoding="UTF-8"?><beans xmlns="http://www.springframework.org/schema/beans"xmlns:xsi="http://www.w3.org/2001/XMLSchema-instance" xmlns:p="http://www.springframework.org/schema/p"xsi:schemaLocation="http://www.springframework.org/schema/beans http://www.springframework.org/schema/beans/spring-beans-3.0.xsd"><!--创建连接工厂 --><bean id="connectionFactory" class="org.apache.activemq.ActiveMQConnectionFactory"><property name="brokerURL" value="tcp://localhost:61616" /></bean><!-- 声明目标,ActiveMQQueue或ActiveMQTopic --><bean id="topicDestination" class="org.apache.activemq.command.ActiveMQTopic"autowire="constructor"><!-- 通配符,匹配多个主题 --><constructor-arg value="on3000.topic.*" /></bean><!-- 创建JMS发送信息的模板的对象 --><bean id="jmsTemplate" class="org.springframework.jms.core.JmsTemplate"><property name="connectionFactory" ref="connectionFactory" /><property name="defaultDestination" ref="topicDestination" /><property name="receiveTimeout" value="6000" /></bean><!-- 生成者 --><bean id="publisher" class="com.nari.spring.jms2.Publisher"><property name="jmsTemplate" ref="jmsTemplate" /><property name="destination" ref="topicDestination" /></bean><!-- 消息监听接口 --><bean id="jmsMessageListener" class="com.nari.spring.jms2.JmsMessageListener"></bean><!-- 消费者,通过消息侦听器实现 --><bean id="consumer"class="org.springframework.jms.listener.DefaultMessageListenerContainer"><property name="connectionFactory" ref="connectionFactory" /><property name="destination" ref="topicDestination" /><property name="messageListener" ref="jmsMessageListener" /></bean></beans>
运行结果: