Angular动画基于W3C的Web Animations标准。不在Angular Core中了。

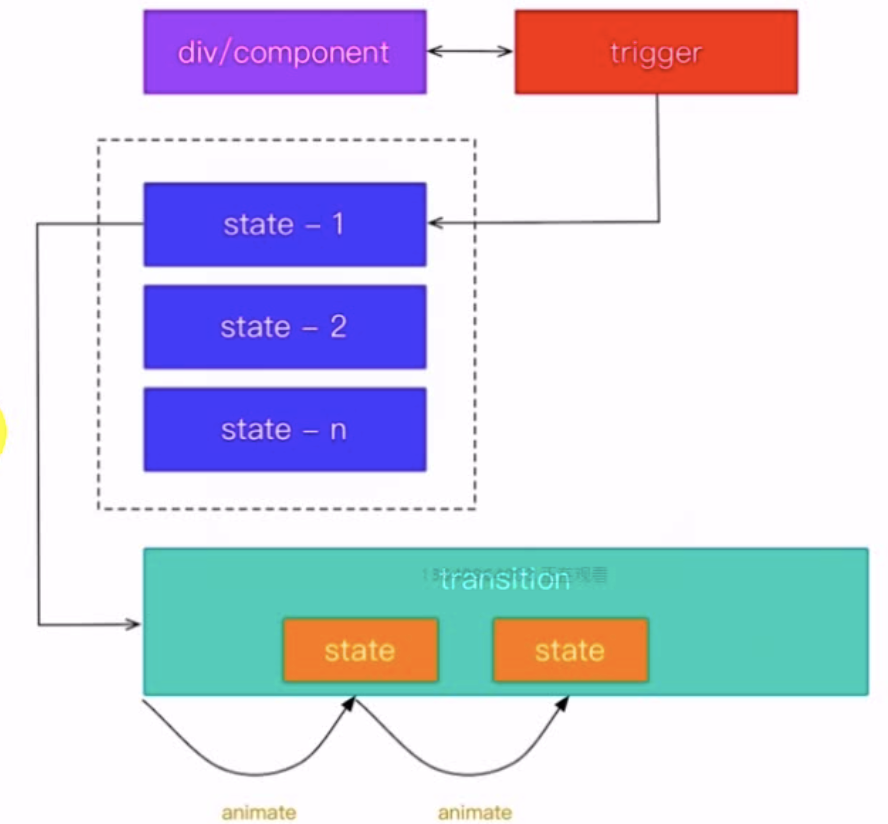
组件里面定义一个或多个触发器trigger,每个触发器有一系列的状态和过渡效果来实现。
动画其实就是从一个状态过渡到另一个状态。状态本身包含形状,颜色,大小等。
核心是State和Transition。
State就是定义每一帧状态
Transition是定义一帧到下一帧如何过渡。
transition中定义animation,Animate规定了具体怎样过渡,比如时间,过渡的速度等。Animate有多个重载形式。
一、例子
先安装动画库
npm i --save @angular/animations
导入module
import { BrowserAnimationsModule } from '@angular/platform-browser/animations';
imports: [
...
BrowserAnimationsModule, //放在最后导入
],
定义一个宽度100的黑色正方形。
.square{
    width: 100px;
    height: 100px;
    background-color:black;
    align-items: center;
}
在animations元数据中定义一个触发器,触发器名字叫square。html的响应元素中[@square]是动画的触发器的名字。这个变量或者函数在某一情况下改变元素的状态。
<div class="square" [@square]="squareState" (click)="onClick()">
</div>
触发器有2个重要组成State和Transition。
State定义状态,在不同的状态下应用不同的样式。通过style把一些css样式应用于实现动画的元素,定义好某一帧的颜色,大小,位置。
Transition负责在不同状态切换时候做怎样的变换,定义如何迁移状态,如何过渡。
import { trigger, state, transition, style, animate } from '@angular/animations';

@Component({
  selector: "app-root",
  templateUrl: "./app.component.html",
  styleUrls: ["./app.component.scss"],
  animations: [
    trigger('square', [
      state('green', style({ 'background-color': 'green','height':'100px','transform':'translateX(0)'  })),
      state('red', style({ 'background-color': 'red','height':'50px' ,'transform':'translateX(100%)'})),
      transition('green=>red', animate('.2s 1s')),//动画持续的时间,延迟多久开始
      transition('red=>green', animate(1000)),
    ])
  ]
})
export class AppComponent {
  squareState:string;

  onClick(){
    this.squareState = this.squareState ==='red'?'green':'red';
  }
}
二、缓动函数
动画执行时候的速度,使其看起来更加真实。
因为不是所有的动画都是匀速的,可以先加速后减速。
例如:皮球下落,先是越调越快,撞到地上后回弹最终才又碰到地板。
例子:
@Component({
  selector: "app-root",
  templateUrl: "./app.component.html",
  styleUrls: ["./app.component.scss"],
  animations: [
    trigger('square', [
      state('green', style({ 'background-color': 'green','height':'100px','transform':'translateY(-100%)'  })),
      state('red', style({ 'background-color': 'red','height':'100px' ,'transform':'translateY(100%)'})),
      transition('green=>red', animate('.8s ease-in')),
      transition('red=>green', animate('.8s ease-out')),
    ])
  ]
})
可以在一个网站看到动画的速度
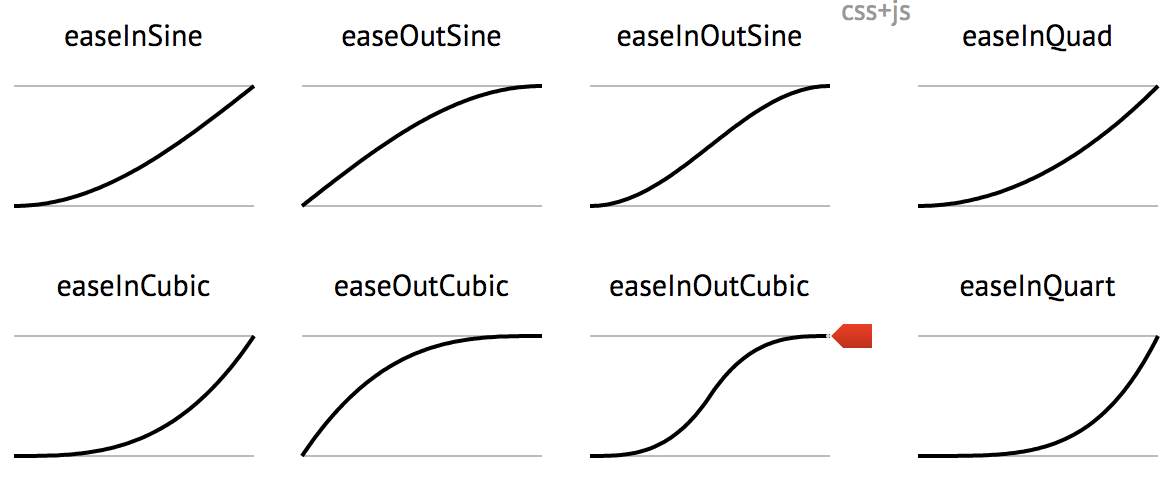
可以参考:
三、关键帧
不是所有的cubic-bezier函数都能在css动画中得到支持,可以通过关键帧来实现。
keyframes是一个数组,里面定义每一帧的样式。
@Component({
  selector: "app-root",
  templateUrl: "./app.component.html",
  styleUrls: ["./app.component.scss"],
  animations: [
    trigger('square', [
      state('green', style({ 'background-color': 'green','height':'100px','transform':'translateY(-100%)'  })),
      state('red', style({ 'background-color': 'red','height':'100px' ,'transform':'translateY(100%)'})),
      transition('green=>red', animate('.8s ease-in')),
      transition('red=>green', animate(5000, keyframes([
        style({transform:'translateY(100%)'}),
        style({transform:'translateY(98%)'}),
        style({transform:'translateY(95%)'}),
        style({transform:'translateY(90%)'}),
        style({transform:'translateY(80%)'}),
        style({transform:'translateY(60%)'}),
        style({transform:'translateY(30%)'}),
        style({transform:'translateY(0)'}),
        style({transform:'translateY(-10%)'}),
        style({transform:'translateY(-5%)'}),
        style({transform:'translateY(-2%)'}),
        style({transform:'translateY(0)'}),
        style({transform:'translateY(10%)'}),
        style({transform:'translateY(15%)'}),
        style({transform:'translateY(-15%)'}),
        style({transform:'translateY(-40%)'}),
        style({transform:'translateY(-80%)'}),
        style({transform:'translateY(-90%)'}),
        style({transform:'translateY(-95%)'})
      ])))
    ])
  ]
})
四、实际应用
把动画分离出来,不要和组件强耦合。
新建一个文件夹animate放所有的动画文件。
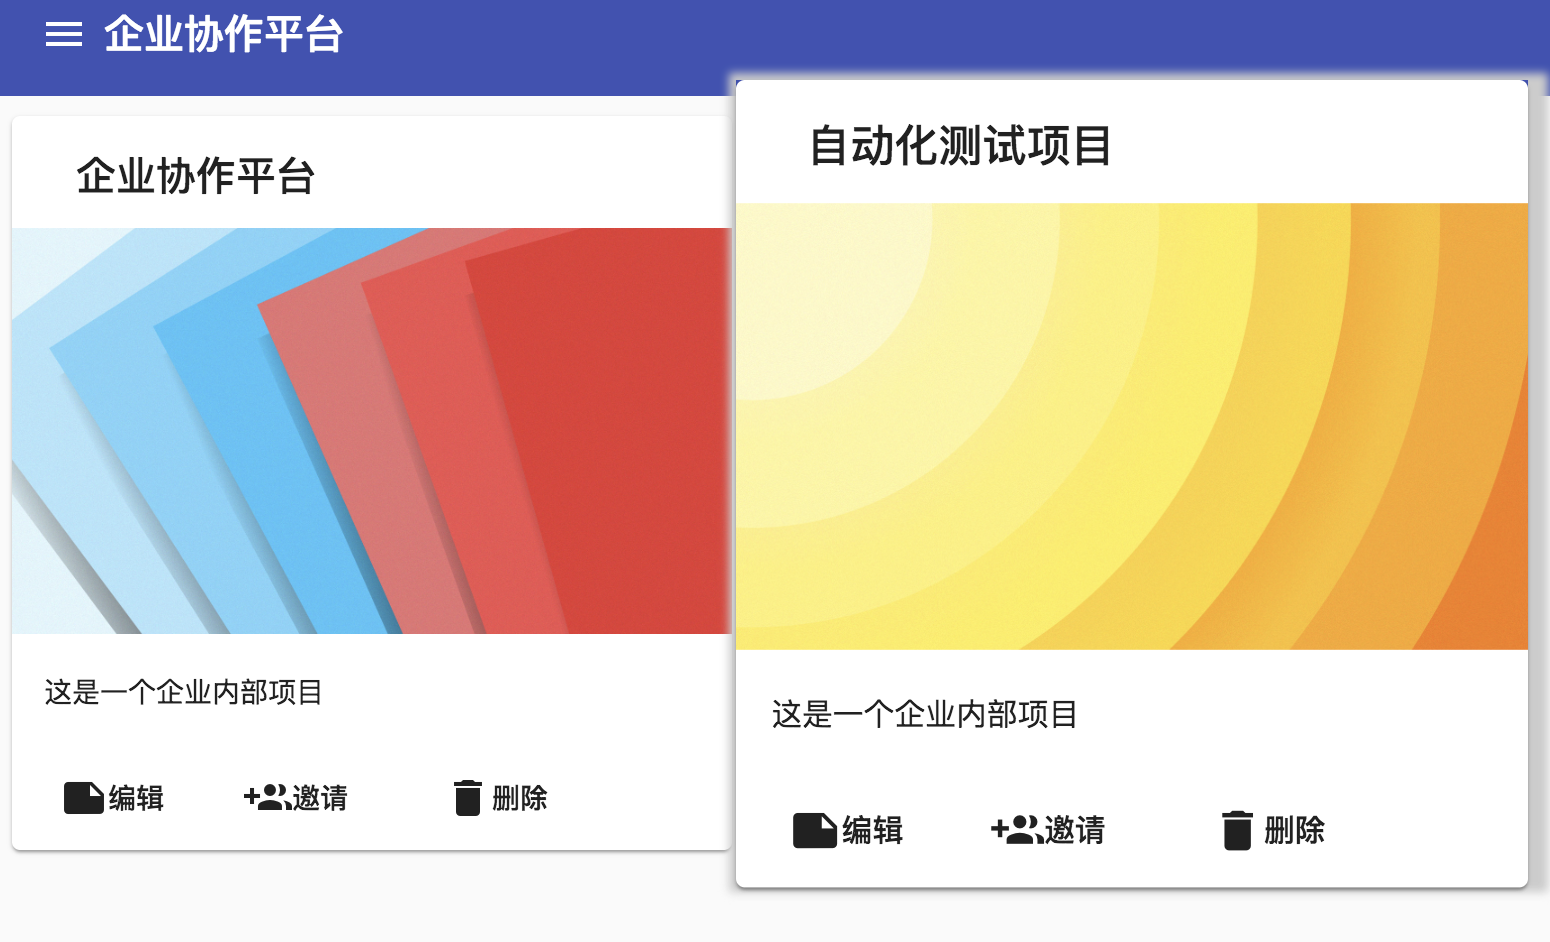
1、card相关的动画——绑定到宿主
新建一个card.animate.ts放card相关的动画。
import { trigger, state, transition, style, animate ,keyframes} from '@angular/animations';

export const cardAnim = trigger('card',[
    state('out',style({transform:'scale(1)','box-shadow':'none'})),
    state('hover',style({transform:'scale(1.1)','box-shadow':'3px 3px 5px 6px #ccc'})),
    transition('out => hover',animate('200ms ease-in')),
    transition('hover => out',animate('200ms ease-out'))
]);
在project-item里使用动画。
1、从@angular/core里导入HostBinding。
2、引入另外一个HostListener
监听鼠标enter和leave的事件
  @HostListener('mouseenter', ['$event.target'])
  onMouseEnter(target) {
    this.cardState = 'hover';
  }

  @HostListener('mouseleave', ['$event.target'])
  onMouseLeave(target) {
    this.cardState = 'out';
  }


import { Component, OnInit, Input, EventEmitter, Output ,HostBinding ,HostListener} from '@angular/core';
import { cardAnim } from '../../animate/card.animate'

@Component({
  selector: 'app-project-item',
  templateUrl: './project-item.component.html',
  styleUrls: ['./project-item.component.scss'],
  animations:[
    cardAnim
  ]
})
export class ProjectItemComponent implements OnInit {

  @Input() item;
  @Output() onInvite = new EventEmitter<void>();
  @Output() onEdit = new EventEmitter<void>();
  @Output() onDelete = new EventEmitter<void>();
  @HostBinding('@card') cardState = 'out';

  constructor() { }

  ngOnInit() {
  }

  @HostListener('mouseenter')
  onmouseenter(){
    this.cardState = 'hover'
  }

  @HostListener('mouseleave')
  onmouseleave(){
    this.cardState = 'out'
  }

  onInviteClick() {
    this.onInvite.emit();
  }
  onEditClick() {
    this.onEdit.emit();
  }
  onDeleteClick(){
this.onDelete.emit();
  }
}
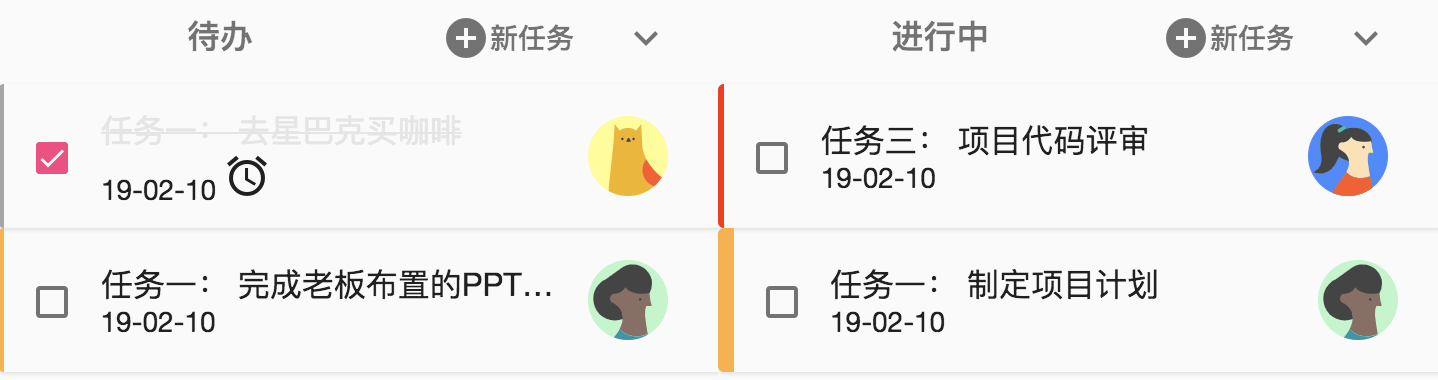
2、task相关的动画——绑定到部分元素
不是组件本身的动画,而是组件中一部分元素的动画。
新建一个item.animate.ts放task相关的动画
import { trigger, state, transition, style, animate ,keyframes} from '@angular/animations';

export const itemAnim = trigger('item',[
    state('in',style({'border-left-width':'3px'})),
    state('out',style({'border-left-width':'8px'})),
    transition('in => out',animate('200ms ease-in')),
    transition('out => in',animate('200ms ease-out'))
]);
在test-item中使用
import { Component, OnInit, Input, EventEmitter, Output, HostListener } from '@angular/core';
import {itemAnim} from '../../animate/item.animate';

@Component({
  selector: 'app-task-item',
  templateUrl: './task-item.component.html',
  styleUrls: ['./task-item.component.scss'],
  animations:[
    itemAnim
  ]
})
export class TaskItemComponent implements OnInit {

  @Input() item;
  @Input() avatar: string;
  @Output() taskClick = new EventEmitter<void>();
  widerPriority = 'in';

  constructor() { }

  ngOnInit() {
    this.avatar = this.item.owner ? this.item.owner.avatar : 'unassigned';
  }

  @HostListener('mouseenter')
  onmouseenter(){
    this.widerPriority='out';
  }
  @HostListener('mouseleave')
  onmouseleave(){
    this.widerPriority='in';
  }

  onItemClick() {
    this.taskClick.emit();
  }
  onCheckBoxClick(event: Event): void {
    event.stopPropagation();
  }

}
在模版中用
<mat-list-item class="container"
[@item]="widerPriority"
[ngClass]="{
  'priority-normal':item.priority===3,
  'priority-important':item.priority===2,
  'priority-emergency':item.priority===1
}"
  (click)=onItemClick()>
  <mat-checkbox [checked]="item.completed" class="status" (click)="onCheckBoxClick($event)"> </mat-checkbox>
  <div class="content" mat-line [ngClass]="{'completed':item.completed}">
    <span [matTooltip]="item.desc">{{item.desc}}</span>
  </div>
  <div class="bottom-bar" mat-line>
    <span class="due-date" *ngIf="item.dueDate">
      {{item.dueDate | date:"yy-MM-dd"}}
    </span>
    <mat-icon *ngIf="item.reminder">
      alarm
    </mat-icon>
  </div>
  <mat-icon [svgIcon]="avatar" mat-list-avatar class="avatar">

  </mat-icon>
</mat-list-item>
效果