一、z-index
z-index用来控制元素重叠时堆叠顺序。
适用于:已经定位的元素(即position:relative/absolute/fixed)。
一般理解就是数值越高越靠上,好像很简单,但是当z-index应用于复杂的HTML元素层次结构,其行为可能很难理解甚至不可预测。因为z-index的堆叠规则很复杂,下面一一道来。
首先解释一个名词:
stacking context:翻译就是“堆叠上下文”。每个元素仅属于一个堆叠上下文,元素的z-index描述元素在相同堆叠上下文中“z轴”的呈现顺序。
z-index取值:
默认值auto:
当页面新生成一个box时,它默认的z-index值为auto,意味着该box不会自己产生一个新的local stacking context,而是处于和父box相同的堆叠上下文中。
正/负整数
这个整数就是当前box的z-index值。z-index值为0也会生成一个local stacking context,这样该box父box的z-index就不会和其子box做比较,相当于隔离了父box的z-index和子box的z-index。
接下来从最简单的不使用z-index的情况开始将,循序渐进。
二、不使用 z-index时堆叠顺序
不使用z-index的情况,也是默认的情况,即所有元素都不用z-index时,堆叠顺序如下(从下到上)
- 根元素(即HTML元素)的background和borders
- 正常流中非定位后代元素(这些元素顺序按照HTML文档出现顺序)
- 已定位后代元素(这些元素顺序按照HTML文档出现顺序)
- 正常流中非positoned element元素,总是先于positioned element元素渲染,所以表现就是在positioned element下方,跟它在HTML中出现的顺序无关。
- 没有指定z-index值的positioned element,他们的堆叠顺序取决于在HTML文档中的顺序,越靠后出现的元素,位置越高,和position属性无关。
例子:


<!DOCTYPE html>
<html>
<head>
    <meta charset="UTF-8">
    <title>Stacking without z-index</title>
    <style type="text/css">

    div {
        font: 12px Arial;
        text-align: center;
    }

    .bold { font-weight: bold; }
    .opacity{opacity: 0.7;}

    #normdiv {
        height: 70px;
        border: 1px dashed #999966;
        background-color: #ffffcc;
        margin: 0px 50px 0px 50px;
    }

    #reldiv1 {
        height: 100px;
        position: relative;
        top: 30px;
        border: 1px dashed #669966;
        background-color: #ccffcc;
        margin: 0px 50px 0px 50px;
    }

    #reldiv2 {
        height: 100px;
        position: relative;
        top: 15px;
        left: 20px;
        border: 1px dashed #669966;
        background-color: #ccffcc;
        margin: 0px 50px 0px 50px;
    }

    #absdiv1 {
        position: absolute;
        width: 150px;
        height: 350px;
        top: 10px;
        left: 10px;
        border: 1px dashed #990000;
        background-color: #ffdddd;
    }

    #absdiv2 {
        position: absolute;
        width: 150px;
        height: 350px;
        top: 10px;
        right: 10px;
        border: 1px dashed #990000;
        background-color: #ffdddd;
    }

</style>
</head>

<body>
    <br /><br />

    <div id="absdiv1" class="opacity">
        <br /><span class="bold">DIV #1</span>
        <br />position: absolute;
    </div>

    <div id="reldiv1" class="opacity">
        <br /><span class="bold">DIV #2</span>
        <br />position: relative;
    </div>

    <div id="reldiv2" class="opacity">
        <br /><span class="bold">DIV #3</span>
        <br />position: relative;
    </div>

    <div id="absdiv2" class="opacity">
        <br /><span class="bold">DIV #4</span>
        <br />position: absolute;
    </div>

    <div id="normdiv">
        <br /><span class="bold">DIV #5</span>
        <br />no positioning
    </div>
</body>
</html>
有图有真相:
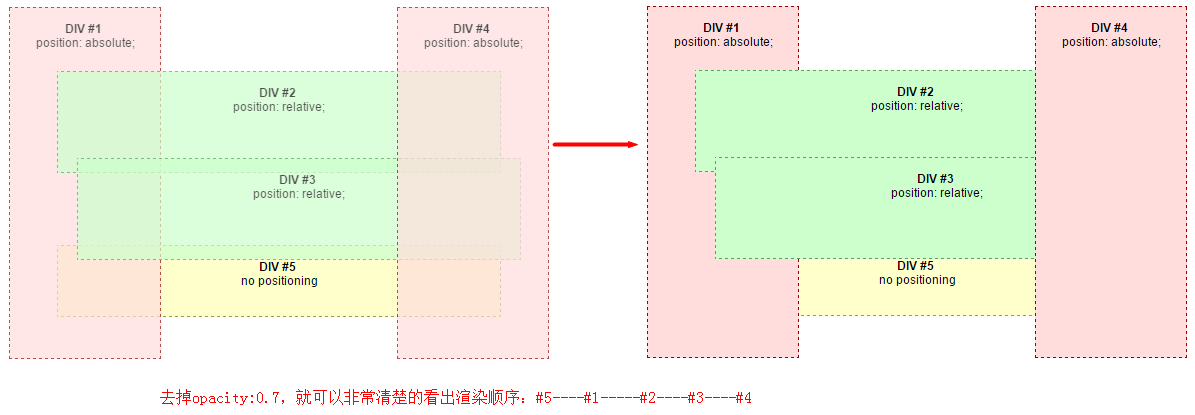
分析:
#5没有定位,处于正常流,所以根据以上规则,先于#1,#2,#3,#4这些已定位元素渲染,在最下方。
#1,#2,#3,#4都是已定位元素,且未设置z-index,所以根据其在文档中出现的顺序依次被渲染,可以去掉apacity查看清晰效果。
三、浮动堆叠顺序
浮动元素z-index位置介于非定位元素和定位元素之间。(从下到上)
- 根元素(即HTML元素)的背景和border
- 正常流中非定位后代元素(这些元素顺序按照HTML文档出现顺序)
- 浮动元素(浮动元素之间是不会出现z-index重叠的)
- 正常流中inline后代元素
- 已定位后代元素(这些元素顺序按照HTML文档出现顺序)
non-positioned元素的背景和边界没有被浮动元素影响,但是元素中的内容受影响(浮动布局特性)
举例:
<!DOCTYPE html>
<html>
<head>
    <meta charset="UTF-8">
    <title>Stacking and float</title>
    <style type="text/css">

    div {
        font: 12px Arial;
        text-align: center;
    }

    .bold { font-weight: bold; }
    .opacity{ opacity: 0.7;}

    #absdiv1 {
        position: absolute;
        width: 150px;
        height: 200px;
        top: 10px;
        right: 140px;
        border: 1px dashed #990000;
        background-color: #ffdddd;
    }

    #normdiv {
/*         opacity: 0.7; */
        height: 100px;
        border: 1px dashed #999966;
        background-color: #ffffcc;
        margin: 0px 10px 0px 10px;
        text-align: left;
    }

    #flodiv1 {
        margin: 0px 10px 0px 20px;
        float: left;
        width: 150px;
        height: 200px;
        border: 1px dashed #009900;
        background-color: #ccffcc;
    }

    #flodiv2 {
        margin: 0px 20px 0px 10px;
        float: right;
        width: 150px;
        height: 200px;
        border: 1px dashed #009900;
        background-color: #ccffcc;
    }

    #absdiv2 {
        position: absolute;
        width: 150px;
        height: 100px;
        top: 130px;
        left: 100px;
        border: 1px dashed #990000;
        background-color: #ffdddd;
    }

</style>
</head>

<body>
    <br /><br />

    <div id="absdiv1" class="opacity">
        <br /><span class="bold">DIV #1</span>
        <br />position: absolute;
    </div>

    <div id="flodiv1" class="opacity">
        <br /><span class="bold">DIV #2</span>
        <br />float: left;
    </div>

    <div id="flodiv2" class="opacity">
        <br /><span class="bold">DIV #3</span>
        <br />float: right;
    </div>

    <br />

    <div id="normdiv">
        <br /><span class="bold">DIV #4</span>
        <br />no positioning
    </div>

    <div id="absdiv2" class="opacity">
        <br /><span class="bold">DIV #5</span>
        <br />position: absolute;
    </div>
</body>
</html>
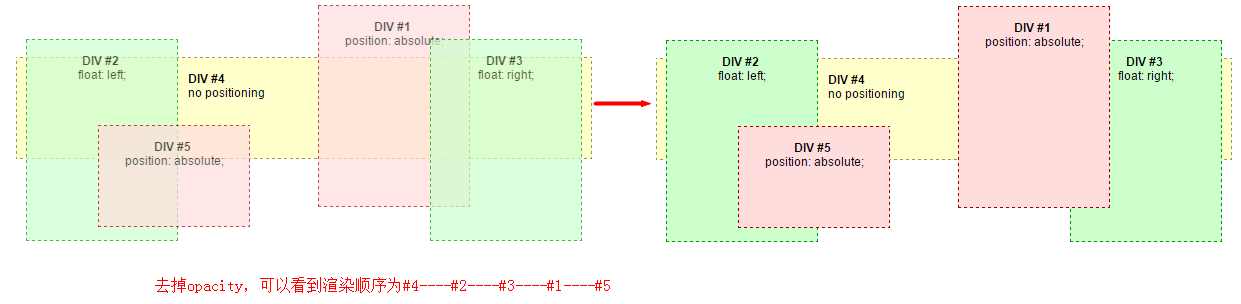
分析:
#4是正常流中非定位的元素,所以先被渲染,在最底层。
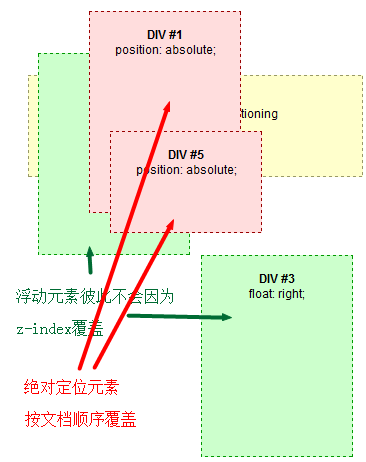
#2 #3一个左浮动,一个右浮动,接着被渲染。彼此不会因为z-index值被覆盖。见下图。
#1 #5为已定位的元素,最后被渲染,当浏览器窗口变小时,#5在#1上面,因为HTML文档中#5在#1后面。见下图。
四、z-index
默认的堆叠顺序上面说了,要想改变 元素的堆叠顺序就得用到z-index。
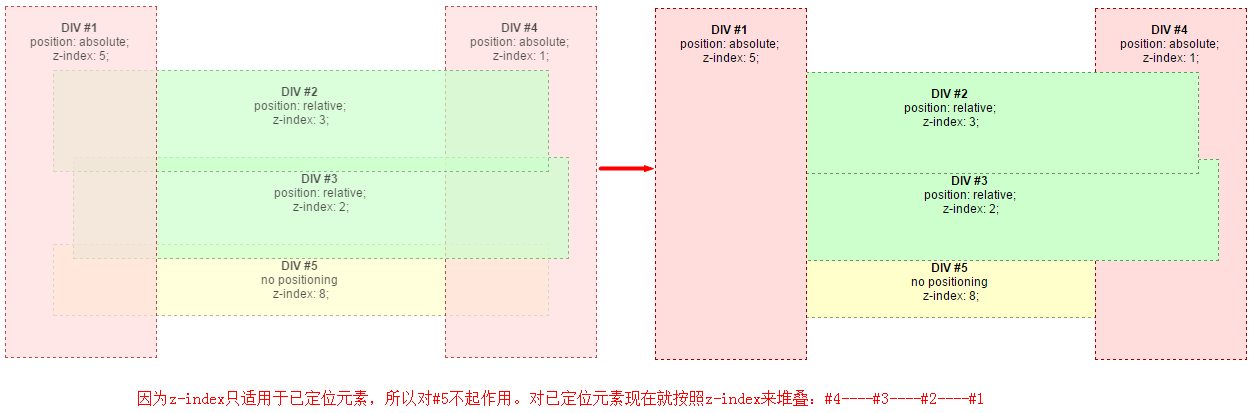
Note:前两种情况中,虽然有元素之间的重叠覆盖,但是它们都是处在同一个z-layer的。因为没有设置z-index属性,默认的渲染层就是layer 0。所以要注意,不同层中元素之间覆盖是理所当然的,但是同一层中的元素也会发生覆盖。
z-index只适用于已经定位的元素(即position:relative/absolute/fixed)。
举例:
<!DOCTYPE html>
<html>
<head>
    <meta charset="UTF-8">
    <title>Stacking without z-index</title>
    <style type="text/css">

    div {
        font: 12px Arial;
        text-align: center;
        opacity: 0.7;
    }

    .bold { font-weight: bold; }

    #normdiv {
        z-index: 8;
        height: 70px;
        border: 1px dashed #999966;
        background-color: #ffffcc;
        margin: 0px 50px 0px 50px;
    }

    #reldiv1 {
        z-index: 3;
        height: 100px;
        position: relative;
        top: 30px;
        border: 1px dashed #669966;
        background-color: #ccffcc;
        margin: 0px 50px 0px 50px;
    }

    #reldiv2 {
        z-index: 2;
        height: 100px;
        position: relative;
        top: 15px;
        left: 20px;
        border: 1px dashed #669966;
        background-color: #ccffcc;
        margin: 0px 50px 0px 50px;
    }

    #absdiv1 {
        z-index: 5;
        position: absolute;
        width: 150px;
        height: 350px;
        top: 10px;
        left: 10px;
        border: 1px dashed #990000;
        background-color: #ffdddd;
    }

    #absdiv2 {
        z-index: 1;
        position: absolute;
        width: 150px;
        height: 350px;
        top: 10px;
        right: 10px;
        border: 1px dashed #990000;
        background-color: #ffdddd;
    }

</style>
</head>

<body>

    <br /><br />

    <div id="absdiv1">
        <br /><span class="bold">DIV #1</span>
        <br />position: absolute;
        <br />z-index: 5;
    </div>

    <div id="reldiv1">
        <br /><span class="bold">DIV #2</span>
        <br />position: relative;
        <br />z-index: 3;
    </div>

    <div id="reldiv2">
        <br /><span class="bold">DIV #3</span>
        <br />position: relative;
        <br />z-index: 2;
    </div>

    <div id="absdiv2">
        <br /><span class="bold">DIV #4</span>
        <br />position: absolute;
        <br />z-index: 1;
    </div>

    <div id="normdiv">
        <br /><span class="bold">DIV #5</span>
        <br />no positioning
        <br />z-index: 8;
    </div>

</body>
</html>
五、stacking context
为什么上个例子中元素的堆叠顺序受z-index的影响呢?因为这些元素有些特殊的属性触发它们生存堆叠上下文(stacking context)。
问题来了,什么样的元素会生成堆叠上下文呢?符合下面规则之一的:
- 根元素(即HTML元素)
- 已定位元素(即绝对定位或相对定位)并且z-index不是默认的auto。
- a flex item with a z-index value other than "auto",
- 元素opacity属性不为1(See the specification for opacity)
- 元素transform不为none
- 元素min-blend-mode不为normal
- 元素filter属性不为none
- 元素isolation属性为isolate
- on mobile WebKit and Chrome 22+,
position: fixedalways creates a new stacking context, even when z-index is "auto" (See this post) - specifing any attribute above in
will-change - elements with
-webkit-overflow-scrollingset to "touch"
在堆叠上下文(stacking context)中 ,子元素的堆叠顺序还是按照上述规则。重点是,子元素的z-index值只在父元素范围内有效。子堆叠上下文被看做是父堆叠上下文中一个独立的模块,相邻的堆叠上下文完全没关系。
总结几句:
渲染的时候,先确定小的stacking context中的顺序,一个小的stacking context确定了以后再将其放在父stacking context中堆叠。有种由内而外,由小及大的感觉。
举例:HTML结果如下,最外层是HTML元素,包含#1 #2 #3,#3中又包含着#4,#5,#6。
Root(HTML)
- DIV #1
- DIV #2
- DIV #3
- DIV #4
- DIV #5
- DIV #6
<!DOCTYPE html PUBLIC "-//W3C//DTD XHTML 1.0 Strict//EN"
  "http://www.w3.org/TR/xhtml1/DTD/xhtml1-strict.dtd">

<html xmlns="http://www.w3.org/1999/xhtml" xml:lang="en">
  <head>

    <title>Understanding CSS z-index: The Stacking Context: Example Source</title>

    <style type="text/css">
      * {
        margin: 0;
        }
      html {
        padding: 20px;
        font: 12px/20px Arial, sans-serif;
        }
      div {
        opacity: 0.7;
        position: relative;
        }
      h1 {
        font: inherit;
        font-weight: bold;
        }
      #div1, #div2 {
        border: 1px solid #696;
        padding: 10px;
        background-color: #cfc;
        }
      #div1 {
        z-index: 5;
        margin-bottom: 190px;
        }
      #div2 {
        z-index: 2;
        }
      #div3 {
        z-index: 4;
        opacity: 1;
        position: absolute;
        top: 40px;
        left: 180px;
        width: 330px;
        border: 1px solid #900;
        background-color: #fdd;
        padding: 40px 20px 20px;
        }
      #div4, #div5 {
        border: 1px solid #996;
        background-color: #ffc;
        }
      #div4 {
        z-index: 6;
        margin-bottom: 15px;
        padding: 25px 10px 5px;
        }
      #div5 {
        z-index: 1;
        margin-top: 15px;
        padding: 5px 10px;
        }
      #div6 {
        z-index: 3;
        position: absolute;
        top: 20px;
        left: 180px;
        width: 150px;
        height: 125px;
        border: 1px solid #009;
        padding-top: 125px;
        background-color: #ddf;
        text-align: center;
        }
    </style>

  </head>
  <body>

    <div id="div1">
      <h1>Division Element #1</h1>
      <code>position: relative;<br/>
      z-index: 5;</code>
    </div>

    <div id="div2">
      <h1>Division Element #2</h1>
      <code>position: relative;<br/>
      z-index: 2;</code>
    </div>

    <div id="div3">

      <div id="div4">
        <h1>Division Element #4</h1>
        <code>position: relative;<br/>
        z-index: 6;</code>
      </div>

      <h1>Division Element #3</h1>
      <code>position: absolute;<br/>
      z-index: 4;</code>

      <div id="div5">
        <h1>Division Element #5</h1>
        <code>position: relative;<br/>
        z-index: 1;</code>
      </div>

      <div id="div6">
        <h1>Division Element #6</h1>
        <code>position: absolute;<br/>
        z-index: 3;</code>
      </div>

    </div>

  </body>
</html>
效果:

分析一下:
1、因为设置了div {opacity: 0.7; position: relative;},所以#1~#6的z-index都是有效的。
2、为什么#4的z-index比#1高,但是却在#1下面?因为#4的z-index虽然值大,但它的作用域在包含块#3内,而#1的z-index的作用域在html内,和#3同属html,而#3的z-index小于#1。
3、为什么#2的z-index值比#5的大,还在下面?同上。
4、#3的z-index是4,但该值和#4,#5,#6的z-index不具有可比性,它们不在一个上下文环境。
5、如何轻易的判断两个元素的堆叠顺序?
z-index对堆叠顺序的控制类似于排版时候一大章下几个小节的样子,或者版本号中一个大的版本号跟着小版本号。
Root-z-index值为默认auto,即0
- DIV #2 - z-index 值为2
- DIV #3 - z-index 值为4
- DIV #5 - z-index值为 1,其父元素z-index值 4,所以最终值为4.1
- DIV #6 - z-index值为 3,其父元素z-index值 4,所以最终值为4.3
- DIV #4 - z-index值为 6,其父元素z-index值 4,所以最终值为4.6
- DIV #1 - z-index 值为5
想看更多例子,可参考文章最后的资源链接。
六、 合理使用z-index数值
如果现有三个堆叠的层,从上到下分别为:DIV3,DIV2,DIV1,设置时以100为间隔,设置DIV1的z-index为0,DIV2的z-index为100,设置DIV3的z-index为200。这样后期如果需要在DIV1和DIV2之间加入一些层的话,以10为间隔,设置z-index为10,20等。再需要向z-index0和z-index10之间加入一层的话以5为间隔。这样的写法可以方便后期扩展添加内容。
尽量避免给z-index使用负值。当然不是绝对的,比如在做图文替换的时候可以使用负值。
七、资源链接
- Stacking without z-index : Default stacking rules
- Stacking and float : How floating elements are handled
- Adding z-index : Using z-index to change default stacking
- The stacking context : Notes on the stacking context
- Stacking context example 1 : 2-level HTML hierarchy, z-index on the last level
- Stacking context example 2 : 2-level HTML hierarchy, z-index on all levels
- Stacking context example 3 : 3-level HTML hierarchy, z-index on the second level
本文作者starof,因知识本身在变化,作者也在不断学习成长,文章内容也不定时更新,为避免误导读者,方便追根溯源,请诸位转载注明出处:http://www.cnblogs.com/starof/p/4424926.html有问题欢迎与我讨论,共同进步。