1.下载storm安装文件并解压
[root@hadoop01 soft]# wget http://mirrors.hust.edu.cn/apache/storm/apache-storm-1.1.3/apache-storm-1.1.3.tar.gz [root@hadoop01 soft]# tar zxvf apache-storm-1.1.3.tar.gz -C /usr/local/ |
2.修改配置文件
[root@hadoop01 apache-storm-1.1.3]# cd /usr/local/apache-storm-1.1.3/conf/ [root@hadoop01 conf]# vim storm.yaml |
注意:storm的配置文件strom.yaml格式按照yaml严格格式书写
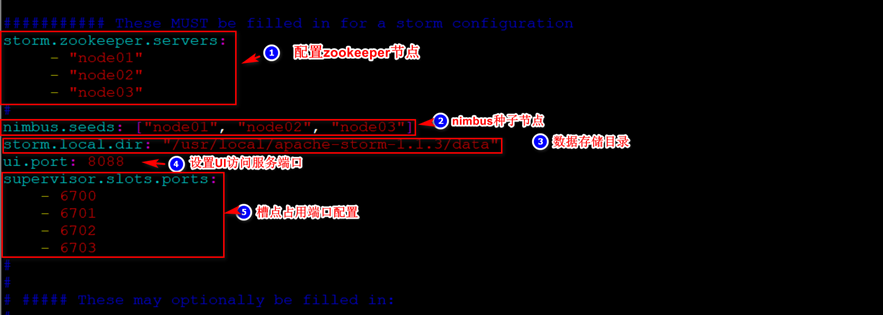
########### These MUST be filled in for a storm configuration storm.zookeeper.servers: - "node01" - "node02" - "node03"
nimbus.seeds: ["node01", "node02", "node03"] storm.local.dir: "/usr/local/apache-storm-1.1.3/data" ui.port: 8088 supervisor.slots.ports: - 6700 - 6701 - 6702 - 6703 |

将配置好的storm程序复制到其他两台服务器上
[root@hadoop01 local]# cd /usr/local/ [root@hadoop01 local]# scp -r apache-storm-1.1.3/ root@node02:$PWD [root@hadoop01 local]# scp -r apache-storm-1.1.3/ root@node03:$PWD |
storm集群启动
[root@hadoop01 local]# cd apache-storm-1.1.3/bin/ #进入启动程序名录 [root@hadoop01 bin]# nohup ./storm nimbus 2>&1 & #启动nimbus [root@hadoop01 bin]# nohup ./storm supervisor 2>&1 & #启动supervisor [root@hadoop01 bin]# nohup ./storm ui 2>&1 & #启动web管理(集群给服务其中只启动一台服务器上web服务进程即可) [root@hadoop01 bin]# nohup ./storm logviewer 2>&1 & #启动日志查看进程(一般不启动,日志服务占用服务器) |