安装环境
[root@localhost ~]# uname -a
Linux localhost 3.10.0-327.el7.x86_64 #1 SMP Thu Nov 19 22:10:57 UTC 2015 x86_64 x86_64 x86_64 GNU/Linux
mysql安装过程不做描述,这里安装的版本是
Server version: 5.7.18 MySQL Community Server (GPL)
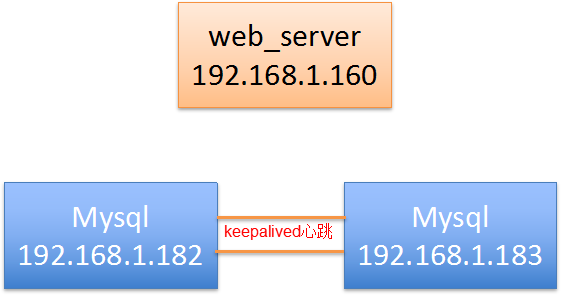
整体的实验架构
Mysql双主复制
新建repl_user用户
create user 'repl_user'@'%' identified by 'Repl@123456';
授权
grant all on *.* to 'repl_user'@'%';
修改182的/etc/my.cnf文件,添加如下的logbin和replicate配置
[mysqld]
log-bin=mysql-bin
relay-log=mysql-relay-bin
server-id=1
replicate-wild-ignore-table=mysql.%
replicate-wild-ignore-table=test.%
replicate-wild-ignore-table=information_schema.%
修改183的/etc/my.cnf文件,添加如下的logbin和replicate配置
[mysqld]
log-bin=mysql-bin
relay-log=mysql-relay-bin
server-id=2
replicate-wild-ignore-table=mysql.%
replicate-wild-ignore-table=test.%
replicate-wild-ignore-table=information_schema.%
推荐在主从库上使用replicate-wild-ignore-table和replicate_wild_do_table两个选项来解决复制过滤的问题。
同步配置前,保证数据的同步一致,可以的操作是导出
配置182为186的主
登陆182,执行如下命令
mysql> show master statusG
*************************** 1. row ***************************
             File: mysql-bin.000001
         Position: 1870
     Binlog_Do_DB:
 Binlog_Ignore_DB:
Executed_Gtid_Set:
1 row in set (0.00 sec)
登录186
#设置182为186的master,master_log_file和master_log_pos的值取自182上获取的值

mysql> change master to master_host='192.168.1.182',master_user='repl_user',master_password='Repl@123456',master_log_file='mysql-bin.000001',master_log_pos=1870;
Query OK, 0 rows affected, 2 warnings (0.01 sec)

#启动slave
mysql> start slave;
Query OK, 0 rows affected (0.00 sec)

#查看slave的状态
mysql> show slave statusG
*************************** 1. row ***************************
               Slave_IO_State: Waiting for master to send event
                  Master_Host: 192.168.1.182
                  Master_User: repl_user
                  Master_Port: 3306
                Connect_Retry: 60
              Master_Log_File: mysql-bin.000001
          Read_Master_Log_Pos: 1870
               Relay_Log_File: mysql-relay-bin.000002
                Relay_Log_Pos: 320
        Relay_Master_Log_File: mysql-bin.000001
             Slave_IO_Running: Yes
            Slave_SQL_Running: Yes
              Replicate_Do_DB:
          Replicate_Ignore_DB:
           Replicate_Do_Table:
       Replicate_Ignore_Table:
      Replicate_Wild_Do_Table:
  Replicate_Wild_Ignore_Table: mysql.%,test.%,information_schema.%
                   Last_Errno: 0
                   Last_Error:
                 Skip_Counter: 0
          Exec_Master_Log_Pos: 1870
              Relay_Log_Space: 527
              Until_Condition: None
               Until_Log_File:
                Until_Log_Pos: 0
           Master_SSL_Allowed: No
           Master_SSL_CA_File:
           Master_SSL_CA_Path:
              Master_SSL_Cert:
            Master_SSL_Cipher:
               Master_SSL_Key:
        Seconds_Behind_Master: 0
Master_SSL_Verify_Server_Cert: No
                Last_IO_Errno: 0
                Last_IO_Error:
               Last_SQL_Errno: 0
               Last_SQL_Error:
  Replicate_Ignore_Server_Ids:
             Master_Server_Id: 1
                  Master_UUID: 8c57082a-b0e7-11e7-b51a-000c29d77e66
             Master_Info_File: /var/lib/mysql/master.info
                    SQL_Delay: 0
          SQL_Remaining_Delay: NULL
      Slave_SQL_Running_State: Slave has read all relay log; waiting for more updates
           Master_Retry_Count: 86400
                  Master_Bind:
      Last_IO_Error_Timestamp:
     Last_SQL_Error_Timestamp:
               Master_SSL_Crl:
           Master_SSL_Crlpath:
           Retrieved_Gtid_Set:
            Executed_Gtid_Set:
                Auto_Position: 0
         Replicate_Rewrite_DB:
                 Channel_Name:
           Master_TLS_Version:
1 row in set (0.00 sec)
配置186为182的主,过程和设置182为186的主一样的逻辑,不在熬述
mysql> change master to master_host='192.168.1.183',master_user='repl_user',master_password='Repl@123456',master_log_file='mysql-bin.000001',master_log_pos=154;
Query OK, 0 rows affected, 2 warnings (0.01 sec)

mysql> start slave;
Query OK, 0 rows affected (0.01 sec)

mysql> show slave statusG
*************************** 1. row ***************************
               Slave_IO_State: Waiting for master to send event
                  Master_Host: 192.168.1.183
                  Master_User: repl_user
                  Master_Port: 3306
                Connect_Retry: 60
              Master_Log_File: mysql-bin.000001
          Read_Master_Log_Pos: 154
               Relay_Log_File: mysql-relay-bin.000002
                Relay_Log_Pos: 320
        Relay_Master_Log_File: mysql-bin.000001
             Slave_IO_Running: Yes
            Slave_SQL_Running: Yes
              Replicate_Do_DB:
          Replicate_Ignore_DB:
           Replicate_Do_Table:
       Replicate_Ignore_Table:
      Replicate_Wild_Do_Table:
  Replicate_Wild_Ignore_Table: mysql.%,test.%,information_schema.%
                   Last_Errno: 0
                   Last_Error:
                 Skip_Counter: 0
          Exec_Master_Log_Pos: 154
              Relay_Log_Space: 527
              Until_Condition: None
               Until_Log_File:
                Until_Log_Pos: 0
           Master_SSL_Allowed: No
           Master_SSL_CA_File:
           Master_SSL_CA_Path:
              Master_SSL_Cert:
            Master_SSL_Cipher:
               Master_SSL_Key:
        Seconds_Behind_Master: 0
Master_SSL_Verify_Server_Cert: No
                Last_IO_Errno: 0
                Last_IO_Error:
               Last_SQL_Errno: 0
               Last_SQL_Error:
  Replicate_Ignore_Server_Ids:
             Master_Server_Id: 2
                  Master_UUID: 1dcdd77b-b26c-11e7-a821-000c2965ea8c
             Master_Info_File: /var/lib/mysql/master.info
                    SQL_Delay: 0
          SQL_Remaining_Delay: NULL
      Slave_SQL_Running_State: Slave has read all relay log; waiting for more updates
           Master_Retry_Count: 86400
                  Master_Bind:
      Last_IO_Error_Timestamp:
     Last_SQL_Error_Timestamp:
               Master_SSL_Crl:
           Master_SSL_Crlpath:
           Retrieved_Gtid_Set:
            Executed_Gtid_Set:
                Auto_Position: 0
         Replicate_Rewrite_DB:
                 Channel_Name:
           Master_TLS_Version:
1 row in set (0.00 sec)
测试验证,mysql双主复制正常运行
182机器上keepalived
yum install -y keepalived
安装后修改/etc/keepalived/keepalived.conf
global_defs {
   notification_email {
     *********@qq.com
   }
   smtp_server 127.0.0.1
   smtp_connect_timeout 30
   router_id Mysql_lvs
}

vrrp_instance VI_1 {
    state MASTER
    interface ens33
    virtual_router_id 51
    priority 100
    nopreempt
    advert_int 1
    authentication {
        auth_type PASS
        auth_pass 1111
    }
    virtual_ipaddress {
        192.168.1.160/24 brd 192.168.1.255  dev ens33
    }
}

virtual_server 192.168.1.160 3306 {
    delay_loop 2
    lb_algo wrr
    lb_kind NAT
    persistence_timeout 50
    protocol TCP

    real_server 192.168.1.182 3306 {
        weight 2
        TCP_CHECK {
            connect_timeout 10         #10秒无响应超时
            delay_before_retry 3
            connect_port 3306
        }
    }

}
启动keepalived
systemctl start keepalived
183机器上安装keepalived
yum install -y keepalived
修改keepalived配置文件
! Configuration File for keepalived

global_defs {
   notification_email {
     ***********@qq.com
   }
   smtp_server 127.0.0.1
   smtp_connect_timeout 30
   router_id Mysql_lvs

}

vrrp_instance VI_1 {
    state BACKUP
    interface ens33
    virtual_router_id 51
    priority 50
    nopreempt
    advert_int 1
    authentication {
        auth_type PASS
        auth_pass 1111
    }
    virtual_ipaddress {
        192.168.1.160/24 brd 192.168.1.255 dev ens33
    }
}

 virtual_server 192.168.1.160 3306 {
    delay_loop 2
    lb_algo wrr
    lb_kind NAT
    persistence_timeout 50
    protocol TCP
    real_server 192.168.1.183 3306 {
        weight 2
        TCP_CHECK {
            connect_timeout 10         #10秒无响应超时
            delay_before_retry 3
            connect_port 3306
        }
    }
}
启动keepalived
systemctl restart keepalived
验证keepalived启动成功
[root@localhost keepalived]# ping 192.168.1.160
PING 192.168.1.160 (192.168.1.160) 56(84) bytes of data.
64 bytes from 192.168.1.160: icmp_seq=1 ttl=64 time=0.275 ms
64 bytes from 192.168.1.160: icmp_seq=2 ttl=64 time=1.34 ms
64 bytes from 192.168.1.160: icmp_seq=3 ttl=64 time=4.20 ms
64 bytes from 192.168.1.160: icmp_seq=4 ttl=64 time=5.58 ms
64 bytes from 192.168.1.160: icmp_seq=5 ttl=64 time=4.47 ms
^C
--- 192.168.1.160 ping statistics ---
5 packets transmitted, 5 received, 0% packet loss, time 4029ms
rtt min/avg/max/mdev = 0.275/3.175/5.587/2.016 ms
用mysql workbench链接mysql,验证mysql功能正确性,验证通过
关于keepalived日志的问题,keepalived的日志通过rsyslog记录,默认是记录的/var/log/messages系统日志目录,修改keepalived的日志需要修改两个地方
1 修改keepalived的启动参数,将/etc/sysconfig/keepalived修改为如下
# Options for keepalived. See `keepalived --help' output and keepalived(8) and
# keepalived.conf(5) man pages for a list of all options. Here are the most
# common ones :
#
# --vrrp               -P    Only run with VRRP subsystem.
# --check              -C    Only run with Health-checker subsystem.
# --dont-release-vrrp  -V    Dont remove VRRP VIPs & VROUTEs on daemon stop.
# --dont-release-ipvs  -I    Dont remove IPVS topology on daemon stop.
# --dump-conf          -d    Dump the configuration data.
# --log-detail         -D    Detailed log messages.
# --log-facility       -S    0-7 Set local syslog facility (default=LOG_DAEMON)

KEEPALIVED_OPTIONS="-D -d -S 0"
2 修改rsyslog的配置文件 /etc/rsyslog.conf,添加如下红色部分
# Save boot messages also to boot.log
local7.*                                                /var/log/boot.log

# keepalived -S 0
local0.*                                                /var/log/keepalived.log
3 配置后重启rsyslog和keepalived服务
#重启keepalived
systemctl restart keepalived
#重启rsyslog服务
systemctl restart rsyslog
完成配置后keepalived的日志将被单独输出到文件/var/log/keepalived.log文件中