前言
前面的文章里介绍了LDAP与一些公共平台的集成方法,今天看看与svn的集成方法,也是笔者花时间最多的一个环节了。
概述
在此之前,我想先跟大家分享下svn与ldap服务集成的大致思路,因为笔者当时在这方便走了不少弯路,也不想后续的同学继续为此花费不必要的时间。
方法选择
在集成的方法上,我这里尝试过两种方式,第一种是走apache,也就是说,需要先让你的svn与apache绑定起来,让你的svn版本库能够走http协议访问,除此之外需要开启apache的认证机制,并且这个认证的数据源,需要配置成ldap,如此一来,也就实现了svn+apache+ldap的集成套路;在尝试的过程中,svn与apache的联通比较好做,但apache与ldap的集成过程一直没有从尝试成功,在测试使用ldap中的用户名和密码登录的时候,一直报错认证失败,花了很多时间也没有解决;除此之外考虑到哪怕集成成功,后续公司所有同学本地的svn的checkout地址都需要从svn:// 改成http:// ,操作的代价比较大,因此转而尝试第二种方式:SASL
SASL
What Is SASL?
The Cyrus Simple Authentication and Security Layer is open source software written by Carnegie Mellon University. It adds generic authentication and encryption capabilities to any network protocol, and as of Subversion 1.5 and later, both the svnserve server and svn client know how to make use of this library. It may or may not be available to you: if you're building Subversion yourself, you'll need to have at least version 2.1 of SASL installed on your system, and you'll need to make sure that it's detected during Subversion's build process. If you're using a prebuilt Subversion binary package, you'll have to check with the package maintainer as to whether SASL support was compiled in. SASL comes with a number of pluggable modules that represent different authentication systems: Kerberos (GSSAPI), NTLM, One-Time-Passwords (OTP), DIGEST-MD5, LDAP, Secure-Remote-Password (SRP), and others. Certain mechanisms may or may not be available to you; be sure to check which modules are provided.You can download Cyrus SASL (both code and documentation) from http://asg.web.cmu.edu/sasl/s...
上面是svn官网上关于sasl的解释,大致描述就是它能够将通用的身份验证和加密功能添加到任何网络协议;
自svn从1.5版本之后,都能够使用sasl功能,同时,我们发现svn的配置文件里有”# use-sasl = true“这条被注释的参数;由此一来,我们就能够通过配置svn的用户验证走sasl,并且sasl从ldap来获1 取用户和密码信息,就能完整实现svn+sasl+ldap功能了,并且对于svn来说,后续需要变动的地方并不多,只需要修改配置即可。
SASL的验证方式
这里需要着重介绍下sasl的几种验证方式以及每种验证方式所适用的场景;
- Password Verification Mechanisms - 接收远程的口令,传递给SASL胶合层,由口令验证器验证,这种机制的例子有 PLAIN ;
- Shared Secret Mechanisms - 不是直接传递口令明文,而是服务方发起一个认证,客户证明自己知道这个口令,这需要服务方和客户方都保存有口令.这种机制的例子有 CRAM-MD5,DIGEST-MD5以及SRP ;
- Kerberos Mechanisms - 使用信任的第三方来验证客户。
- saslauthd - 呼叫saslauthd服务进程,验证用户。saslauthd支持很多识别方式,比如PAM,LDAP,Kerberos数据库等 。
如上,最后一种验证方式,就是那个被选中的方式!!!
安装sasl
root@saier-zj-online-game-192:/etc# apt-get -y install sasl*
配置sasl+ldap
vim /etc/default/saslauthd
修改参数
START=yes
MECHANISMS="ldap"
重启服务:
root@saier-zj-online-game-192:~# /etc/init.d/saslauthd restart
[ ok ] Restarting saslauthd (via systemctl): saslauthd.service.
查看saslauthd进程
root@saier-zj-online-game-192:~# ps -ef | grep ldap
openldap  3282     1  0 Sep23 ?        00:00:09 /usr/sbin/slapd -h ldap:/// ldapi:/// -g openldap -u openldap -F /etc/ldap/slapd.d
root     27914     1  0 20:52 ?        00:00:00 /usr/sbin/saslauthd -a ldap -c -m /var/run/saslauthd -n 5
root     27915 27914  0 20:52 ?        00:00:00 /usr/sbin/saslauthd -a ldap -c -m /var/run/saslauthd -n 5
root     27916 27914  0 20:52 ?        00:00:00 /usr/sbin/saslauthd -a ldap -c -m /var/run/saslauthd -n 5
root     27919 27914  0 20:52 ?        00:00:00 /usr/sbin/saslauthd -a ldap -c -m /var/run/saslauthd -n 5
root     27921 27914  0 20:52 ?        00:00:00 /usr/sbin/saslauthd -a ldap -c -m /var/run/saslauthd -n 5
root     27937  1304  0 20:52 pts/0    00:00:00 grep --color=auto ldap
这里看到saslauthd进程已经启动了,但是此时sasl并没有正确关联ldap,下面看看如何配置sasl与ldap的关联~
我们需要在/etc/下创建一个文件,命名为:saslauthd.conf,内容如下:
root@saier-zj-online-game-192:~# cat /etc/saslauthd.conf
ldap_servers: ldap://192.168.0.83:389

ldap_bind_dn: cn=admin,dc=ldap,dc=com

ldap_bind_pw: admin

ldap_auth_method: bind

ldap_search_base: dc=ldap,dc=com

ldap_filter: uid=%U
重启saslauthd:
root@saier-zj-online-game-192:~# /etc/init.d/saslauthd restart
[ ok ] Restarting saslauthd (via systemctl): saslauthd.service.
测试saslauthd与ldap的认证链路是否正确,这里saslauthd提供了一个测试指令:testsaslauthd,在此之前需要现先在ldap中创建用户并设置密码,测试指令如下:
root@saier-zj-online-game-192:~# testsaslauthd -u zhangjian -p zhangjian123
0: OK "Success."
当出现上面这样的输出,说明你的ldap+saslauthd配置正确。
安装svn
指令
apt-get -y install subversion
创建版本库:
svnadmin create /data/svntest
修改svn服务配置文件:
vim /data/svntest/conf/svnserve.conf
调整配置
anon-access = none
auth-access = write
authz-db = authz
use-sasl = true
修改权限认证文件:
需要调整的配置如下,因为我在ldap里创建的用户名是‘zhangjian’,因此需要在这里给该用户分组并且分配权限;
root@saier-zj-online-game-192:/data/svntest/conf# cat authz
[aliases]
# joe = /C=XZ/ST=Dessert/L=Snake City/O=Snake Oil, Ltd./OU=Research Institute/CN=Joe Average
[groups]
admin = zhangjian

[svntest:/]
@admin = rw
* = r
配置sasl+svn
在上面的配置中,我们打开了svn的sasl认证方式,此外,我们还需要配置sasl的svn配置文件,用来告诉sasl,svn的这个服务的认证方式是怎样的,上面的简介中可以看到,我们需要使用saslauthd这个认证方式,而且,这个文件一般是需要新建的,并且以服务的名字来命名,因为这里是svn服务,所以名字就叫做“svn.conf”。
注意
不同系统中,这个配置文件的位置也是不一样的,在Centos系列中,配置文件的绝对路径为“/etc/sasl2/svn.conf”,在Ubuntu系列中,配置文件的绝对路径为“/usr/lib/sasl2/svn.conf”。
root@saier-zj-online-game-192:/usr/lib/sasl2# cat svn.conf
pwcheck_method: saslauthd
mech_list: PLAIN LOGIN
重启saslauthd
root@saier-zj-online-game-192:/usr/lib/sasl2# /etc/init.d/saslauthd restart
[ ok ] Restarting saslauthd (via systemctl): saslauthd.service.
启动svn
svnserve -d --listen-port 3690 -r /data
测试
ok,svn开启之后,我们就来本地测试下,使用ldap里的用户名和密码,能不能拉取到我们的svn版本库~
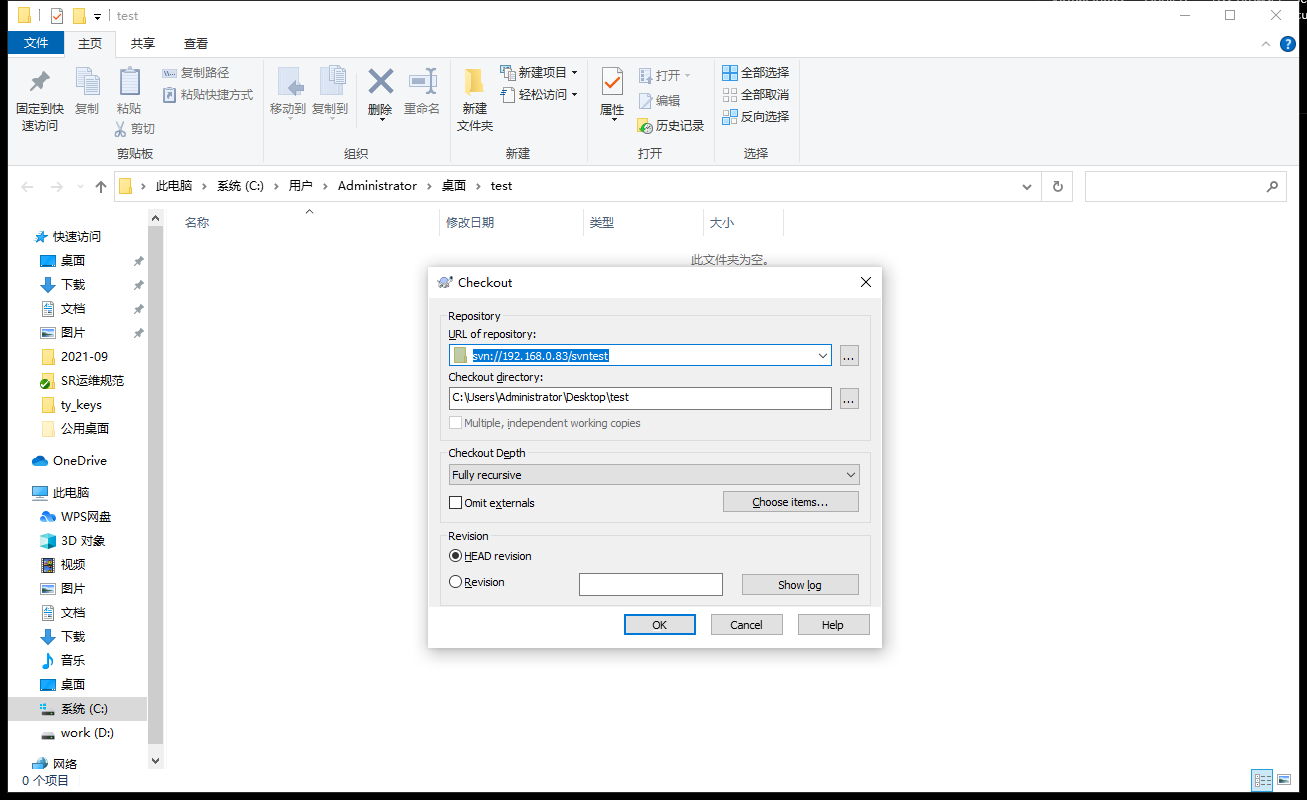
咱们新建一个目录,在里面尝试拉取我们的版本库,截图如下:

注意
因为我们的svn进程启动的时候,指定的’-r‘是’/data‘,因此,这里CO的时候,路径里需要把svntest加上;
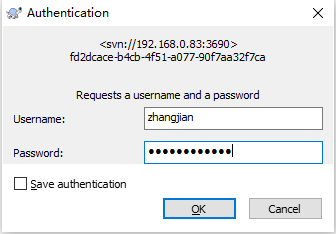
输入ldap中的用户名和密码,点击OK:

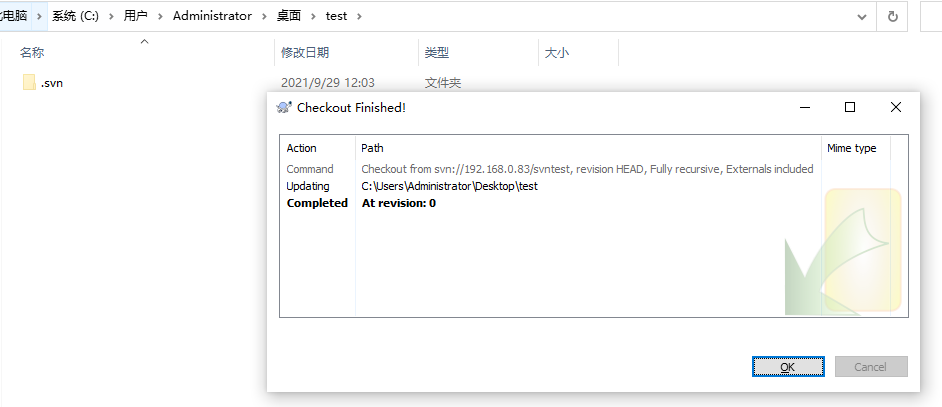
可以看到,这里是能够通过ldap里的用户名和密码来顺利拉取到版本库的~

同时,svn相关的提交和周边操作都是可以正确执行的,至此,就实现了svn+sasl+ldap三个组件的集成;
典型报错
笔者这里在部署初期遇到一个比较隐晦的问题,在参考很多其他文档的时候,发现大家把如下两条参数打开并配置了特定值
min-encryption = 125
max-encryption = 256
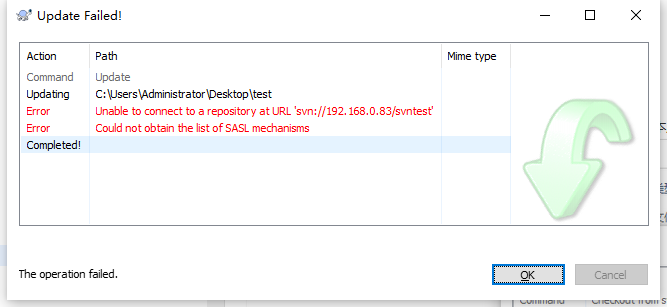
进而导致了如下的错误:

首先解释下这两条参数的含义,变量 min-encryption 和 max-encryption 控制服务器所需要的加密强度。要完全禁用加密,就将这 2 个变量的值都设为 0。要启用简单的数据校验(例如,为了防止篡改和保证数据的完整,不加密),就将这 2 个值都设为 1。如果你想允许(但不强制)加密,将最小值设为 0,最大值设为任意位数。要强制加密,将这 2 个值设为大于 1 的数字。在前面的例子中,我们要求客户端至少进行 128 位加密,但是不大于 256 位加密。
这里的加密是用在当svn需要使用sasl自带的数据文件进行存储并加密用户数据的时候,举个例子,当我们的svn.conf配置的内容如下的时候:
pwcheck_method: auxprop
auxprop_plugin: sasldb
sasldb_path: /home/svn/svnjiami/sasldb
mech_list: DIGEST-MD5
此时,我们需要通过saslpasswd2指令来创建用户和密码的,上面两条参数,就是指定这里的加密策略,那么再回到当前的场景中,我们使用的用户数据,都是来自ldap,并且ldap自身在存储用户信息的时候是有加密的,默认SHA1,因此,在笔者的部署场景中,并不需要打开这两条参数,或者把这两条参数都设置为0,截图中的报错就能解决了~
总结
以上是一些在集成svn和ldap服务的时候,一些个人的发现和感想,不能确保百分百准确,关于ldap,还有很多功能需要发掘和探索,仅仅是给大家一个参考,有理解偏差或没有阐明的地方,还望指正 ^ ^.