最近要开始使用activiti结合原有的系统来开发一个专业领域内的业务管理软件,以下记录了第一次搭建该开发平台过程中所遇到的各种问题,备忘。
一、按照如下方式新建一个web工程
之所以要用maven,主要是为了解决各种依赖项的问题,用maven来管理依赖项还是很方便的。
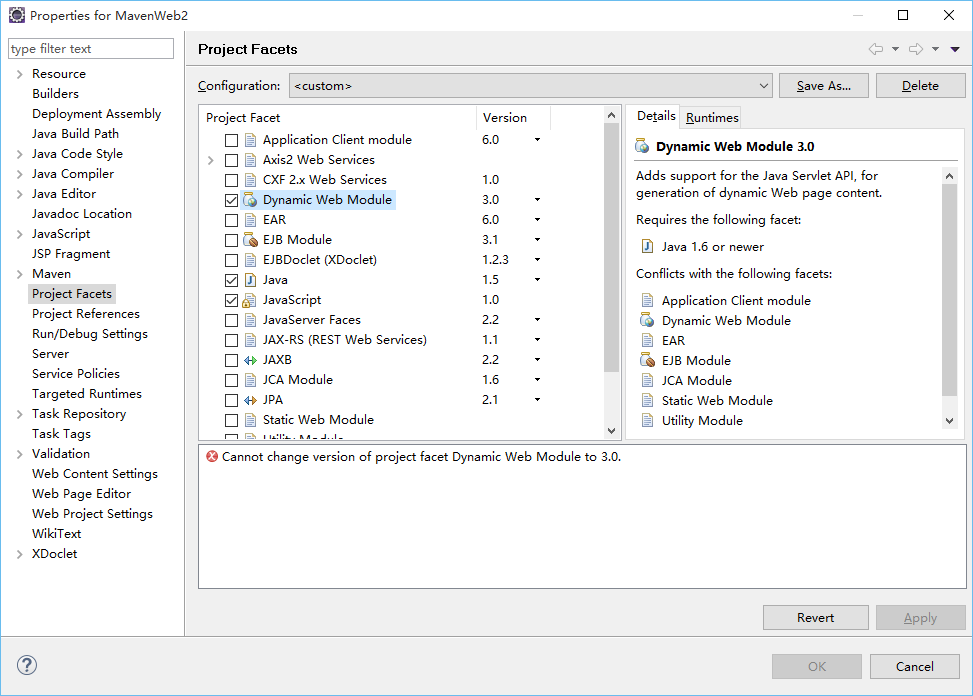
用Eclipse创建Maven结构的web项目的时候选择了Artifact Id为maven-artchetype-webapp,由于这个catalog比较老,用的servlet还是2.3的,而一般现在都是用3.0,在Project Facets里面修改Dynamic web module为3.0的时候就会出现Cannot change version of project facet Dynamic web module to 3.0,如图:
解决这个问题的步骤如下:
1. 把Servlet改成3.0,打开项目的web.xml
<?xml version="1.0" encoding="UTF-8"?><web-app xmlns:xsi="http://www.w3.org/2001/XMLSchema-instance" xmlns="http://java.sun.com/xml/ns/javaee" xsi:schemaLocation="http://java.sun.com/xml/ns/javaee http://java.sun.com/xml/ns/javaee/web-app_3_0.xsd" id="schedule-console" version="3.0">2. 修改项目的设置,在Navigator下打开项目.settings目录下的org.eclipse.jdt.core.prefs
把1.5改成1.8
eclipse.preferences.version=1org.eclipse.jdt.core.compiler.codegen.inlineJsrBytecode=enabledorg.eclipse.jdt.core.compiler.codegen.targetPlatform=1.8org.eclipse.jdt.core.compiler.compliance=1.8org.eclipse.jdt.core.compiler.problem.assertIdentifier=errororg.eclipse.jdt.core.compiler.problem.enumIdentifier=errororg.eclipse.jdt.core.compiler.problem.forbiddenReference=warningorg.eclipse.jdt.core.compiler.source=1.8 3. 打开org.eclipse.wst.common.project.facet.core.xml
把java改为1.8, 把jst.web改为3.0;
<?xml version="1.0" encoding="UTF-8"?><faceted-project> <fixed facet="wst.jsdt.web"/> <installed facet="jst.web" version="3.0"/> <installed facet="wst.jsdt.web" version="1.0"/> <installed facet="java" version="1.8"/></faceted-project>二、解决报错The superclass "javax.servlet.http.HttpServlet" was not found on the Java Build Path
可以使用如下步骤来解决。
1、右击web工程-》属性或Build Path-》Java Build Path->Libraries-> Add Libray...->Server Runtime -》Tomcat Server
2、切换到Java Build Path界面中的Orader and Export,选择Tomcat。
三、修改项目的pom.xml文件,添加activiti相关依赖项
相关依赖项如下:
<dependency>
<groupId>org.activiti</groupId>
<artifactId>activiti-engine</artifactId>
<version>${activiti-version}</version>
</dependency>
<dependency>
<groupId>org.activiti</groupId>
<artifactId>activiti-spring</artifactId>
<version>${activiti-version}</version>
</dependency>
<dependency>
<groupId>org.codehaus.groovy</groupId>
<artifactId>groovy-all</artifactId>
<version>2.4.3</version>
</dependency>
<dependency>
<groupId>com.h2database</groupId>
<artifactId>h2</artifactId>
<version>1.3.168</version>
</dependency>
<dependency>
<groupId>org.slf4j</groupId>
<artifactId>slf4j-api</artifactId>
<version>1.7.6</version>
</dependency>
<dependency>
<groupId>org.slf4j</groupId>
<artifactId>slf4j-jdk14</artifactId>
<version>1.7.6</version>
</dependency>
<dependency>
<groupId>junit</groupId>
<artifactId>junit</artifactId>
<version>4.11</version>
</dependency> 其中activiti-version的定义如下:
<properties>
<activiti-version>5.18.0</activiti-version>
</properties> 其实这些内容我都是从Activiti工程的pom文件中拷贝过来的。
四、添加activiti需要的配置文件
在activiti的userguide(http://activiti.org/userguide/index.html#_configuration )中有说。
如果我们使用如下语句来创建一个流程引擎实例
| ProcessEngine processEngine = ProcessEngines.getDefaultProcessEngine() |
那么实际上他是到该项目的classpath路径下去找一个名为 activiti.cfg.xml的配置文件,然后根据该配置文件的设置,通过spring的方式来创建一个processEngine。而且是去找其中的那个名字是default的processEngine。
所以我们可以在该项目的src/main/resources 目录下创建一个名为 activiti.cfg.xml的文件,然后将如下内容复制进去。
<?xml version="1.0" encoding="UTF-8"?>
<beans xmlns="http://www.springframework.org/schema/beans"
xmlns:xsi="http://www.w3.org/2001/XMLSchema-instance"
xsi:schemaLocation="http://www.springframework.org/schema/beans
http://www.springframework.org/schema/beans/spring-beans.xsd">
<bean id="processEngineConfiguration" class="org.activiti.engine.impl.cfg.StandaloneInMemProcessEngineConfiguration">
</bean>
</beans> 五、创建sql server数据库
通过sql server management studio 创建一个数据库,比如名字叫做 activiti
六、在maven中添加sql server jdbc依赖项
在maven仓库中是没有sql server 的jdbc jar包的,可以按照如下步骤操作
Download the JDBC driver for Microsoft SQL Server
- Visit the MSDN site for SQL Server and download the latest version of the JDBC driver for your operating system.
- Unzip the package
- Open a command prompt and switch into the expanded directory where the
jarfile is located. - Execute the following command. Be sure to modify the
jarfile name and version as necessary:
|
1
|
mvn install:install-file -Dfile=sqljdbc4.jar -Dpackaging=jar -DgroupId=com.microsoft.sqlserver -DartifactId=sqljdbc4 -Dversion=4.0 |
- You should see something similar to this:
|
1
2
3
4
5
6
7
8
9
10
11
12
13
14
15
16
|
[INFO] Scanning for projects...[INFO][INFO] ------------------------------------------------------------------------[INFO] Building Maven Stub Project (No POM) 1[INFO] ------------------------------------------------------------------------[INFO][INFO] --- maven-install-plugin:2.3.1:install-file (default-cli) @ standalone-pom ---[INFO] Installing /Users/claude/installers/JDBC/sqljdbc_4.0/enu/sqljdbc4.jar to /Users/claude/.m2/repository/com/microsoft/sqlserver/sqljdbc4/4.0/sqljdbc4-4.0.jar[INFO] Installing /var/folders/c6/q1bdtq557kv54783p1g6cbsw0000gp/T/mvninstall1874482299687761721.pom to /Users/claude/.m2/repository/com/microsoft/sqlserver/sqljdbc4/4.0/sqljdbc4-4.0.pom[INFO] ------------------------------------------------------------------------[INFO] BUILD SUCCESS[INFO] ------------------------------------------------------------------------[INFO] Total time: 1.208s[INFO] Finished at: Tue Mar 13 14:07:31 EDT 2012[INFO] Final Memory: 3M/81M[INFO] ------------------------------------------------------------------------ |
Modify your POM
Include the new dependency by modifying your project’s pom.xml. Add the following dependency:
|
1
2
3
4
5
|
<dependency> <groupId>com.microsoft.sqlserver</groupId> <artifactId>sqljdbc4</artifactId> <version>4.0</version></dependency> |
Save the pom.xml file and build the project to make sure no errors exist.
七、让activiti连接sql server数据库
修改第四节中的activiti.cfg.xml文件,将 processEngineConfiguration的内容改成下文这样:
<bean id="processEngineConfiguration" class="org.activiti.engine.impl.cfg.StandaloneInMemProcessEngineConfiguration">
<property name="databaseSchemaUpdate" value="true"/>
<property name="jdbcUrl" value="jdbc:sqlserver://localhost:1433;databaseName=activiti2 " />
<property name="jdbcDriver" value="com.microsoft.sqlserver.jdbc.SQLServerDriver" />
<property name="jdbcUsername" value="sa" />
<property name="jdbcPassword" value="sa123" />
</bean> 八、在代码中使用activiti的api
ProcessEngine processEngine = ProcessEngines.getDefaultProcessEngine();
if(processEngine != null)
{
out.println("<h1> Hello !" + processEngine.getName() + "</h1>");
IdentityService identityService = processEngine.getIdentityService();
List<String> keys = identityService.getUserInfoKeys("Kermit");
for(String key: keys)
{
out.println(String.format("<h1> key = %s, value = %s </h1>", key, identityService.getUserInfo("Kermit", key)));
}
}
以上在调用 ProcessEngines.getDefaultProcessEngine(); 的时候,实际上背后就会去调用搜索classPath目录下的activiti.cfg.xml文件,然后通过其中的配置来创建processEngine对象。
九、在eclipse中调试activiti项目
在eclipse中调试web项目,其实他是把相关的资料生成到如下路径:
<eclipse workspace dir>.metadata.pluginsorg.eclipse.wst.server.core mp0wtpwebappsMavenWeb
如果发现某项配置修改之后,调试的时候没有生效,那可以试着clean一下, Project ->clean...,然后重新生成即可。