GatewayWorker 结合 Laravel 使用的简单案例,重点是在Laravel中使用GatewayClient发送消息
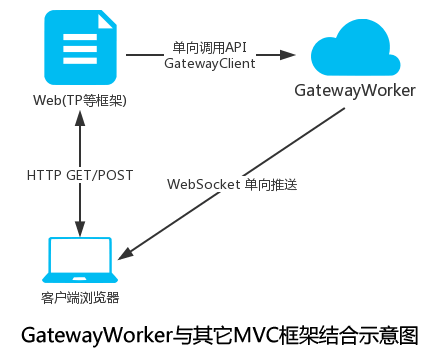
主要流程:GatewayWorker主要负责推送消息给客户端但不接受客户端数据,Laravel主要负责接受客户端数据并处理业务逻辑,然后使用GatewayClient推送数据,
示意图拿一个官方图片哈 http://www.workerman.net/gatewaydoc/work-with-other-frameworks/README.html
跟Laravel结合使用的优点:
1,当 GatewayWorker服务运行时,修改了Laravel业务代码,直接推送业务相关代码到服务器上即可,不用重启GatewayWorker服务;
2,可以尽情使用Laravel提供的各种便利工具处理数据和业务逻辑;
整个项目压缩文件太大不便上传,接下来直接贴代码咯,
本地windows使用步骤:
1,启动GatewayWorker,双击 start_for_win.bat
2,新建一个虚拟域名路径指定到该项目public目录
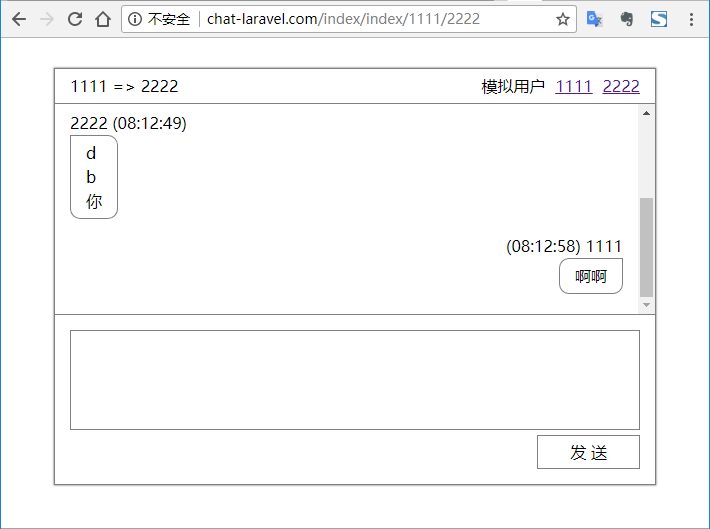
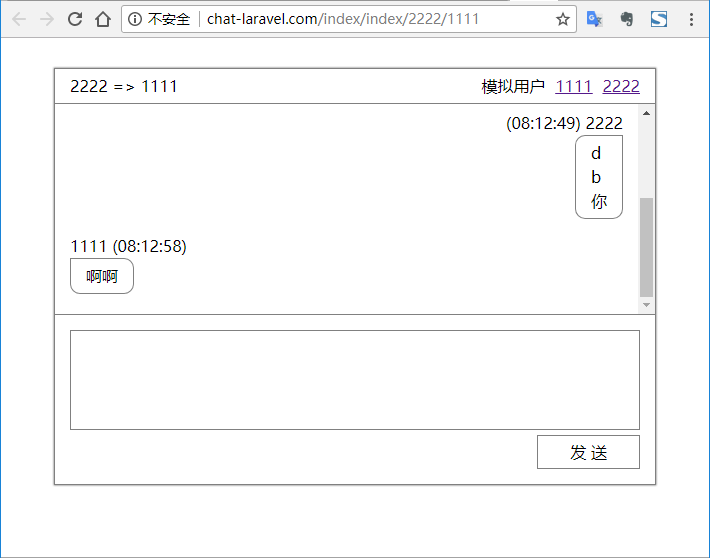
3,开两个浏览器页面就能互发消息了,如下面两个效果图,
效果图:
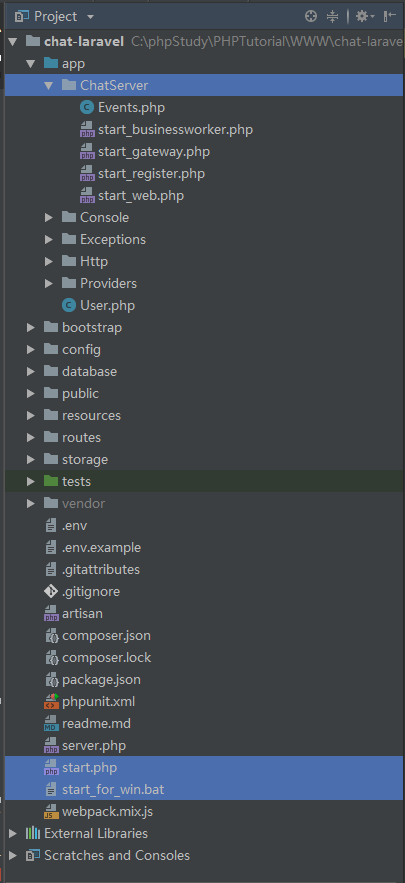
项目结构:
ChatServer目录下的4个start_*.php文件是直接复制的官方demo https://github.com/walkor/workerman-chat/tree/master/Applications/Chat
composer.json 的 require 部分
    "require": {
        "php": ">=7.0.0",
        "fideloper/proxy": "~3.3",
        "laravel/framework": "5.5.*",
        "laravel/tinker": "~1.0",
        "workerman/gateway-worker" : ">=3.0.0",
        "workerman/gatewayclient": "^3.0"
    },
start_for_win.bat 本地windows启动脚本
php appChatServerstart_register.php appChatServerstart_web.php appChatServerstart_gateway.php appChatServerstart_businessworker.php
pause
start.php 服务器上的启动脚本
<?php
/**
 * run with command
 * php start.php start
 */

ini_set('display_errors', 'on');
use WorkermanWorker;

if(strpos(strtolower(PHP_OS), 'win') === 0)
{
    exit("start.php not support windows, please use start_for_win.bat
");
}

// 检查扩展
if(!extension_loaded('pcntl'))
{
    exit("Please install pcntl extension. See http://doc3.workerman.net/appendices/install-extension.html
");
}

if(!extension_loaded('posix'))
{
    exit("Please install posix extension. See http://doc3.workerman.net/appendices/install-extension.html
");
}

// 标记是全局启动
define('GLOBAL_START', 1);

require_once __DIR__ . '/vendor/autoload.php';

// 加载所有application/*/start.php,以便启动所有服务
foreach(glob(__DIR__.'/app/ChatServer/start*.php') as $start_file)
{
    require_once $start_file;
}
// 运行所有服务
Worker::runAll();
Events.php 参考 http://www.workerman.net/gatewaydoc/work-with-other-frameworks/README.html
<?php

/**
 * 用于检测业务代码死循环或者长时间阻塞等问题
 * 如果发现业务卡死,可以将下面declare打开(去掉//注释),并执行php start.php reload
 * 然后观察一段时间workerman.log看是否有process_timeout异常
 */
//declare(ticks=1);

use GatewayWorkerLibGateway;
class Events
{
    // 当有客户端连接时,将client_id返回,让mvc框架判断当前uid并执行绑定
    public static function onConnect($client_id)
    {
        Gateway::sendToClient($client_id, json_encode(array(
            'type'      => 'init',
            'client_id' => $client_id
        )));
    }

    // GatewayWorker建议不做任何业务逻辑,onMessage留空即可
    public static function onMessage($client_id, $message)
    {

    }
}
IndexController.php 发送消息用的控制器 参考 http://www.workerman.net/gatewaydoc/work-with-other-frameworks/README.html
<?php

namespace AppHttpControllers;

use IlluminateHttpRequest;
use GatewayClientGateway;

class IndexController extends Controller
{
    public function __construct()
    {
        Gateway::$registerAddress = '127.0.0.1:1236';
    }

    /**
     * web客户端
     * @param string $uid
     * @param string $to_uid
     * @return IlluminateContractsViewFactory|IlluminateViewView
     */
    public function client()
    {
        return view('client');
    }

    /**
     * 绑定uid
     * @return mixed
     */
    public function bind()
    {
        // 假设用户已经登录,用户uid和群组id在session中
        $uid = request('uid');
        $client_id = request('client_id');

        $res = request()->all();
        $res['type'] = 'bind';
        $res['time'] = date('H:i:s');
        // client_id与uid绑定
        Gateway::bindUid($client_id, $uid);
        Gateway::sendToUid($uid, json_encode($res));
        return response()->json($res);
    }

    /**
     * 发送消息
     * @return mixed
     */
    public function send()
    {
        $uid = request('uid');
        $to_uid = request('to_uid');
        $res = request()->all();
        $res['type'] = 'send';
        $res['time'] = date('H:i:s');
        // 向任意uid的网站页面发送数据
        Gateway::sendToUid($uid, json_encode($res));
        Gateway::sendToUid($to_uid, json_encode($res));
        return response()->json($res);
    }
}
web.php 路由
<?php

/*
|--------------------------------------------------------------------------
| Web Routes
|--------------------------------------------------------------------------
|
| Here is where you can register web routes for your application. These
| routes are loaded by the RouteServiceProvider within a group which
| contains the "web" middleware group. Now create something great!
|
*/

Route::get('/', function () {
    return view('welcome');
});

Route::match(['post', 'get'], 'index/index/{uid}/{to_uid}', 'IndexController@client');

Route::match(['post', 'get'], 'index/client/{uid}/{to_uid}', 'IndexController@client');

Route::match(['post', 'get'], 'index/bind', 'IndexController@bind');

Route::match(['post', 'get'], 'index/send', 'IndexController@send');
client.blade.php web客户端视图
<html>
<head>
    <title>{{ request('uid') }} => {{ request('to_uid') }}</title>
    <link href="https://cdn.bootcss.com/normalize/8.0.0/normalize.css" rel="stylesheet">
    <script src="https://cdn.bootcss.com/jquery/1.12.4/jquery.js"></script>
    <script src="https://cdn.bootcss.com/json5/0.5.1/json5.js"></script>
    <style>
        * {
            padding: 0;
            margin: 0;
        }

        .chat-main {
            width: 600px;
            margin: 30px auto;
            box-shadow: 0 0 1px gray;
            border: 1px solid gray;
            line-height: 1.5em;
        }

        .chat-header {
            border-bottom: 1px solid gray;
            padding: 5px 15px;
        }

        .chat-log {
            height: 200px;
            overflow-y: auto;
            border-bottom: 1px solid gray;
            padding: 5px 15px;
        }

        .chat-log dl {
            margin: 15px 0;
        }

        .chat-log dl dd {
            display: inline-block;
            border: 1px solid gray;
            padding: 5px 15px;
            border-radius: 10px;
            border-top-left-radius: 0;
        }

        .chat-log dl.me dd {
            border-radius: 10px;
            border-top-right-radius: 0;
        }

        .chat-log dl.me {
            text-align: right;
        }

        .chat-log dl.me dd {
            text-align: left;
        }

        .user-link {
            float: right;
        }

        .user-link a {
            margin-left: 5px;
        }

        .hide {
            display: none;
        }

        .inline-block {
            display: inline-block;
        }

        .btn {
            text-align: right;
            padding: 5px 15px 15px;
        }

        #btn-send {
            display: inline-block;
            background: white;
            border: 1px solid gray;
            line-height: 2em;
            padding: 0 2em;
            outline: none;
        }

        #btn-send:focus {
            background: white;
            border-color: green;
        }

        #message {
            display: block;
            width: 570px;
            height: 100px;
            margin: 15px auto 0;
            border: 1px solid gray;
            overflow-x: hidden;
            overflow-y: auto;
            resize: none;
            outline: none;
            padding: 10px;
        }

        #message:focus {
            border-color: green;
        }

        .chat-body > .tpl {
            display: none;
        }
    </style>
</head>
<body>

<div class="hide">
    bind<input type="text" id="bind" value="{{ url('index/bind') }}"><br>
    send<input type="text" id="send" value="{{ url('index/send') }}"><br>
</div>

<div class="chat-main">
    <div class="chat-header">
        <div class="chat-title inline-block">
            {{ request('uid') }} => {{ request('to_uid') }}
        </div>
        <div class="user-link inline-block">
            <span class="inline-block">模拟用户</span>
            <a class="inline-block" href="{{ url('index/index',['uid'=>1111,'to_uid'=>2222]) }}">1111</a>
            <a class="inline-block" href="{{ url('index/index',['uid'=>2222,'to_uid'=>1111]) }}" target="_blank">2222</a>
        </div>
    </div>
    <div class="chat-body">
        <div class="chat-log">

        </div>
        <dl class="tpl">
            <dt>1111(12:00:00)</dt>
            <dd>aaaabbbbbb</dd>
        </dl>
    </div>
    <div class="chat-footer">
        <form action="" id="form">
            <div class="hide">
                cliend_id<input type="text" name="client_id" id="client_id" value="{{ request('uid') }}"><br>
                uid<input type="text" name="uid" id="uid" value="{{ request('uid') }}"><br>
                to_uid<input type="text" name="to_uid" value="{{ request('to_uid') }}"><br>
            </div>
            <textarea name="message" id="message" cols="30" rows="10"></textarea>
            <div class="btn">
                <button type="button" id="btn-send">发 送</button>
            </div>
        </form>
    </div>
</div>


<script>

    /**
     * 与GatewayWorker建立websocket连接,域名和端口改为你实际的域名端口,
     * 其中端口为Gateway端口,即start_gateway.php指定的端口。
     * start_gateway.php 中需要指定websocket协议,像这样
     * $gateway = new Gateway(websocket://0.0.0.0:7272);
     */
    ws = new WebSocket("ws://127.0.0.1:7272");
    // 服务端主动推送消息时会触发这里的onmessage
    ws.onmessage = function (e) {
        // json数据转换成js对象
        var data = JSON5.parse(e.data);
        var type = data.type || '';
        switch (type) {
            // Events.php中返回的init类型的消息,将client_id发给后台进行uid绑定
            case 'init':
                $('#client_id').val(data.client_id);
                // 利用jquery发起ajax请求,将client_id发给后端进行uid绑定
                $.get($('#bind').val(), $('#form').serialize(), function (res) {
                    console.log('bind', res);
                }, 'json');
                break;
            case 'send':
                var $tpl = $('.chat-body>.tpl').clone().show();

                if (data.uid == $('#uid').val()) {
                    $tpl.find('dt').html('(' + data.time + ') ' + data.uid);
                    $tpl.addClass('me')
                } else {
                    $tpl.find('dt').html(data.uid + ' (' + data.time + ')');
                }

                $tpl.find('dd').html(data.message.replace(/
/gim, '<br>'));

                $('.chat-log').append($tpl);

                scrollBottom();
                break;
            // 当mvc框架调用GatewayClient发消息时直接alert出来
            default:
                console.log('default', e.data);
        }
    };

    $('#form').submit(function (e) {
        return false;
    });

    var isScrollBottom = true;

    function scrollBottom(){
        if (isScrollBottom) {
            $('.chat-log').scrollTop($('.chat-log')[0].scrollHeight);
        }
    }

    $('#btn-send').click(function (e) {
        if ($.trim($('#message').val())) {
            $.get($('#send').val(), $('#form').serialize(), function (res) {
                console.log('send', res);
                $('#message').val('');
                scrollBottom();
            }, 'json');
        }
    });

    $('.chat-log').scroll(function (e) {
        var outerHeight = $(this).outerHeight();
        var scrollTop = $(this).scrollTop();
        var scrollHeight = $(this)[0].scrollHeight;
        if (outerHeight + scrollTop >= scrollHeight - 15) {
            isScrollBottom = true;
        } else {
            isScrollBottom = false;
        }
    })
</script>

</body>
</html>
==============================================
本文链接 https://www.cnblogs.com/stumpx/p/9156850.html
==============================================