ok,docker监控,宿主机CPU、磁盘、网络、内存监控我们都已讲过,是时候讲一波mysql监控了。本次mysql部署在客户端。
架构
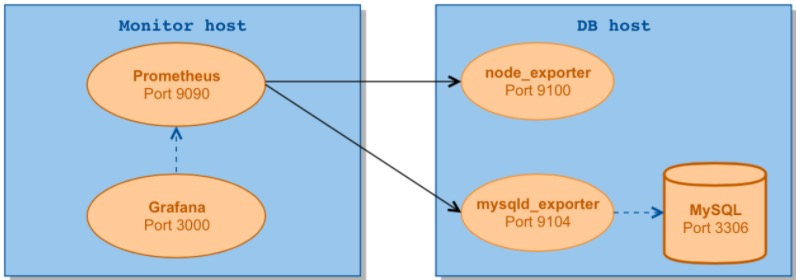
客户端
MySql安装
##下载mysql的repo源:
[root@localhost ~]# wget http://repo.mysql.com/mysql-community-release-el7-5.noarch.rpm
##安装mysql-community-release-el7-5.noarch.rpm包:
[root@localhost ~]# rpm -ivh mysql-community-release-el7-5.noarch.rpm
##安装mysql:
[root@localhost ~]# yum install mysql-server -y
##修改权限,否则会报错:
[root@localhost ~]# chown -R root:root /var/lib/mysql
##重启mysql服务:
[root@localhost ~]# service mysqld restart
##登录并重置密码:
[root@localhost ~]# mysql -u root
mysql > use mysql;
mysql > update user set password=password('123456') where user='root';
mysql > exit;
mysqld_exporter安装
##下载并解压:
[root@localhost ~] wget https://github.com/prometheus/mysqld_exporter/releases/download/v0.10.0/mysqld_exporter-0.10.0.linux-amd64.tar.gz
[root@localhost ~] tar -xvf mysqld_exporter-0.10.0.linux-amd64.tar.gz
##mysqld_exporter需要连接Mysql,首先为它创建用户并赋予所需的权限:
[root@localhost ~]# mysql -u root -p123456
mysql >  GRANT REPLICATION CLIENT, PROCESS ON *.* TO 'exporter'@'localhost' identified by '123456';
mysql >  GRANT SELECT ON performance_schema.* TO 'exporter'@'localhost';
mysql >  flush privileges;
创建.my.cnf文件
[root@localhost ~]vi .my.cnf

[client]
user=exporter
password=123456
进入mysqld_exporter的所在目录,运行mysqld_exporter
./mysqld_exporter -config.my-cnf=".my.cnf" &
服务端
Prometheus配置
[root@localhost ~]vi /etc/prometheus/prometheus.yml
## 新增mysql监控
·······
### 新增对对docker容器的监控
  - job_name: 'docker'
    static_configs:
    - targets: ['192.168.229.139:9101','192.168.229.138:9101']  ## 目标主机

  - job_name: mysql
    static_configs:
      - targets: ['192.168.229.138:9104']
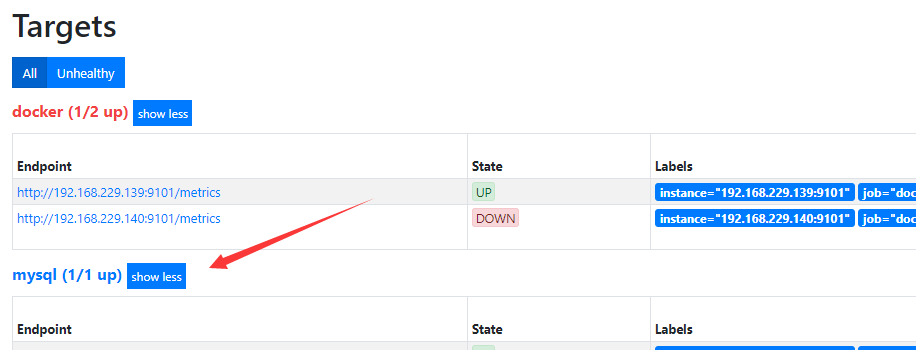
重启Prometheus查看targets:
[root@localhost ~]# systemctl restart prometheus
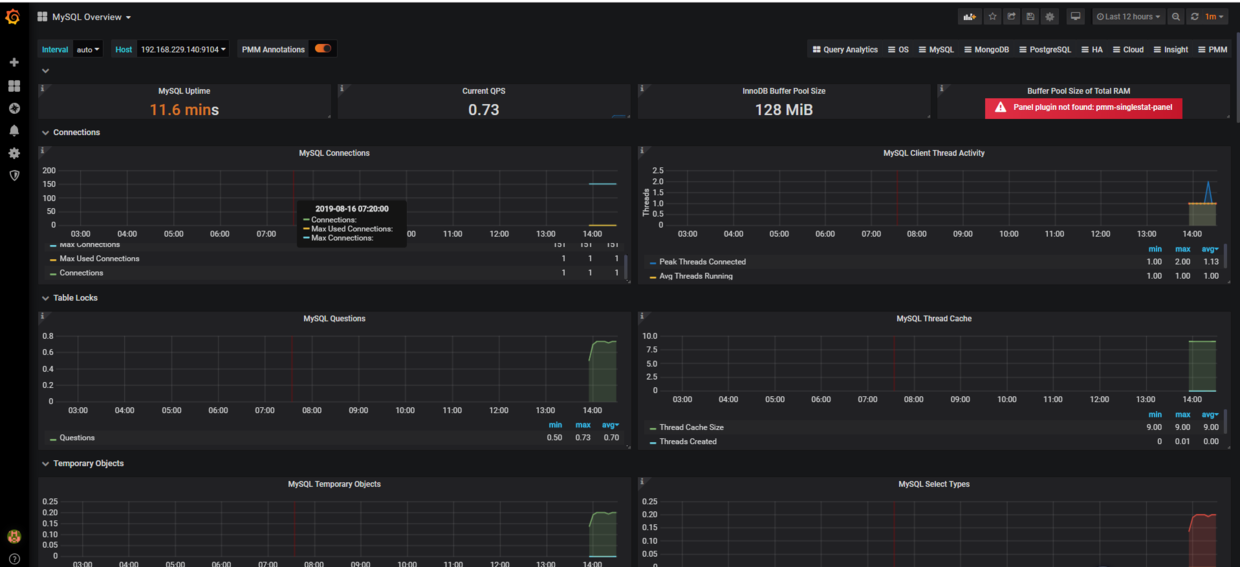
grafana配置
下载MySQL_Overview.json
关于json文件如何导入,在第5节已经说过,这里不在多做赘述。导入成功后,如下所示:
欢迎关注微信公众号:软件测试汪。软件测试交流群:809111560
转载请注意出处,谢谢合作