来自 http://www.cnblogs.com/jenny-jenny/p/6600174.html
1、第一步, 首先环境建好:需要哪些环境或者工具。
1、首先得有一个android的sdk

2、 有了运行的环境还得有一个编写Python的工具,notepad和pycharm都可以
首先在notepad或者在pycharm把代码保存文件夹命名monkey_record.py 然后把文件放在sdk/tools里面。

#!/usr/bin/env monkeyrunner
# Copyright 2010, The Android Open Source Project#
# Licensed under the Apache License, Version 2.0 (the "License");
# you may not use this file except in compliance with the License.
# You may obtain a copy of the License at#
# http://www.apache.org/licenses/LICENSE-2.0#
# Unless required by applicable law or agreed to in writing, software
# distributed under the License is distributed on an "AS IS" BASIS,
# WITHOUT WARRANTIES OR CONDITIONS OF ANY KIND, either express or implied.
# See the License for the specific language governing permissions and
# limitations under the License.
from com.android.monkeyrunner import MonkeyRunner as mr
from com.android.monkeyrunner.recorder import MonkeyRecorder as recorder
device = mr.waitForConnection()
recorder.start(device)
存放路径:

3、Python文件放到tools里面以后回到tools界面

然后在按shift加鼠标右键打开命令窗口

4、命令窗口打开以后我们就可以运行脚本啦
首先手机连接电脑-打开usb调试模式-手机可以传输文件。然后在命令框内输入命令monkeyrunner monkey_record.py运行便会会弹出一个MonkeyRecord窗口界面。
该窗口的功能:
1、可以自动显示手机当前的界面
2、自动刷新手机的最新状态
3、点击手机界面即可对手机进行操作,同时会反应到真机,而且会在右侧插入操作脚本
4:、wait: 用来插入下一次操作的时间间隔,点击后即可设置时间,单位是秒
Press a Button:用来确定需要点击的按钮,包括menu、home、search,以及对按钮的press、down、up属性
Type Something:用来输入内容到输入框
Fling:用来进行拖动操作,可以向上、下、左、右,以及操作的范围
Export Actions:用来导出脚本,不需要后缀名,也可以添加后缀名.mr
Refresh Display:用来刷新手机界面,估计只有在断开手机后,重新连接时才会用到

我们试着点击一下图库就会发现进入图库界面,右面会提示图库的坐标。然后pressbutton home就可以回到主界面。

我们录制完脚本以后 点击Export Actions:用来导出脚本,不需要后缀名,也可以添加后缀名.mr保存路径依旧是tools里面。

5、脚本录制好以后我们要回放时怎么办?
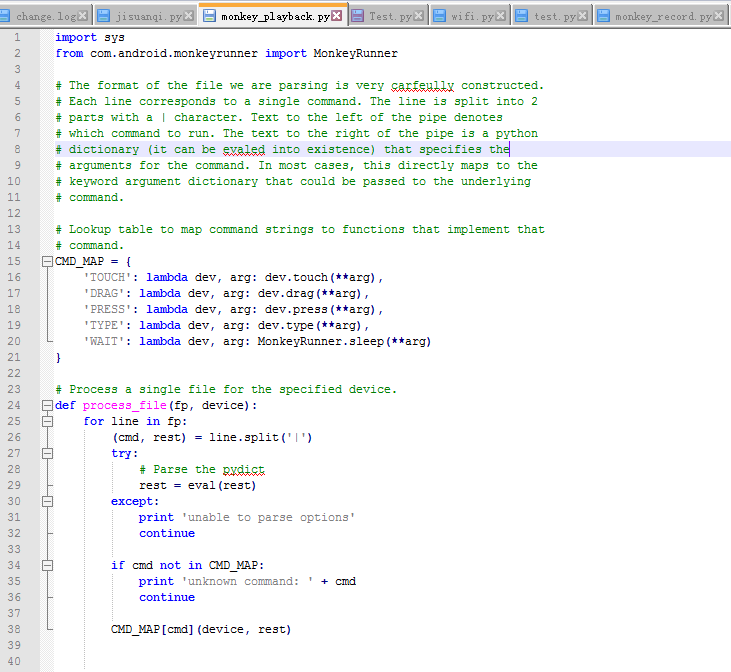
1、在次打开notepad把脚本复制并保存。命名为monkey_playback.py 把文件保存到tools里面。操作步骤和上面一样。
import sys
from com.android.monkeyrunner import MonkeyRunner
# The format of the file we are parsing is very carfeully constructed.
# Each line corresponds to a single command. The line is split into 2
# parts with a | character. Text to the left of the pipe denotes
# which command to run. The text to the right of the pipe is a python
# dictionary (it can be evaled into existence) that specifies the
# arguments for the command. In most cases, this directly maps to the
# keyword argument dictionary that could be passed to the underlying
# command.
# Lookup table to map command strings to functions that implement that
# command.
CMD_MAP = {
'TOUCH': lambda dev, arg: dev.touch(**arg),
'DRAG': lambda dev, arg: dev.drag(**arg),
'PRESS': lambda dev, arg: dev.press(**arg),
'TYPE': lambda dev, arg: dev.type(**arg),
'WAIT': lambda dev, arg: MonkeyRunner.sleep(**arg)
}
# Process a single file for the specified device.
def process_file(fp, device):
for line in fp:
(cmd, rest) = line.split('|')
try:
# Parse the pydict
rest = eval(rest)
except:
print 'unable to parse options'
continue
if cmd not in CMD_MAP:
print 'unknown command: ' + cmd
continue
CMD_MAP[cmd](device, rest)
def main():
file = sys.argv[1]
fp = open(file, 'r')
device = MonkeyRunner.waitForConnection()
process_file(fp, device)
fp.close();
if __name__ == '__main__':
main()
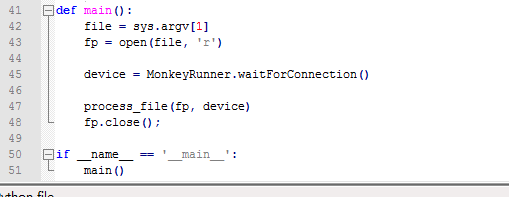
注意缩进问题
2、然后我们再次打开命令窗口,运行命令 monkeyrunner monkey_playback.py action.mr (action就是我们刚才导出的脚本的名称)
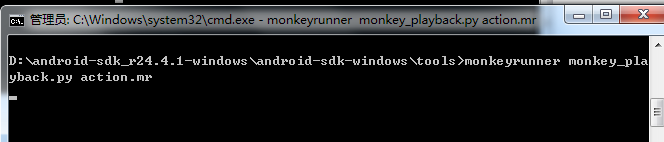

上面可以看到我跑成功两次。
备注:以上路径都是绝对路径,录制后的脚本可以进行二次更改,而且每一步操作需要有时间间隔,这样才能保证测试的正确性
总结:现在就是录制和回放我们已经都完成了。下次给大家讲一下怎么跑自己写的脚本。。