1. 什么是Fragment
Fragment是Android honeycomb 3.0新增的概念,Fragment名为碎片不过却和Activity十分相似。Fragment是用来描述一些行为或一部分用户界面在一个Activity中,
(1)你可以合并多个fragment在一个单独的activity中建立多个UI面板,
(2)同时重用fragment在多个activity中。
你可以认为fragment作为一个activity中的一节模块 ,fragment有自己的生命周期,接收自己的输入事件,你可以添加或移除从运行中的activity。
从中可以看出:一个fragment必须总是嵌入在一个activity中,同时fragment的生命周期 受 activity而影响。当activity 暂停,那么所有在这个activity的fragments将被destroy释放。
2. Fragment的生命周期
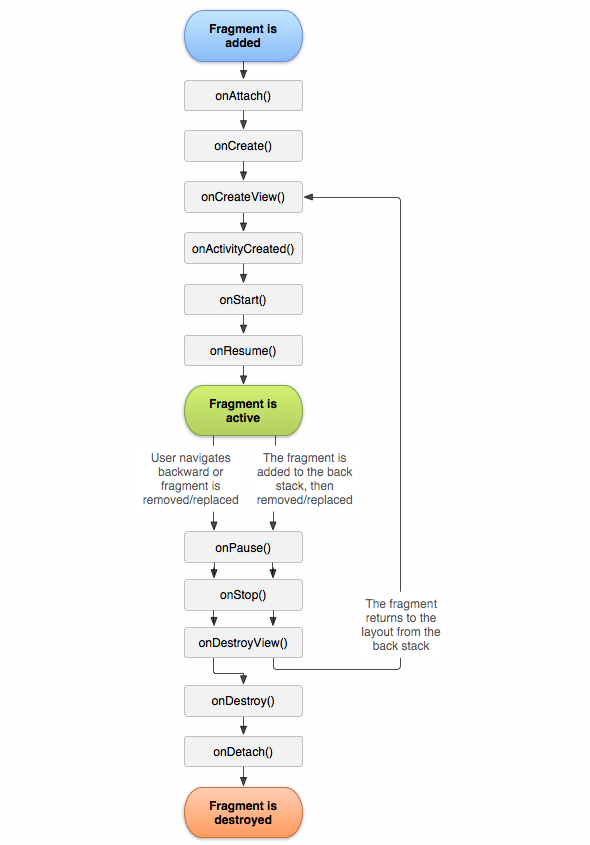
- onAttach()
当fragment和activity被关联时调用。
- onCreate()
当fragment创建时被调用,你应该初始化一些实用的组件,比如在fragment暂停或停止时需要恢复的
- onCreateView()
当系统调用fragment在首次绘制用户界面时,如果画一个UI在你的fragment你必须返回一个View当然了你可以返回null代表这个fragment没有UI.
public static class AndroidFragment extends Fragment {
    @Override
    public View onCreateView(LayoutInflater inflater, ViewGroup container,
                             Bundle savedInstanceState) {
               return inflater.inflate(R.layout.android_fragment, container, false);
    }
}
- onActivityCreated()
当activity的onCreate()方法返回时调用。
- onResumed()
在running状态下的可见状态。
- onPaused()
另一个activity在前景运行,并且享有焦点,但是这个fragment所在的activity仍然可见(前景activity部分遮挡或者是半透明的)。
- onStop()
fragment不可见。可能是因为宿主activity处于stopped状态,或者fragment被remove掉,然后加在了back stack中。
一个处于stopped状态的activity还是存活状态的,所有的状态和成员信息会被系统保持。但是,它不再被用户可见,并且如果宿主activity被kill掉,它也会被kill掉。
- onDestroyView()
当fragment的UI被移除的时候调用。
- onDetach()
当fragment和activity去关联时调用。
3. 创建Fragment
3.1 静态创建
3.1.1 activity_main.xml,在一个xml文件中创建了两个fragment
<?xml version="1.0" encoding="utf-8"?>
<LinearLayout xmlns:android="http://schemas.android.com/apk/res/android"
    android:layout_width="match_parent"
    android:layout_height="match_parent"
    android:orientation="horizontal" >
    <fragment
        android:id="@+id/fragment1"
        android:layout_width="0dp"
        android:layout_height="match_parent"
        android:layout_weight="1"
        android:name="com.egos.fragmentsample.Fragment1" />
    <fragment
        android:id="@+id/fragment2"
        android:layout_width="0dp"
        android:layout_height="match_parent"
        android:layout_weight="1"
        android:name="com.egos.fragmentsample.Fragment2" />

</LinearLayout>
3.1.2 分别创建两个Fragment
//Fragment1.java
public class Fragment1 extends Fragment {
	@Override
	public View onCreateView(LayoutInflater inflater, ViewGroup container, Bundle savedInstanceState) {
		// TODO Auto-generated method stub
		return inflater.inflate(R.layout.fragment1, container, false);
	}
}
//Fragment2.java
public class Fragment2 extends Fragment {
	@Override
	public View onCreateView(LayoutInflater inflater, ViewGroup container, Bundle savedInstanceState) {
		// TODO Auto-generated method stub
		return inflater.inflate(R.layout.fragment1, container, false);
	}
}
3.1.3 创建main.activity
public class MainActivity extends FragmentActivity {
	@Override
	protected void onCreate(Bundle arg0) {
		super.onCreate(arg0);
		setContentView(R.layout.activity_main);
	}
}
3.2 动态创建
3.2.1 创建Fragment布局
//Fragment_dynamic.xml
<?xml version="1.0" encoding="utf-8"?>
<LinearLayout xmlns:android="http://schemas.android.com/apk/res/android"
    android:layout_width="match_parent"
    android:layout_height="match_parent"
    android:orientation="vertical" >
    <TextView
        android:layout_width="wrap_content"
        android:layout_height="wrap_content"
        android:text="This is a fragment" />

</LinearLayout>
3.2.2 创建DynamicFragment.java
public class DynamicFragment extends Fragment {
	@Override
	public View onCreateView(LayoutInflater inflater, ViewGroup container, Bundle savedInstanceState) {
		// TODO Auto-generated method stub
		return inflater.inflate(R.layout.fragment_dynamic, container, false);
	}

}
3.2.3 创建main Activity布局
<?xml version="1.0" encoding="utf-8"?>
<LinearLayout xmlns:android="http://schemas.android.com/apk/res/android"
    android:layout_width="match_parent"
    android:layout_height="match_parent"
    android:orientation="vertical" >
    <LinearLayout
        android:id="@+id/container"
        android:layout_width="match_parent"
        android:layout_height="match_parent"
        android:orientation="vertical"/>

</LinearLayout>
3.2.4 创建MainActivity.java
public class MainActivity extends FragmentActivity {
	@Override
	protected void onCreate(Bundle arg0) {
		super.onCreate(arg0);
		setContentView(R.layout.activity_main2);
		if (arg0 == null) {
			getSupportFragmentManager().beginTransaction().add(R.id.container, new DynamicFragment()).commit();
		}
	}
}
4. Fragment与Activity
4.1 fragment显得更加灵活。可以直接在XML文件中添加<fragment/>,Activity则不能。
4.2 可以在一个界面上灵活的替换一部分页面,activity不可以,做不到。
4.3 fragment和Activity之间的通信:(也就是控件的相互操控)
- fragment控制fragment:得到一个Activity,然后通过这个Activity的getFragmentManager()获得该Fragment的实例。
- fragment控制Activity:这个很简单。每个Fragment都有getActivity()得到一个Activity的实例:
View listView = getActivity().findViewById(R.id.list);PS:在当前activity和fragment已经进行关联的情况下否则返回null。
- Activity控制fragment:activity也可以获得一个fragment的引用,从而调用fragment中的方法:
xxxFragment xxx=getFragmentManager().findFragmentById();
- Activity控制Activity:这个显然是通过Intent活动之间的通信完成。别忘了在被打开的活动中创建Intent和得到Intent一起进行,写个静态的actionStart()。
4.4 fragment和Activity中控件的加载
Fragment的载入是通过OnCreateView的时候通过inflater.inflate()加载布局,然后通过修改main.xml,在main.xml上增加注册fragment标签,然后通过android:name来载入你已经通过inflater加载的隐藏布局。有几个关键点:fragment是通过inflater加载View然后在main.xml中注册得到的。当然如果你可以在fragment中得到View那就可以通过View.findViewId()来操控fragment上的具体控件。