本文目录
1 本文采用 hibernate4 整合 Spring3.1
2 把Spring获取datasource通过class="org.springframework.orm.hibernate3.annotation.AnnotationSessionFactoryBean"把datasource注入给hibernate的sessionfactory
3 注入后,配置sessionfactory的相关属性,例如实体类,properties
4 实体类上添加注解
5 编写测试类,测试通过
一 构建sessionFactory
1 datasource注入sessionfactory
a 把datasource注入到class="org.springframework.orm.hibernate3.LocalSessionFactoryBean"
注意: LocalSessionFactoryBean是hibernate3使用XML时使用的sessionfactory,所以不支持annotation----------------hibernate3的时候不推荐使用,hibernate4的时候自带annotation实现
b 把datasource注入到class="org.springframework.orm.hibernate3.annotation.AnnotationSessionFactoryBean" ----------------hibernate3的时候推荐使用
我使用的是hibernate4,编译的时候出了一个错误如下:
注意: java.lang.NoClassDefFoundError: Lorg/hibernate/cache/CacheProvider; (hibernate4整合spring3.1)
查了一下相关资料,原来发现hibernate4已经将hibernate3的一些功能改掉了,在hibernate4已经不使用CacheProvider了,所以做了以下修改,
原先:<bean id="sessionFactory"
class="org.springframework.orm.hibernate3.annotation.AnnotationSessionFactoryBean">
改成:<bean id="sessionFactory"
class="org.springframework.orm.hibernate4.LocalSessionFactoryBean">
问题解决,可以正常使用(本文是采用hibernate4整合spring3.1)
LocalSessionFactoryBean配置
<beans>

    <bean id="myDataSource" class="org.apache.commons.dbcp.BasicDataSource" destroy-method="close">
        <property name="driverClassName" value="org.hsqldb.jdbcDriver"/>
        <property name="url" value="jdbc:hsqldb:hsql://localhost:9001"/>
        <property name="username" value="sa"/>
        <property name="password" value=""/>
    </bean>

    <bean id="mySessionFactory" class="org.springframework.orm.hibernate3.LocalSessionFactoryBean">
        <property name="dataSource" ref="myDataSource"/>
        <property name="mappingResources">
            <list>
                <value>product.hbm.xml</value>
            </list>
        </property>
        <property name="hibernateProperties">
            <value>
                hibernate.dialect=org.hibernate.dialect.HSQLDialect
            </value>
        </property>
    </bean>

</beans>
AnnotationSessionFactoryBean(推荐)
    <bean id="mySessionFactory"
        class="org.springframework.orm.hibernate3.annotation.AnnotationSessionFactoryBean">    <!--这个支持annotation-->
        <property name="dataSource" ref="dataSource" />
        <property name="mappingResources">
            <list>
                <value>product.hbm.xml</value>
            </list>
        </property>
        <property name="hibernateProperties">
            <value>
                hibernate.dialect=org.hibernate.dialect.HSQLDialect
            </value>
        </property>
    </bean>
2 注入hibernate需要的proptity的参数
<property name="hibernateProperties">
            <value>
                hibernate.dialect=org.hibernate.dialect.MySQLDialect
                hibernate.show_sql=true
            </value>
</property>
3 注入实体类
annotatedClasses是注入类
mappingResource是注入XML
<property name="annotatedClasses">
            <list>
                <value>com.entity.User</value>
            </list>
 </property>
也可以使用自动扫描的方式注入实体类
 <property name="packagesToScan">
            <list>
                    <value>com.entity</value>
            </list>
        </property>
同时在实体类上添上注解
package com.entity;

import javax.persistence.Entity;
import javax.persistence.Id;

@Entity
public class User {
    @Id
    private int id;
    private String name;
    private String remark;

    public String getName() {
        return name;
    }
    public void setName(String name) {
        this.name = name;
    }
    public String getRemark() {
        return remark;
    }
    public void setRemark(String remark) {
        this.remark = remark;
    }
    public int getId() {
        return id;
    }
    public void setId(int id) {
        this.id = id;
    }
}
4 引入hibernate包
5 最后附上所有代码
beans.xml
<?xml version="1.0" encoding="UTF-8"?>
<beans xmlns="http://www.springframework.org/schema/beans"
    xmlns:xsi="http://www.w3.org/2001/XMLSchema-instance"
    xmlns:aop="http://www.springframework.org/schema/aop"
    xmlns:context="http://www.springframework.org/schema/context"
    xsi:schemaLocation="http://www.springframework.org/schema/beans
        http://www.springframework.org/schema/beans/spring-beans.xsd
        http://www.springframework.org/schema/context
        http://www.springframework.org/schema/context/spring-context.xsd
        ">
        <context:component-scan base-package="com.*"></context:component-scan>


    <bean id="mappings"
        class="org.springframework.beans.factory.config.PropertyPlaceholderConfigurer">
        <property name="locations">
            <value>classpath:jdbc.properties</value>
        </property>
    </bean>

<!--    <bean id="dataSource" class="org.apache.commons.dbcp.BasicDataSource" destroy-method="close">-->
<!--        <property name="driverClassName" value="com.mysql.jdbc.Driver"/>-->
<!--        <property name="url" value="jdbc:mysql://localhost:3306/spring"/>-->
<!--        <property name="username" value="root"/>-->
<!--        <property name="password" value="root"/>-->
<!--    </bean>-->

    <bean id="dataSource" class="org.apache.commons.dbcp.BasicDataSource" destroy-method="close">
        <property name="driverClassName" value="${jdbc.driverClassName}"/>
        <property name="url" value="${jdbc.url}"/>
        <property name="username" value="${jdbc.username}"/>
        <property name="password" value="${jdbc.password}"/>
    </bean>

    <bean id="mySessionFactory"
        class="org.springframework.orm.hibernate4.LocalSessionFactoryBean">
        <property name="dataSource" ref="dataSource" />
        <property name="annotatedClasses">
            <list>
                <value>com.entity.User</value>
            </list>
        </property>
        <property name="hibernateProperties">
            <value>
                hibernate.dialect=org.hibernate.dialect.MySQLDialect
                hibernate.show_sql=true
            </value>
        </property>
    </bean>

</beans>
service
package com.serviceImpl;

import javax.annotation.PostConstruct;
import javax.annotation.PreDestroy;
import javax.annotation.Resource;

import org.springframework.context.annotation.Scope;
import org.springframework.stereotype.Component;

import com.dao.UserDao;
import com.entity.User;
@Component
public class UserServiceImpl {

    private UserDao userDao;

    public void add(User user) {
        userDao.save(user);
    }
    public void update(User user) {
        userDao.update(user);
    }
    public void init() {// 初始方法
        System.out.println("init");
    }
    public void destroy() {// 销毁方法
        System.out.println("destory");
    }
    public UserDao getUserDao() {
        return userDao;
    }

    @Resource(name="userDaoImpl2")
    public void setUserDao(UserDao userDao) {
        this.userDao = userDao;
    }
}
userDaoImpl2
package com.daoImpl;

import javax.annotation.Resource;

import org.hibernate.Session;
import org.hibernate.SessionFactory;
import org.springframework.stereotype.Component;

import com.dao.UserDao;
import com.entity.User;
@Component
public class UserDaoImpl2 implements UserDao{
    SessionFactory mySessionFactory;
    public void save(User user) {
        System.out.println(user.getName()+"-->"+user.getRemark()+"  save --调用UserDaoImpl2!");
//        Session s = mySessionFactory.getCurrentSession();
//    这里没有用getCurrentSession是因为配置文件没有配置,在property中配置hibernate.current_session_context_class=thread即可,比较推荐
        Session s = mySessionFactory.openSession();
        s.beginTransaction();
        s.save(user);
        s.getTransaction().commit();
    }

    public void update(User user) {
        System.out.println(user.getName()+"-->"+user.getRemark()+"  update  --调用UserDaoImpl2!");
    }


    public SessionFactory getMySessionFactory() {
        return mySessionFactory;
    }

     @Resource
    public void setMySessionFactory(SessionFactory mySessionFactory) {
        this.mySessionFactory = mySessionFactory;
    }

}
测试类
package com.serviceImpl.test;
import org.junit.Before;
import org.junit.Test;
import org.springframework.context.support.ClassPathXmlApplicationContext;

import com.entity.User;
import com.serviceImpl.UserServiceImpl;

public class UserServiceImplTest {
    User user;

    @Before
    public void setUp() throws Exception {
        user = new User();
        user.setName("testName");
        user.setRemark("testRemark");
    }

    @Test
    public void testAdd() {
        ClassPathXmlApplicationContext app = new ClassPathXmlApplicationContext("beans.xml");
         UserServiceImpl UserServiceImpl = (UserServiceImpl)app.getBean("userServiceImpl");
         UserServiceImpl.add(user);//调用方法
         UserServiceImpl.update(user);//调用方法
    }
}
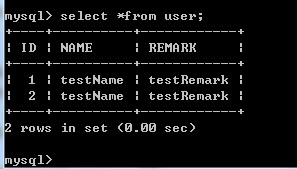
执行结果
testName-->testRemark save --调用UserDaoImpl2!
Hibernate: insert into User (name, remark, id) values (?, ?, ?)
testName-->testRemark update --调用UserDaoImpl2!
hibernate4 整合 Spring3.1 SessionFactory完成
回顾一下步骤
1 本文采用 hibernate4 整合 Spring3.1
2 把Spring获取datasource通过class="org.springframework.orm.hibernate3.annotation.AnnotationSessionFactoryBean"把datasource注入给hibernate的sessionfactory
3 注入后,配置sessionfactory的相关属性,例如实体类,properties
4 实体类上添加注解
5 编写测试类,测试通过