一、背景介绍
http://www.360doc.com/content/18/0428/20/53742993_749517107.shtml
《高性能网关设备及服务实践》这篇博文,介绍了传统内核网络协议栈技术的瓶颈及怎么突破,从而引入DPDK + VPP这种处理方式。
二、高性能
性能提升方法。
架构:DPDK使用巨页、NUMA、D-cache优化,VPP 的I-cache优化;
算法:Bihash,查表lockless;
代码:Vector 、宏构造函数、结构体cacheline对齐、线程绑核、指令预取、指令优化;
三、转发流程图谱
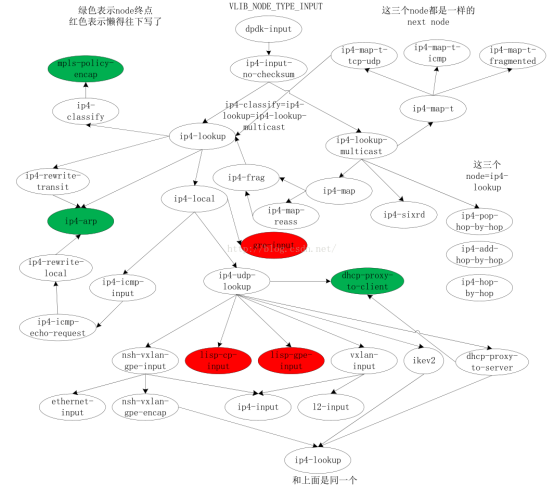
3.1 VPP转发图谱
https://blog.csdn.net/icebluechao/article/details/51208811
层二转发图谱:

层三转发图谱:
3.2 Linux内核报文收发流程
https://zhaozhanxu.com/2016/07/14/Linux/2016-07-14-Linux-Kernel-Pkts_Processing3/
层二转发:
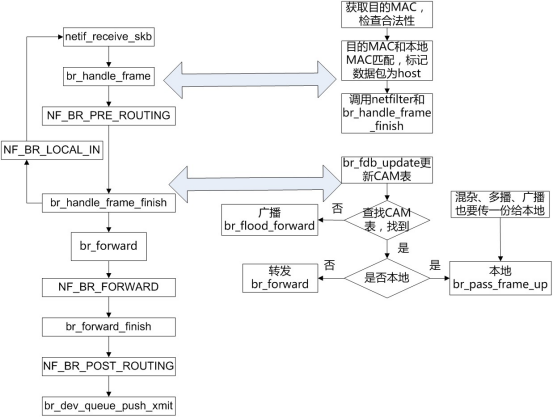
层三转发:

四、Node节点及初始化
https://blog.csdn.net/Illina/article/details/82224918

node的基础数据结构如上图所示,__bootstrap_vlib_main_vector是最顶级的全局变量,此变量下的vm是一个vec结构,每thread一个vlib_main_t,对于node结构来讲,比较重要的是node_main,对应vlib_node_main_t结构体,在vlib_node_main_t中,nodes成员以vec数据结构组织,用来真正保存一个个注册在VPP系统中的node,vlib_node_t结构中存储了node节点的所有信息。
为查找方便高效,vlib_node_main_t有成员node_by_name,以hash的方式组织,可按name快速hash到node的index;
node_registrations是提供给初始化函数使用的,是一个单链表的结构,VLIB_REGISTER_NODE宏注册的node在初始化前就预先挂载在这个成员变量中。
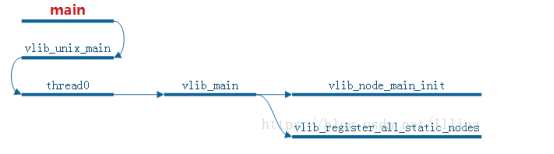
函数流程如上图,vlib_unix_main是初始化入口,函数默认会启动一个线程,在thread0中完成node结构的注册和node graph的创建,vlib_register_all_static_nodes函数用来将vlib_node_registration_t结构下node_registrations链表中的node真正放到vlib_node_main_t结构下的node池中。
vlib_node_main_init函数用来根据注册node提供的next node信息,建立一个完整的node graph,在VPP运行正确后,通过命令show vlib graph可以查看所有注册的node和node之间的关系。
五、Main过程
https://www.cnblogs.com/lulu1997/p/10511749.html
5.1 vpp/vnet main.c
1.main 首先解析参数,再需要初始化堆,插件的初始化将由他提供。
2.vpe_main_init 初始化各种插件,通过宏函数VLIB_INIT_FUNCTION(X),可以通过遍历单链表、动态链接的方式指定不同的初始化类型如早期的配置、功能等
3.调用 vilb_unix_main
5.2 vilb_unix_mian
vlib_plugin_early_init (vlib_load_one_plugins) 从配置文件中读取插件的路径而不用重新编译.
vlib_thread_stack_init 创建主线程的线程栈,对于线程的管理,通过了数组的形式,所以每次使用地址可以直接通过偏移量来找到他
clib_call_jmp 这里执行了main线程(thread0)的回调函数。
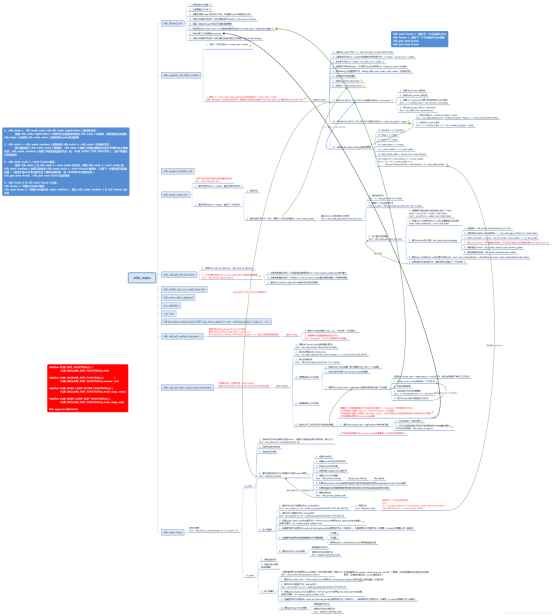
5.3 vlib_main
cli_time_init 用于多线程时间轮调度
vlib_register_all_static nodes 同样也是通过遍历单链表的方式对所有的节点分配内存、初始化等等。
vlib_call_all_init_fountions 这里的初始化不同于最开始时的初始化,这里是建立节点图,通过函数指针计算矢量,也就是在节点图的下一跳(对于不同类型的数据包所形成的路径也是不同的)。
vlib_buffer_get_or_create_free_list 创建默认的缓冲区,dpdk使用了特定的缓冲区的格式,vpp在其头部添加信息使两者相对隔离,给网络栈和空间存储提供了便利。
vlib_call_all_config_functions 进入主循环前最后一次进行配置
进入 vlib_main_loop
5.4 vlib_main_loop
dispatch_process
dispatch_node(PRE_INPUT) 目前只有一个epoll node,对socket相关逻辑提供服务,主要使用在控制业务上。可以处理CLI命令以及可以在中断模式和轮询模式中切换。
dispatch_node(INPUT) 需要从其他容器中获得input方法(dpdk_input),由之前构建好的节点图进行矢量跳转,
queue_signal_pending 用户可以自行定义信号后会调用回调函数
中断模式和时间轮计算
dispatch_pending_node 由于我们之前已经定义好了数据包的矢量,现在要做的就是跳转到我收到包后现在要做的事情。(p.s.有对于trace版本的优化以及debug版本显示更多信息,同时也可以在gdb中看出数据包的流
dispatch_node(INTERNAL)
node->function 调用节点指定的动作(对于dpdk来说这里就是发包)
六、CLI命令
https://blog.csdn.net/Illina/article/details/81666935
例子:使用VPP作为家庭路由器,通过这个例子,可以看到用VPP可以完成路由转发功能。
|
comment { bring the WAN interface up, then change the MAC address. Otherwise the rx filter will be misprogrammed! } set int state GigabitEthernet3/0/0 upVPP set int mac address GigabitEthernet3/0/0 <desired-mac-address> set dhcp client intfc GigabitEthernet3/0/0 hostname vppgate comment { create the IRB loopback interface, give it the usual local network IP address } loopback create set int l2 bridge loop0 1 bvi set int ip address loop0 192.168.1.1/24 set int state loop0 up comment { add other inside addresses to the IRB bridge group } set int l2 bridge GigabitEthernet4/0/0 1 set int state GigabitEthernet4/0/0 up set int l2 bridge GigabitEthernet0/14/0 1 set int state GigabitEthernet0/14/0 up set int l2 bridge GigabitEthernet0/14/1 1 set int state GigabitEthernet0/14/1 up set int l2 bridge GigabitEthernet0/14/2 1 set int state GigabitEthernet0/14/2 up comment { create a tap interface for dhcp server and host-stack access } tap connect lstack address 192.168.1.2/24
set int l2 bridge tap-0 1 set int state tap-0 up comment { Configure the snat plugin }
nat44 add interface address GigabitEthernet3/0/0 set interface nat44 in loop0 out GigabitEthernet3/0/0 comment { create static outside-to-inside port mappings } comment { Send traffic received on the WAN interface DHCP address, <REDACTED-outside-port> to 192.168.1.xxx, <REDACTED-inside-port> nat44 add static mapping local 192.168.1.xxx <REDACTED-inside-port> external GigabitEthernet3/0/0 <REDACTED-outside-port> tcp comment { Enable the vpp DNS caching name resolver } comment { nat44 add identity mapping external GigabitEthernet3/0/0 udp 53053 } comment { bin dns_name_server_add_del 8.8.8.8 } comment { bin dns_enable_disable } |