转自:https://blog.csdn.net/eson_15/article/details/51297698
上一节我们搭建好了Struts2、Hibernate和Spring的开发环境,并成功将它们整合在一起。这节主要完成一些基本的增删改查以及Service、Dao和Action的抽取。
1. Service层的抽取
上一节中,我们在service层简单写了save和update方法,这里我们开始完善该部分的代码,然后对service层的代码进行抽取。
1.1 完善CategoryService层
对数据库的操作无非是增删改查,首先我们来完善CategoryService层的接口和实现:

 1 //CategoryService接口
 2 public interface CategoryService extends BaseService<Category> {
 3
 4 public void save(Category category); //插入
 5
 6 public void update(Category category);//更新
 7
 8 public void delete(int id); //删除
 9
10 public Category get(int id); //获取一个Category
11
12 public List<Category> query(); //获取全部Category
13
14 }
对CategoryService接口的具体实现:
 1 public class CategoryServiceImpl extends BaseServiceImpl<Category> implements CategoryService {
 2
 3 private SessionFactory sessionFactory;
 4
 5 //Spring会注进来
 6 public void setSessionFactory(SessionFactory sessionFactory) {
 7 this.sessionFactory = sessionFactory;
 8 }
 9
10 protected Session getSession() {
11 //从当前线程获取session,如果没有则创建一个新的session
12 return sessionFactory.getCurrentSession();
13 }
14
15 @Override
16 public void save(Category category) {
17 getSession().save(category);
18 }
19
20 @Override
21 public void update(Category category) {
22 getSession().update(category);
23 }
24
25 @Override
26 public void delete(int id) {
27 /*第一种方法有个弊端,就是没删除一次得先查询一次
28 Object obj = getSession().get(Category.class, id);
29 if(obj != null) {
30 getSession().delete(obj);
31 }*/
32 String hql = "delete Category while id=:id";
33 getSession().createQuery(hql) //
34 .setInteger("id", id) //
35 .executeUpdate();
36 }
37
38 @Override
39 public Category get(int id) {
40 return (Category) getSession().get(Category.class, id);
41 }
42
43 @Override
44 public List<Category> query() {
45 String hql = "from Category";
46 return getSession().createQuery(hql).list();
47 }
48 }
1.2 Service层抽取实现
完成了CategoryService后,我们来抽取Service层的基础实现。思路是这样的:我们抽取一个基础接口BaseService以及基础接口的实现BaseServiceImpl,后面开发的时候,如果需要新的Service,只需要做两步即可:首先定义一个新的接口xxxService继承BaseService接口,这个接口可以增加新的抽象方法;然后定义一个新的实现类xxxServiceImpl继承BaseServiceImpl并实现xxxService接口即可。这样更加便于项目的维护。
我们先根据上面的CategoryService接口来创建BaseService接口:
 1 //基础接口BaseService,使用泛型
 2 public interface BaseService<T> {
 3 public void save(T t);
 4
 5 public void update(T t);
 6
 7 public void delete(int id);
 8
 9 public T get(int id);
10
11 public List<T> query();
12 }
然后再根据CategoryServiceImpl实现类创建BaseService接口的实现类BaseServiceImpl:
 1 /**
 2 * @Description TODO(公共模块的抽取)
 3 * @author eson_15
 4 *
 5 */
 6 @SuppressWarnings("unchecked")
 7 public class BaseServiceImpl<T> implements BaseService<T> {
 8
 9 private Class clazz; //clazz中存储了当前操作的类型,即泛型T
10 private SessionFactory sessionFactory;
11
12 public BaseServiceImpl() {
13 //下面三个打印信息可以去掉,这里是给自己看的
14  System.out.println("this代表的是当前调用构造方法的对象" + this);
15 System.out.println("获取当前this对象的父类信息" + this.getClass().getSuperclass());
16 System.out.println("获取当前this对象的父类信息(包括泛型信息)" + this.getClass().getGenericSuperclass());
17 //拿到泛型的参数类型
18 ParameterizedType type = (ParameterizedType) this.getClass().getGenericSuperclass();
19 clazz = (Class)type.getActualTypeArguments()[0];
20 }
21
22 public void setSessionFactory(SessionFactory sessionFactory) {
23 this.sessionFactory = sessionFactory;
24 }
25
26 protected Session getSession() {
27 //从当前线程获取session,如果没有则创建一个新的session
28 return sessionFactory.getCurrentSession();
29 }
30
31 @Override
32 public void save(T t) {
33 getSession().save(t);
34 }
35
36 @Override
37 public void update(T t) {
38 getSession().update(t);
39 }
40
41 @Override
42 public void delete(int id) {
43 System.out.println(clazz.getSimpleName());
44 String hql = "delete " + clazz.getSimpleName() + " as c where c.id=:id";
45 getSession().createQuery(hql) //
46 .setInteger("id", id) //
47 .executeUpdate();
48 }
49
50 @Override
51 public T get(int id) {
52 return (T) getSession().get(clazz, id);
53 }
54
55 @Override
56 public List<T> query() {
57 String hql = "from " + clazz.getSimpleName();
58 return getSession().createQuery(hql).list();
59 }
60
61 }
抽取完了后,我们就可以改写CategoryService接口和CategoryServiceImpl实现类了。如下:
 1
 2
 3 //CategoryService接口继承BaseService接口
 4 public interface CategoryService extends BaseService<Category> {
 5 /*
 6      * 只要添加CategoryService本身需要的新的方法即可,公共方法已经在BaseService中了
 7      */
 8 }
 9
10 /**
11  * @Description TODO(模块自身的业务逻辑)
12  * @author eson_15
13  *
14  */
15 public class CategoryServiceImpl extends BaseServiceImpl<Category> implements CategoryService {
16
17     /*
18      * 只需实现CategoryService接口中新增的方法即可,公共方法已经在BaseServiceImpl中实现了
19      */
20 }
从代码中可以看出,新增的Service只需要继承BaseService接口,然后在接口中新增本Service所需要的业务逻辑即可。新增的ServiceImpl只需要继承BaseServiceImpl并实现新增的业务逻辑即可。
但是别忘了很重要的一点:就是修改Spring的配置文件beans.xml中的bean。
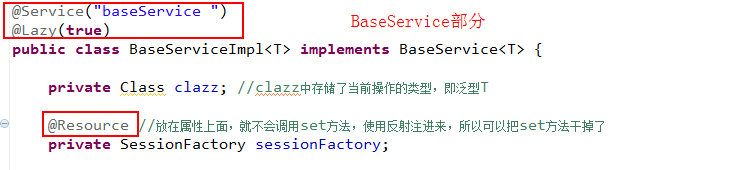
1 <!-- 泛型类是不能实例化的,所以要加lazy-init属性 -->
2 <bean id="baseService" class="cn.it.shop.service.impl.BaseServiceImpl" lazy-init="true">
3 <property name="sessionFactory" ref="sessionFactory" />
4 </bean>
5
6 <bean id="categoryService" class="cn.it.shop.service.impl.CategoryServiceImpl" parent="baseService"/>
将原来categoryService中的property干掉,然后增加parent属性,指明继承baseService;然后配置一下baseService,将sessionFactory配到baseService中去,另外要注意一点:设置lazy-init属性为true,因为baseService是泛型类,泛型类是不能实例化的。至此,Service层的抽取就搞定了。
2. Service层添加一个Account
刚刚抽取好了Service层,那么现在我们想写一个Account(管理员)的service就很简单了:
首先写一个AccountService接口继承BaseService:
1 public interface AccountService extends BaseService<Account> { //注意BaseService里的泛型现在是Account
2 /*
3 * 只要添加AccountService本身需要的新的方法即可,公共方法已经在BaseService中了
4 */
5 }
6 然后写一个AccountServiceImpl实现类继承BaseServiceImpl实现类,并实现AccountService接口即可:
7
8
9
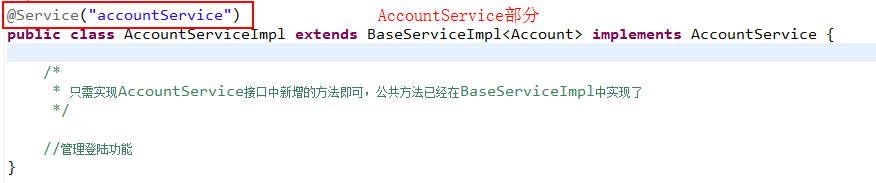
10 public class AccountServiceImpl extends BaseServiceImpl<Account> implements AccountService {
11
12 /*
13 * 只需实现AccountService接口中新增的方法即可,公共方法已经在BaseServiceImpl中实现了
14 */
15
16 //管理登陆功能,后期再完善
17 }
最后在beans.xml文件里加上如下配置:
<bean id="accountService" class="cn.it.shop.service.impl.AccountServiceImpl" parent="baseService" />
这样就写好了一个新的service了,以后需要添加service就遵循这个流程,非常方便。
3. Action的抽取
3.1 Action中往域(request,session,application等)中存数据
我们知道,在Action中可以直接通过ActionContext.getContext()去获取一个ActionContext对象,然后通过该对象再去获得相应的域对象;也可以通过实现xxxAware接口来注入相应的域对象。我们先来看一下这两种方法:
 1 public class CategoryAction extends ActionSupport implements RequestAware,SessionAware,ApplicationAware{
 2
 3 private Category category;
 4
 5     private CategoryService categoryService;
 6
 7      public void setCategoryService(CategoryService categoryService) {
 8          this.categoryService = categoryService;
 9      }
10
11 public String update() {
12 System.out.println("----update----");
13 categoryService.update(category);
14 return "index";
15 }
16
17 public String save() {
18 System.out.println("----save----");
19 return "index";
20 }
21
22 public String query() {
23 //解决方案一,采用相应的map取代原来的内置对象,这样与jsp没有依赖,但是代码量比较大
24 //    ActionContext.getContext().put("categoryList", categoryService.query()); //放到request域中
25 //    ActionContext.getContext().getSession().put("categoryList", categoryService.query()); //放到session域中
26 //    ActionContext.getContext().getApplication().put("categoryList", categoryService.query()); //放到application域中
27
28 //解决方案二,实现相应的接口(RequestAware,SessionAware,ApplicationAware),让相应的map注入
29 request.put("categoryList", categoryService.query());
30 session.put("categoryList", categoryService.query());
31 application.put("categoryList", categoryService.query());
32 return "index";
33 }
34
35 public Category getCategory() {
36 return category;
37 }
38
39 public void setCategory(Category category) {
40 this.category = category;
41 }
42
43 private Map<String, Object> request;
44 private Map<String, Object> session;
45 private Map<String, Object> application;
46
47 @Override
48 public void setApplication(Map<String, Object> application) {
49 this.application = application;
50 }
51
52 @Override
53 public void setSession(Map<String, Object> session) {
54 this.session = session;
55 }
56
57 @Override
58 public void setRequest(Map<String, Object> request) {
59 this.request = request;
60 }
61 }
还是上一节整合三大框架时的CategoryAction类,我们在里面加了一个query方法,在该方法中,我们通过向request域、session域和application域中存入查询的结果。第一种方法是直接使用ActionContext来实现,不需要实现任何接口,但是代码量较大;第二种方法通过实现RequestAware、SessionAware和ApplicationAware接口,实现该接口的三个抽象方法把request、session和application注入进来,然后赋给相应的成员变量中,这样就可以在query方法中向域中存放查询结果了。这代码量貌似比第一种方法更大……但是我们可以抽取,先往下看。
我们在index.jsp中新加一个查询连接来测试能否将查询结果显示出来:
 1
 2
 3 <%@ page language="java" import="java.util.*" pageEncoding="UTF-8"%>
 4 <%@ taglib uri="http://java.sun.com/jsp/jstl/core" prefix="c" %>
 5 <!DOCTYPE HTML PUBLIC "-//W3C//DTD HTML 4.01 Transitional//EN">
 6 <html>
 7 <head>
 8 <title>My JSP 'index.jsp' starting page</title>
 9 </head>
10
11 <body>
12 <a href="${pageContext.request.contextPath }/category_update.action?category.id=2&category.type=gga&category.hot=false">访问update</a>
13 <a href="category_save.action">访问save</a>
14 <a href="category_query.action">查询所有类别</a><br/>
15 <c:forEach items="${requestScope.categoryList }" var="category">
16 ${category.id } | ${category.type } | ${category.hot } <br/>
17 </c:forEach>
18
19 <c:forEach items="${sessionScope.categoryList }" var="category">
20 ${category.id } | ${category.type } | ${category.hot } <br/>
21 </c:forEach>
22
23 <c:forEach items="${applicationScope.categoryList }" var="category">
24 ${category.id } | ${category.type } | ${category.hot } <br/>
25 </c:forEach>
26 </body>
27 </html>
3.2 抽取BaseAction
刚刚提到了,第二种方法的代码量更大,但是我们可以抽取一个BaseAction,专门处理这些域相关的操作。
 1 public class BaseAction extends ActionSupport implements RequestAware,SessionAware,ApplicationAware {
 2
 3 protected Map<String, Object> request;
 4 protected Map<String, Object> session;
 5 protected Map<String, Object> application;
 6
 7 @Override
 8 public void setApplication(Map<String, Object> application) {
 9 this.application = application;
10 }
11
12 @Override
13 public void setSession(Map<String, Object> session) {
14 this.session = session;
15 }
16
17 @Override
18 public void setRequest(Map<String, Object> request) {
19 this.request = request;
20 }
21 }
然后我们自己的Action如果需要用到这些域对象来存储数据时,直接继承BaseAction即可,就能直接使用request、session和application对象了。所以修改后的CategoryAction如下:
 1
 2
 3 public class CategoryAction extends BaseAction {
 4
 5 private Category category;
 6 <pre name="code" class="java">
 7     private CategoryService categoryService;
 8
 9      public void setCategoryService(CategoryService categoryService) {
10          this.categoryService = categoryService;
11      }
12 public String update() {System.out.println("----update----");categoryService.update(category); return "index"; }public String save() {System.out.println("----save----");return "index"; } public String query() {request.put("categoryList", categoryService.query()); session.put("categoryList", categoryService.query()); application.put("categoryList", categoryService.query()); return "index"; } public Category getCategory() { return category; } public void setCategory(Category category) {this.category = category; }}
13
14
后面所有要使用request、session和application域的Action,只要直接继承BaseAction即可,非常方便。
3.3 获取参数(ModelDriven)
我们继续看上面的CategoryAction类,里面有个成员变量category,这是个POJO,定义这个变量并写好set和get方法是为了JSP页面可以通过url后面附带参数传进来,参数是category对象中的属性,比如id,type等,但是url中的参数必须写成category.id、category.type等。这样struts会自动将这写参数注入到category对象中,然后我们就可以直接使用这个category对象了,但是这样有点繁琐。我们可以使用ModelDriven来更方便的解决。
 1 public class CategoryAction extends BaseAction implements ModelDriven<Category>{
 2
 3 private Category category;
 4
 5 //使用ModelDriven接口必须要实现getModel()方法,此方法会把返回的项压到栈顶
 6 @Override
 7 public Category getModel() {
 8 category = new Category();
 9 return category;
10 }
11 <pre name="code" class="java">    private CategoryService categoryService;
12
13      public void setCategoryService(CategoryService categoryService) {
14          this.categoryService = categoryService;
15      }
16
17 public String update() {
18 System.out.println("----update----");
19 categoryService.update(category);
20 return "index";
21 }
22
23 public String save() {
24 System.out.println("----save----");
25 return "index";
26 }
27
28 public String query() {
29 request.put("categoryList", categoryService.query());
30 session.put("categoryList", categoryService.query());
31 application.put("categoryList", categoryService.query());
32 return "index";
33 }
34
35 }
36
37
38
39
这样我们在前台JSP页面就不用带category.id这种繁琐的参数了,看JSP页面中的ModelDriven部分:
 1 <%@ page language="java" import="java.util.*" pageEncoding="UTF-8"%>
 2 <%@ taglib uri="http://java.sun.com/jsp/jstl/core" prefix="c" %>
 3 <!DOCTYPE HTML PUBLIC "-//W3C//DTD HTML 4.01 Transitional//EN">
 4 <html>
 5 <head>
 6 <title>My JSP 'index.jsp' starting page</title>
 7 </head>
 8
 9 <body>
10 <a href="${pageContext.request.contextPath }/category_update.action?category.id=2&category.type=gga&category.hot=false">访问update</a>
11 <a href="category_save.action?id=1&type=haha&hot=true">测试ModelDriven</a>
12 <a href="category_query.action">查询所有类别</a><br/>
13 <c:forEach items="${requestScope.categoryList }" var="category">
14 ${category.id } | ${category.type } | ${category.hot } <br/>
15 </c:forEach>
16
17 <c:forEach items="${sessionScope.categoryList }" var="category">
18 ${category.id } | ${category.type } | ${category.hot } <br/>
19 </c:forEach>
20
21 <c:forEach items="${applicationScope.categoryList }" var="category">
22 ${category.id } | ${category.type } | ${category.hot } <br/>
23 </c:forEach>
24 </body>
25 </html>
测试结果是可以获得catgory,并且将id,type和hot属性全部赋值好。我们可以看出,通过实现ModelDriven接口,我们可以很方便的在url中携带参数,Action中只需要实现getModel方法,new一个要使用的对象返回即可。到这里我们很容易想到,struts中肯定会有很多这种model需要获取,所以这一块我们也要抽取到BaseAction中去。
3.4 抽取ModelDriven到BaseAction
首先我们在BaseAction中添加ModelDriven部分的代码,如下:
 1 //因为有很多不同的model都需要使用ModelDriven,所以这里使用泛型
 2 public class BaseAction<T> extends ActionSupport implements RequestAware,SessionAware,ApplicationAware,ModelDriven<T> {
 3
 4 protected Map<String, Object> request;
 5 protected Map<String, Object> session;
 6 protected Map<String, Object> application;
 7
 8 protected T model;
 9
10 @Override
11 public void setApplication(Map<String, Object> application) {
12 this.application = application;
13 }
14
15 @Override
16 public void setSession(Map<String, Object> session) {
17 this.session = session;
18 }
19
20 @Override
21 public void setRequest(Map<String, Object> request) {
22 this.request = request;
23 }
24
25 @Override
26 public T getModel() { //这里通过解析传进来的T来new一个对应的instance
27 ParameterizedType type = (ParameterizedType)this.getClass().getGenericSuperclass();
28 Class clazz = (Class)type.getActualTypeArguments()[0];
29 try {
30 model = (T)clazz.newInstance();
31 } catch (Exception e) {
32 throw new RuntimeException(e);
33 }
34 return model;
35 }
36 }
抽取完了后,CategoryAction中的代码会越来越少:
 1 //继承BaseAction,并且加上泛型
 2 public class CategoryAction extends BaseAction<Category> {
 3
 4 private CategoryService categoryService;
 5
 6 public void setCategoryService(CategoryService categoryService) {
 7 this.categoryService = categoryService;
 8 }
 9
10 public String update() {
11 System.out.println("----update----");
12 categoryService.update(model);//直接使用model
13 return "index";
14 }
15
16 public String save() {
17 System.out.println("----save----");
18 System.out.println(model); //直接使用model
19 return "index";
20 }
21
22 public String query() {
23 request.put("categoryList", categoryService.query());
24 session.put("categoryList", categoryService.query());
25 application.put("categoryList", categoryService.query());
26 return "index";
27 }
28
29 }
到这里,还有一个看着不爽的地方,就是categoryService这个成员变量,它一直存在在CategoryAction里,因为CategoryAction中有用到categoryService对象中的方法,所以必须得创建这个对象,并且有set方法才能注入进来。这就导致一个弊端:如果很多Action都需要使用categoryService的话,那就必须在它们的Action里创建这个对象和set方法,而且,如果一个Action中要使用好几个不同的service对象,那就得全部创建,这样就变得很冗杂。
3.5 抽取service到BaseAction
针对上面的问题,我们将工程中所有的service对象都抽取到BaseAction中创建,这样其他Action继承BaseAction后,想用什么service就直接拿来用即可:
 1 //我将BaseAction中的内容归归类了
 2 public class BaseAction<T> extends ActionSupport implements RequestAware,SessionAware,ApplicationAware,ModelDriven<T> {
 3
 4 //service对象
 5 protected CategoryService categoryService;
 6 protected AccountService accountService;
 7
 8 public void setCategoryService(CategoryService categoryService) {
 9 this.categoryService = categoryService;
10 }
11 public void setAccountService(AccountService accountService) {
12 this.accountService = accountService;
13 }
14
15 //域对象
16 protected Map<String, Object> request;
17 protected Map<String, Object> session;
18 protected Map<String, Object> application;
19
20 @Override
21 public void setApplication(Map<String, Object> application) {
22 this.application = application;
23 }
24 @Override
25 public void setSession(Map<String, Object> session) {
26 this.session = session;
27 }
28 @Override
29 public void setRequest(Map<String, Object> request) {
30 this.request = request;
31 }
32
33 //ModelDriven
34 protected T model;
35 @Override
36 public T getModel() {
37 ParameterizedType type = (ParameterizedType)this.getClass().getGenericSuperclass();
38 Class clazz = (Class)type.getActualTypeArguments()[0];
39 try {
40 model = (T)clazz.newInstance();
41 } catch (Exception e) {
42 throw new RuntimeException(e);
43 }
44 return model;
45 }
46 }
这样CategoryAction中就更加清爽了:
 1
 2
 3 public class CategoryAction extends BaseAction<Category> {
 4
 5 public String update() {
 6 System.out.println("----update----");
 7 categoryService.update(model);
 8 return "index";
 9 }
10
11 public String save() {
12 System.out.println("----save----");
13 System.out.println(model);
14 return "index";
15 }
16
17 public String query() {
18 request.put("categoryList", categoryService.query());
19 session.put("categoryList", categoryService.query());
20 application.put("categoryList", categoryService.query());
21 return "index";
22 }
23
24 }
有人可能会问,BaseAction中注入了那么多service对象的话不会冗余么?这是不会的,因为就算不写在BaseAction中,Spring容器也是会创建这个对象的,这点没有关系,相反,service对象全放在BaseAction中更加便于其他Action的开发,而且BaseAction不需要配到struts.xml文件中,因为根本就没有哪个JSP会请求BaseAction,它只是让其他Action来继承用的。
还有一点别忘了:那就是修改在beans.xml中的配置:
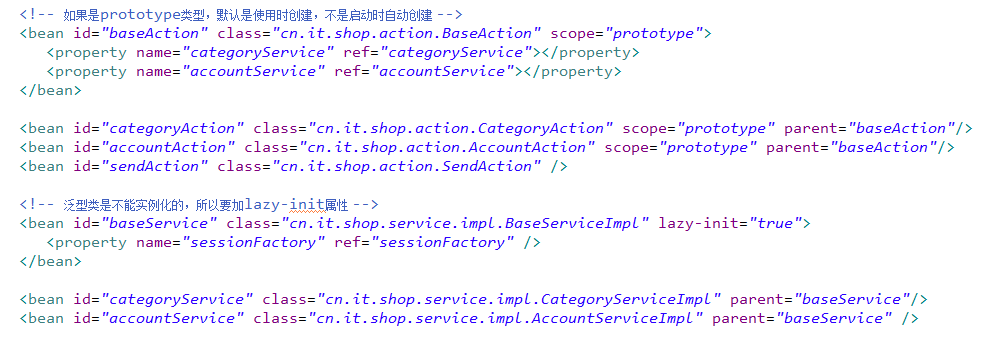
1 <!-- 如果是prototype类型,默认是使用时创建,不是启动时自动创建 -->
2 <bean id="baseAction" class="cn.it.shop.action.BaseAction" scope="prototype">
3 <property name="categoryService" ref="categoryService"></property>
4 <property name="accountService" ref="accountService"></property>
5 </bean>
6
7 <bean id="categoryAction" class="cn.it.shop.action.CategoryAction" scope="prototype" parent="baseAction"/>
新加一个baseAction的bean,将工程中所有service对象作为property配好,将原来的categoryAction中的property干掉。
以后我们如果要写新的xxxAction,直接继承BaseAction即可,如果xxxAction中有用到某个service,直接拿来用即可,只需要在beans.xml文件中加一个xxxAction对应的bean,在struts.xml文件中配置好跳转即可。
4. 将xml改成注解
我们可以看到,随着项目越写越大,beans.xml中的配置会越来越多,而且很多配置有冗余,为了更加便于开发,我们现在将xml的配置改成注解的形式,我们先看一下beans.xml中的配置:
这些是我们之前搭建环境以及抽取的时候写的bean,这些都需要转换成注解的形式,下面我们一块一块的换掉:首先替换service部分,这部分有三个:baseService、categoryService和accountService。替换如下:

然后将beans.xml中的相应部分干掉即可。接下来修改ActIon部分,主要有baseAction、categoryAction和accountAction三个,替换如下:


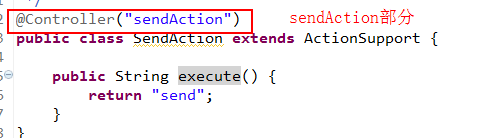
然后再干掉beans.xml中的Action部分的配置即可,最后在beans.xml文件中添加一个如下配置,就可以使用注解了。
<context:component-scan base-package="cn.it.shop.."/>