MySQL主从介绍
http://blog.csdn.net/wm_1991/article/details/52211032


适用场景:
(1)做数据库数据备份,仅仅是备份,当主机宕机时,马上从机可以代替主机。
(2)还是做数据备份,但是和主机一样,会向web服务器提供服务。但是不能往从机上写数据。
-
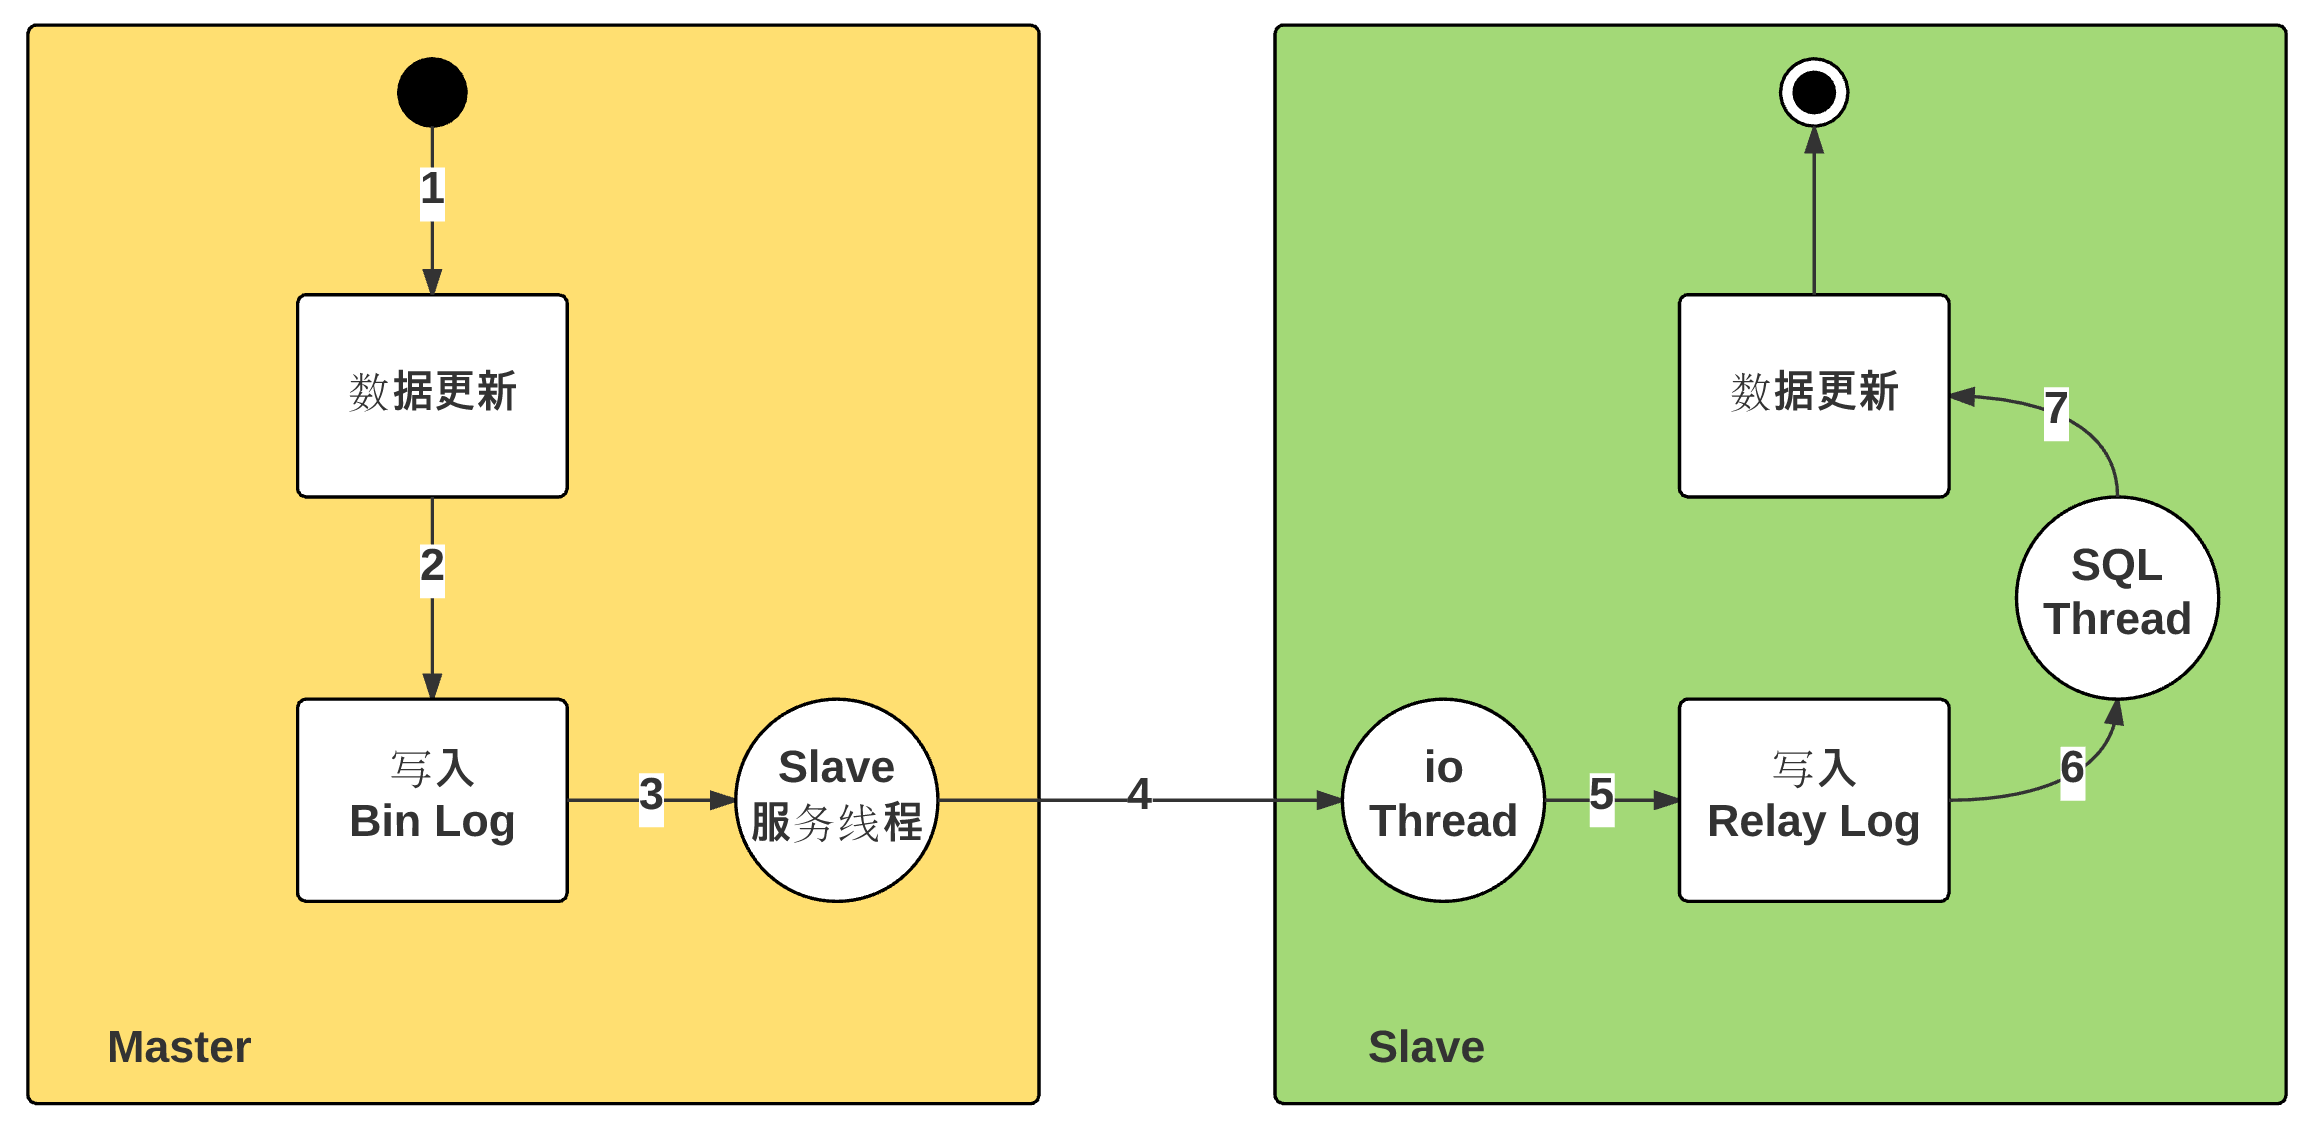
主从延迟:「步骤2」开始,到「步骤7」执行结束。
-
步骤 2:存储引擎处理,时间极短
-
步骤 3:文件更新通知,磁盘读取延迟
-
步骤 4:Bin Log 文件更新的传输延迟,单线程
-
步骤 5:磁盘写入延迟
-
步骤 6:文件更新通知,磁盘读取延迟
-
步骤 7:SQL 执行时长
-
Master上 1 个IO线程,负责向Slave传输binary log(binlog)Slave上 2 个线程:IO 线程和执行SQL的线程,其中:IO线程:将获取的日志信息,追加到relay log上;执行SQL的线程:检测到relay log中内容有更新,则在Slave上执行sql; -
准备工作
- 准备两台机器,上面都要安装MySQL。
- MySQL的安装这里就不说了,前面日志会有。
-
这里经常会出现一个权限问题。因为/data/mysql下的文件所有者和所属组都变成了root。用chmod改成MySQL即可(chmod -R mysql:mysql .)。
准备工作
1.master主机(122)作为主库,sunyujun02主机(58)作为从库
安装mysql步骤说明:
1.下载 cd /usr/local/src/ 从r.aminglinux.com下载mysql免编译的二进制源码包(用wget命令)
2.解压 tar zxvf mysql-5.6.35-linux-glibc2.5-x86_64.tar.gz
3.将解压的目录放到/usr/local/mysql目录下 mv msyql_…… /usr/local/mysql(如果有mysql目录,目录里有文件先将文件删除,没有的话建立mysql目录)
4.初始化 cd /usr/local/mysql/ ./scripts/mysql_install_db --user=mysql --datadir=/data/mysql (事先创建好mysql用户)
5.检查 echo $?
6.修改my.conf中的datadir=/data/mysql和shocket=/tmp/mysql.sock vim /etc/my.cnf
7.拷贝mysql的启动脚本 cp support-files/mysql.server /etc/init.d/mysqld
8.编辑/etc/init.d/mysqld,定义basedir=/usr/local/mysql datadir=/data/mysql
9.启动 /etc/init.d/mysqld start
10.如果有错查看日志 less /data/msyql/aminglinux-01.err
11.提示primess (没权限) 查看/data/mysql/下的文件用户都是root 需要改成mysql (chown -R mysql:mysql .)
12.再启动就ok了 /etc/init.d/mysqld start
13.添加开机启动 chkconfig mysqld on
配置主
1.修改my.conf添加配置文件(server-id值随便,我们这里写ip地址的最后一段(122) log_bin的值也随便定义值是binlog的前缀(我们这里写成master))
[root@master ~]# vim /etc/my.cnf
[root@master ~]#
[mysqld]
datadir=/data/mysql
socket=/tmp/mysql.sock
server-id=122
log_bin=master
[root@master ~]# /etc/init.d/mysqld restart
Starting MySQL.... SUCCESS!
[root@master ~]#
2.这时查看data/mysql/目录发现多了一些master开头的文件,说明起作用了
[root@master ~]# cd /data/mysql/
[root@master mysql]# ll
总用量 110700
-rw-rw----. 1 mysql mysql       56 2月   8 17:32 auto.cnf
-rw-rw----. 1 mysql mysql    11957 2月   8 17:39 bogon.err
-rw-rw----. 1 mysql mysql        6 2月   8 17:39 bogon.pid
-rw-rw----. 1 mysql mysql 12582912 2月  28 15:17 ibdata1
-rw-rw----. 1 mysql mysql 50331648 2月  28 15:17 ib_logfile0
-rw-rw----. 1 mysql mysql 50331648 2月   8 17:09 ib_logfile1
-rw-rw----. 1 mysql mysql    19699 2月  28 15:15 localhost.localdomain.err
-rw-rw----. 1 mysql mysql      143 2月  28 15:16 master.000001
-rw-rw----. 1 mysql mysql      120 2月  28 15:17 master.000002
-rw-rw----. 1 mysql mysql    33966 2月  28 15:17 master.err
-rw-rw----. 1 mysql mysql       32 2月  28 15:17 master.index
-rw-rw----. 1 mysql mysql        6 2月  28 15:17 master.pid
drwx------. 2 mysql mysql     4096 2月   8 17:09 mysql
drwx------. 2 mysql mysql     4096 2月  22 16:06 mysql2
drwx------. 2 mysql mysql     4096 2月   8 17:09 performance_schema
drwx------. 2 mysql mysql        6 2月   8 17:09 test
drwx------. 2 mysql mysql     4096 2月  27 17:20 zrlog
[root@master mysql]#
3.备份创建测试数据库
[root@master mysql]# mysqldump -uroot -proot zrlog > /tmp/zrlog.sql
Warning: Using a password on the command line interface can be insecure.
[root@master mysql]# du -sh /tmp/zrlog.sql
12K     /tmp/zrlog.sql
[root@master mysql]# mysql -uroot -proot -e "create database zrlogtest"
Warning: Using a password on the command line interface can be insecure.
[root@master mysql]# mysql -uroot -proot zrlogtest < /tmp/zrlog.sql
4.创建用于同步的用户
[root@master mysql]# mysql -uroot -proot
Warning: Using a password on the command line interface can be insecure.
Welcome to the MySQL monitor.  Commands end with ; or g.
Your MySQL connection id is 27665
Server version: 5.6.35-log MySQL Community Server (GPL)

Copyright (c) 2000, 2016, Oracle and/or its affiliates. All rights reserved.

Oracle is a registered trademark of Oracle Corporation and/or its
affiliates. Other names may be trademarks of their respective
owners.

Type 'help;' or 'h' for help. Type 'c' to clear the current input statement.

mysql> grant replication slave on *.* to 'repl'@'10.21.95.58' identified by 'root';
Query OK, 0 rows affected (0.07 sec)

mysql>
5.锁表(不让数据继续写了,保持当前状态,从库不要讲备份的数据同步,两者数据保持一致)
mysql> flush tables with read lock;
Query OK, 0 rows affected (1.10 sec)
6.show一下master需要记住File(binlog的file名称)和Position(位置)
mysql> show master status;
+---------------+----------+--------------+------------------+-------------------+
| File          | Position | Binlog_Do_DB | Binlog_Ignore_DB | Executed_Gtid_Set |
+---------------+----------+--------------+------------------+-------------------+
| master.000002 |    10937 |              |                  |                   |
+---------------+----------+--------------+------------------+-------------------+
1 row in set (0.00 sec)

mysql>
7.同步数据库(mysql库不用同步,因为mysql中保存的是用户的密码权限等信息,同步到从库中无意义)备份主上的数据库,传到从上
[root@master mysql]# mysqldump -uroot -proot test > /tmp/test.sql
Warning: Using a password on the command line interface can be insecure.
[root@master mysql]# ls /tmp/*sql
/tmp/test.sql  /tmp/zrlog.sql
[root@master mysql]#
配置从

1.安装MySQL
2.编辑配置my.cnf的server-id(log-bin参数就不用配置了,只有主才需要二进制日志文件)
[root@sunyujun02 ~]# vim /etc/my.cnf
server-id = 58
3.重启mysql
[root@sunyujun02 ~]# /etc/init.d/mysql restart
Shutting down MySQL..... SUCCESS!
Starting MySQL....... SUCCESS!
[root@sunyujun02 ~]#
4.将主上的几个sql拷贝过来并做数据的恢复到从上,scp命令拷贝相比于CP命令,主要就是在source跟dest之前加上remote_username@remote_ip:,通过加的位置的不同区分出到底从远程到本地还是本地到远程
[root@sunyujun02 var]# scp 10.21.95.122:/tmp/*.sql /tmp/
The authenticity of host '10.21.95.122 (10.21.95.122)' can't be established.
ECDSA key fingerprint is 18:59:d2:46:49:14:c3:70:66:09:7f:70:85:49:d8:c3.
Are you sure you want to continue connecting (yes/no)? yes
Warning: Permanently added '10.21.95.122' (ECDSA) to the list of known hosts.
root@10.21.95.122's password:
test.sql                                                  100% 1258     1.2KB/s   00:00
zrlog.sql                                                 100% 9862     9.6KB/s   00:00
[root@sunyujun02 var]# ls /tmp/*sql
/tmp/test.sql  /tmp/zrlog.sql
[root@sunyujun02 var]#
5.如果mysql没有加到环境变量中,可以临时加alias,这样就可以用mysql命令了
[root@sunyujun02 var]# alias 'mysql=/usr/localhost/mysql/bin/mysql'
6.进入从库,建立创建相应的数据库
[root@sunyujun02 var]# mysql -uroot -proot
Welcome to the MySQL monitor.  Commands end with ; or g.
Your MySQL connection id is 3
Server version: 5.5.48-log Source distribution

Copyright (c) 2000, 2016, Oracle and/or its affiliates. All rights reserved.

Oracle is a registered trademark of Oracle Corporation and/or its
affiliates. Other names may be trademarks of their respective
owners.

Type 'help;' or 'h' for help. Type 'c' to clear the current input statement.

mysql> create database zrlogtest;
Query OK, 1 row affected (0.01 sec)

mysql> create database test;
Query OK, 1 row affected (0.00 sec)

mysql>
7.把备份的库恢复到从机上,保证主从两边数据库一致
[root@sunyujun02 var]# mysql -uroot -proot zrlogtest < /tmp/zrlog.sql
[root@sunyujun02 var]# mysql -uroot -proot test < /tmp/test.sql
[root@sunyujun02 var]#
8.进入从库
[root@sunyujun02 var]# mysql -uroot -proot
Welcome to the MySQL monitor.  Commands end with ; or g.
Your MySQL connection id is 17
Server version: 5.5.48-log Source distribution

Copyright (c) 2000, 2016, Oracle and/or its affiliates. All rights reserved.

Oracle is a registered trademark of Oracle Corporation and/or its
affiliates. Other names may be trademarks of their respective
owners.

Type 'help;' or 'h' for help. Type 'c' to clear the current input statement.

mysql> show databases;
+--------------------+
| Database           |
+--------------------+
| information_schema |
| coreseek           |
| mysql              |
| mysql2             |
| performance_schema |
| test               |
| zrlogtest          |
+--------------------+
7 rows in set (0.00 sec)
9.停止主从同步
mysql> stop slave;
Query OK, 0 rows affected, 1 warning (0.00 sec)

mysql>
10.接下来就是最重要的一步操作,在从机上配置主机的ip,用户名,密码,binlog的name以及pos(如果端口不是3306可以指定master_port)。
mysql> change master to master_host='10.21.95.122', master_user='repl', master_password='root', master_log_file='master.000002', master_log_pos=10937;
Query OK, 0 rows affected (0.08 sec)

mysql>
11.开启主从同步
mysql> start slave;
Query OK, 0 rows affected (0.03 sec)

mysql>
12.查看主从有没有配置成功 (查看是否有两个yes)
mysql> show slave statusG
*************************** 1. row ***************************
               Slave_IO_State: Waiting for master to send event
                  Master_Host: 10.21.95.122
                  Master_User: repl
                  Master_Port: 3306
                Connect_Retry: 60
              Master_Log_File: master.000002
          Read_Master_Log_Pos: 10937
               Relay_Log_File: sunyujun02-relay-bin.000002
                Relay_Log_Pos: 147
        Relay_Master_Log_File: master.000002
             Slave_IO_Running: Yes
            Slave_SQL_Running: Yes
全的
mysql> show slave statusG
*************************** 1. row ***************************
               Slave_IO_State: Waiting for master to send event
                  Master_Host: 10.21.95.122
                  Master_User: repl
                  Master_Port: 3306
                Connect_Retry: 60
              Master_Log_File: master.000001
          Read_Master_Log_Pos: 120
               Relay_Log_File: sunyujun02-relay-bin.000002
                Relay_Log_Pos: 263
        Relay_Master_Log_File: master.000001
             Slave_IO_Running: Yes
            Slave_SQL_Running: Yes
              Replicate_Do_DB:
          Replicate_Ignore_DB:
           Replicate_Do_Table:
       Replicate_Ignore_Table:
      Replicate_Wild_Do_Table:
  Replicate_Wild_Ignore_Table:
                   Last_Errno: 0
                   Last_Error:
                 Skip_Counter: 0
          Exec_Master_Log_Pos: 120
              Relay_Log_Space: 424
              Until_Condition: None
               Until_Log_File:
                Until_Log_Pos: 0
           Master_SSL_Allowed: No
           Master_SSL_CA_File:
           Master_SSL_CA_Path:
              Master_SSL_Cert:
            Master_SSL_Cipher:
               Master_SSL_Key:
        Seconds_Behind_Master: 0
Master_SSL_Verify_Server_Cert: No
                Last_IO_Errno: 0
                Last_IO_Error:
               Last_SQL_Errno: 0
               Last_SQL_Error:
  Replicate_Ignore_Server_Ids:
             Master_Server_Id: 122
1 row in set (0.00 sec)

mysql>
13.解锁主机上的表,让它恢复写的操作
主机 10.21.95.122
mysql> unlock tables;
Query OK, 0 rows affected (0.00 sec)

mysql>

测试主从同步


几个配置参数:在/etc/my.cnf里
主服务器上:
binlog-do-db= //仅同步指定的库
binlog-ignore-db= //忽略指定库
从服务器上:
(推荐应用等级:中)
replicate_do_db= //仅同步指定的库
replicate_ignore_db= //忽略指定库
(推荐应用等级:低)万一不通的库里有同名的表
replicate_do_table= //仅同步指定的表
replicate_ignore_table= //忽略指定表
(推荐应用等级:高)
replicate_wild_do_table= //如aming.%, 支持通配符% //仅同步指定库里的指定表
replicate_wild_ignore_table= //不同步指定库里的指定表
1.主从测试(主上添加数据测试)
mysql> show databases;
+--------------------+
| Database           |
+--------------------+
| information_schema |
| mysql              |
| mysql2             |
| performance_schema |
| test               |
| zrlog              |
| zrlogtest          |
+--------------------+
7 rows in set (0.00 sec)

mysql> use zrlogtest
Reading table information for completion of table and column names
You can turn off this feature to get a quicker startup with -A

Database changed
mysql> show tables;
+---------------------+
| Tables_in_zrlogtest |
+---------------------+
| comment             |
| link                |
| log                 |
| lognav              |
| plugin              |
| tag                 |
| type                |
| user                |
| website             |
+---------------------+
9 rows in set (0.00 sec)

mysql> select * from user;
+--------+-------------------+----------------------------------+----------+--------+--------------------------------------+
| userId | email             | password                         | userName | header | secretKey                            |
+--------+-------------------+----------------------------------+----------+--------+--------------------------------------+
|      1 | admin@example.com | 7fef6171469e80d32c0559f88b377245 | admin    | NULL   | c4badd31-9da8-49eb-ba27-a9c19452c560 |
+--------+-------------------+----------------------------------+----------+--------+--------------------------------------+
1 row in set (0.00 sec)

mysql> insert into user (userId,email) values(2,'1111@qq.com');
Query OK, 1 row affected (0.33 sec)

mysql> select * from user;
+--------+-------------------+----------------------------------+----------+--------+--------------------------------------+
| userId | email             | password                         | userName | header | secretKey                            |
+--------+-------------------+----------------------------------+----------+--------+--------------------------------------+
|      1 | admin@example.com | 7fef6171469e80d32c0559f88b377245 | admin    | NULL   | c4badd31-9da8-49eb-ba27-a9c19452c560 |
|      2 | 1111@qq.com       | NULL                             | NULL     | NULL   | NULL                                 |
+--------+-------------------+----------------------------------+----------+--------+--------------------------------------+
2 rows in set (0.00 sec)

mysql>
2.从上查看结果
mysql> show databases;
+--------------------+
| Database           |
+--------------------+
| information_schema |
| coreseek           |
| mysql              |
| mysql2             |
| performance_schema |
| test               |
| zrlogtest          |
+--------------------+
7 rows in set (0.02 sec)

mysql> use zrlogtest;
Database changed
mysql> show tables;
+---------------------+
| Tables_in_zrlogtest |
+---------------------+
| comment             |
| link                |
| log                 |
| lognav              |
| plugin              |
| tag                 |
| type                |
| user                |
| website             |
+---------------------+
9 rows in set (0.00 sec)

mysql> select * from user;
+--------+-------------------+----------------------------------+----------+--------+--------------------------------------+
| userId | email             | password                         | userName | header | secretKey                            |
+--------+-------------------+----------------------------------+----------+--------+--------------------------------------+
|      1 | admin@example.com | 7fef6171469e80d32c0559f88b377245 | admin    | NULL   | c4badd31-9da8-49eb-ba27-a9c19452c560 |
+--------+-------------------+----------------------------------+----------+--------+--------------------------------------+
1 row in set (0.01 sec)

mysql> select * from user;
+--------+-------------------+----------------------------------+----------+--------+--------------------------------------+
| userId | email             | password                         | userName | header | secretKey                            |
+--------+-------------------+----------------------------------+----------+--------+--------------------------------------+
|      1 | admin@example.com | 7fef6171469e80d32c0559f88b377245 | admin    | NULL   | c4badd31-9da8-49eb-ba27-a9c19452c560 |
|      2 | 1111@qq.com       | NULL                             | NULL     | NULL   | NULL                                 |
+--------+-------------------+----------------------------------+----------+--------+--------------------------------------+
2 rows in set (0.00 sec)

mysql>
3.添加表测试
主
mysql> use test ;
Database changed
mysql> show tables;
Empty set (0.01 sec)

mysql> creat table linux (`id`int(11),`name`char(100));
ERROR 1064 (42000): You have an error in your SQL syntax; check the manual that corresponds to your MySQL server version for the right syntax to use near 'creat table linux (`id`int(11),`name`char(100))' at line 1
mysql> create table linux (`id`int(11),`name`char(100));
Query OK, 0 rows affected (0.15 sec)

mysql> show tables;
+----------------+
| Tables_in_test |
+----------------+
| linux          |
+----------------+
1 row in set (0.00 sec)

mysql>
从
mysql> use  test;
Database changed
mysql> show tables;
Empty set (0.00 sec)

mysql> show tables;
+----------------+
| Tables_in_test |
+----------------+
| linux          |
+----------------+
1 row in set (0.00 sec)

mysql>
4.删除表
主
mysql> drop table linux;
Query OK, 0 rows affected (0.05 sec)

mysql> show tables;
Empty set (0.00 sec)

mysql>
从
mysql> show tables;
Empty set (0.00 sec)

mysql>
5.如果误操作,导致主从同步异常,怎么办?
最重要的一步就是马上关闭主从同步:
stop slave;
接着马上做一步操作:(确认下master_log_pos)
change master to master_host='', master_user='repl', master_password='', master_log_file='', master_log_pos=xx,
接着打开主从同步:
start slave;
然后查看是否恢复正常。