代码管理平台介绍

安装svn
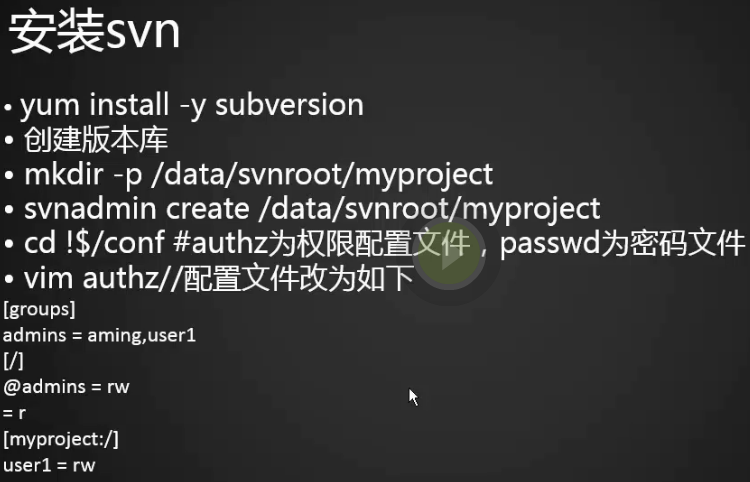
1.svn是cs架构,所以我们需要安装一个服务端
[root@centos-01 ~]# yum install -y subversion
2.创建版本库(我们的项目代码放置的地方),并用svnadmin命令初始化一些文件
[root@centos-01 ~]# mkdir -p /data/svnroot/myproject
[root@centos-01 ~]# svnadmin create /data/svnroot/myproject/
[root@centos-01 ~]# ls -la !$
ls -la /data/svnroot/myproject/
总用量 8
drwxr-xr-x 6 root root  86 4月  26 06:32 .
drwxr-xr-x 3 root root  23 4月  26 06:31 ..
drwxr-xr-x 2 root root  54 4月  26 06:32 conf
drwxr-sr-x 6 root root 233 4月  26 06:32 db
-r--r--r-- 1 root root   2 4月  26 06:32 format
drwxr-xr-x 2 root root 231 4月  26 06:32 hooks
drwxr-xr-x 2 root root  41 4月  26 06:32 locks
-rw-r--r-- 1 root root 229 4月  26 06:32 README.txt
[root@centos-01 ~]#
3.进入conf文件有三个文件authz是控制权限的,passwd是密码文件,svnserve.conf是仓库的配置文件
[root@centos-01 ~]# cd !$/conf
cd /data/svnroot/myproject//conf
[root@centos-01 conf]# ls
authz  passwd  svnserve.conf
[root@centos-01 conf]#
4.编辑authz文件,在组中添加一个admins组加两个用户user1,user2
[groups]
# harry_and_sally = harry,sally
# harry_sally_and_joe = harry,sally,&joe
admins = user1,user2 (admin组有两个用户user1,user2)

[/](指的是/data/svnroot/myproject/目录)
@admins = rw(admins组下的用户有读写权限)
* = r (其他所有用户有读权限)

[myproject:/](另外一种写法,myproject是项目名)
user1 = rw(user1是读写)

5.创建用户和密码
[root@centos-01 conf]# vim passwd
[root@centos-01 conf]#
[users]
# harry = harryssecret
# sally = sallyssecret
user1 = user1
user2 = user2
6.编辑配置文件
[root@centos-01 conf]# vim svnserve.conf
[root@centos-01 conf]#
[general]
anon-access = none (匿名用户没有任何权限)
auth-access = write  (被授权的用户有写的权限)
password-db = passwd (用户的密码文件)
authz-db = authz (权限控制文件)
realm = /data/svnroot/myproject (对哪一个项目生效)
7.启动svn(-d是后台模式启动)
[root@centos-01 conf]# svnserve -d -r /data/svnroot/
[root@centos-01 conf]#
[root@centos-01 conf]# ps aux|grep svn
root       4100  0.0  0.1 197136  1024 ?        Ss   07:04   0:00 svnserve -d -r /data/svnroot/
root       4102  0.0  0.0 112664   932 pts/0    S+   07:05   0:00 grep --color=auto svn
[root@centos-01 conf]# netstat -lntp
Active Internet connections (only servers)
Proto Recv-Q Send-Q Local Address           Foreign Address         State       PID/Program name
tcp        0      0 0.0.0.0:3690            0.0.0.0:*               LISTEN      4100/svnserve
tcp        0      0 0.0.0.0:111             0.0.0.0:*               LISTEN      1/systemd
tcp        0      0 192.168.122.1:53        0.0.0.0:*               LISTEN      1840/dnsmasq
tcp        0      0 0.0.0.0:22              0.0.0.0:*               LISTEN      1089/sshd
tcp        0      0 127.0.0.1:631           0.0.0.0:*               LISTEN      984/cupsd
tcp        0      0 127.0.0.1:25            0.0.0.0:*               LISTEN      1624/master
tcp        0      0 192.168.133.44:27017    0.0.0.0:*               LISTEN      1504/mongod
tcp        0      0 127.0.0.1:27017         0.0.0.0:*               LISTEN      1504/mongod
tcp6       0      0 :::111                  :::*                    LISTEN      1/systemd
tcp6       0      0 :::22                   :::*                    LISTEN      1089/sshd
tcp6       0      0 ::1:631                 :::*                    LISTEN      984/cupsd
tcp6       0      0 ::1:25                  :::*                    LISTEN      1624/master
[root@centos-01 conf]#
8.清掉防火墙规则
[root@centos-01 conf]# iptables -F
[root@centos-01 conf]# iptables -nvL
Chain INPUT (policy ACCEPT 9 packets, 692 bytes)
 pkts bytes target     prot opt in     out     source               destination

Chain FORWARD (policy ACCEPT 0 packets, 0 bytes)
 pkts bytes target     prot opt in     out     source               destination

Chain OUTPUT (policy ACCEPT 10 packets, 924 bytes)
 pkts bytes target     prot opt in     out     source               destination
[root@centos-01 conf]#
客户端上使用svn(linux)
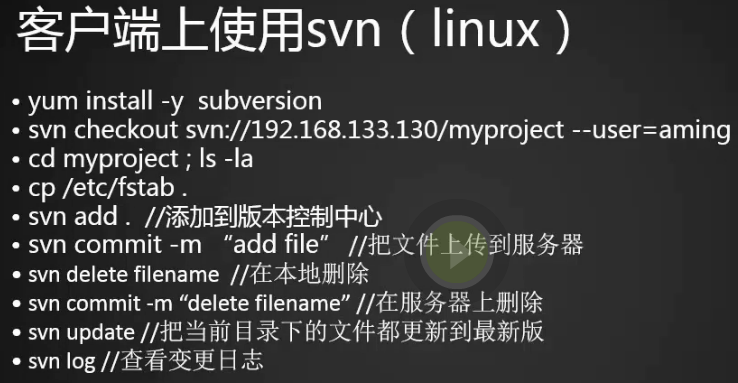
1.在本机使用svn
[root@centos-01 conf]# cd /home/
[root@centos-01 home]# mkdir svntest
[root@centos-01 home]# cd svntest/
[root@centos-01 svntest]# ls
[root@centos-01 svntest]# svn checkout svn://192.168.133.44/myproject --username=user1
认证领域: <svn://192.168.133.44:3690> /data/svnroot/myproject
“user1”的密码:

-----------------------------------------------------------------------
注意!  你的密码,对于认证域:

   <svn://192.168.133.44:3690> /data/svnroot/myproject

只能明文保存在磁盘上!  如果可能的话,请考虑配置你的系统,让 Subversion
可以保存加密后的密码。请参阅文档以获得详细信息。

你可以通过在“/root/.subversion/servers”中设置选项“store-plaintext-passwords”为“yes”或“no”,
来避免再次出现此警告。
-----------------------------------------------------------------------
保存未加密的密码(yes/no)?yes
取出版本 0。
[root@centos-01 svntest]# ls
myproject
[root@centos-01 svntest]# ls -la myproject/
总用量 0
drwxr-xr-x 3 root root 18 4月  26 07:17 .
drwxr-xr-x 3 root root 23 4月  26 07:17 ..
drwxr-xr-x 4 root root 75 4月  26 07:17 .svn
[root@centos-01 svntest]#
2.在另外一台机器使用svn(如果没有安装svn需要用yum安装)
[root@centos-02 ~]# cd /home/
[root@centos-02 home]# ls
elastic  sunyujun  sunyujun1  user1  user2
[root@centos-02 home]# svn checkout
svn: E205001: 请使用 “svn help” 以得到更多信息
svn: E205001: 没有提供足够的参数
[root@centos-02 home]# svn checkout svn://192.168.133.44/myproject --username=user1
认证领域: <svn://192.168.133.44:3690> /data/svnroot/myproject
“user1”的密码:
认证领域: <svn://192.168.133.44:3690> /data/svnroot/myproject
用户名: user1
“user1”的密码:

-----------------------------------------------------------------------
注意!  你的密码,对于认证域:

   <svn://192.168.133.44:3690> /data/svnroot/myproject

只能明文保存在磁盘上!  如果可能的话,请考虑配置你的系统,让 Subversion
可以保存加密后的密码。请参阅文档以获得详细信息。

你可以通过在“/root/.subversion/servers”中设置选项“store-plaintext-passwords”为“yes”或“no”,
来避免再次出现此警告。
-----------------------------------------------------------------------
保存未加密的密码(yes/no)?yes
A    myproject/123.txt
取出版本 1。
[root@centos-02 home]#
3.客户端上添加666.txt文件并svn提交
[root@centos-02 home]# ls
elastic  myproject  sunyujun  sunyujun1  user1  user2
[root@centos-02 home]# cd myproject/
[root@centos-02 myproject]# ls
123.txt
[root@centos-02 myproject]# touch 666.txt
[root@centos-02 myproject]# ls
123.txt  666.txt
[root@centos-02 myproject]# svn add 666.txt
A         666.txt
[root@centos-02 myproject]# svn commit -m "add 666.txt"
正在增加       666.txt
传输文件数据.
提交后的版本为 2。
[root@centos-02 myproject]#
4.服务端更新
[root@centos-01 myproject]# ls
123.txt
[root@centos-01 myproject]# svn up
正在升级 '.':
A    666.txt
更新到版本 2。
[root@centos-01 myproject]#
5.我们第二次不用再输入密码了是因为系统已经记录了我们的密码
[root@centos-01 svn.simple]# pwd
/root/.subversion/auth/svn.simple
[root@centos-01 svn.simple]# cat 4b291284476d572783808d129e4feb70
K 8
passtype
V 6
simple
K 8
password
V 5
user1
K 15
svn:realmstring
V 51
<svn://192.168.133.44:3690> /data/svnroot/myproject
K 8
username
V 5
user1
END
[root@centos-01 svn.simple]#
6.修改文件内容并提交到svn,服务端更新
[root@centos-02 myproject]# ls
123.txt  666.txt
[root@centos-02 myproject]# vim 666.txt
[root@centos-02 myproject]# cat 666.txt
1111111
[root@centos-02 myproject]#
[root@centos-02 myproject]# svn commit -m "ch 666.txt"
正在发送 666.txt
传输文件数据.
提交后的版本为 3。
[root@centos-02 myproject]#
[root@centos-01 myproject]# ls
123.txt  666.txt
[root@centos-01 myproject]# svn up
正在升级 '.':
U    666.txt
更新到版本 3。
[root@centos-01 myproject]# cat 666.txt
1111111
[root@centos-01 myproject]#
7.svn删除文件
[root@centos-01 myproject]# ls
123.txt  666.txt
[root@centos-01 myproject]# svn delete 123.txt
D         123.txt
[root@centos-01 myproject]# svn commit -m "delete 123.txt"
正在删除       123.txt

提交后的版本为 4。
[root@centos-01 myproject]#

[root@centos-02 myproject]# svn up
正在升级 '.':
D    123.txt
更新到版本 4。
[root@centos-02 myproject]#
8.查看日志
[root@centos-02 myproject]# svn log
------------------------------------------------------------------------
r4 | user1 | 2018-04-26 08:00:13 +0800 (四, 2018-04-26) | 1 行

delete 123.txt
------------------------------------------------------------------------
r3 | user1 | 2018-04-26 07:55:22 +0800 (四, 2018-04-26) | 1 行

ch 666.txt
------------------------------------------------------------------------
r2 | user1 | 2018-04-26 07:42:55 +0800 (四, 2018-04-26) | 1 行

add 666.txt
------------------------------------------------------------------------
r1 | user1 | 2018-04-26 07:26:25 +0800 (四, 2018-04-26) | 1 行

add 123.txt
------------------------------------------------------------------------
[root@centos-02 myproject]#
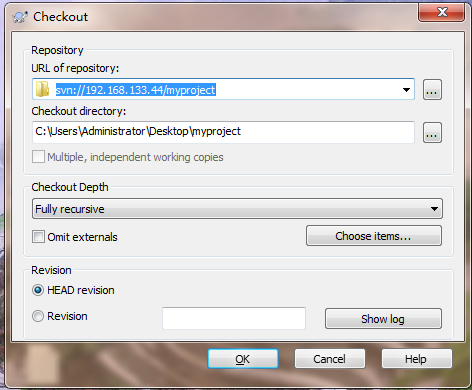
客户端上使用svn(windows)

https://tortoisesvn.net/index.zh.html
1.svn checkout
单机上使用git(上)
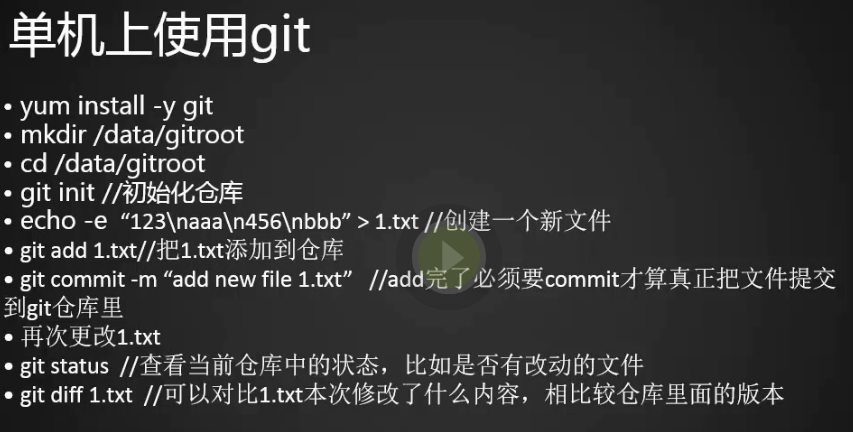
1.git是分布式的,不依赖网络,我在我的电脑上使用git,你在你的电脑上使用git互不影响,不需要把代码更新到服务端上去。
2.安装git
[root@centos-01 ~]# yum install -y git
[root@centos-01 ~]# mkdir /data/gitroot
[root@centos-01 ~]# cd /data/gitroot/
[root@centos-01 gitroot]# ls
[root@centos-01 gitroot]# git init  (初始化仓库,svn初始化仓库用svnadmin)
初始化空的 Git 版本库于 /data/gitroot/.git/
[root@centos-01 gitroot]# ls -la
总用量 0
drwxr-xr-x 3 root root  18 4月  26 23:19 .
drwxr-xr-x 5 root root  51 4月  26 23:18 ..
drwxr-xr-x 7 root root 119 4月  26 23:19 .git
[root@centos-01 gitroot]#
[root@centos-01 gitroot]# ls .git/
branches  config  description  HEAD  hooks  info  objects  refs
[root@centos-01 gitroot]# vim 1.txt
[root@centos-01 gitroot]# cat 1.txt
aaaaaaaaaaaaaa
[root@centos-01 gitroot]# git add 1.txt
[root@centos-01 gitroot]# git commit -m "add 1.txt"

*** Please tell me who you are.

Run

  git config --global user.email "you@example.com"
  git config --global user.name "Your Name"

to set your account's default identity.
Omit --global to set the identity only in this repository.

fatal: unable to auto-detect email address (got 'root@centos-01.(none)')
[root@centos-01 gitroot]# git config --global user.email "278108678@qq.com"
[root@centos-01 gitroot]# git config --global "phper"
error: key does not contain a section: phper
[root@centos-01 gitroot]# git config --global user.name "phper"
[root@centos-01 gitroot]# git commit -m "add 1.txt"
[master(根提交) 178684e] add 1.txt
 1 file changed, 1 insertion(+)
 create mode 100644 1.txt
[root@centos-01 gitroot]# vim 1.txt
[root@centos-01 gitroot]# cat 1.txt
aaaaaaaaaaaaaa
bbbbbbbbbbbbbb
[root@centos-01 gitroot]# git add 1.txt
[root@centos-01 gitroot]# git commit -m "add 1.txt"
[master 173e740] add 1.txt
 1 file changed, 1 insertion(+)
[root@centos-01 gitroot]# git commit -m "add 1.txt agin"
# 位于分支 master
无文件要提交,干净的工作区
[root@centos-01 gitroot]# git status
# 位于分支 master
无文件要提交,干净的工作区
[root@centos-01 gitroot]# vim 1.txt
[root@centos-01 gitroot]# git status
# 位于分支 master
# 尚未暂存以备提交的变更:
#   (使用 "git add <file>..." 更新要提交的内容)
#   (使用 "git checkout -- <file>..." 丢弃工作区的改动)
#
#	修改:      1.txt
#
修改尚未加入提交(使用 "git add" 和/或 "git commit -a")
[root@centos-01 gitroot]# git diff 1.txt
diff --git a/1.txt b/1.txt
index 88cd09c..387c6e1 100644
--- a/1.txt
+++ b/1.txt
@@ -1,2 +1,3 @@
 aaaaaaaaaaaaaa
 bbbbbbbbbbbbbb
+cccccccccccccc
[root@centos-01 gitroot]#

[root@centos-01 gitroot]# git add 1.txt
[root@centos-01 gitroot]# git commit -m "add 1.txt agin"
[master 8cc5c90] add 1.txt agin
 1 file changed, 1 insertion(+)
[root@centos-01 gitroot]# vim 1.txt
[root@centos-01 gitroot]# cat 1.txt
aaaaaaaaaaaaaa
bbbbbbbbbbbbbb
cccccccccccccc
dddddddddddddd
[root@centos-01 gitroot]# git add 1.txt; git commit -m "ch 1.txt agin"
[master 892a682] ch 1.txt agin
 1 file changed, 1 insertion(+)
[root@centos-01 gitroot]# git log
commit 892a682ff335c779233b60e58d023e97ea6f0f7b
Author: phper <278108678@qq.com>
Date:   Thu Apr 26 23:40:39 2018 +0800


    ch 1.txt agin

commit 8cc5c9023033d1aedc9b01698437cddeef9bc504
Author: phper <278108678@qq.com>
Date:   Thu Apr 26 23:39:31 2018 +0800

    add 1.txt agin

commit 173e740090f5b7b5bf79169a7eb2e5de6a150f23
Author: phper <278108678@qq.com>
Date:   Thu Apr 26 23:26:47 2018 +0800

    add 1.txt

commit 178684eb053088a2db6879c0b1b1df805816cf6c
Author: phper <278108678@qq.com>
Date:   Thu Apr 26 23:25:27 2018 +0800


[root@centos-01 gitroot]# cat /root/.gitconfig
[user]
	email = 278108678@qq.com
	name = phper
[root@centos-01 gitroot]#
1.回退到之前的某个版本
[root@centos-01 gitroot]# git log --pretty=oneline
892a682ff335c779233b60e58d023e97ea6f0f7b ch 1.txt agin
8cc5c9023033d1aedc9b01698437cddeef9bc504 add 1.txt agin
173e740090f5b7b5bf79169a7eb2e5de6a150f23 add 1.txt
178684eb053088a2db6879c0b1b1df805816cf6c add 1.txt
[root@centos-01 gitroot]# git reset --hard 173e740090f5
HEAD 现在位于 173e740 add 1.txt
[root@centos-01 gitroot]# git log --pretty=oneline
173e740090f5b7b5bf79169a7eb2e5de6a150f23 add 1.txt
178684eb053088a2db6879c0b1b1df805816cf6c add 1.txt
[root@centos-01 gitroot]# git reflog
173e740 HEAD@{0}: reset: moving to 173e740090f5
892a682 HEAD@{1}: commit: ch 1.txt agin
8cc5c90 HEAD@{2}: commit: add 1.txt agin
173e740 HEAD@{3}: commit: add 1.txt
178684e HEAD@{4}: commit (initial): add 1.txt
[root@centos-01 gitroot]# git reset --hard 892a682
HEAD 现在位于 892a682 ch 1.txt agin
[root@centos-01 gitroot]# git log --pretty=oneline
892a682ff335c779233b60e58d023e97ea6f0f7b ch 1.txt agin
8cc5c9023033d1aedc9b01698437cddeef9bc504 add 1.txt agin
173e740090f5b7b5bf79169a7eb2e5de6a150f23 add 1.txt
178684eb053088a2db6879c0b1b1df805816cf6c add 1.txt
[root@centos-01 gitroot]#
2.不小心删了文件
[root@centos-01 gitroot]# ls
1.txt
[root@centos-01 gitroot]# rm -f 1.txt
[root@centos-01 gitroot]# ls
[root@centos-01 gitroot]# git checkout -- 1.txt
[root@centos-01 gitroot]# ls
1.txt
[root@centos-01 gitroot]# vim 1.txt
[root@centos-01 gitroot]# cat 1.txt
aaaaaaaaaaaaaa
bbbbbbbbbbbbbb
cccccccccccccc
dddddddddddddd
eeeeeeeeeeeeee
[root@centos-01 gitroot]# git add 1.txt
[root@centos-01 gitroot]# git reset HEAD 1.txt (将上面add的标记去掉)
重置后撤出暂存区的变更:
M	1.txt
[root@centos-01 gitroot]#git checkout -- 1.txt(将代码库里面最新的文件搞回来)

3.删除文件
[root@centos-01 gitroot]# git rm 1.txt
error: '1.txt' 有本地修改
(使用 --cached 保存文件,或用 -f 强制删除)
[root@centos-01 gitroot]#
[root@centos-01 gitroot]# vim 1.txt
[root@centos-01 gitroot]# git checkout -- 1.txt
[root@centos-01 gitroot]# cat 1.txt
aaaaaaaaaaaaaa
bbbbbbbbbbbbbb
cccccccccccccc
dddddddddddddd
[root@centos-01 gitroot]# git rm 1.txt
rm '1.txt'
[root@centos-01 gitroot]# git commit -m "delete 1.txt"
[master eb733c2] delete 1.txt
 1 file changed, 4 deletions(-)
 delete mode 100644 1.txt
[root@centos-01 gitroot]# git checkout -- 1.txt
error: pathspec '1.txt' did not match any file(s) known to git.
[root@centos-01 gitroot]# git log --pretty=oneline
eb733c21800a28909e478756464ccc59ebab23dc delete 1.txt
892a682ff335c779233b60e58d023e97ea6f0f7b ch 1.txt agin
8cc5c9023033d1aedc9b01698437cddeef9bc504 add 1.txt agin
173e740090f5b7b5bf79169a7eb2e5de6a150f23 add 1.txt
178684eb053088a2db6879c0b1b1df805816cf6c add 1.txt
[root@centos-01 gitroot]# git reset --hard 892a682ff335c
HEAD 现在位于 892a682 ch 1.txt agin
[root@centos-01 gitroot]# ls
1.txt
[root@centos-01 gitroot]# cat 1.txt
aaaaaaaaaaaaaa
bbbbbbbbbbbbbb
cccccccccccccc
dddddddddddddd
[root@centos-01 gitroot]#
建立远程仓库

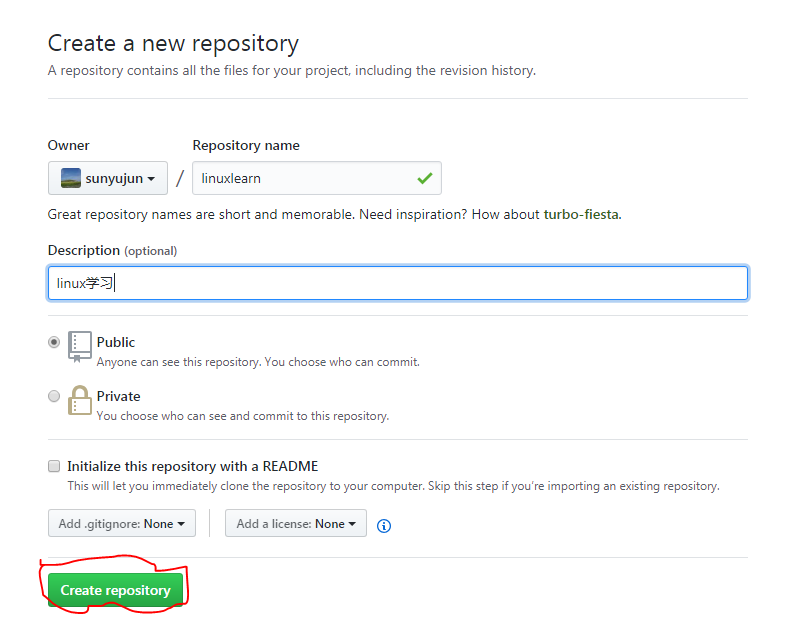
1.到github上注册一个账号,sign up注册一个账号,注册完成之后点击sign in登录,登录之后新建仓库。
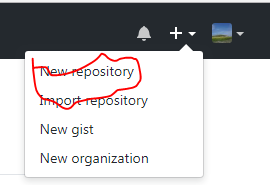
2.点击创建仓库
3.创建秘钥,点击头像下面的setting

4.在客户端生成公钥放到github上去
[root@centos-01 ~]# ssh-keygen
Generating public/private rsa key pair.
Enter file in which to save the key (/root/.ssh/id_rsa):
Enter passphrase (empty for no passphrase):
Enter same passphrase again:
Your identification has been saved in /root/.ssh/id_rsa.
Your public key has been saved in /root/.ssh/id_rsa.pub.
The key fingerprint is:
7a:0a:cb:9e:c0:5f:6b:1b:33:db:95:35:9b:43:6a:10 root@centos-01
The key's randomart image is:
+--[ RSA 2048]----+
|                 |
|                 |
|        E        |
|         .       |
|        S   +    |
| .     . . = +   |
|  o . * . = +    |
|   + =.X o   .   |
|   .*.=..        |
+-----------------+
[root@centos-01 ~]# cat .ssh/id_rsa.pub
ssh-rsa AAAAB3NzaC1yc2EAAAADAQABAAABAQDBTj3AjVScW1LoWdcbJLLwhgNcemhko3PMu8Sze9QePkvvCi49seQrcet9Yp9zxAVovs74tWHQPmfJ3h2OMx3GDk36b14O+8WpbKnZV/pN0PUX1ZvVVfw7v8t22SDHYm09jHHbzQJdiMK2T
J89RcKmE8d8D2Z9igInhdK2BEaGp4JYVQZdhchM58JcE+rvPcdsDhEhsA+z88UejWBGMZpJo1T8OCaK0OKPqKR7ZRt1kSlG78CDuHoldDu9HaKMm5ED/JxguC8EyIOLnnHTa/3kutMIEdK4ZOowlAEsgVmrKizMa7JvDOHhl5ycoaL8DD/rdh
aLquXX+8bRcgqXl385 root@centos-01
[root@centos-01 ~]#


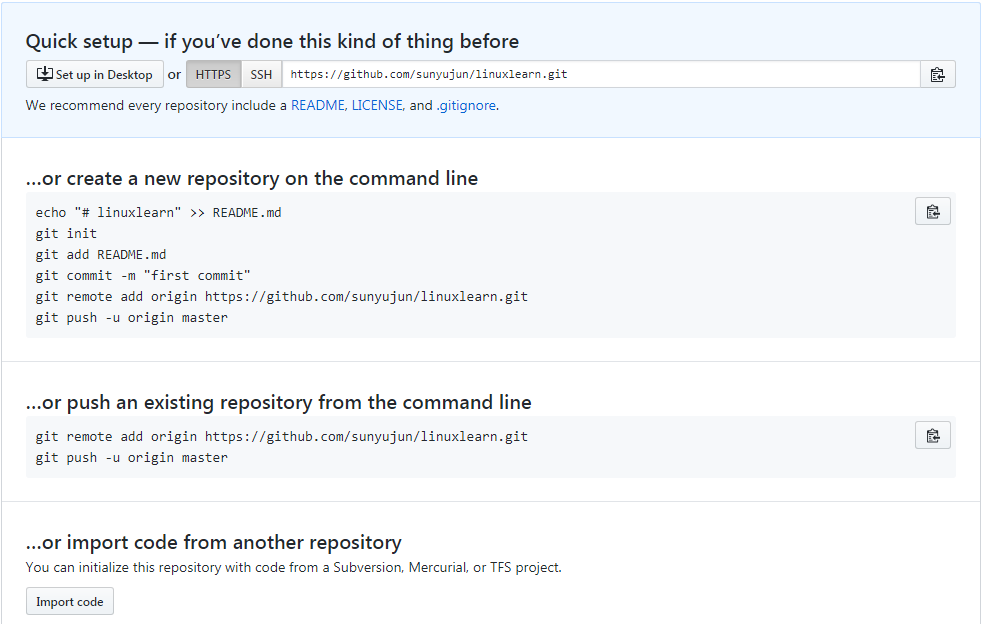
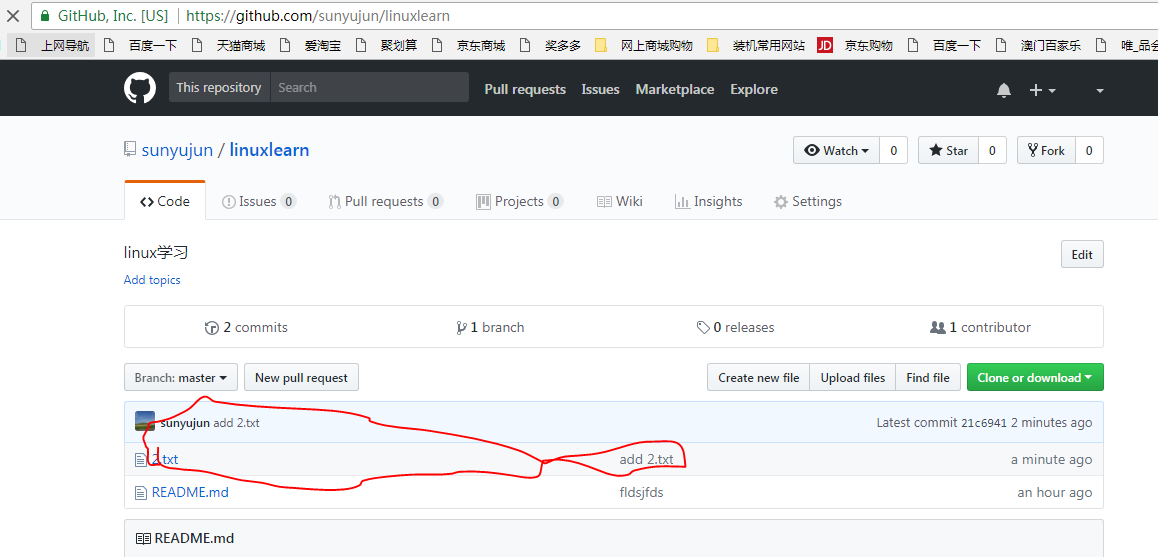
5.git推送文件到github
[root@centos-01 tmp]# cd /tmp/
[root@centos-01 tmp]# mkdir linuxlearn
[root@centos-01 tmp]# cd linuxlearn/
[root@centos-01 linuxlearn]# echo "# linuxlearn" >> README.md
[root@centos-01 linuxlearn]# git init
初始化空的 Git 版本库于 /tmp/linuxlearn/.git/
[root@centos-01 linuxlearn]# ls -la
总用量 8
drwxr-xr-x   3 root root   35 5月   5 16:26 .
drwxrwxrwt. 19 root root 4096 5月   5 16:25 ..
drwxr-xr-x   7 root root  119 5月   5 16:26 .git
-rw-r--r--   1 root root   13 5月   5 16:25 README.md
[root@centos-01 linuxlearn]# git add README.md
[root@centos-01 linuxlearn]# git commit -m "fldsjfds"
[master(根提交) a08b6ef] fldsjfds
 1 file changed, 1 insertion(+)
 create mode 100644 README.md
[root@centos-01 linuxlearn]# git remote add origin https://github.com/sunyujun/linuxlearn.git
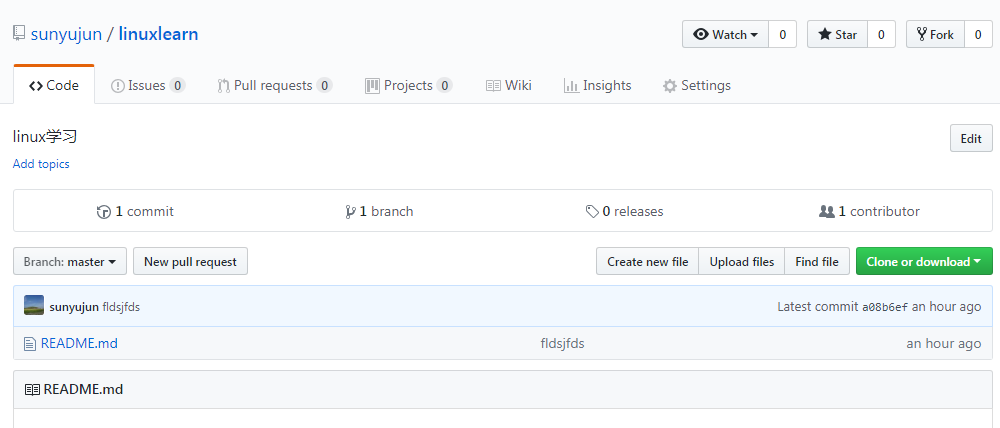
6.验证发现推送成功
7.再次推送文件测试
[root@centos-01 ~]# cd /tmp/linuxlearn/
[root@centos-01 linuxlearn]# ls
README.md
[root@centos-01 linuxlearn]# vim 2.txt
[root@centos-01 linuxlearn]# cat 2.txt
111111111111111111
[root@centos-01 linuxlearn]# git add 2.txt
[root@centos-01 linuxlearn]# git commit -m "add 2.txt"
[master 21c6941] add 2.txt
 1 file changed, 1 insertion(+)
 create mode 100644 2.txt
[root@centos-01 linuxlearn]# git push
warning: push.default 未设置,它的默认值将会在 Git 2.0 由 'matching'
修改为 'simple'。若要不再显示本信息并在其默认值改变后维持当前使用习惯,
进行如下设置:

  git config --global push.default matching

若要不再显示本信息并从现在开始采用新的使用习惯,设置:

  git config --global push.default simple

参见 'git help config' 并查找 'push.default' 以获取更多信息。
('simple' 模式由 Git 1.7.11 版本引入。如果您有时要使用老版本的 Git,
为保持兼容,请用 'current' 代替 'simple' 模式)

Username for 'https://github.com': sunyujun
Password for 'https://sunyujun@github.com':
Counting objects: 4, done.
Compressing objects: 100% (2/2), done.
Writing objects: 100% (3/3), 267 bytes | 0 bytes/s, done.
Total 3 (delta 0), reused 0 (delta 0)
To https://github.com/sunyujun/linuxlearn.git
   a08b6ef..21c6941  master -> master
[root@centos-01 linuxlearn]#
8.成功
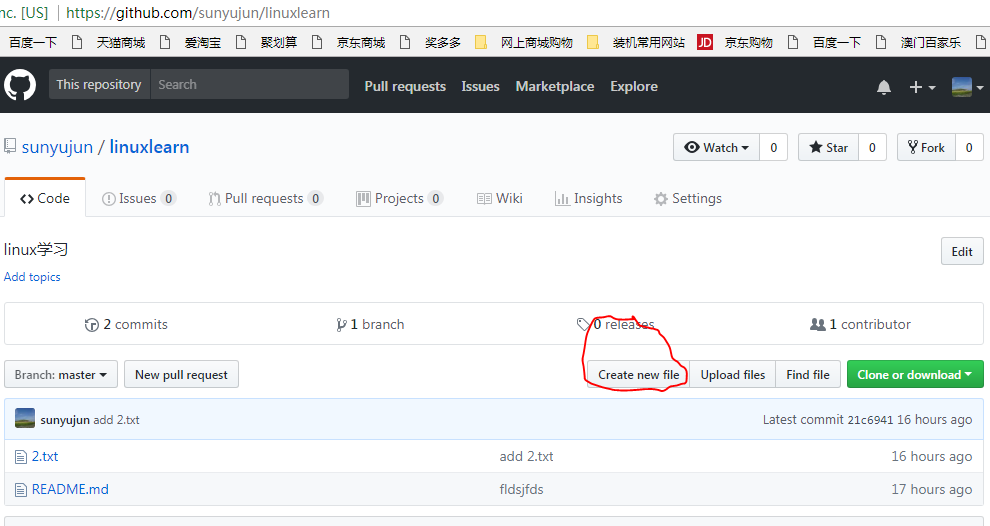
克隆远程仓库
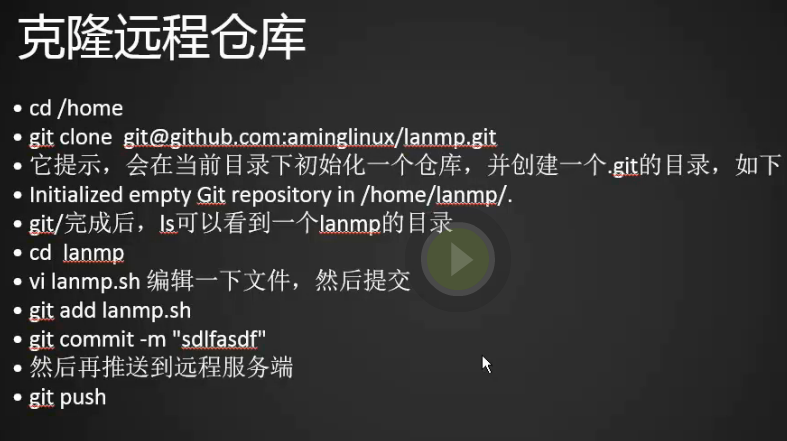
1.克隆远程的项目
[root@centos-01 linuxlearn]# cd /home/
[root@centos-01 home]# ls
sunyujun  svntest  user1  user2
[root@centos-01 home]# git clone git@github.com:aminglinux/lanmp.git
正克隆到 'lanmp'...
The authenticity of host 'github.com (13.229.188.59)' can't be established.
RSA key fingerprint is 16:27:ac:a5:76:28:2d:36:63:1b:56:4d:eb:df:a6:48.
Are you sure you want to continue connecting (yes/no)? yes
Warning: Permanently added 'github.com,13.229.188.59' (RSA) to the list of known hosts.
remote: Counting objects: 32, done.
接收对象中: 100% (32/32), 5.99 KiB | 0 bytes/s, done.
remote: Total 32 (delta 0), reused 0 (delta 0), pack-reused 32
处理 delta 中: 100% (6/6), done.
[root@centos-01 home]# ls
lanmp  sunyujun  svntest  user1  user2
[root@centos-01 home]# cd lanmp/
[root@centos-01 lanmp]# ls
lanmp.sh  README.md
[root@centos-01 lanmp]#
[root@centos-01 lanmp]# cat lanmp.sh
#!/bin/bash
## written by aming.
## 2015-06-24.

#######Begin########
echo "It will install lamp or lnmp."
sleep 1
##check last command is OK or not.
check_ok() {
if [ $? != 0 ]
then
    echo "Error, Check the error log."
    exit 1
fi
}
##get the archive of the system,i686 or x86_64.
ar=`arch`
##close seliux
sed -i 's/SELINUX=enforcing/SELINUX=disabled/' /etc/selinux/config
selinux_s=`getenforce`
if [ $selinux_s == "enforcing" ]
then
    setenforce 0
fi
##close iptables
iptables-save > /etc/sysconfig/iptables_`date +%s`
iptables -F
service iptables save

##if the packge installed ,then omit.
myum() {
if ! rpm -qa|grep -q "^$1"
then
    yum install -y $1
    check_ok
else
    echo $1 already installed.
fi
}

## install some packges.
for p in gcc wget perl perl-devel libaio libaio-devel pcre-devel zlib-devel
do
    myum $p
done

##install epel.
if rpm -qa epel-release >/dev/null
then
    rpm -e epel-release
fi
if ls /etc/yum.repos.d/epel-6.repo* >/dev/null 2>&1
then
    rm -f /etc/yum.repos.d/epel-6.repo*
fi
wget -P /etc/yum.repos.d/ http://mirrors.aliyun.com/repo/epel-6.repo


##function of installing mysqld.
install_mysqld() {
    case $mysql_v in
        5.1)
            cd /usr/local/src
            [ -f mysql-5.1.72-linux-$ar-glibc23.tar.gz ] || wget http://mirrors.sohu.com/mysql/MySQL-5.1/mysql-5.1.72-linux-$ar-glibc23.tar.gz
            tar zxf mysql-5.1.72-linux-$ar-glibc23.tar.gz
            check_ok
            [ -d /usr/local/mysql ] && /bin/mv /usr/local/mysql /usr/local/mysql_`date +%s`
            mv mysql-5.1.72-linux-$ar-glibc23 /usr/local/mysql
            check_ok
            if ! grep '^mysql:' /etc/passwd
            then
                useradd -M mysql -s /sbin/nologin
                check_ok
            fi
            myum compat-libstdc++-33
            [ -d /data/mysql ] && /bin/mv /data/mysql /data/mysql_`date +%s`
            mkdir -p /data/mysql
            chown -R mysql:mysql /data/mysql
            cd /usr/local/mysql
            ./scripts/mysql_install_db --user=mysql --datadir=/data/mysql
            check_ok
            /bin/cp support-files/my-huge.cnf /etc/my.cnf
            check_ok
            sed -i '/^[mysqld]$/adatadir = /data/mysql' /etc/my.cnf
            /bin/cp support-files/mysql.server /etc/init.d/mysqld
            sed -i 's#^datadir=#datadir=/data/mysql#' /etc/init.d/mysqld
            chmod 755 /etc/init.d/mysqld
            chkconfig --add mysqld
            chkconfig mysqld on
            service mysqld start
            check_ok
            break
            ;;
        5.6)
            cd /usr/local/src
            [ -f mysql-5.6.26-linux-glibc2.5-$ar.tar.gz ] || wget http://mirrors.sohu.com/mysql/MySQL-5.6/mysql-5.6.26-linux-glibc2.5-$ar.tar.gz
            tar zxf mysql-5.6.26-linux-glibc2.5-$ar.tar.gz
            check_ok
            [ -d /usr/local/mysql ] && /bin/mv /usr/local/mysql /usr/local/mysql_bak
            mv mysql-5.6.26-linux-glibc2.5-$ar /usr/local/mysql
            if ! grep '^mysql:' /etc/passwd
            then
                useradd -M mysql -s /sbin/nologin
            fi
            myum compat-libstdc++-33
            [ -d /data/mysql ] && /bin/mv /data/mysql /data/mysql_bak
            mkdir -p /data/mysql
            chown -R mysql:mysql /data/mysql
            cd /usr/local/mysql
            ./scripts/mysql_install_db --user=mysql --datadir=/data/mysql
            check_ok
            /bin/cp support-files/my-default.cnf /etc/my.cnf
            check_ok
            sed -i '/^[mysqld]$/adatadir = /data/mysql' /etc/my.cnf
            /bin/cp support-files/mysql.server /etc/init.d/mysqld
            sed -i 's#^datadir=#datadir=/data/mysql#' /etc/init.d/mysqld
            chmod 755 /etc/init.d/mysqld
            chkconfig --add mysqld
            chkconfig mysqld on
            service mysqld start
            check_ok
            break
            ;;

         *)
            echo "only 1(5.1) or 2(5.6)"
            exit 1
            ;;
    esac
}

##function of install httpd.
install_httpd() {
echo "Install apache version 2.2."
cd /usr/local/src
[ -f httpd-2.2.16.tar.gz ] || wget  http://syslab.comsenz.com/downloads/linux/httpd-2.2.16.tar.gz
tar zxf  httpd-2.2.16.tar.gz && cd httpd-2.2.16
check_ok
./configure
--prefix=/usr/local/apache2
--with-included-apr
--enable-so
--enable-deflate=shared
--enable-expires=shared
--enable-rewrite=shared
--with-pcre
check_ok
make && make install
check_ok
}

##function of install lamp's php.
install_php() {
echo -e "Install php.
Please chose the version of php."
    case $php_v in
        5.4)
            cd /usr/local/src/
            [ -f php-5.4.45.tar.bz2 ] || wget 'http://cn2.php.net/get/php-5.4.45.tar.bz2/from/this/mirror' -O php-5.4.45.tar.bz2
            tar jxf php-5.4.45.tar.bz2 && cd php-5.4.45

            for p in openssl-devel bzip2-devel
            libxml2-devel curl-devel libpng-devel
            libjpeg-devel freetype-devel libmcrypt-devel
            libtool-ltdl-devel perl-devel
            do
                myum $p
            done

            check_ok
            ./configure
            --prefix=/usr/local/php
            --with-apxs2=/usr/local/apache2/bin/apxs
            --with-config-file-path=/usr/local/php/etc
            --with-mysql=/usr/local/mysql
            --with-libxml-dir
            --with-gd
            --with-jpeg-dir
            --with-png-dir
            --with-freetype-dir
            --with-iconv-dir
            --with-zlib-dir
            --with-bz2
            --with-openssl
            --with-mcrypt
            --enable-soap
            --enable-gd-native-ttf
            --enable-mbstring
            --enable-sockets
            --enable-exif
            --disable-ipv6
            check_ok
            make && make install
            check_ok
            [ -f /usr/local/php/etc/php.ini ] || /bin/cp php.ini-production  /usr/local/php/etc/php.ini
            break
            ;;
        5.6)
            cd /usr/local/src/
            [ -f php-5.6.6.tar.gz ] || wget http://mirrors.sohu.com/php/php-5.6.6.tar.gz
            tar zxf php-5.6.6.tar.gz &&   cd php-5.6.6
            for p in openssl-devel bzip2-devel
            libxml2-devel curl-devel libpng-devel
            libjpeg-devel freetype-devel libmcrypt-devel
            libtool-ltdl-devel perl-devel
            do
                myum $p
            done

            ./configure
            --prefix=/usr/local/php
            --with-apxs2=/usr/local/apache2/bin/apxs
            --with-config-file-path=/usr/local/php/etc
            --with-mysql=/usr/local/mysql
            --with-libxml-dir
            --with-gd
            --with-jpeg-dir
            --with-png-dir
            --with-freetype-dir
            --with-iconv-dir
            --with-zlib-dir
            --with-bz2
            --with-openssl
            --with-mcrypt
            --enable-soap
            --enable-gd-native-ttf
            --enable-mbstring
            --enable-sockets
            --enable-exif
            --disable-ipv6
            check_ok
            make && make install
            check_ok
            [ -f /usr/local/php/etc/php.ini ] || /bin/cp php.ini-production  /usr/local/php/etc/php.ini
            break
            ;;

        *)
            echo "only 1(5.4) or 2(5.6)"
            ;;
    esac
}

##function of apache and php configue.
join_apa_php() {
sed -i '/AddType .*.gz .tgz$/aAddType application/x-httpd-php .php' /usr/local/apache2/conf/httpd.conf
check_ok
sed -i 's/DirectoryIndex index.html/DirectoryIndex index.php index.html index.htm/' /usr/local/apache2/conf/httpd.conf
check_ok
cat > /usr/local/apache2/htdocs/index.php <<EOF
<?php
   phpinfo();
?>
EOF

if /usr/local/php/bin/php -i |grep -iq 'date.timezone => no value'
then
    sed -i '/;date.timezone =$/adate.timezone = "Asia/Chongqing"'  /usr/local/php/etc/php.ini
fi

/usr/local/apache2/bin/apachectl restart
check_ok
}

##function of check service is running or not, example nginx, httpd, php-fpm.
check_service() {
if [ "$1" == "phpfpm" ]
then
    s="php-fpm"
else
    s=$1
fi
n=`ps aux |grep "$s"|wc -l`
if [ $n -gt 1 ]
then
    echo "$1 service is already started."
else
    if [ -f /etc/init.d/$1 ]
    then
        /etc/init.d/$1 start
        check_ok
    else
        install_$1
    fi
fi
}

##function of install lamp
lamp() {
check_service mysqld
check_service httpd
install_php
join_apa_php
echo "LAMP done,Please use 'http://your ip/index.php' to access."
}

##function of install nginx
install_nginx() {
cd /usr/local/src
[ -f nginx-1.8.0.tar.gz ] || wget http://nginx.org/download/nginx-1.8.0.tar.gz
tar zxf nginx-1.8.0.tar.gz
cd nginx-1.8.0
myum pcre-devel
./configure --prefix=/usr/local/nginx
check_ok
make && make install
check_ok
if [ -f /etc/init.d/nginx ]
then
    /bin/mv /etc/init.d/nginx  /etc/init.d/nginx_`date +%s`
fi
curl http://www.apelearn.com/study_v2/.nginx_init  -o /etc/init.d/nginx
check_ok
chmod 755 /etc/init.d/nginx
chkconfig --add nginx
chkconfig nginx on
curl http://www.apelearn.com/study_v2/.nginx_conf -o /usr/local/nginx/conf/nginx.conf
check_ok
service nginx start
check_ok
echo -e "<?php
    phpinfo();
?>" > /usr/local/nginx/html/index.php
check_ok
}

##function of install php-fpm
install_phpfpm() {
echo -e "Install php.
Please chose the version of php."
    case $php_v in
        5.4)
            cd /usr/local/src/
            [ -f php-5.4.45.tar.bz2 ] || wget 'http://cn2.php.net/get/php-5.4.45.tar.bz2/from/this/mirror' -O php-5.4.45.tar.bz2
            tar jxf php-5.4.45.tar.bz2 && cd php-5.4.45
            for p in  openssl-devel bzip2-devel
            libxml2-devel curl-devel libpng-devel
            libjpeg-devel freetype-devel libmcrypt-devel
            libtool-ltdl-devel perl-devel
            do
                myum $p
            done
            if ! grep -q '^php-fpm:' /etc/passwd
            then
                useradd -M -s /sbin/nologin php-fpm
                check_ok
            fi
            ./configure
            --prefix=/usr/local/php-fpm
            --with-config-file-path=/usr/local/php-fpm/etc
            --enable-fpm
            --with-fpm-user=php-fpm
            --with-fpm-group=php-fpm
            --with-mysql=/usr/local/mysql
            --with-mysql-sock=/tmp/mysql.sock
            --with-libxml-dir
            --with-gd
            --with-jpeg-dir
            --with-png-dir
            --with-freetype-dir
            --with-iconv-dir
            --with-zlib-dir
            --with-mcrypt
            --enable-soap
            --enable-gd-native-ttf
            --enable-ftp
            --enable-mbstring
            --enable-exif
            --enable-zend-multibyte
            --disable-ipv6
            --with-pear
            --with-curl
            --with-openssl
            check_ok
            make && make install
            check_ok
            [ -f /usr/local/php-fpm/etc/php.ini ] || /bin/cp php.ini-production  /usr/local/php-fpm/etc/php.ini
            if /usr/local/php-fpm/bin/php -i |grep -iq 'date.timezone => no value'
            then
                sed -i '/;date.timezone =$/adate.timezone = "Asia/Chongqing"'  /usr/local/php-fpm/etc/php.ini
                check_ok
            fi
            [ -f /usr/local/php-fpm/etc/php-fpm.conf ] || curl http://www.apelearn.com/study_v2/.phpfpm_conf -o /usr/local/php-fpm/etc/php-fpm.conf
            [ -f /etc/init.d/phpfpm ] || /bin/cp sapi/fpm/init.d.php-fpm /etc/init.d/phpfpm
            chmod 755 /etc/init.d/phpfpm
            chkconfig phpfpm on
            service phpfpm start
            check_ok
            break
            ;;
        5.6)
            cd /usr/local/src/
            [ -f php-5.6.6.tar.gz ] || wget http://mirrors.sohu.com/php/php-5.6.6.tar.gz

            tar zxf php-5.6.6.tar.gz &&   cd php-5.6.6
            for p in  openssl-devel bzip2-devel
            libxml2-devel curl-devel libpng-devel
            libjpeg-devel freetype-devel libmcrypt-devel
            libtool-ltdl-devel perl-devel
            do
                myum $p
            done

            if ! grep -q '^php-fpm:' /etc/passwd
            then
                useradd -M -s /sbin/nologin php-fpm
            fi
            check_ok
            ./configure
            --prefix=/usr/local/php-fpm
            --with-config-file-path=/usr/local/php-fpm/etc
            --enable-fpm
            --with-fpm-user=php-fpm
            --with-fpm-group=php-fpm
            --with-mysql=/usr/local/mysql
            --with-mysql-sock=/tmp/mysql.sock
            --with-libxml-dir
            --with-gd
            --with-jpeg-dir
            --with-png-dir
            --with-freetype-dir
            --with-iconv-dir
            --with-zlib-dir
            --with-mcrypt
            --enable-soap
            --enable-gd-native-ttf
            --enable-ftp
            --enable-mbstring
            --enable-exif
            --disable-ipv6
            --with-pear
            --with-curl
            --with-openssl
            check_ok
            make && make install
            check_ok
            [ -f /usr/local/php-fpm/etc/php.ini ] || /bin/cp php.ini-production  /usr/local/php-fpm/etc/php.ini
            if /usr/local/php-fpm/bin/php -i |grep -iq 'date.timezone => no value'
            then
                sed -i '/;date.timezone =$/adate.timezone = "Asia/Chongqing"'  /usr/local/php-fpm/etc/php.ini
                check_ok
            fi
            [ -f /usr/local/php-fpm/etc/php-fpm.conf ] || curl http://www.apelearn.com/study_v2/.phpfpm_conf -o /usr/local/php-fpm/etc/php-fpm.conf
            check_ok
            [ -f /etc/init.d/phpfpm ] || /bin/cp sapi/fpm/init.d.php-fpm /etc/init.d/phpfpm
            chmod 755 /etc/init.d/phpfpm
            chkconfig phpfpm on
            service phpfpm start
            check_ok
            break
            ;;

        *)
            echo 'only 1(5.4) or 2(5.6)'
            ;;
    esac
}

##function of install lnmp
lnmp() {
check_service mysqld
check_service nginx
check_service phpfpm
echo "The lnmp done, Please use 'http://your ip/index.php' to access."
}

read -p "Please chose which type env you install, (lamp|lnmp)? " t
case $t in
    lamp)
        read -p "Please chose the version of mysql. (5.1|5.6)" mysql_v
        read -p "Please chose the version of php. (5.4|5.6)" php_v
        lamp
        ;;
    lnmp)
        read -p "Please chose the version of mysql. (5.1|5.6)" mysql_v
        read -p "Please chose the version of php. (5.4|5.6)" php_v
        lnmp
        ;;
    *)
        echo "Only 'lamp' or 'lnmp' your can input."
        ;;
esac
##111111
##########end##############
[root@centos-01 lanmp]#
2.更改README.md文件添加CCCCC,提示我没有权限,看来是不能更改了
[root@centos-01 lanmp]# vim README.md
[root@centos-01 lanmp]# cat README.md
# lanmp
lamp/lnmp 一键安装脚本
author: aming
version: 0.2
aaaaa
as
df
asd
f
bbbbb
CCCCC
[root@centos-01 lanmp]# git add README.md
[root@centos-01 lanmp]# git commit -m "change README.md"
[master efffdbe] change README.md
 1 file changed, 1 insertion(+)
[root@centos-01 lanmp]# git push
warning: push.default 未设置,它的默认值将会在 Git 2.0 由 'matching'
修改为 'simple'。若要不再显示本信息并在其默认值改变后维持当前使用习惯,
进行如下设置:

  git config --global push.default matching

若要不再显示本信息并从现在开始采用新的使用习惯,设置:

  git config --global push.default simple

参见 'git help config' 并查找 'push.default' 以获取更多信息。
('simple' 模式由 Git 1.7.11 版本引入。如果您有时要使用老版本的 Git,
为保持兼容,请用 'current' 代替 'simple' 模式)

Warning: Permanently added the RSA host key for IP address '13.250.177.223' to the list of known hosts.
ERROR: Permission to aminglinux/lanmp.git denied to sunyujun.
fatal: Could not read from remote repository.

Please make sure you have the correct access rights
and the repository exists.
[root@centos-01 lanmp]#
3.如果线上的更改了,我们客户端相同步该怎么办,用git pull拉下来
[root@centos-01 lanmp]# git pull
Already up-to-date.
[root@centos-01 lanmp]#
分支管理
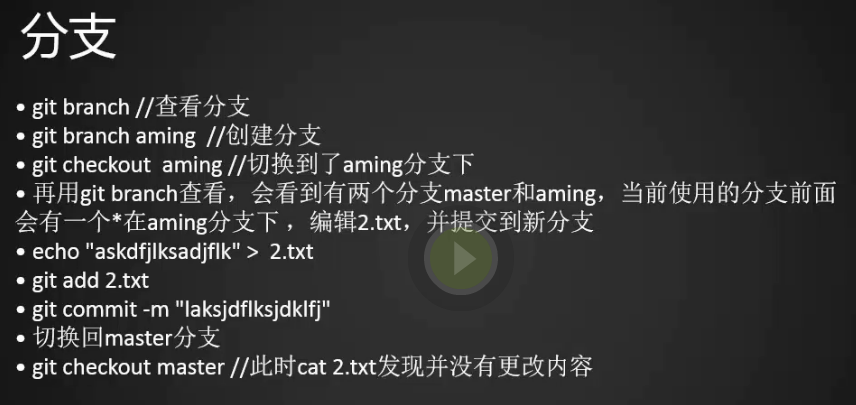
1.查看仓库中都有哪些分支
[root@centos-01 lanmp]# cd /data/gitroot/
[root@centos-01 gitroot]# git branch
* master
[root@centos-01 gitroot]#
2.创建新分支
[root@centos-01 gitroot]# git branch syj
[root@centos-01 gitroot]# git branch
* master
  syj
[root@centos-01 gitroot]#
3.切换分支
[root@centos-01 gitroot]# git checkout syj
切换到分支 'syj'
[root@centos-01 gitroot]#
4.星号到了syj分支上代表当前在syj分支中
[root@centos-01 gitroot]# git branch
  master
* syj
[root@centos-01 gitroot]#
5.我们在syj分支下创建一个新的文件2.txt,然后提交,然后再切换到master分支发现没有这个2.txt文件,说明分支是相互隔离开的。
[root@centos-01 ~]# cd /data/gitroot/
[root@centos-01 gitroot]# git branch
  master
* syj
[root@centos-01 gitroot]# ls
1.txt
[root@centos-01 gitroot]# vim 2.txt
[root@centos-01 gitroot]# cat 2.txt
2222222222
[root@centos-01 gitroot]# git add .
[root@centos-01 gitroot]# git commit -m "add 2.txt"
[syj db5eca6] add 2.txt
 1 file changed, 1 insertion(+)
 create mode 100644 2.txt
[root@centos-01 gitroot]# git checkout master
切换到分支 'master'
[root@centos-01 gitroot]# ls
1.txt
[root@centos-01 gitroot]#

1.我们想让两个分支合并,首先需要切换到目标分支下,然后使用git merge syj命令将syj分支下的变更同步到master上来
[root@centos-01 gitroot]# git checkout master
已经位于 'master'
[root@centos-01 gitroot]# git merge syj
更新 892a682..db5eca6
Fast-forward
 2.txt | 1 +
 1 file changed, 1 insertion(+)
 create mode 100644 2.txt
[root@centos-01 gitroot]# ls
1.txt  2.txt
[root@centos-01 gitroot]#
2.现在我们做一个合并冲突的实验,我们给master分支下的2.txt文件增加一些内容,给syj分支下的2.txt文件删除一些内容,然后合并分支试试。
[root@centos-01 gitroot]# vim 2.txt
[root@centos-01 gitroot]# cat 2.txt
2222222222
3333333333
[root@centos-01 gitroot]# git add 2.txt
[root@centos-01 gitroot]# git commit -m "ch 2.txt"
[master 5e371af] ch 2.txt
 1 file changed, 1 insertion(+)
[root@centos-01 gitroot]# git checkout syj
切换到分支 'syj'
[root@centos-01 gitroot]# vim 2.txt
[root@centos-01 gitroot]# cat 2.txt
2
[root@centos-01 gitroot]# git add 2.txt
[root@centos-01 gitroot]# git commit -m "ch 2.txt"
[syj 9c66db9] ch 2.txt
 1 file changed, 1 insertion(+), 1 deletion(-)
[root@centos-01 gitroot]# git checkout master
切换到分支 'master'
[root@centos-01 gitroot]# git merge syj
自动合并 2.txt
冲突(内容):合并冲突于 2.txt
自动合并失败,修正冲突然后提交修正的结果。
[root@centos-01 gitroot]#
3.我们编辑两个分支下的2.txt文件两者保持一致。
[root@centos-01 gitroot]# vim 2.txt
[root@centos-01 gitroot]# cat 2.txt
<<<<<<< HEAD
2222222222
3333333333
=======
2
>>>>>>> syj
[root@centos-01 gitroot]# vim 2.txt
[root@centos-01 gitroot]# cat 2.txt
2
[root@centos-01 gitroot]# git checkout syj
2.txt: needs merge
error: 您需要先解决当前索引的冲突
[root@centos-01 gitroot]# git add 2.txt
[root@centos-01 gitroot]# git commit -m "ch 2.txt"
[master 7b11106] ch 2.txt
[root@centos-01 gitroot]# git merge syj
Already up-to-date.
[root@centos-01 gitroot]# git checkout syj
切换到分支 'syj'
[root@centos-01 gitroot]# cat 2.txt
2
4.删除分支(-D强制删除分支)
[root@centos-01 gitroot]# git checkout master
切换到分支 'master'
[root@centos-01 gitroot]# git branch -d syj
已删除分支 syj(曾为 9c66db9)。
[root@centos-01 gitroot]#
远程分支管理


1.我们先创建一个新文件
2.接着我们创建一个新的分支dev

3.下面我们克隆一下远程的仓库

4.我们克隆完成之后发现克隆的分支里只有master,我们远程其实是有两个分支,还有一个dev
[root@centos-01 tmp]# git clone https://github.com/sunyujun/linuxlearn.git
正克隆到 'linuxlearn'...
remote: Counting objects: 9, done.
remote: Compressing objects: 100% (5/5), done.
remote: Total 9 (delta 1), reused 5 (delta 0), pack-reused 0
Unpacking objects: 100% (9/9), done.
[root@centos-01 tmp]# cd linuxlearn/
[root@centos-01 linuxlearn]# ls
2.txt  linux.doc  README.md
[root@centos-01 linuxlearn]# git branch
* master
[root@centos-01 linuxlearn]#
5.查看远程服务器的分支
[root@centos-01 linuxlearn]# git ls-remote origin
26359e748fd0482441e6b24fec1b73689774f8f9	HEAD
26359e748fd0482441e6b24fec1b73689774f8f9	refs/heads/dev
26359e748fd0482441e6b24fec1b73689774f8f9	refs/heads/master
[root@centos-01 linuxlearn]#
6.切换分支到dev
[root@centos-01 linuxlearn]# git checkout -b dev origin/dev
分支 dev 设置为跟踪来自 origin 的远程分支 dev。
切换到一个新分支 'dev'
[root@centos-01 linuxlearn]# git branch
* dev
  master
[root@centos-01 linuxlearn]#
7.在dev分支下新建一个文件3.txt并推送到远程服务器
[root@centos-01 linuxlearn]# ls
2.txt  linux.doc  README.md
[root@centos-01 linuxlearn]# vim 3.txt
[root@centos-01 linuxlearn]# cat 3.txt
3333333333
[root@centos-01 linuxlearn]# git add 3.txt
[root@centos-01 linuxlearn]# git commit -m "ch 3.txt"
[dev 9bafd0e] ch 3.txt
 1 file changed, 1 insertion(+)
 create mode 100644 3.txt
[root@centos-01 linuxlearn]# git push
warning: push.default 未设置,它的默认值将会在 Git 2.0 由 'matching'
修改为 'simple'。若要不再显示本信息并在其默认值改变后维持当前使用习惯,
进行如下设置:

  git config --global push.default matching

若要不再显示本信息并从现在开始采用新的使用习惯,设置:

  git config --global push.default simple

参见 'git help config' 并查找 'push.default' 以获取更多信息。
('simple' 模式由 Git 1.7.11 版本引入。如果您有时要使用老版本的 Git,
为保持兼容,请用 'current' 代替 'simple' 模式)

Username for 'https://github.com': sunyujun
Password for 'https://sunyujun@github.com':
Counting objects: 4, done.
Compressing objects: 100% (2/2), done.
Writing objects: 100% (3/3), 254 bytes | 0 bytes/s, done.
Total 3 (delta 1), reused 0 (delta 0)
remote: Resolving deltas: 100% (1/1), completed with 1 local object.
To https://github.com/sunyujun/linuxlearn.git
   26359e7..9bafd0e  dev -> dev
[root@centos-01 linuxlearn]#
8.只推dev分支
[root@centos-01 linuxlearn]# git push origin dev
Username for 'https://github.com': sunyujun
Password for 'https://sunyujun@github.com':
Everything up-to-date
[root@centos-01 linuxlearn]#
9.将客户端新建的分支推到远程客户端
[root@centos-01 linuxlearn]# git branch dev2
[root@centos-01 linuxlearn]# git branch
* dev
  dev2
  master
[root@centos-01 linuxlearn]# git checkout dev2
切换到分支 'dev2'
[root@centos-01 linuxlearn]# ls
2.txt  3.txt  linux.doc  README.md
[root@centos-01 linuxlearn]# vim 4.txt
[root@centos-01 linuxlearn]# cat 4.txt
444444444444
[root@centos-01 linuxlearn]# git add 4.txt
[root@centos-01 linuxlearn]# git commit -m "add 4.txt"
[dev2 f3bea1d] add 4.txt
 1 file changed, 1 insertion(+)
 create mode 100644 4.txt
[root@centos-01 linuxlearn]# git push origin dev2
Username for 'https://github.com': sunyujun
Password for 'https://sunyujun@github.com':
Counting objects: 4, done.
Compressing objects: 100% (2/2), done.
Writing objects: 100% (3/3), 256 bytes | 0 bytes/s, done.
Total 3 (delta 1), reused 0 (delta 0)
remote: Resolving deltas: 100% (1/1), completed with 1 local object.
To https://github.com/sunyujun/linuxlearn.git
 * [new branch]      dev2 -> dev2
[root@centos-01 linuxlearn]#
标签管理

1.
[root@centos-01 linuxlearn]# git checkout master
切换到分支 'master'
[root@centos-01 linuxlearn]# git tag v1.0
[root@centos-01 linuxlearn]# git tag
v1.0
[root@centos-01 linuxlearn]# git show v1.0
commit 26359e748fd0482441e6b24fec1b73689774f8f9
Author: sunyujun <278108678@qq.com>
Date:   Sun May 6 09:25:26 2018 +0800

    Create linux.doc

diff --git a/linux.doc b/linux.doc
new file mode 100644
index 0000000..a08e1f3
--- /dev/null
+++ b/linux.doc
@@ -0,0 +1 @@
+linux
[root@centos-01 linuxlearn]# git log --pretty=oneline
26359e748fd0482441e6b24fec1b73689774f8f9 Create linux.doc
21c6941c478471a8f192bd93c359759422d75aa3 add 2.txt
a08b6ef1d0d706437114974776e83a9e659bc378 fldsjfds
[root@centos-01 linuxlearn]# git tag v0.8 21c6941c4784
[root@centos-01 linuxlearn]# git tag
v0.8
v1.0
[root@centos-01 linuxlearn]# git log --pretty=oneline --abbrev-commit
26359e7 Create linux.doc
21c6941 add 2.txt
a08b6ef fldsjfds
[root@centos-01 linuxlearn]# git tag -a v0.1 -m "first tag" a08b6ef
[root@centos-01 linuxlearn]# git tag
v0.1
v0.8
v1.0
[root@centos-01 linuxlearn]# git show v0.1
tag v0.1
Tagger: phper <278108678@qq.com>
Date:   Tue May 8 06:34:26 2018 +0800

first tag

commit a08b6ef1d0d706437114974776e83a9e659bc378
Author: phper <278108678@qq.com>
Date:   Sat May 5 16:29:12 2018 +0800

    fldsjfds

diff --git a/README.md b/README.md
new file mode 100644
index 0000000..eb983dd
--- /dev/null
+++ b/README.md
@@ -0,0 +1 @@
+# linuxlearn
...skipping...
tag v0.1
Tagger: phper <278108678@qq.com>
Date:   Tue May 8 06:34:26 2018 +0800

first tag

commit a08b6ef1d0d706437114974776e83a9e659bc378
Author: phper <278108678@qq.com>
Date:   Sat May 5 16:29:12 2018 +0800

    fldsjfds

diff --git a/README.md b/README.md
new file mode 100644
index 0000000..eb983dd
--- /dev/null
+++ b/README.md
@@ -0,0 +1 @@
+# linuxlearn

[root@centos-01 linuxlearn]#
2.删除一个tag
[root@centos-01 linuxlearn]# git tag -d v0.1
已删除 tag 'v0.1'(曾为 9739c3d)
[root@centos-01 linuxlearn]# git push origin v1.0 (推送一个tag)
Username for 'https://github.com': sunyujun
Password for 'https://sunyujun@github.com':
Total 0 (delta 0), reused 0 (delta 0)
To https://github.com/sunyujun/linuxlearn.git
 * [new tag]         v1.0 -> v1.0
[root@centos-01 linuxlearn]#
3.将所有的tag推送到远程
[root@centos-01 linuxlearn]# git push --tag origin
Username for 'https://github.com': sunyujun
Password for 'https://sunyujun@github.com':
Total 0 (delta 0), reused 0 (delta 0)
To https://github.com/sunyujun/linuxlearn.git
 * [new tag]         v0.8 -> v0.8
[root@centos-01 linuxlearn]#
4.远程同步删除tag
[root@centos-01 linuxlearn]# git tag
v0.8
v1.0
[root@centos-01 linuxlearn]# git tag -d v0.8
已删除 tag 'v0.8'(曾为 21c6941)
[root@centos-01 linuxlearn]# git tag
v1.0
[root@centos-01 linuxlearn]# git push origin :refs/tags/v0.8
Username for 'https://github.com': sunyujun
Password for 'https://sunyujun@github.com':
To https://github.com/sunyujun/linuxlearn.git
 - [deleted]         v0.8
[root@centos-01 linuxlearn]#
git别名
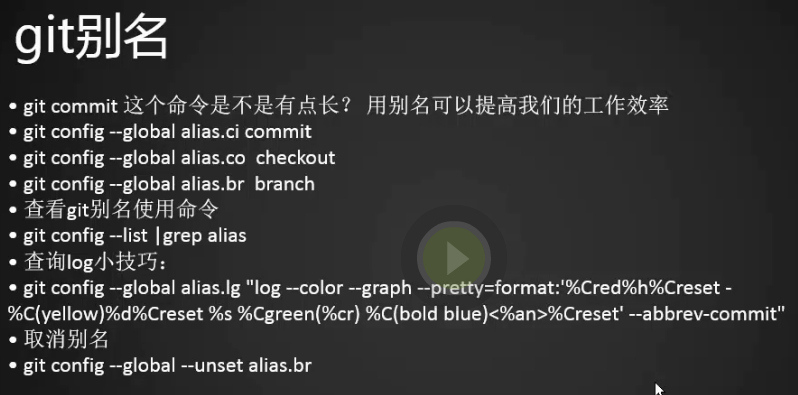
1.commit的别名改成ci
[root@centos-01 linuxlearn]# git config --global alias.ci commit
[root@centos-01 linuxlearn]# ls
2.txt  linux.doc  README.md
[root@centos-01 linuxlearn]# vim 3.txt
[root@centos-01 linuxlearn]# cat 3.txt
3333333333333
[root@centos-01 linuxlearn]# git add 3.txt
[root@centos-01 linuxlearn]# git ci -m "add 3.txt"
[master b299542] add 3.txt
 1 file changed, 1 insertion(+)
 create mode 100644 3.txt
[root@centos-01 linuxlearn]#
2.查看git别名使用的命令
[root@centos-01 linuxlearn]# git config --list |grep alias
alias.ci=commit
[root@centos-01 linuxlearn]#
3.查看log

4.取消别名
[root@centos-01 linuxlearn]# git config --global --unset alias.ci
搭建git服务器

1.首先安装git
[root@centos-02 ~]# yum install -y git
2.禁止git用户远程登录
[root@centos-02 ~]# useradd -s /usr/bin/git-shell git
[root@centos-02 ~]# cd /home/git/
[root@centos-02 git]# ls
[root@centos-02 git]# mkdir .ssh
[root@centos-02 git]# touch .ssh/authorized_keys
[root@centos-02 git]# chmod 600 .ssh/authorized_keys
[root@centos-02 git]# chown -R git:git .ssh
[root@centos-02 git]#
3.在01服务器上将公钥放到02服务器的git家目录authorized_keys文件中
[root@centos-01 ~]# cat .ssh/id_rsa.pub
ssh-rsa AAAAB3NzaC1yc2EAAAADAQABAAABAQDBTj3AjVScW1LoWdcbJLLwhgNcemhko3PMu8Sze9QePkvvCi49seQrcet9Yp9zxAVovs74tWHQPmfJ3h2OMx3GDk36b14O+8WpbKnZV/pN0PUX1ZvVVfw7v8t22SDHYm09jHHbzQJdiMK2TJ
89RcKmE8d8D2Z9igInhdK2BEaGp4JYVQZdhchM58JcE+rvPcdsDhEhsA+z88UejWBGMZpJo1T8OCaK0OKPqKR7ZRt1kSlG78CDuHoldDu9HaKMm5ED/JxguC8EyIOLnnHTa/3kutMIEdK4ZOowlAEsgVmrKizMa7JvDOHhl5ycoaL8DD/rdhaL
quXX+8bRcgqXl385 root@centos-01
[root@centos-01 ~]#
[root@centos-02 git]# vim .ssh/authorized_keys
[root@centos-02 git]# cat .ssh/authorized_keys
ssh-rsa AAAAB3NzaC1yc2EAAAADAQABAAABAQDBTj3AjVScW1LoWdcbJLLwhgNcemhko3PMu8Sze9QePkvvCi49seQrcet9Yp9zxAVovs74tWHQPmfJ3h2OMx3GDk36b14O+8WpbKnZV/pN0PUX1ZvVVfw7v8t22SDHYm09jHHbzQJdiMK2TJ
89RcKmE8d8D2Z9igInhdK2BEaGp4JYVQZdhchM58JcE+rvPcdsDhEhsA+z88UejWBGMZpJo1T8OCaK0OKPqKR7ZRt1kSlG78CDuHoldDu9HaKMm5ED/JxguC8EyIOLnnHTa/3kutMIEdK4ZOowlAEsgVmrKizMa7JvDOHhl5ycoaL8DD/rdhaL
quXX+8bRcgqXl385 root@centos-01
[root@centos-02 git]#
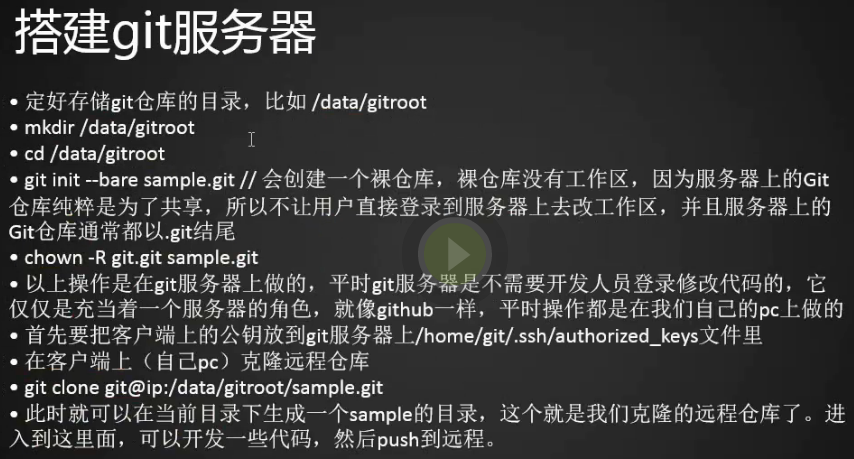
4.测试公钥是否设置成功,结果说明成功了只是git是不允许登录的
[root@centos-01 ~]# ssh git@192.168.133.88
fatal: Interactive git shell is not enabled.
hint: ~/git-shell-commands should exist and have read and execute access.
Connection to 192.168.133.88 closed.
[root@centos-01 ~]#
5.创建一个git的仓库
[root@centos-02 git]# cd /data/
[root@centos-02 data]# mkdir /data/gitroot
[root@centos-02 data]# cd /data/gitroot/
[root@centos-02 gitroot]# git init --bare sample.git
初始化空的 Git 版本库于 /data/gitroot/sample.git/
[root@centos-02 gitroot]# ls
sample.git
[root@centos-02 gitroot]# chown -R git.git sample.git
[root@centos-02 gitroot]#
6.在远程上(01客户端)克隆服务器仓库
[root@centos-01 ~]# git clone git@192.168.133.88:/data/gitroot/sample.git
正克隆到 'sample'...
warning: 您似乎克隆了一个空版本库。
[root@centos-01 ~]# cd sample/
[root@centos-01 sample]# ls -la
总用量 4
drwxr-xr-x   3 root root   18 5月   9 06:53 .
dr-xr-x---. 21 root root 4096 5月   9 06:53 ..
drwxr-xr-x   7 root root  119 5月   9 06:53 .git
[root@centos-01 sample]# cp /e
epel-release-7-11.noarch.rpm  etc/
[root@centos-01 sample]# cp /etc/init.d/mysqld .
[root@centos-01 sample]# git add .
[root@centos-01 sample]# git commit -m "add new file"
[master(根提交) e841397] add new file
 1 file changed, 388 insertions(+)
 create mode 100755 mysqld
[root@centos-01 sample]# git push origin master
Counting objects: 3, done.
Compressing objects: 100% (2/2), done.
Writing objects: 100% (3/3), 3.88 KiB | 0 bytes/s, done.
Total 3 (delta 0), reused 0 (delta 0)
To git@192.168.133.88:/data/gitroot/sample.git
 * [new branch]      master -> master
[root@centos-01 sample]#
7.测试git服务器
[root@centos-01 sample]# echo "lafldkflksdf" > 222.txt
[root@centos-01 sample]# git add 222.txt
[root@centos-01 sample]# git commit -m "add 222.txt"
[master 6c56668] add 222.txt
 1 file changed, 1 insertion(+)
 create mode 100644 222.txt
[root@centos-01 sample]# git push
warning: push.default 未设置,它的默认值将会在 Git 2.0 由 'matching'
修改为 'simple'。若要不再显示本信息并在其默认值改变后维持当前使用习惯,
进行如下设置:

  git config --global push.default matching

若要不再显示本信息并从现在开始采用新的使用习惯,设置:

  git config --global push.default simple

参见 'git help config' 并查找 'push.default' 以获取更多信息。
('simple' 模式由 Git 1.7.11 版本引入。如果您有时要使用老版本的 Git,
为保持兼容,请用 'current' 代替 'simple' 模式)

Counting objects: 4, done.
Compressing objects: 100% (2/2), done.
Writing objects: 100% (3/3), 279 bytes | 0 bytes/s, done.
Total 3 (delta 0), reused 0 (delta 0)
To git@192.168.133.88:/data/gitroot/sample.git
   e841397..6c56668  master -> master
[root@centos-01 sample]# cd /tmp/
[root@centos-01 tmp]# git clone git@192.168.133.88:/data/gitroot/sample.git
正克隆到 'sample'...
remote: Counting objects: 6, done.
remote: Compressing objects: 100% (4/4), done.
remote: Total 6 (delta 0), reused 0 (delta 0)
接收对象中: 100% (6/6), 4.13 KiB | 0 bytes/s, done.
[root@centos-01 tmp]# ls sample/
222.txt  mysqld
[root@centos-01 tmp]# cd sample/
[root@centos-01 sample]# vim 222.txt
[root@centos-01 sample]# cat 222.txt
lafldkflksdf
alfdldsflsdlf
[root@centos-01 sample]# git add 222.txt
[root@centos-01 sample]# git commit -m "ch 222.txt"
[master 6f7c268] ch 222.txt
 1 file changed, 1 insertion(+)
[root@centos-01 sample]# git push
warning: push.default 未设置,它的默认值将会在 Git 2.0 由 'matching'
修改为 'simple'。若要不再显示本信息并在其默认值改变后维持当前使用习惯,
进行如下设置:

  git config --global push.default matching

若要不再显示本信息并从现在开始采用新的使用习惯,设置:

  git config --global push.default simple

参见 'git help config' 并查找 'push.default' 以获取更多信息。
('simple' 模式由 Git 1.7.11 版本引入。如果您有时要使用老版本的 Git,
为保持兼容,请用 'current' 代替 'simple' 模式)

Counting objects: 5, done.
Compressing objects: 100% (2/2), done.
Writing objects: 100% (3/3), 295 bytes | 0 bytes/s, done.
Total 3 (delta 0), reused 0 (delta 0)
To git@192.168.133.88:/data/gitroot/sample.git
   6c56668..6f7c268  master -> master
[root@centos-01 sample]# cd /root/sample/
[root@centos-01 sample]# ls
222.txt  mysqld
[root@centos-01 sample]# git pull
remote: Counting objects: 5, done.
remote: Compressing objects: 100% (2/2), done.
remote: Total 3 (delta 0), reused 0 (delta 0)
Unpacking objects: 100% (3/3), done.
来自 192.168.133.88:/data/gitroot/sample
   6c56668..6f7c268  master     -> origin/master
更新 6c56668..6f7c268
Fast-forward
 222.txt | 1 +
 1 file changed, 1 insertion(+)
[root@centos-01 sample]# cat 222.txt
lafldkflksdf
alfdldsflsdlf
[root@centos-01 sample]#
安装gitlab

1.安装gitlab(失败,还是用官方的安装吧)
[root@centos-01 sample]# vim /etc/yum.repos.d/gitlab.repo
[root@centos-01 sample]# cat /etc/yum.repos.d/gitlab.repo
[gitlab-ce]
name=gitlab-ce
baseurl=http://mirrors.tuna.tsinghua.edu.cn/gitlab-ce/yum/el7
Repo_gpgcheck=0
Enabled=1
Gpgkey=https://packages.gitlab.com/gpg.key
[root@centos-01 sample]# yum install -y gitlab-ce
gitlab-ce-10.7.3-ce.0.el7.x86_64.rpm 的公钥尚未安装


 失败的软件包是:gitlab-ce-10.7.3-ce.0.el7.x86_64
 GPG  密钥配置为:https://packages.gitlab.com/gpg.key

[root@centos-01 sample]#
2.官方安装
[root@centos-01 ~]# sudo yum install -y curl policycoreutils-python openssh-server openssh-clients  (安装和配置必要的依赖关系)
[root@centos-01 ~]# sudo systemctl enable sshd
[root@centos-01 ~]# sudo systemctl start sshd
[root@centos-01 ~]# sudo firewall-cmd --permanent --add-service=http
FirewallD is not running
[root@centos-01 ~]# sudo systemctl reload firewalld
Job for firewalld.service invalid.
[root@centos-01 ~]# sudo yum install postfix
已加载插件:fastestmirror, langpacks
https://repo.mongodb.org/yum/redhat/7/mongodb-org/3.6/x86_64/repodata/repomd.xml: [Errno 14] curl#35 - "TCP connection reset by peer"
正在尝试其它镜像。
Loading mirror speeds from cached hostfile
 * base: mirrors.tuna.tsinghua.edu.cn
 * epel: mirror.dmmlabs.jp
 * extras: mirrors.tuna.tsinghua.edu.cn
 * updates: mirrors.njupt.edu.cn
软件包 2:postfix-2.10.1-6.el7.x86_64 已安装并且是最新版本
无须任何处理
[root@centos-01 ~]# sudo systemctl enable postfix
[root@centos-01 ~]# sudo systemctl start postfix
[root@centos-01 ~]#
3.生成gitlab包仓库
[root@centos-01 ~]# curl -sS https://packages.gitlab.com/install/repositories/gitlab/gitlab-ce/script.rpm.sh | sudo bash
4.安装gitlab-ce并指定访问的ip为192.168.133.44(可以指定其他域名)
[root@centos-01 ~]# sudo EXTERNAL_URL="192.168.133.44" yum install -y gitlab-ce
5.配置配置文件
[root@centos-01 ~]# gitlab-ctl reconfigure
6.配置文件目录(目的是配置gitlab相关的服务启动)
[root@centos-01 ~]# cat /etc/gitlab/gitlab.rb |grep external_url
##! For more details on configuring external_url see:
external_url 'http://192.168.133.44'
# registry_external_url 'https://registry.gitlab.example.com'
# pages_external_url "http://pages.example.com/"
# gitlab_pages['artifacts_server_url'] = nil # Defaults to external_url + '/api/v4'
# mattermost_external_url 'http://mattermost.example.com'
[root@centos-01 ~]#
[root@centos-01 ~]# ps aux|grep gitlab
[root@centos-01 ~]# netstat -lntp
[root@centos-01 ~]#
[root@centos-01 ~]# /etc/init.d/nginx stop (关闭之前的nginx)
[root@centos-01 ~]# chkconfig nginx off
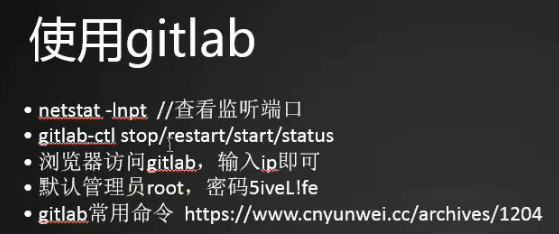
1.停止服务
[root@centos-01 ~]# gitlab-ctl stop
2.启动服务
[root@centos-01 ~]# gitlab-ctl start
3.ip进行访问

使用gitlab
1.配置gitlab域名访问,配置文件如下,修改server_name就行。
[root@centos-01 ~]# cat /var/opt/gitlab/nginx/conf/gitlab-http.conf |grep server
  server unix:/var/opt/gitlab/gitlab-workhorse/socket;
server {
  server_name 192.168.133.44;
  server_tokens off; ## Don't show the nginx version number, a security best practice
[root@centos-01 ~]#
2.在gitlab上新建项目,首先建立一个group

3.创建项目

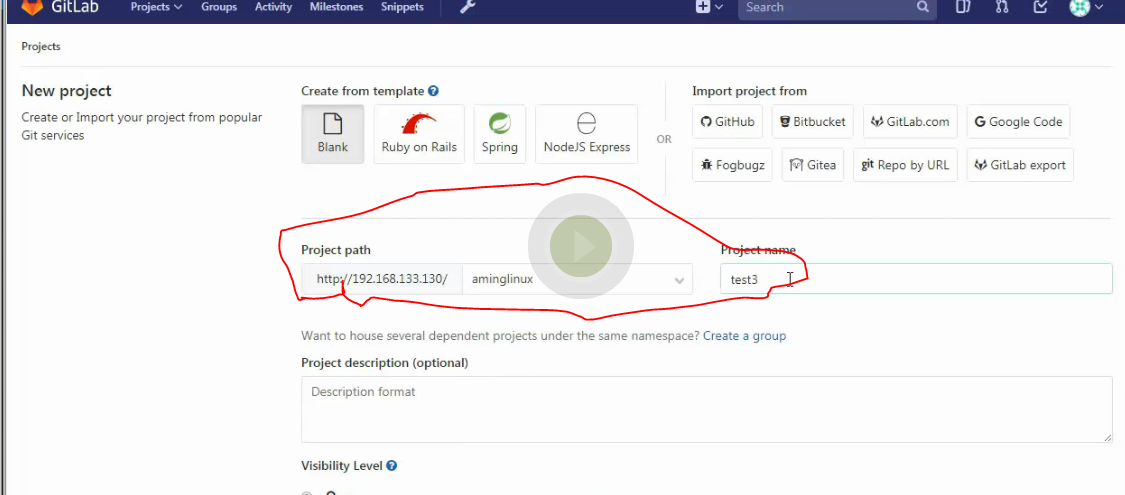
4.创建完项目后会有一个提醒,意思是还没有建立ssh key,这个key和我们之前做的gitlab一样需要添加key,然后就可以通信了。


5.点setting添加key
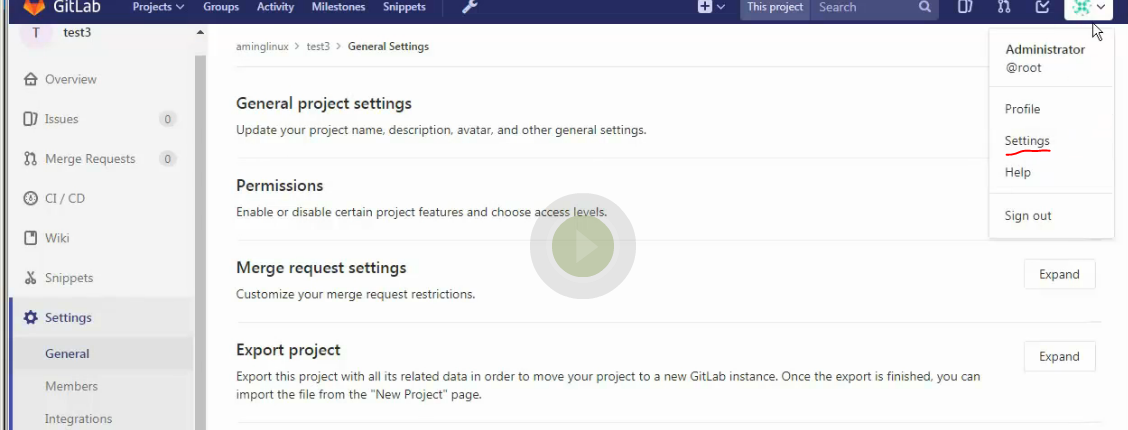

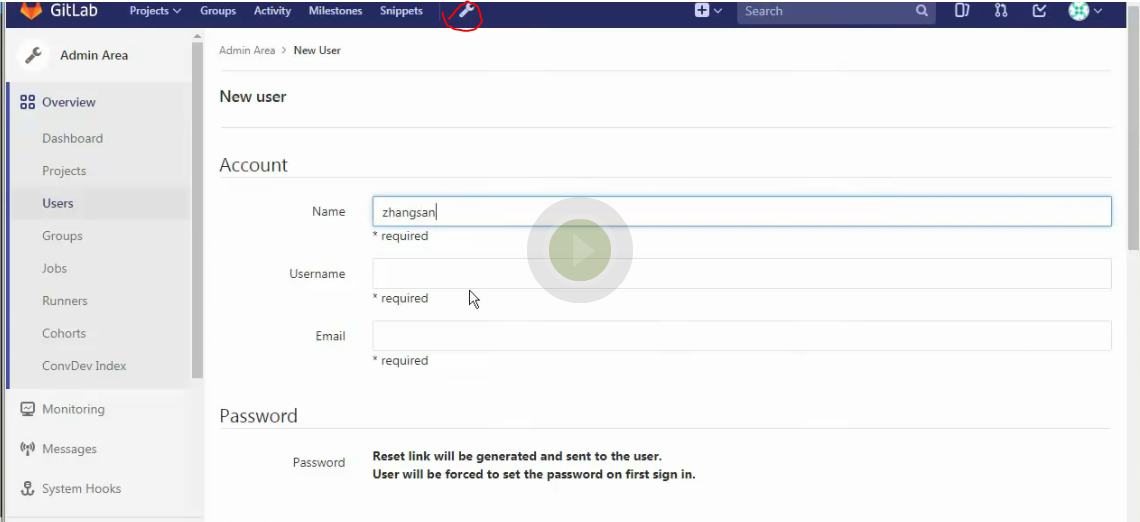
6.添加新用户
gitlab备份和恢复
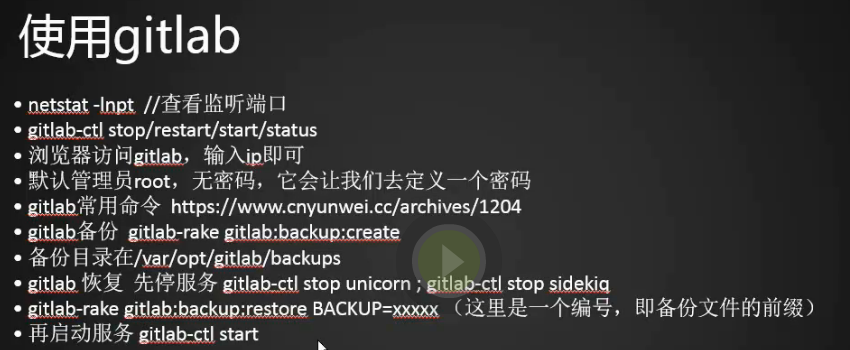
1.执行命令

2.备份文件所在目录

3.恢复gitlab
