环境
win7 安装vmware12,虚拟机装 centos7.9
主机: hc2108/192.168.25.108
已有
- 已经创建hadoop账号,添加了sudo 权限
- 已经安装jdk1.8
- 配置了 主机名 和静态ip地址
- 关闭防火墙
计划
计划把这台机器当作伪分布式机器,安装大数据开源生态常见组件,具体如下
- ✓ hadoop 3.3.1 (最新版本)
- spark
- ✓ hive 2.3.9
- zookeeper 3.6.3
- hbase
说明
- 默认操作都用hadoop账户进行, 需要特别权限的地方,会在前面加sudo,在文中会补充描述。 需要root账户单独操作的,也会特别说明
- 所有的组件都安装在 /opt 目录下, 放在下面的安装包的默认权限是 drwxr-xr-x
- 环境搭建下组件的配置, 只满足能够跑起来来就行,并不考虑其他。后续修改体现在 "b0107 大数据集群-2021伪分布式-运维“, 根据具体使用情况调整配置参数
10. Sqoop 1.4.7 20210808
简单资料
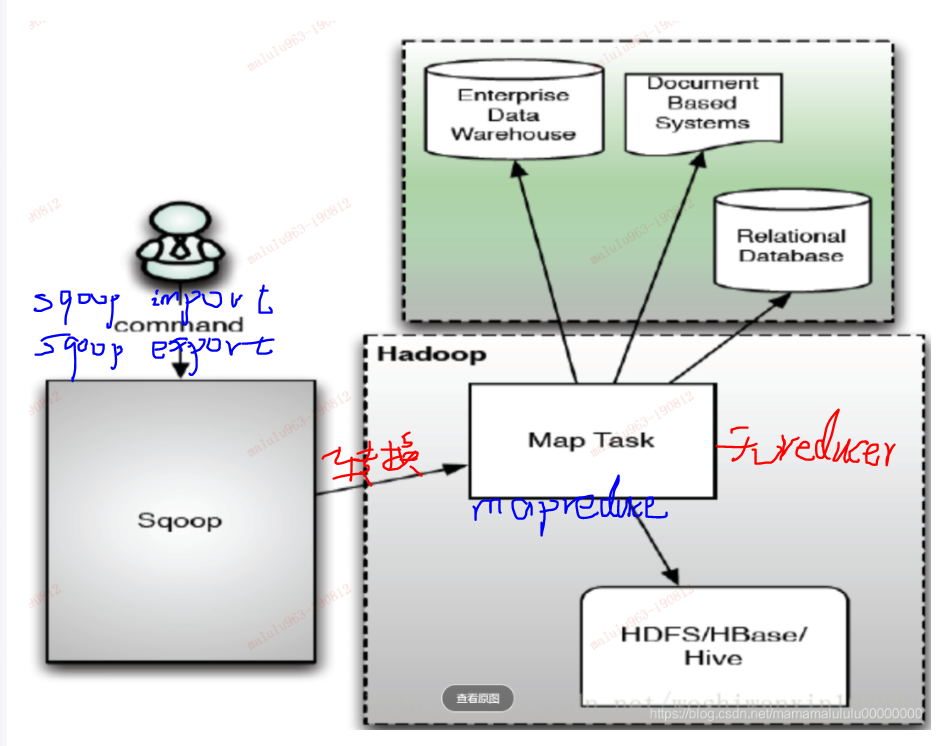
sqoop 支持在 关系型数据库 和 hadoop上的hdfs、hive、hbase之间传输数据,不支持业务逻辑编写 。 sqoop由java编写, 给使用者的开发方式是 linux命令行工具。
通过在命令行执行 sqoop import,sqoop export 并指定源、目标等参数,sqoop (个人认为是一个编译器,转换器) 将其转化为 只带map的mapeduce程序, 然后提交到hadoop集群去执行,实现数据传输。
sqoop 最新的版本是 1.4.7,2017年12月发布,基本停止更新了。
- http://sqoop.apache.org/
- http://attic.apache.org/projects/sqoop.html
- https://github.com/apache/sqoop
更多资料参考
- "Sqoop原理和架构,一直打铁,2019/08/22"
- "sqoop简介以及架构介绍,正在加载,2017/11/15"
- "Sqoop架构,努力的凹凸曼,2018/06/21"
前置
- jdk (必须)
- hadoop (必须)
- 一个关系型数据库,比如mariadb (必须)
下载和解压
http://archive.apache.org/dist/sqoop/ ,从下载地址找到最新的版本是 1.4.7 , 注意1.99去掉了一些功能,不适合部署到生产,官网这样说的
win下载 并上传到linux,解压和移动到安装目录/opt.
看一下一级目录下的文件

参数配置
sqoop-env.sh
定位到conf目录, 复制一个参数脚本 cp sqoop-env-template.sh sqoop-env.sh
并添加以下内容,根据个人将来使用情况添加, 最基础的是hadoop,然后是hive、hbase, 不清楚zookeeper是不是必须的。
# hadoop 安装信息
export HADOOP_COMMON_HOME=/opt/hadoop-3.3.1

export HADOOP_MAPRED_HOME=/opt/hadoop-3.3.1

# hive 安装信息
export HIVE_HOME=/opt/apache-hive-2.3.9-bin

# hbase 安装信息
export HBASE_HOME=/opt/hbase-2.3.6

# zookeeper 安装信息
export ZOOKEEPER_HOME=/opt/apache-zookeeper-3.6.3-bin

export ZOOCFGDIR=/opt/apache-zookeeper-3.6.3-bin
sqoop-site.xml
保持原样。 这个文件里面有很多参数,都注释了。 有些参数暂时不明白,这里都贴出来方便查询和学习

1 <?xml version="1.0"?> 2 <?xml-stylesheet type="text/xsl" href="configuration.xsl"?> 3 <!-- 4 Licensed to the Apache Software Foundation (ASF) under one 5 or more contributor license agreements. See the NOTICE file 6 distributed with this work for additional information 7 regarding copyright ownership. The ASF licenses this file 8 to you under the Apache License, Version 2.0 (the 9 "License"); you may not use this file except in compliance 10 with the License. You may obtain a copy of the License at 11 12 http://www.apache.org/licenses/LICENSE-2.0 13 14 Unless required by applicable law or agreed to in writing, 15 software distributed under the License is distributed on an 16 "AS IS" BASIS, WITHOUT WARRANTIES OR CONDITIONS OF ANY 17 KIND, either express or implied. See the License for the 18 specific language governing permissions and limitations 19 under the License. 20 --> 21 22 <!-- Put Sqoop-specific properties in this file. --> 23 24 <configuration> 25 26 <!-- 27 Set the value of this property to explicitly enable third-party 28 ManagerFactory plugins. 29 30 If this is not used, you can alternately specify a set of ManagerFactories 31 in the $SQOOP_CONF_DIR/managers.d/ subdirectory. Each file should contain 32 one or more lines like: 33 manager.class.name[=/path/to/containing.jar] 34 35 Files will be consulted in lexicographical order only if this property 36 is unset. 37 --> 38 <!-- 39 <property> 40 <name>sqoop.connection.factories</name> 41 <value>com.cloudera.sqoop.manager.DefaultManagerFactory</value> 42 <description>A comma-delimited list of ManagerFactory implementations 43 which are consulted, in order, to instantiate ConnManager instances 44 used to drive connections to databases. 45 </description> 46 </property> 47 --> 48 49 <!-- 50 Set the value of this property to enable third-party tools. 51 52 If this is not used, you can alternately specify a set of ToolPlugins 53 in the $SQOOP_CONF_DIR/tools.d/ subdirectory. Each file should contain 54 one or more lines like: 55 plugin.class.name[=/path/to/containing.jar] 56 57 Files will be consulted in lexicographical order only if this property 58 is unset. 59 --> 60 <!-- 61 <property> 62 <name>sqoop.tool.plugins</name> 63 <value></value> 64 <description>A comma-delimited list of ToolPlugin implementations 65 which are consulted, in order, to register SqoopTool instances which 66 allow third-party tools to be used. 67 </description> 68 </property> 69 --> 70 71 <!-- 72 By default, the Sqoop metastore will auto-connect to a local embedded 73 database stored in ~/.sqoop/. To disable metastore auto-connect, uncomment 74 this next property. 75 --> 76 <!-- 77 <property> 78 <name>sqoop.metastore.client.enable.autoconnect</name> 79 <value>false</value> 80 <description>If true, Sqoop will connect to a local metastore 81 for job management when no other metastore arguments are 82 provided. 83 </description> 84 </property> 85 --> 86 87 <!-- 88 The auto-connect metastore is stored in ~/.sqoop/. Uncomment 89 these next arguments to control the auto-connect process with 90 greater precision. 91 --> 92 <!-- 93 <property> 94 <name>sqoop.metastore.client.autoconnect.url</name> 95 <value>jdbc:hsqldb:file:/tmp/sqoop-meta/meta.db;shutdown=true</value> 96 <description>The connect string to use when connecting to a 97 job-management metastore. If unspecified, uses ~/.sqoop/. 98 You can specify a different path here. 99 </description> 100 </property> 101 <property> 102 <name>sqoop.metastore.client.autoconnect.username</name> 103 <value>SA</value> 104 <description>The username to bind to the metastore. 105 </description> 106 </property> 107 <property> 108 <name>sqoop.metastore.client.autoconnect.password</name> 109 <value></value> 110 <description>The password to bind to the metastore. 111 </description> 112 </property> 113 --> 114 115 <!-- 116 For security reasons, by default your database password will not be stored in 117 the Sqoop metastore. When executing a saved job, you will need to 118 reenter the database password. Uncomment this setting to enable saved 119 password storage. (INSECURE!) 120 --> 121 <!-- 122 <property> 123 <name>sqoop.metastore.client.record.password</name> 124 <value>true</value> 125 <description>If true, allow saved passwords in the metastore. 126 </description> 127 </property> 128 --> 129 130 <!-- 131 Enabling this option will instruct Sqoop to put all options that 132 were used in the invocation into created mapreduce job(s). This 133 become handy when one needs to investigate what exact options were 134 used in the Sqoop invocation. 135 --> 136 <!-- 137 <property> 138 <name>sqoop.jobbase.serialize.sqoopoptions</name> 139 <value>true</value> 140 <description>If true, then all options will be serialized into job.xml 141 </description> 142 </property> 143 --> 144 145 <!-- 146 SERVER CONFIGURATION: If you plan to run a Sqoop metastore on this machine, 147 you should uncomment and set these parameters appropriately. 148 149 You should then configure clients with: 150 sqoop.metastore.client.autoconnect.url = 151 jdbc:hsqldb:hsql://<server-name>:<port>/sqoop 152 --> 153 <!-- 154 <property> 155 <name>sqoop.metastore.server.location</name> 156 <value>/tmp/sqoop-metastore/shared.db</value> 157 <description>Path to the shared metastore database files. 158 If this is not set, it will be placed in ~/.sqoop/. 159 </description> 160 </property> 161 162 <property> 163 <name>sqoop.metastore.server.port</name> 164 <value>16000</value> 165 <description>Port that this metastore should listen on. 166 </description> 167 </property> 168 --> 169 170 <!-- 171 Configuration required to integrate Sqoop with Apache Atlas. 172 --> 173 <!-- 174 <property> 175 <name>atlas.rest.address</name> 176 <value>http://localhost:21000/</value> 177 </property> 178 <property> 179 <name>atlas.cluster.name</name> 180 <value>primary</value> 181 </property> 182 <property> 183 <name>sqoop.job.data.publish.class</name> 184 <value>org.apache.atlas.sqoop.hook.SqoopHook</value> 185 <description>Atlas (or any other publisher) should implement this hook. 186 </description> 187 </property> 188 --> 189 190 </configuration>
注意几类参数 ,不是很清楚元数据的存储原理。
- sqoop.metastore.client
- sqoop.metastore.server
/etc/profile
### sqoop
export SQOOP_HOME=/opt/sqoop-1.4.7.bin__hadoop-2.6.0
export PATH=$PATH:${SQOOP_HOME}/bin
添加以上环境变量, 并source生效
查询版本检验一下

准备数据库jdbc驱动
根据后续使用的数据库类型选择, 我这里是MariaDB, 用mysql jdbc jar包, 从之前安装hive时用的jar包拿过来了。
拥有一个jar 包后,放入到sqoop/lib目录下, 如下命令
cp mysql-connector-java-5.1.39-bin.jar /opt/sqoop-1.4.7.bin__hadoop-2.6.0/lib
启动和检验
1 查看支持命令
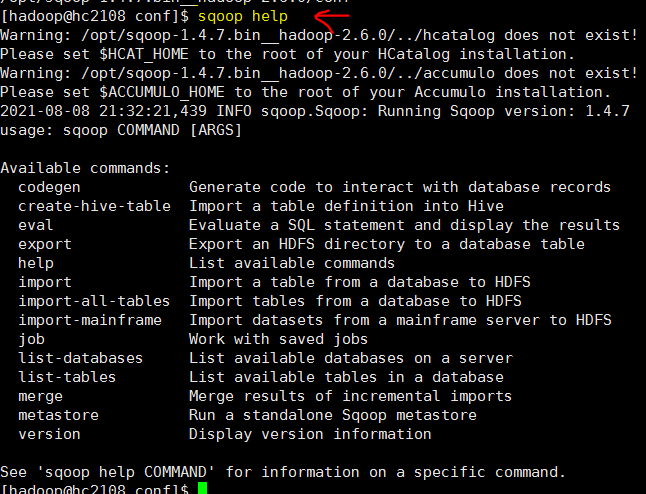
执行sqoop help 了解一下有哪些命令,具体某个细分命令的帮助 sqoop list-databases --help
2 测试关系数据库连接
测试 能够连上关系型数据库
sqoop list-databases --connect jdbc:mysql://hc2102:3306/ --username hive1 --password 123456

注: 这一步报错了,提示找不到一个类,详细参考 b0107/sqoop/Q1 ,以及如何解决
3 测试 mysql 到hive表
# 导入表数据到hive中
sqoop import --connect jdbc:mysql://hc2102:3306/test01?characterEncoding=UTF-8 --username hive1 --password 123456 --table emp -m 1 --hive-import --create-hive-table --hive-table tb_emp
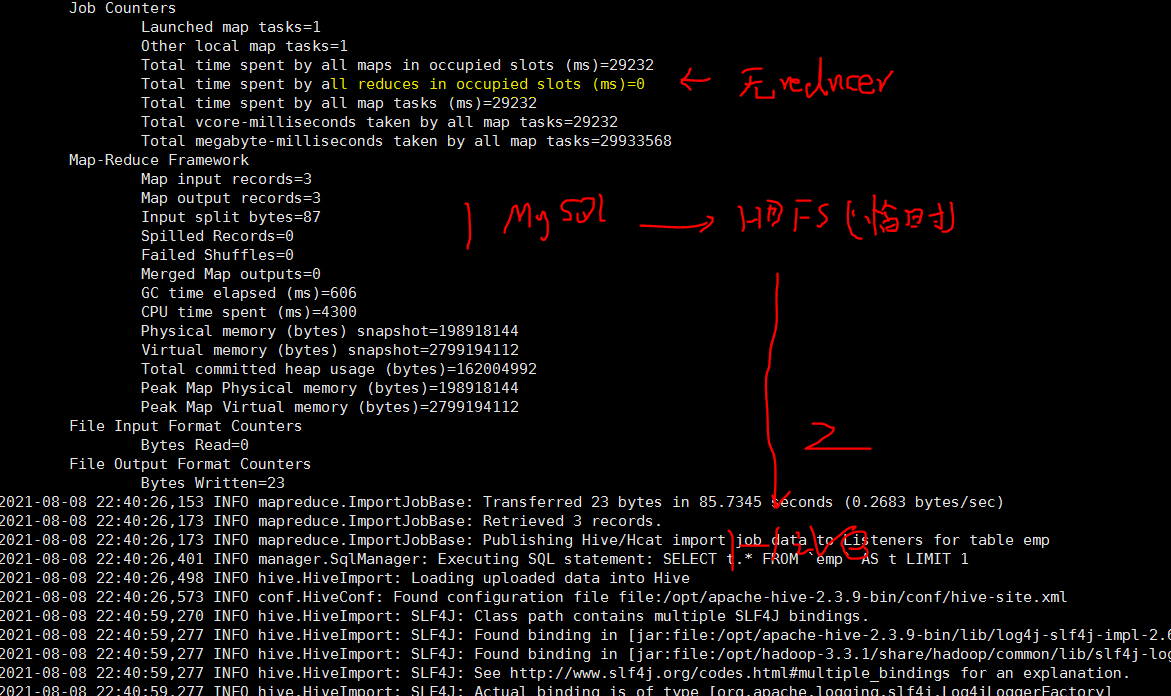
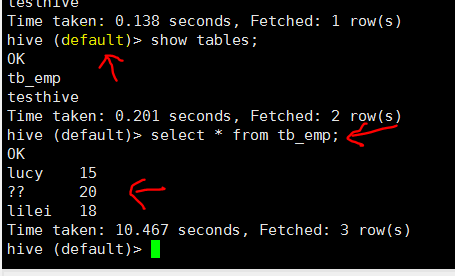
注: 这一步报错了,提示找不到一个hive包的类,详细参考 b0107/sqoop/Q2 ,以及如何解决
参考
- disk 20210808_大数据_伪分布式_sqoop安装.txt
- ref1 "CnetOS7 搭建Sqoop-1.4.7,在奋斗的大道,2019/07/09"
- ref2 "Sqoop的安装与使用,子清,2020/09/26"
其他
疑问
- sqoop 是不是必须安装在hadoop 集群所在机器上
- sqoop 有没有 客户端、服务器端的关系,并且可以分开安装在2台机器上
- sqoop-site.xml里的 sqoop.metastore.server, sqoop.metastore.cleint 背后反映出sqoop运行的哪些原理
- sqoop 是否支持分布式,有没有必要
9. Flume 1.9.0 20210807
简单资料
flume 可以接收文本类对象(服务器日志、json等可按行拆开,每行数据/消息称为 Event) , 将数据传输到 不同类型的存储中。 有点类似kafka, 侧重点是数据能直接写入各种类型的存储组件,hive,hbase等,无需要额外编程。 个人认为一句话总结, flume就是一个适配器, 适配文本类型的数据与 各种不同类型的数据存储。
http://flume.apache.org/index.html
https://github.com/apache/flume
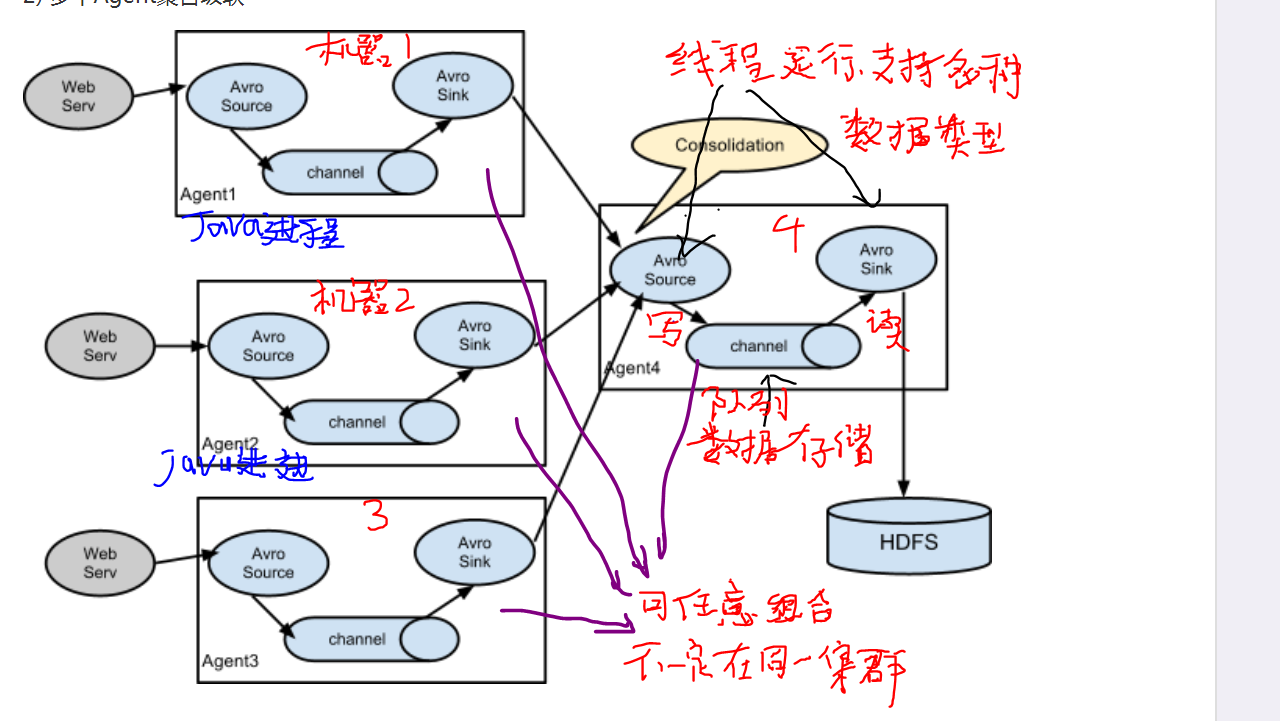
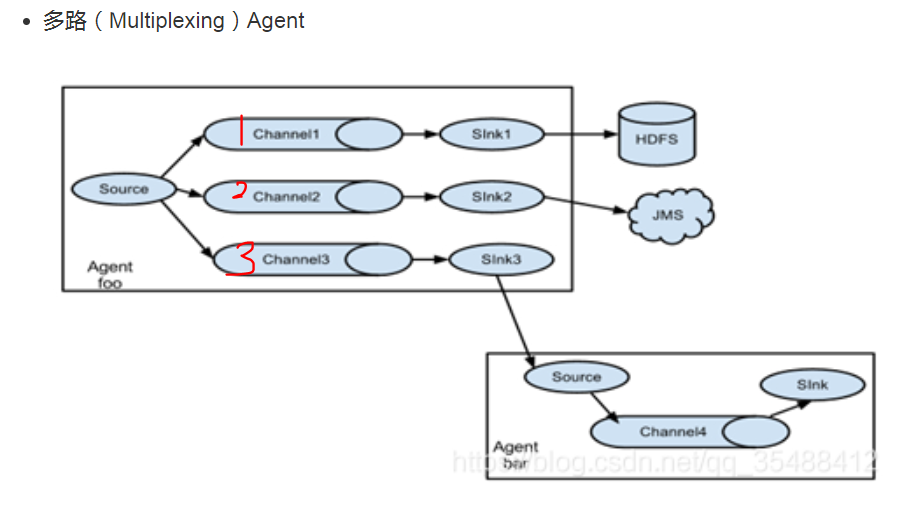
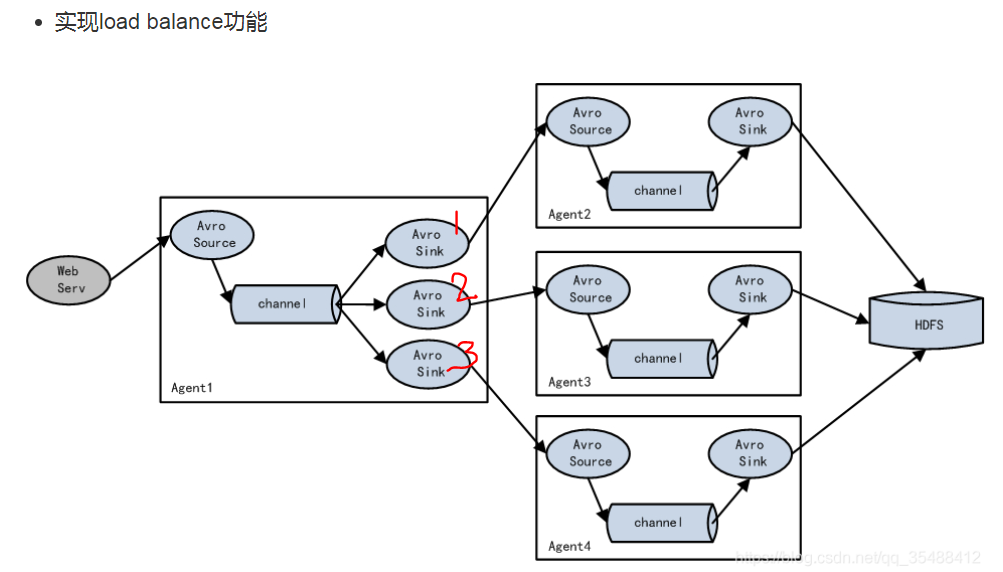
总结说明
- 一般一台机器上 启动一个Flume进程,名叫 Agent,从上游接收消息并发送到下游
- 虽然部署在多台机器上,不像其他 大数据组件, 都部署在同一个集群上(专门用来装某个分布式组件)。
- 虽然是分布式的,但是没有主节点, 各个机器上的程序 只简单存在上下游的关系。 每个机器上的flume配置很可能各不一样,不像其他分布式组件的配置都一样。
- 对 容灾支持不好。
- 如果 需要把一份文件传到另外一个地方的hbase, 用kafak集群的话, 需要编写一个特别的消费者,从集群读取信息并写入hbase,但是用Flume就不需要额外编程。 还有一个共同点,都是数据传输,不支持写业务逻辑进去。
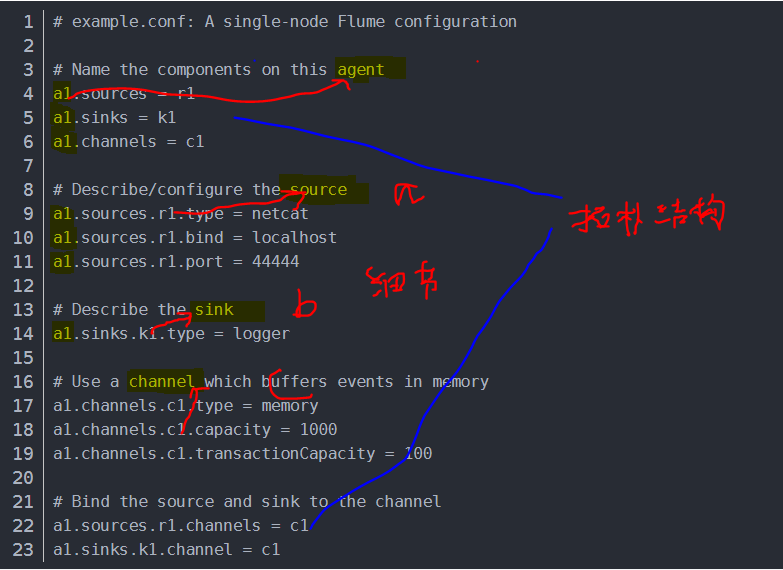
- 一个Agent进程内部的 source、changel、sink 每个组件可能有多个, 它们的连接关系构成了拓扑图
- source负责接收数据,相对上游的发送数据程序, 它可能是服务器端程序,监听端口。 sink 负责发送数据,相对下游的服务器接收程序,它是客户端程序。
更多资料参考
- "Flume整体架构总结, 山森海子, 2017/11/09"
- "flume1.8 基础架构介绍(一), 牧梦者 , 2017/12/31"
- "01_Flume基本架构及原理, shayzhang , 2016/11/08" noets: 里面有一个实际的应用场景,值得学习
前置
- jdk 1.8 (必须)
注意: flume和hadoop,大数据没有必然联系,不玩那些,flume也可能用到。
下载和解压
从官网下载 http://flume.apache.org/download.html ,最新的版本是 2019年1月发布的 1.9.0
win 下载 并上传到Linux.
解压并移动到安装目录下
tar -zxvf apache-flume-1.9.0-bin.tar.gz
sudo mv apache-flume-1.9.0-bin /opt
查看一下一级目录结构
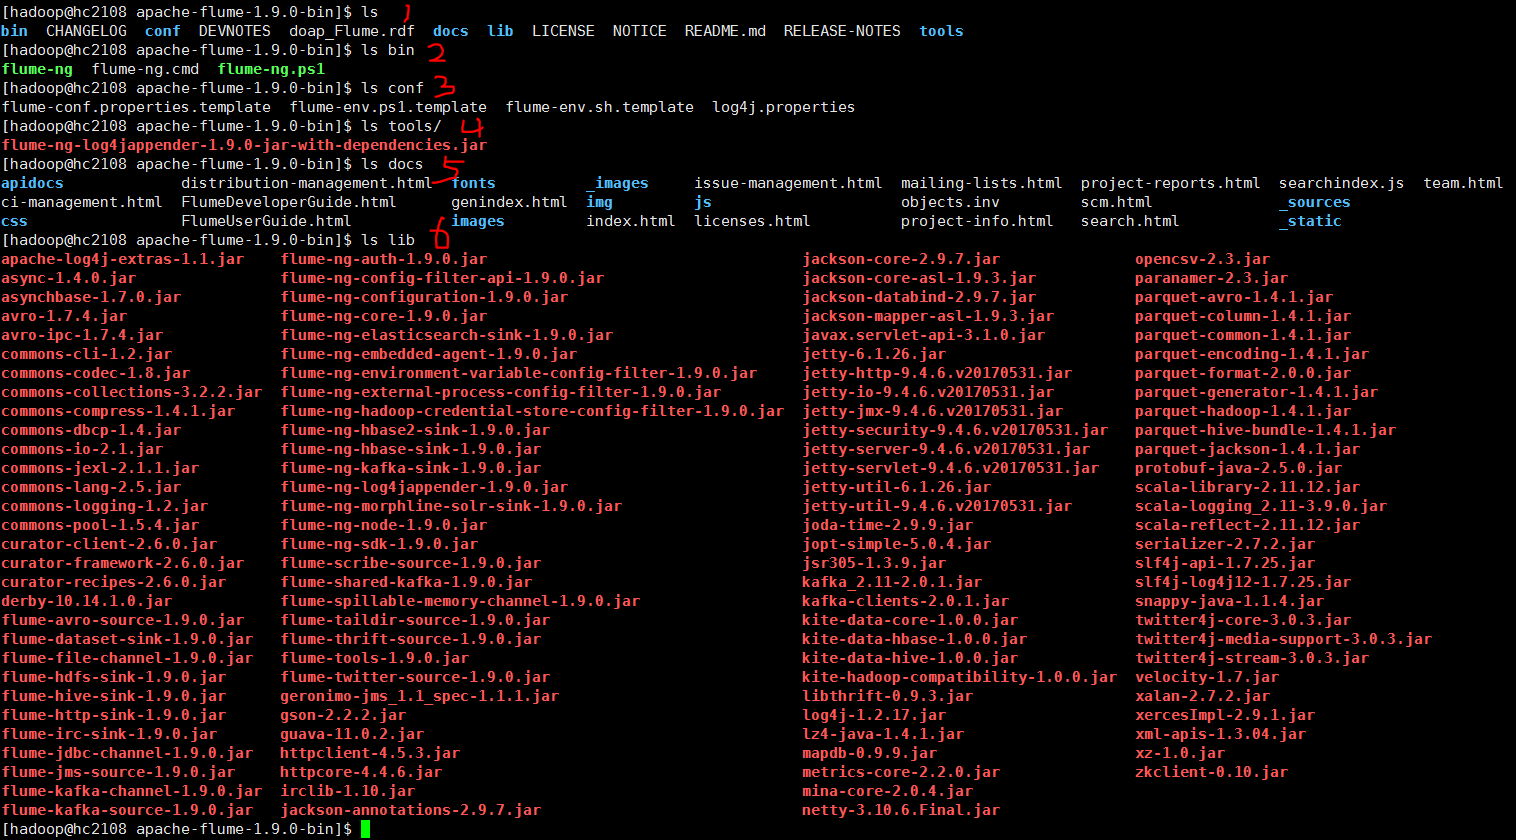
参数配置
除了配置环境变量外。 基本没有通用的参数配置。 需要在实际使用中根据具体场景,配置 从哪里获取数据,channel是什么,数据存放哪里。
/etc/profile
### flume
export FLUME_HOME=/opt/apache-flume-1.9.0-bin
export PATH=$PATH:${FLUME_HOME}/bin
默认配置文件如下, 结合简单资料 配置好的一个Agent,可以熟悉如何使用

启动和检验
直接依照(务必点击进去) ref1 "Flume应用实战——Flume安装及简单使用, 我是干勾鱼 , 2018/08/07"/ 3测试实例/实例1 执行。
补充

这里soruce是一个服务器监听网络端口的程序,等待客户端程序连接并发送数据。
相关命令
# 版本验证
flume-ng version

# 帮助
flume-ng help

cd  /opt/apache-flume-1.9.0-bin

# 读取配置文件,启动一个agent
./bin/flume-ng agent --conf conf --conf-file conf/flume-conf.properties.example --name a1 -Dflume.root.logger=INFO,console

telnet localhost 44444
参考
- disk 20210807_大数据_伪分布式_flume安装.txt
- ref2 "Flume安装及简单部署, 阳光奶爸 , 2016/09/08"
8. Flink 1.13.2 20210806
简单资料
Flink工具主要由java编写的分布式数据处理程序,其类似spark, 支持流批一体化, 支持SQL, SCALA, JAVA 编写业务逻辑,架构如下。
官网和github路径如下 https://github.com/apache/flink https://flink.apache.org
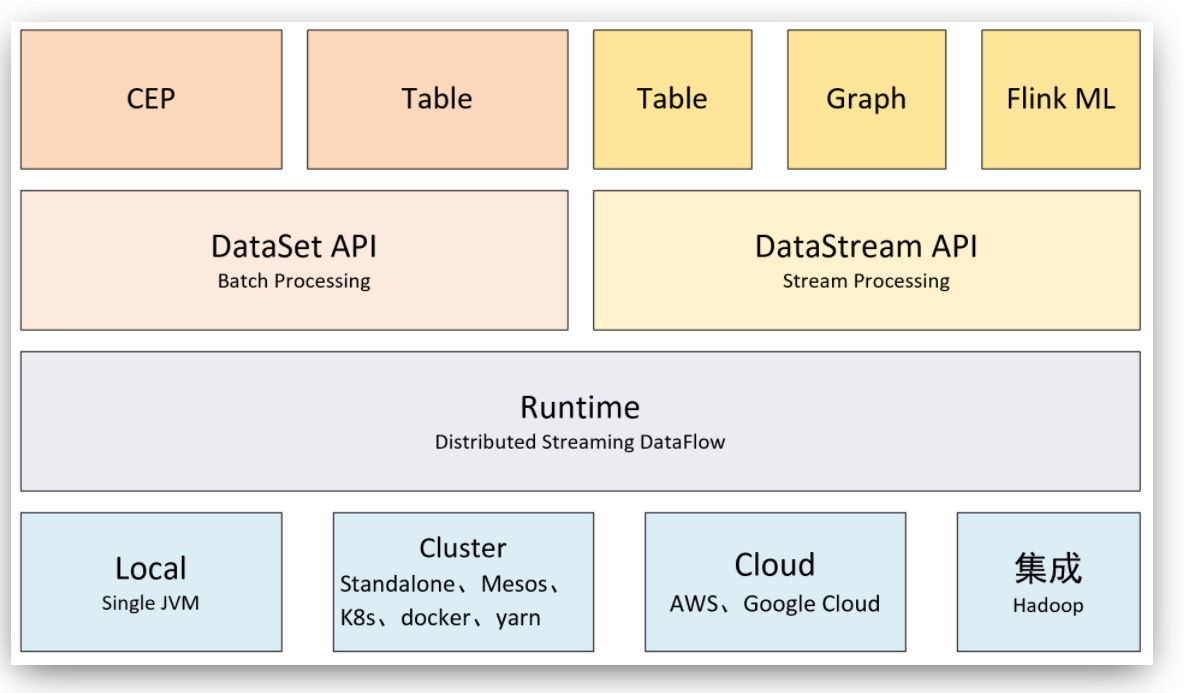
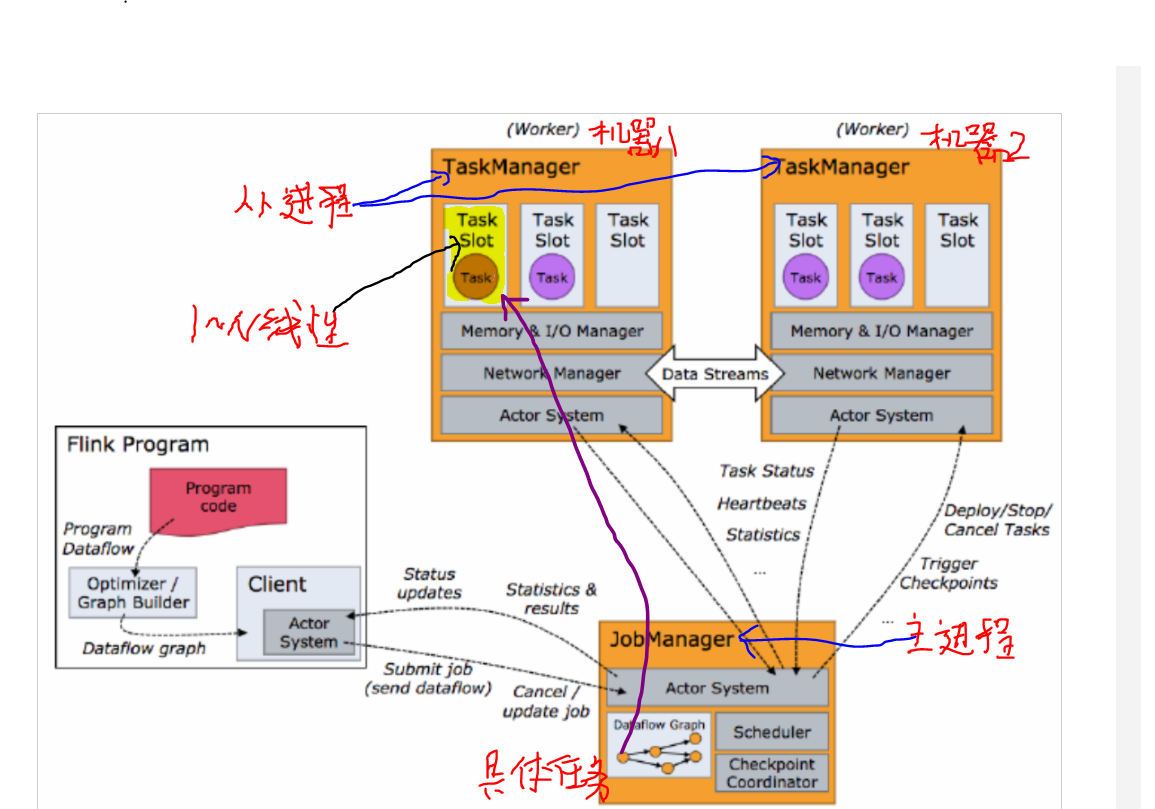
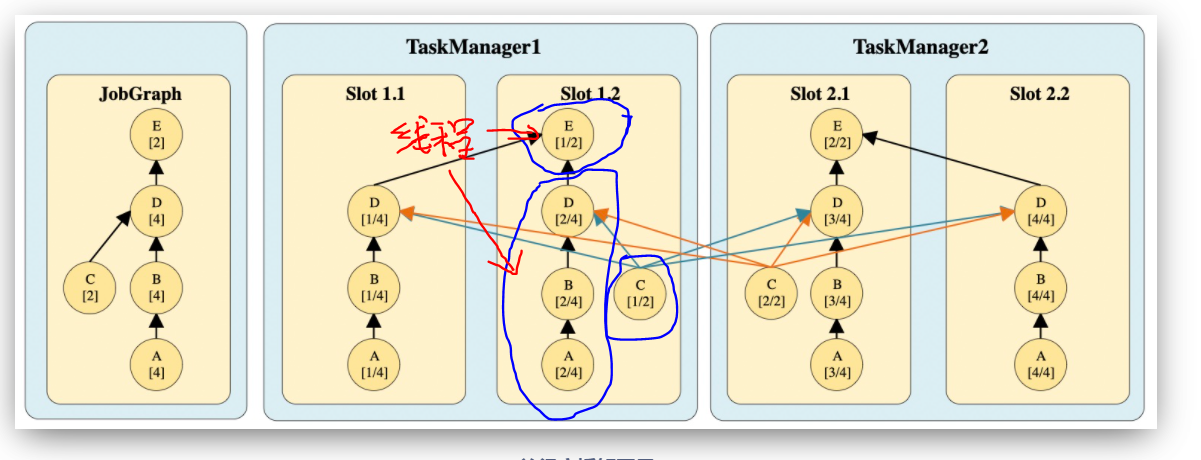
注意点:
- TaskManager进程在从节点上,既是常驻进程,也是执行具体用户业务程序的地方。通过分配slot资源,启动线程执行 task。 不像storm,从节点运行常驻进程supervior, 如果有用户业务持续提交,会启动一个新的进程worker 去执行程序业务部分。
- 正常情况,一台机器启动 一个TaskManager进程, 将机器上的资源平均分配给多个slot, 有客户端提交程序时, 每个solt 上可以运行多个线程,每个线程运行多个task。
- 同一个TaskMansger进程可能 同时执行多个不同的用户程序部分单元。 不确定 会不会相互影响稳定性。
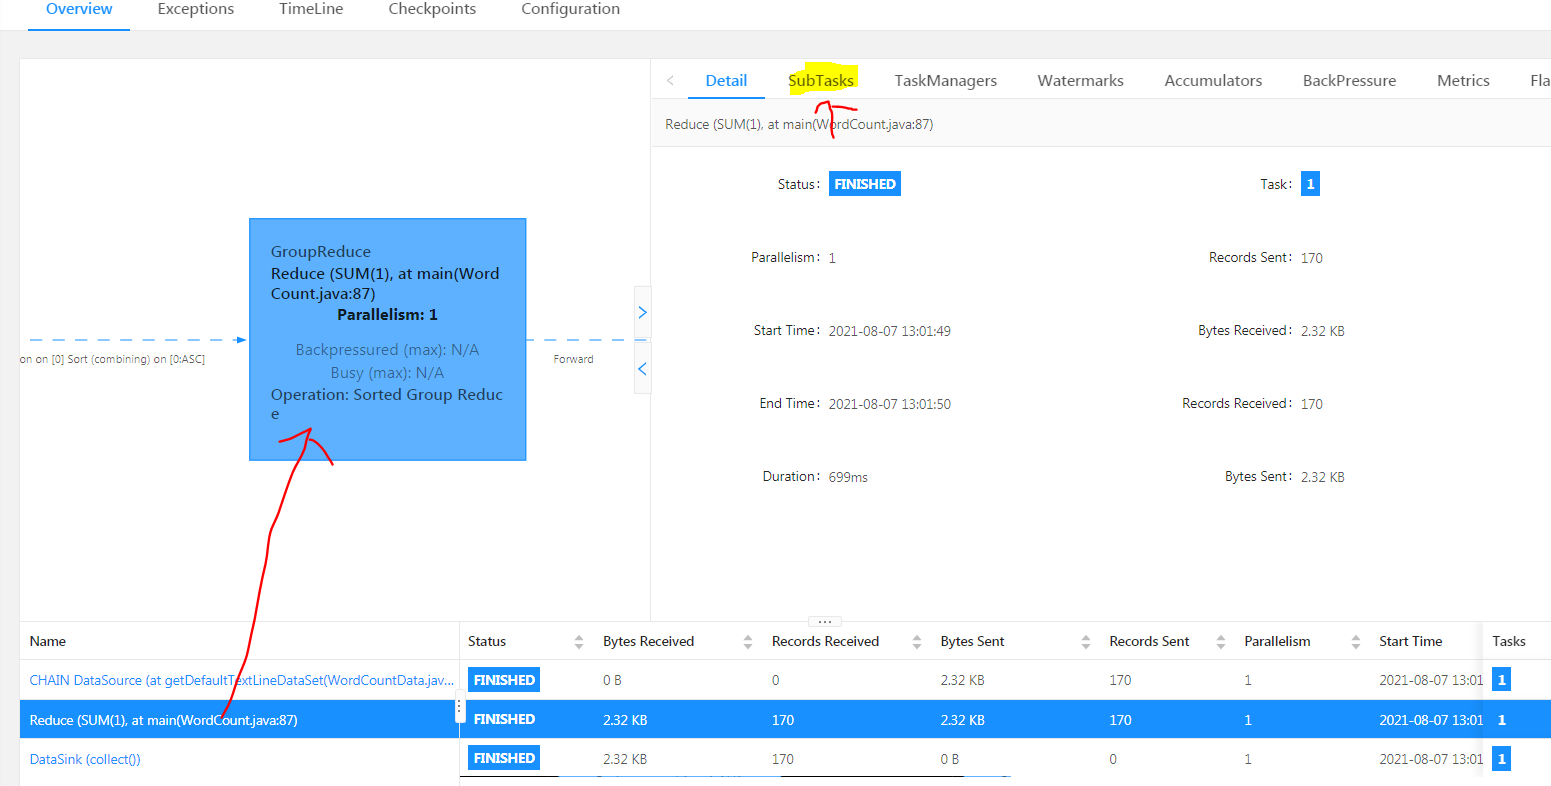
- 一个程序由若干操作根据先后依赖组成toplogy, 执行时, 每个操作可能会在集群机器上并发同时执行, 每个操作的每个并发称为一个sub-task,每个操作也称为task, sub-task有时也称为task, 注意在具体上下文中识别概念。
更多资料参考:
- flink 官网 https://ci.apache.org/projects/flink/flink-docs-release-1.13/zh/
- "Flink运行架构,「miraitowa,2020/09/29"
- "(转)Flink系列 4. 架构与组件介绍,hnbian,2020/05/05"
- "flink solt和并行度, 香山上的麻雀, 2019/05/27"
- "Flink架构(一)- 系统架构, ZacksTang, 2019/05/27"
前置
- jdk , 这里最低版本1.8, 必须
standlone 无需hadoop。 也无需安装scala。
下载和解压
从下载页面 https://flink.apache.org/downloads.html 找到最新的 稳定版,这里是 1.13.2
win下载,winscp上传到Linuux , 解压并移动到安装目录 /opt
tar -zxvf flink-1.13.2-bin-scala_2.12.tgz
sudo mv flink-1.13.2 /opt
一级目录下的内容如下

参数配置
使用默认配置
单机standlone 使用 flink默认参数。这里不做任何改动
附上 主要配置文件的默认内容。

  1 #==============================================================================
  2 # Common
  3 #==============================================================================
  4
  5 # The external address of the host on which the JobManager runs and can be
  6 # reached by the TaskManagers and any clients which want to connect. This setting
  7 # is only used in Standalone mode and may be overwritten on the JobManager side
  8 # by specifying the --host <hostname> parameter of the bin/jobmanager.sh executable.
  9 # In high availability mode, if you use the bin/start-cluster.sh script and setup
 10 # the conf/masters file, this will be taken care of automatically. Yarn/Mesos
 11 # automatically configure the host name based on the hostname of the node where the
 12 # JobManager runs.
 13
 14 jobmanager.rpc.address: localhost
 15
 16 # The RPC port where the JobManager is reachable.
 17
 18 jobmanager.rpc.port: 6123
 19
 20
 21 # The total process memory size for the JobManager.
 22 #
 23 # Note this accounts for all memory usage within the JobManager process, including JVM metaspace and other overhead.
 24
 25 jobmanager.memory.process.size: 1600m
 26
 27
 28 # The total process memory size for the TaskManager.
 29 #
 30 # Note this accounts for all memory usage within the TaskManager process, including JVM metaspace and other overhead.
 31
 32 taskmanager.memory.process.size: 1728m
 33
 34 # To exclude JVM metaspace and overhead, please, use total Flink memory size instead of 'taskmanager.memory.process.size'.
 35 # It is not recommended to set both 'taskmanager.memory.process.size' and Flink memory.
 36 #
 37 # taskmanager.memory.flink.size: 1280m
 38
 39 # The number of task slots that each TaskManager offers. Each slot runs one parallel pipeline.
 40
 41 taskmanager.numberOfTaskSlots: 1
 42
 43 # The parallelism used for programs that did not specify and other parallelism.
 44
 45 parallelism.default: 1
 46
 47 # The default file system scheme and authority.
 48 #
 49 # By default file paths without scheme are interpreted relative to the local
 50 # root file system 'file:///'. Use this to override the default and interpret
 51 # relative paths relative to a different file system,
 52 # for example 'hdfs://mynamenode:12345'
 53 #
 54 # fs.default-scheme
 55
 56 #==============================================================================
 57 # High Availability
 58 #==============================================================================
 59
 60 # The high-availability mode. Possible options are 'NONE' or 'zookeeper'.
 61 #
 62 # high-availability: zookeeper
 63
 64 # The path where metadata for master recovery is persisted. While ZooKeeper stores
 65 # the small ground truth for checkpoint and leader election, this location stores
 66 # the larger objects, like persisted dataflow graphs.
 67 #
 68 # Must be a durable file system that is accessible from all nodes
 69 # (like HDFS, S3, Ceph, nfs, ...)
 70 #
 71 # high-availability.storageDir: hdfs:///flink/ha/
 72
 73 # The list of ZooKeeper quorum peers that coordinate the high-availability
 74 # setup. This must be a list of the form:
 75 # "host1:clientPort,host2:clientPort,..." (default clientPort: 2181)
 76 #
 77 # high-availability.zookeeper.quorum: localhost:2181
 78
 79
 80 # ACL options are based on https://zookeeper.apache.org/doc/r3.1.2/zookeeperProgrammers.html#sc_BuiltinACLSchemes
 81 # It can be either "creator" (ZOO_CREATE_ALL_ACL) or "open" (ZOO_OPEN_ACL_UNSAFE)
 82 # The default value is "open" and it can be changed to "creator" if ZK security is enabled
 83 #
 84 # high-availability.zookeeper.client.acl: open
 85
 86 #==============================================================================
 87 # Fault tolerance and checkpointing
 88 #==============================================================================
 89
 90 # The backend that will be used to store operator state checkpoints if
 91 # checkpointing is enabled.
 92 #
 93 # Supported backends are 'jobmanager', 'filesystem', 'rocksdb', or the
 94 # <class-name-of-factory>.
 95 #
 96 # state.backend: filesystem
 97
 98 # Directory for checkpoints filesystem, when using any of the default bundled
 99 # state backends.
100 #
101 # state.checkpoints.dir: hdfs://namenode-host:port/flink-checkpoints
102
103 # Default target directory for savepoints, optional.
104 #
105 # state.savepoints.dir: hdfs://namenode-host:port/flink-savepoints
106
107 # Flag to enable/disable incremental checkpoints for backends that
108 # support incremental checkpoints (like the RocksDB state backend).
109 #
110 # state.backend.incremental: false
111
112 # The failover strategy, i.e., how the job computation recovers from task failures.
113 # Only restart tasks that may have been affected by the task failure, which typically includes
114 # downstream tasks and potentially upstream tasks if their produced data is no longer available for consumption.
115
116 jobmanager.execution.failover-strategy: region
117
118 #==============================================================================
119 # Rest & web frontend
120 #==============================================================================
121
122 # The port to which the REST client connects to. If rest.bind-port has
123 # not been specified, then the server will bind to this port as well.
124 #
125 #rest.port: 8081
126
127 # The address to which the REST client will connect to
128 #
129 #rest.address: 0.0.0.0
130
131 # Port range for the REST and web server to bind to.
132 #
133 #rest.bind-port: 8080-8090
134
135 # The address that the REST & web server binds to
136 #
137 #rest.bind-address: 0.0.0.0
138
139 # Flag to specify whether job submission is enabled from the web-based
140 # runtime monitor. Uncomment to disable.
141
142 #web.submit.enable: false
143
144 #==============================================================================
145 # Advanced
146 #==============================================================================
147
148 # Override the directories for temporary files. If not specified, the
149 # system-specific Java temporary directory (java.io.tmpdir property) is taken.
150 #
151 # For framework setups on Yarn or Mesos, Flink will automatically pick up the
152 # containers' temp directories without any need for configuration.
153 #
154 # Add a delimited list for multiple directories, using the system directory
155 # delimiter (colon ':' on unix) or a comma, e.g.:
156 #     /data1/tmp:/data2/tmp:/data3/tmp
157 #
158 # Note: Each directory entry is read from and written to by a different I/O
159 # thread. You can include the same directory multiple times in order to create
160 # multiple I/O threads against that directory. This is for example relevant for
161 # high-throughput RAIDs.
162 #
163 # io.tmp.dirs: /tmp
164
165 # The classloading resolve order. Possible values are 'child-first' (Flink's default)
166 # and 'parent-first' (Java's default).
167 #
168 # Child first classloading allows users to use different dependency/library
169 # versions in their application than those in the classpath. Switching back
170 # to 'parent-first' may help with debugging dependency issues.
171 #
172 # classloader.resolve-order: child-first
173
174 # The amount of memory going to the network stack. These numbers usually need
175 # no tuning. Adjusting them may be necessary in case of an "Insufficient number
176 # of network buffers" error. The default min is 64MB, the default max is 1GB.
177 #
178 # taskmanager.memory.network.fraction: 0.1
179 # taskmanager.memory.network.min: 64mb
180 # taskmanager.memory.network.max: 1gb
181
182 #==============================================================================
183 # Flink Cluster Security Configuration
184 #==============================================================================
185
186 # Kerberos authentication for various components - Hadoop, ZooKeeper, and connectors -
187 # may be enabled in four steps:
188 # 1. configure the local krb5.conf file
189 # 2. provide Kerberos credentials (either a keytab or a ticket cache w/ kinit)
190 # 3. make the credentials available to various JAAS login contexts
191 # 4. configure the connector to use JAAS/SASL
192
193 # The below configure how Kerberos credentials are provided. A keytab will be used instead of
194 # a ticket cache if the keytab path and principal are set.
195
196 # security.kerberos.login.use-ticket-cache: true
197 # security.kerberos.login.keytab: /path/to/kerberos/keytab
198 # security.kerberos.login.principal: flink-user
199
200 # The configuration below defines which JAAS login contexts
201
202 # security.kerberos.login.contexts: Client,KafkaClient
203
204 #==============================================================================
205 # ZK Security Configuration
206 #==============================================================================
207
208 # Below configurations are applicable if ZK ensemble is configured for security
209
210 # Override below configuration to provide custom ZK service name if configured
211 # zookeeper.sasl.service-name: zookeeper
212
213 # The configuration below must match one of the values set in "security.kerberos.login.contexts"
214 # zookeeper.sasl.login-context-name: Client
215
216 #==============================================================================
217 # HistoryServer
218 #==============================================================================
219
220 # The HistoryServer is started and stopped via bin/historyserver.sh (start|stop)
221
222 # Directory to upload completed jobs to. Add this directory to the list of
223 # monitored directories of the HistoryServer as well (see below).
224 #jobmanager.archive.fs.dir: hdfs:///completed-jobs/
225
226 # The address under which the web-based HistoryServer listens.
227 #historyserver.web.address: 0.0.0.0
228
229 # The port under which the web-based HistoryServer listens.
230 #historyserver.web.port: 8082
231
232 # Comma separated list of directories to monitor for completed jobs.
233 #historyserver.archive.fs.dir: hdfs:///completed-jobs/
234
235 # Interval in milliseconds for refreshing the monitored directories.
236 #historyserver.archive.fs.refresh-interval: 10000
更详细的 参数配置和参数介绍,在后续b0105 安装分布式standlone时。
/etc/profile
### flink
export FLINK_HOME=/opt/flink-1.13.2
export PATH=$PATH:${FLINK_HOME}/bin
添加路径到环境变量,执行source生效
启动和检验
1. 启动flink
命令行执行
start-cluster.sh

2 web查看集群运行状态
登录web健康页面查看情况
http://hc2108:8081
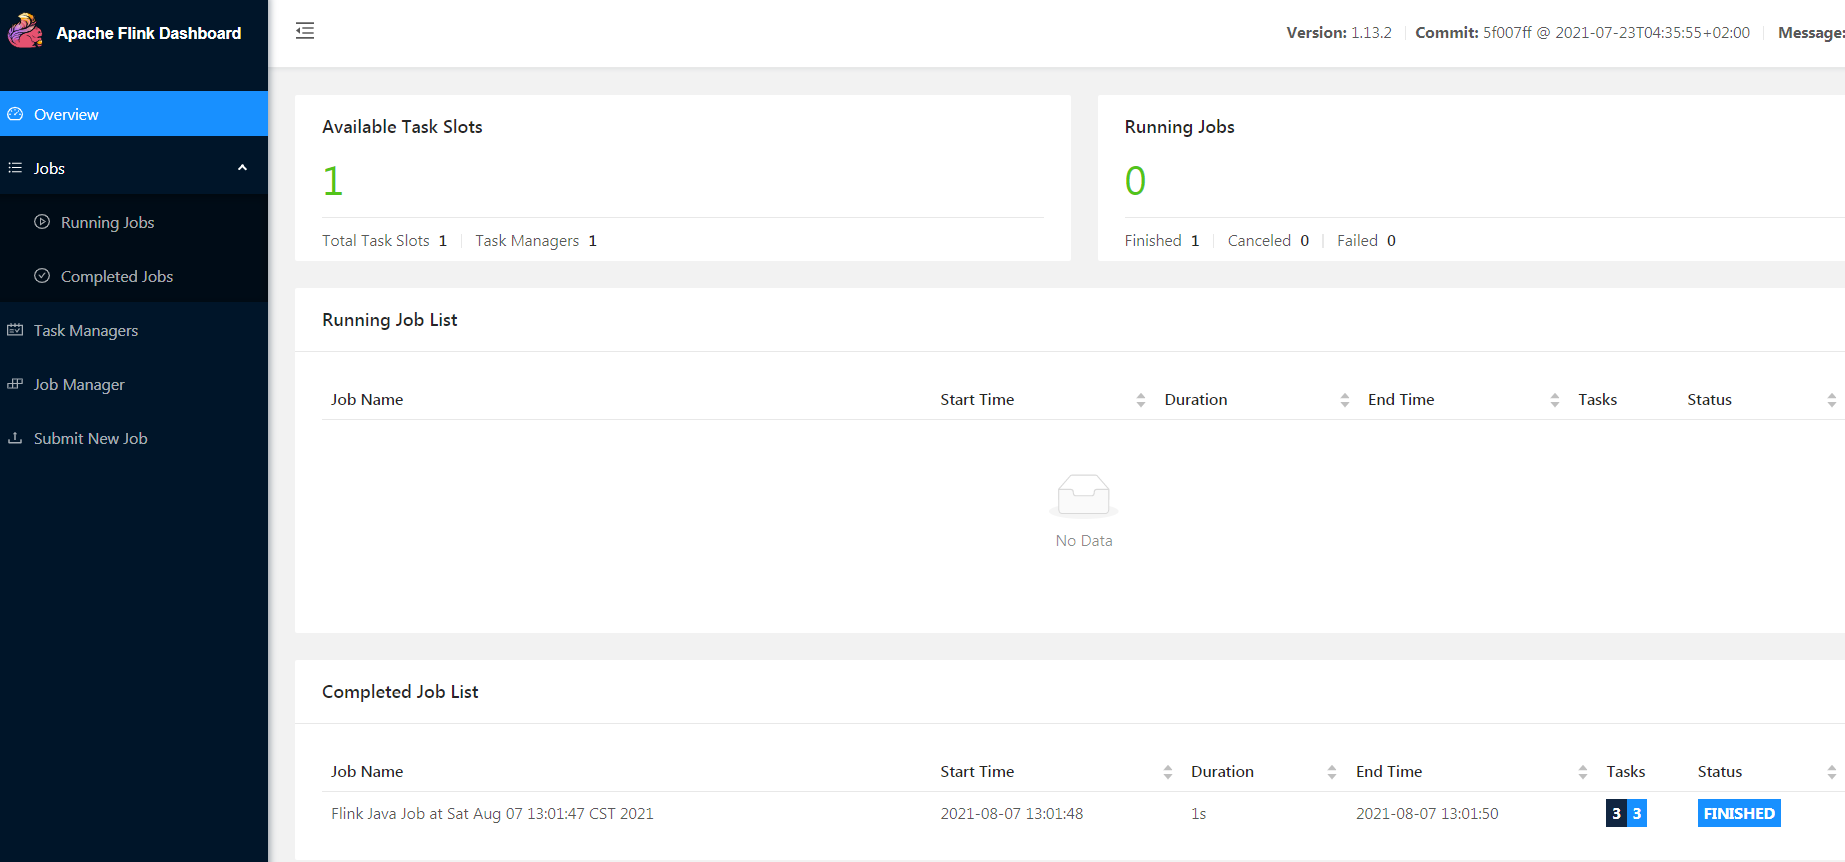

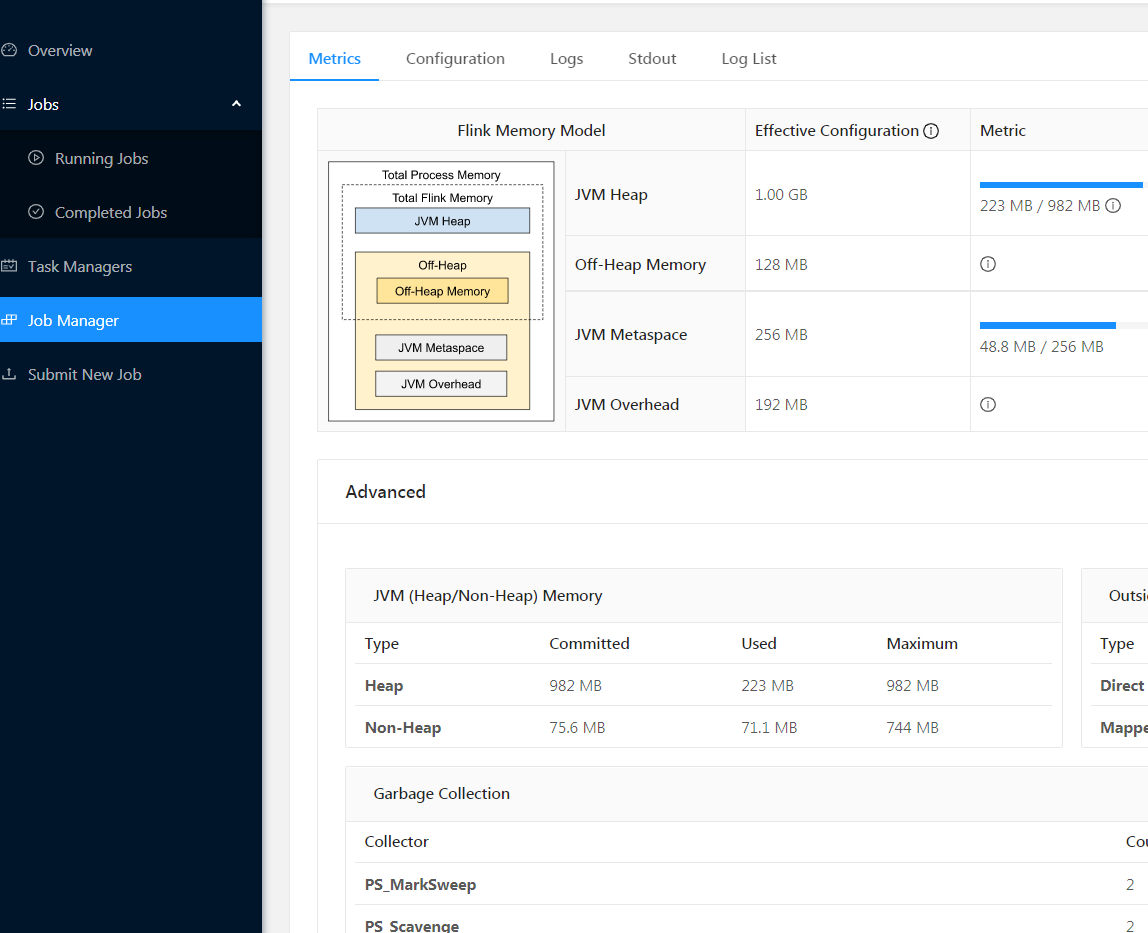
3 执行程序
执行批处理 wordcount 的例子,如下命令
flink run $FLINK_HOME/examples/batch/WordCount.jar


参考
- disk 20210807_大数据_伪分布式_flink安装.txt
- ref1 "Flink的安装及案例, Going_sky, 2018/03/08"
- ref2 "Flink安装及使用, Ruthless, 2020/03/06"
7. Storm 2.2 20210805
简单资料
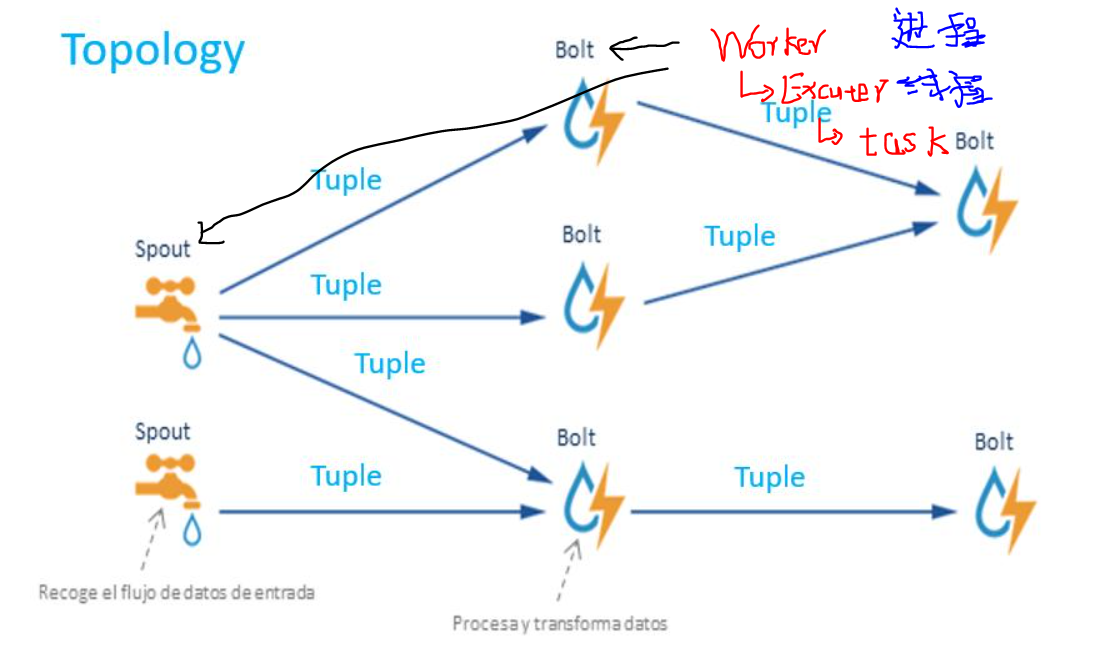
总结说明:
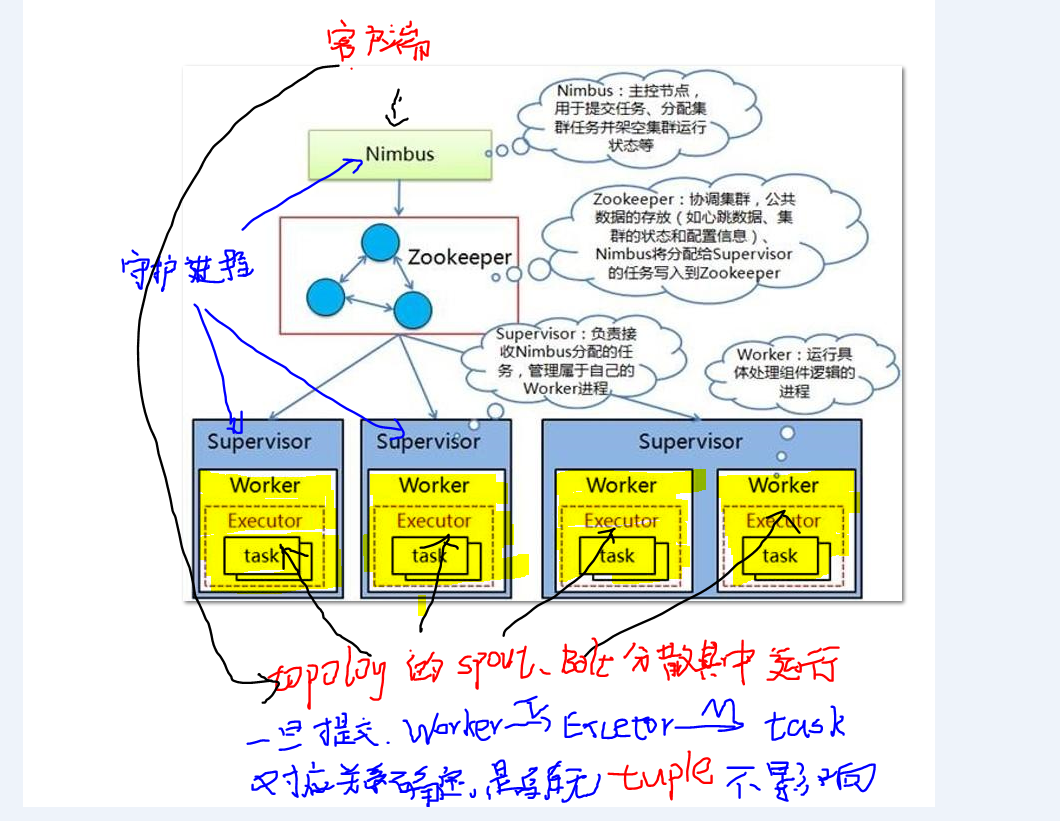
- 主从机器上的守护进程 Nimbus, Supervisor,类似YARN的 resoucemansger,nodemanasger, spark的master,worker。 重要区别,必须借助zookeeper, 主从守护进程不直接通信。
- 1个topology 是就是一个完整的,承载某个业务的storm程序,由若干spout和bolt组件组成, 组件都是程序员实现指定固定接口,并把业务逻辑实现的代码。 运行时在这些组件里流动的最小数据单元叫Tuple, 发送一个数据集,会产生多条tuple。 没有数据tuple时,topology空运行,等待数据的到来。
- 1个集群 可以运行多个topology,1个topology 会在集群机器中产生多个worker进程(分散不同机器上), worker可产生若干线程Executor,线程下产生若干task, 所有的spout和bolt分散在这些 Worker|Executor|Task 中并发运行。 1个worker只给1个topology使用.
- 每个spout、bolt 可以设置并发数量,所有 spout,bolt对应executor(线程),它的每个并发对应一个task。 理论上可以 在1个worker中运行所有的spout和bolt, 实现进程内的并非,显示storm的希望是实现集群机器之间的并发。 所以根据并发级别从大到小, 集群机器之间并发-> 单机器上的多进程并发 -> 单进程里的多线程并发 -> 单线程里的多任务(task)并发, 最后这种很少见,但是在storm里实现了,可以借鉴学习。
更多资料可以参考
- ref "Storm架构运行原理,小学僧丶Monk, 2020/03/23"
- ref "Storm架构与运行原理,一路前行1, 2017/08/13"
前置
- 安装zookeeper (必须)
- 安装jdk (必须)
下载和解压
登录storm 下载页面 http://storm.apache.org/downloads.html , 找到最新的版本, 这里是2.2.x
win 下载, winscp 上传到linux
解压并移动到安装目录/opt,命令如下
tar -zxvf apache-storm-2.2.0.tar.gz
sudo mv apache-storm-2.2.0 /opt
这里storm 安装包的 一级目录下的文件对象。 可以大概了解有什么功能。
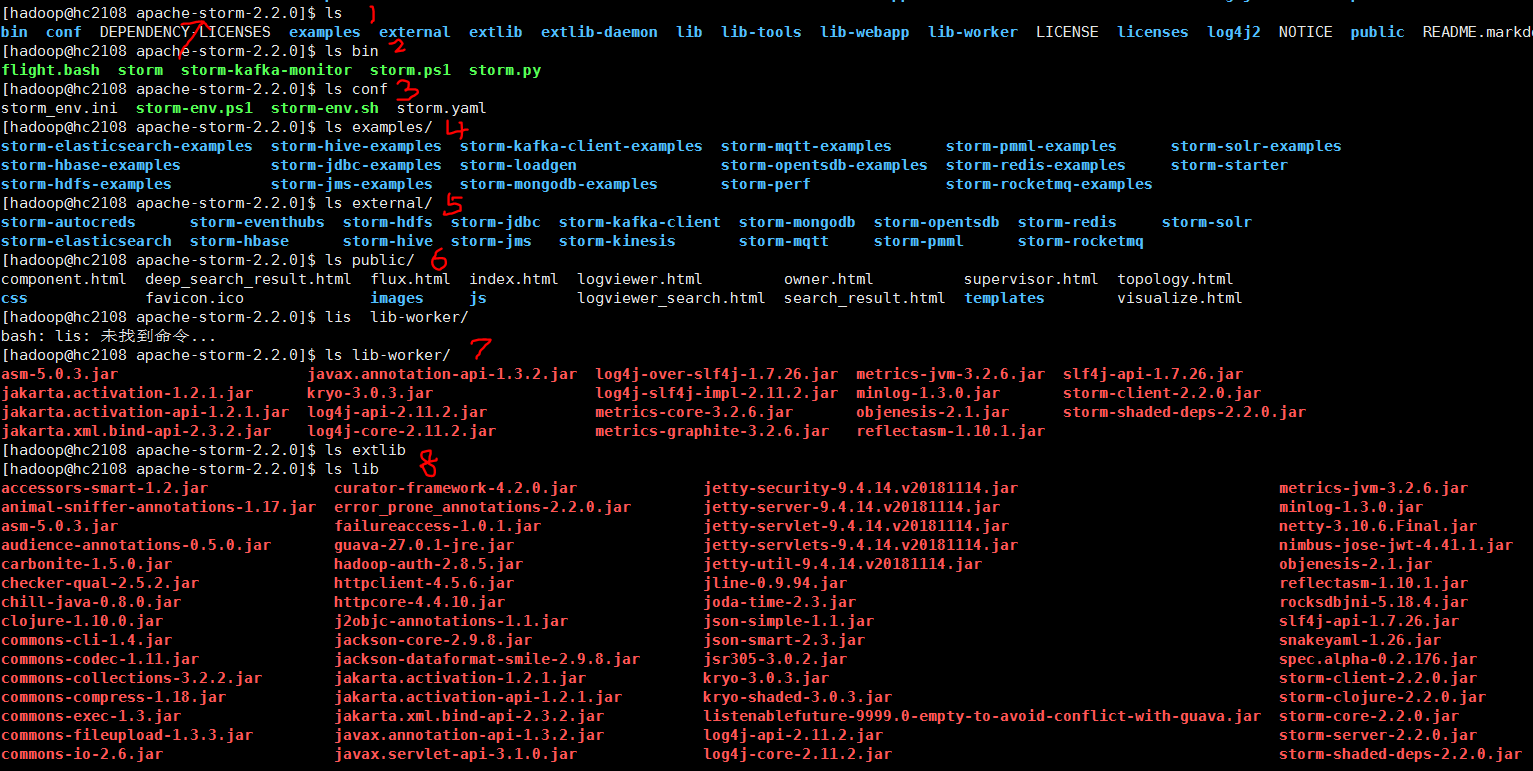
参数配置
storm.yaml
切换到配置文件目录 apache-storm-2.2.0/conf,给该文件添加以下信息
#所使用的zookeeper集群主机
storm.zookeeper.servers:
- "hc2108"
#nimbus所在的主机候选列表,实际会从中选一个
nimbus.seeds: ["hc2108"]
# 指定ui端口,以免被其他程序占用
ui.port: 8081
/etc/profile
### storm
export STORM_HOME=/opt/apache-storm-2.2.0
export PATH=$PATH:${STORM_HOME}/bin
添加,并source生效
启动和检验
1. 先启动 zookeepr,
zkServer.sh start
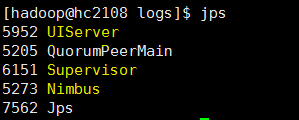
2 启动nimbus和ui , 可以jps查看进程是否起来, storm下会创建logs目录
nohup storm nimbus & 开启nimbus
nohup storm ui & 开启ui界面,通过web服务
3 启动supervisor
nohup storm supervisor &
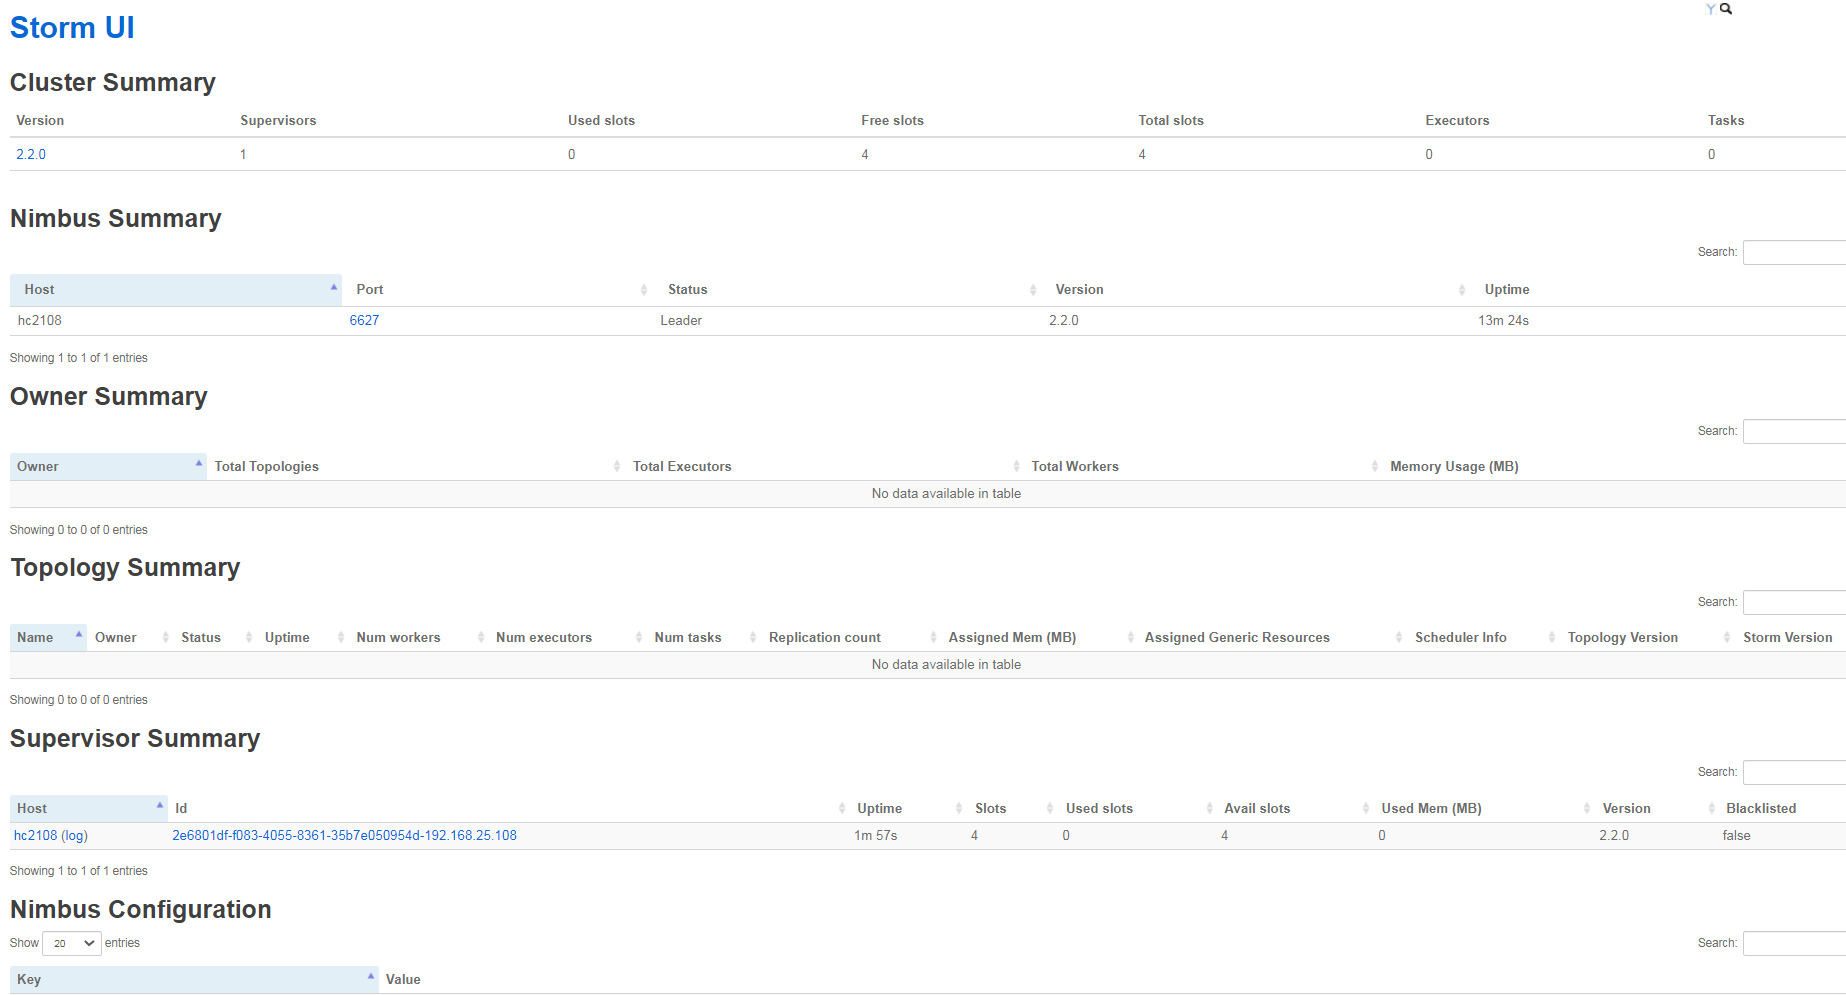
可以查看web端口 http://hc2108:8081,(默认8080,这里只参数中配置为8081端口了)
参考
- disk 20210805_大数据_伪分布式_storm安装.txt
- ref1 "Storm安装及使用, 山上有风景, 2020/03/16", notes:可关注该博客
- ref2 "storm之2:安装部署, jinhong_lu, 2015/06/16"
- ref3 "Strom2.1.0安装, eakom, 2020/03/21"
其他
接下来
- 由于没有现成程序jar包,接下来可以把mava装好,用来打包storm工程源代码,然后测试
6. Spark 3.1.2 20210804
简单资料
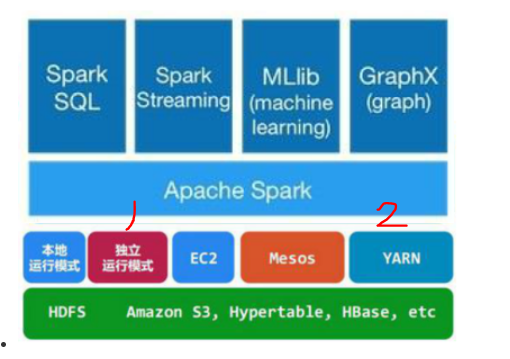
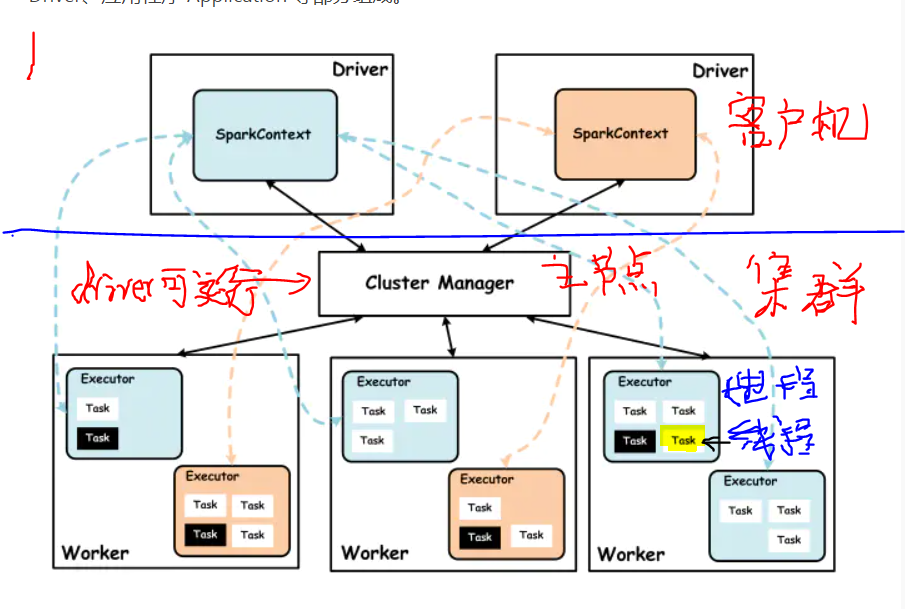
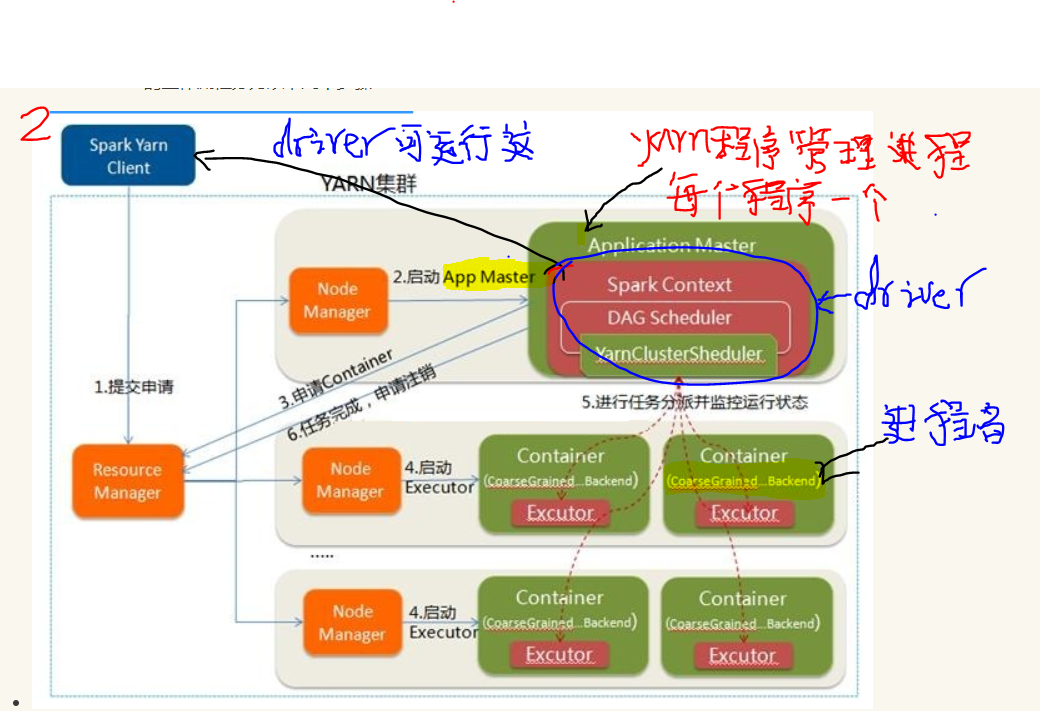
| 项 | spark | yarn |
| 管理节点, 常驻进程名 | master*1 | resourcemanager*1 |
| 干活节点, 常驻进程名 | worker*N, 每个机器启动一个 | nodemanger*N, 每个机器启动一个 |
| 执行分布式任务时, 管理进程以及运行节点 |
Driver*1 (Client、管理节点、干活节点(yarn模式)) |
XXAppMaster*1 干活节点 |
| 执行分布式任务时, 干活进程以及运行节点 |
execuer *M 干活节点 |
CoarseGrainedExecutorBackend(spark) *M 干活节点 |
更多资料参考
- "Spark学习(三): 基本架构及原理, 巷中人, 2019/05/07"
- "spark原理:概念与架构、工作机制, black_hnu, 2018/09/03"
- "Spark(一): 基本架构及原理, chenxiangxiang, 2018/04/22"
- "Spark 基本概念、模块和架构, w1992wishes, 2018/10/24"
前置
- 安装jdk (必须)
- 安装hadoop (必须)
注意: spark 由scala 编写,正常情况要安装这个编译工具,但是现在spark基本自带scala语言编译器,不用单独安装。
Spark的安装部署支持三种模式,standalone、spark on mesos和 spark on YARN ,本文主要安装standalone模式, 不过数据来源还是HDFS。
下载和解压
从下载 页面选一个与hadoop匹配的版本, 我这里选了最新的 3.1.2
http://spark.apache.org/downloads.html
win下下载,通过winscp上传, 解压并移动到安装目录 /opt,如下
tar -zxvf spark-3.1.2-bin-hadoop3.2.tgz
sudo mv spark-3.1.2-bin-hadoop3.2 /opt
spark安装包目录文件

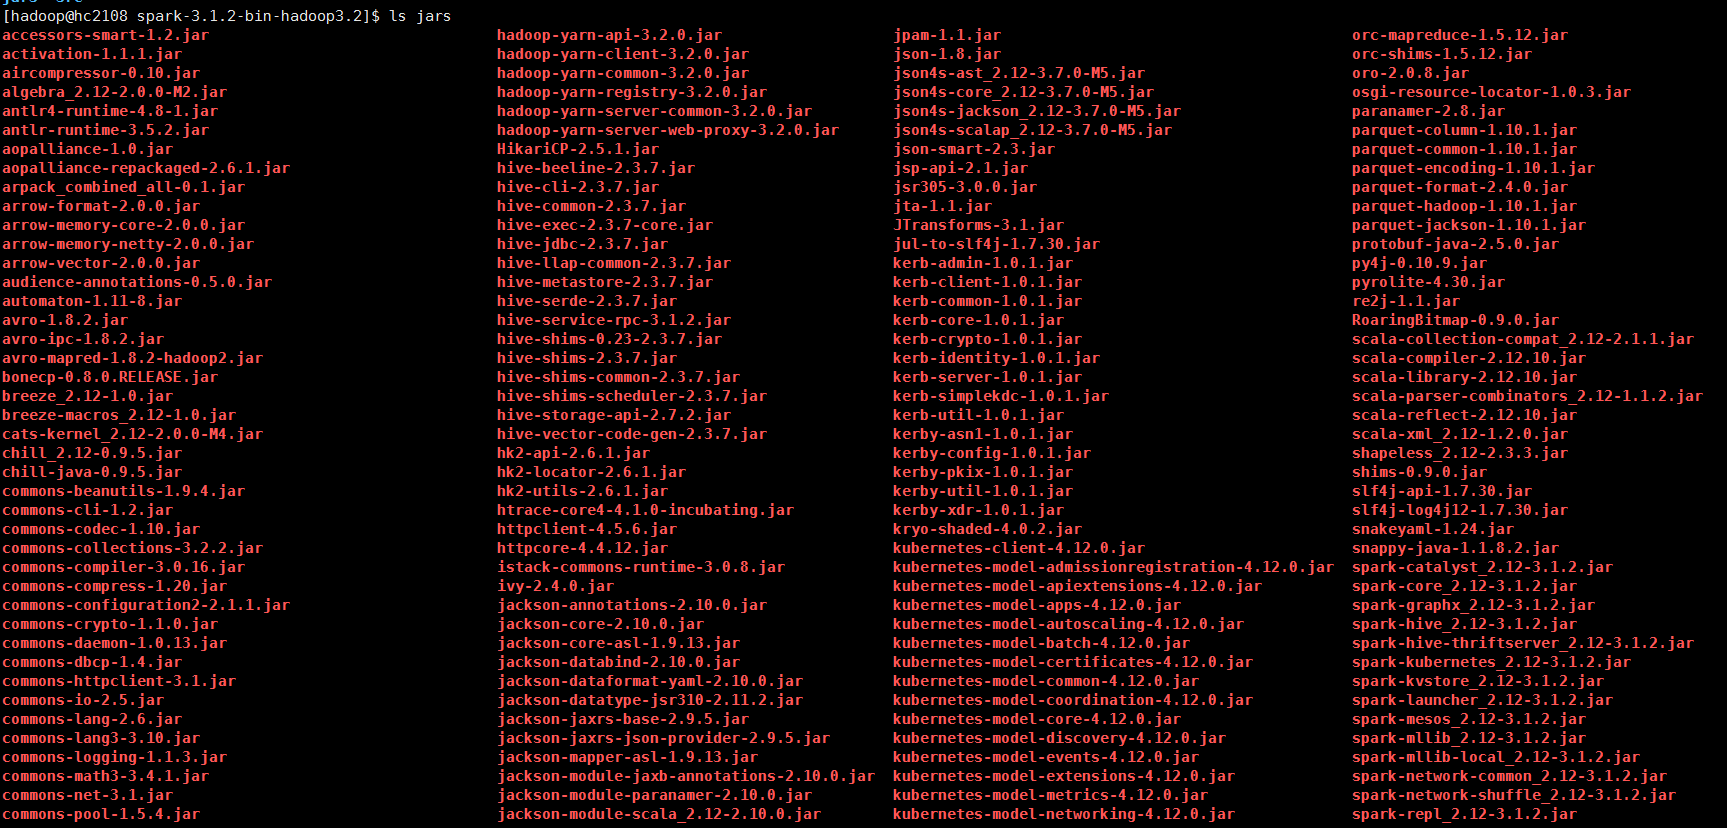
用到jars包/包含功能
从中可以看出,最新的spark 默认支持 和kubernetes、hive组件搭配使用

参数配置
spark-env.sh
进入 配置文件目录 spark-3.1.2-bin-hadoop3.2/conf, 从模板拷贝一份
cp spark-env.sh.template spark-env.sh
里面有很多描述各类参数用途的信息, 添加以下参数
### 通用参数
# jdk 位置
export JAVA_HOME=/opt/jdk1.8.0_301

### standalone 模式

# 指定master机器 和对外通信端口
export SPARK_MASTER_HOST=hc2108
export SPARK_MASTER_PORT=7077

# worker进程 占用资源
export SPARK_WORKER_MEMORY=1g
export SPARK_WORKER_CORES=2
export SPARK_WORKER_INSTANCES=1

### yarn 模式

# hadoop 位置
export HADOOP_HOME=/opt/hadoop-3.3.1
export HADOOP_CONF_DIR=/opt/hadoop-3.3.1/etc/hadoop

# spark 配置
export SPARK_CONF_DIR=/opt/spark-3.1.2-bin-hadoop3.2/conf
workers
在配置目录下,复制一个
cp workers.template workers
里面记录了 worker节点有哪些机器,默认值有localhost, 伪分布式下不需要改动。
/etc/profile
### spark
export SPARK_HOME=/opt/spark-3.1.2-bin-hadoop3.2
export PATH=$PATH:${SPARK_HOME}/bin:${SPARK_HOME}/sbin
添加spark路径信息, 并执行source生效
启动和检验
1. spark服务器程序启动
先后运行 start-master.sh, start-slaves.sh/start-workers.sh 启动主节点和从节点
可以执行 start-all.sh 一步到位,注意hadoop里面也有这个脚本

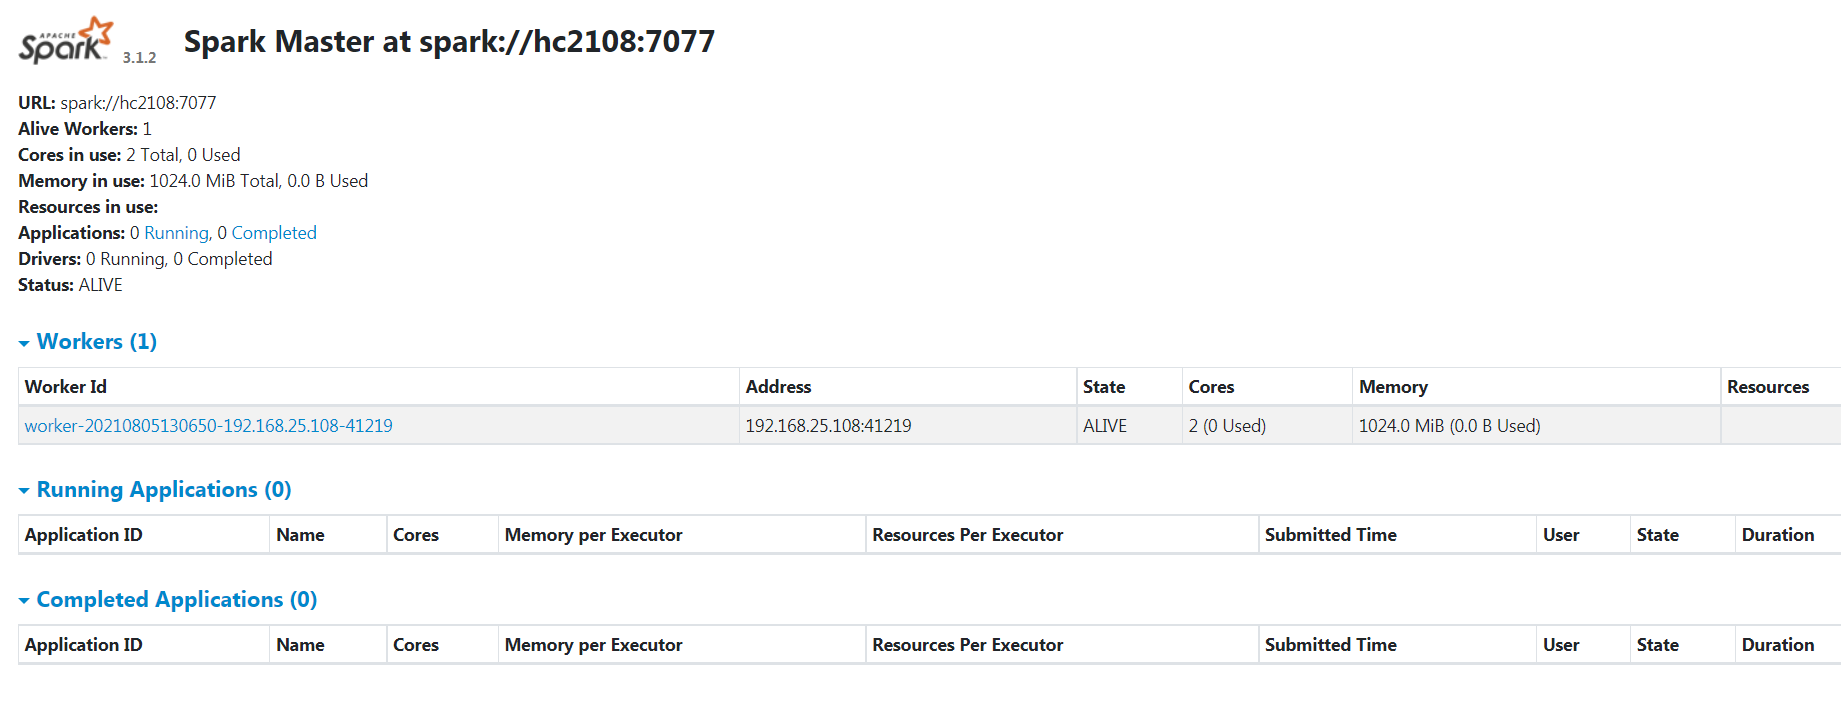
2 web端口查看
http://hc2108:8080/
3 spark shell测试
a. 在命令行执行 spark-shell, 如下, 注意 master=local 这是本地模式。 集群模式在后面测试
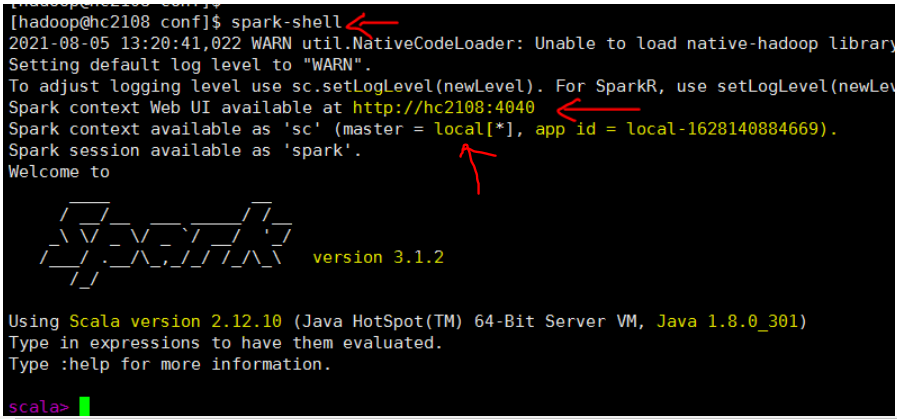
b 查看web http://hc2108:4040/


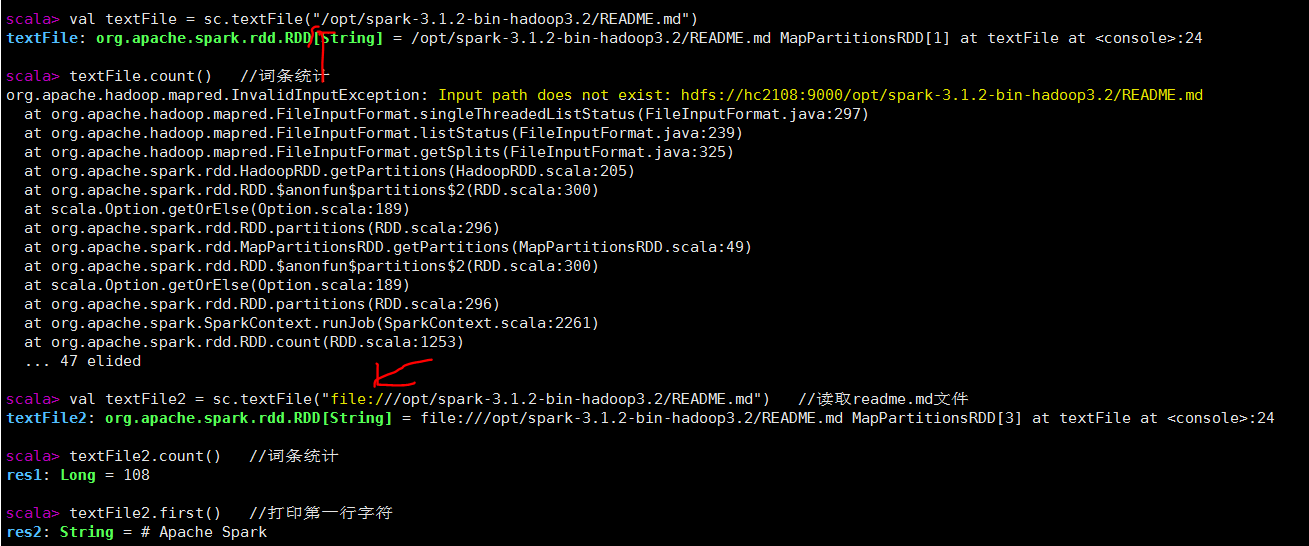
c 跑简单程序
在命令行执行以下代码
//读取readme.md文件, 实际上读取hdfs上的数据,没有提前创建,这一步没有报错
val textFile = sc.textFile("/opt/spark-3.1.2-bin-hadoop3.2/README.md")

textFile.count()   //词条统计,这一步报错

val textFile2 = sc.textFile("file:///opt/spark-3.1.2-bin-hadoop3.2/README.md")   //读取readme.md文件,linux上文件
textFile2.count()   //词条统计
textFile2.first()   //打印第一行字符

d 程序在集群执行模式
启动命令如下
spark-shell --master spark://hc2108:7077
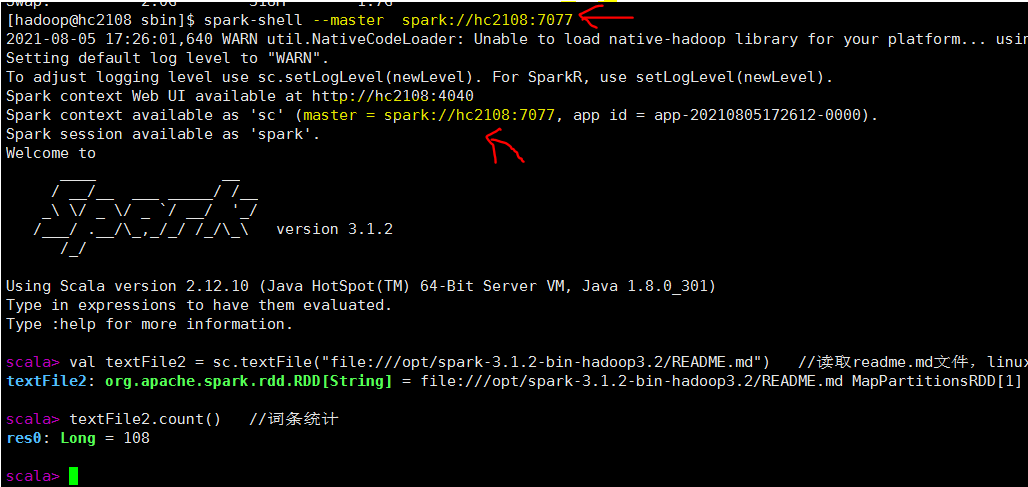
其他都一样,只是在集群web页面中可以看到程序
http://hc2108:8080/

参考
- disk 20210805_大数据_伪分布式_spark安装.txt
-
ref1 "Spark-3.1.1单机安装教程, 郭建華, 2021/05/04"
- ref2 "Spark3.1.2单机安装部署, 花菜回锅肉, 2021/07/08"
5. kafka 2.8 20210803
简单资料

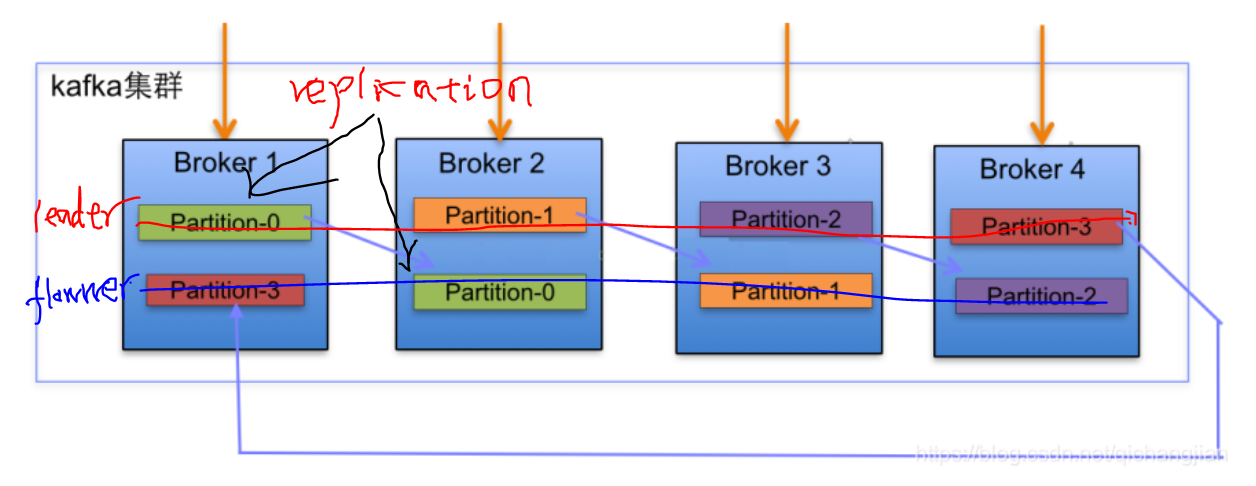
上面, 4台机器, 一个topic, 4个分区, 2个副本,对应创建命令如下:
kafka-topics.sh --create --zookeeper localhost:2181 --replication-factor 2 --partitions 4 --topic test1
分区和副本随topic变化的, 不同topic的分区数和副本数可以不一样。 经过实际测试, 分区数量可以超过集群机器数, 副本数量不能超过机器数。
当前4台机器同时能够并发进行消息传送, 假如机器1坏了,partion-0的leader节点会切换到机器2上, 机器2上有2个leader节点。 做到并发和容灾。
更多资料参考:
- ref "Kafka(一)Kafka的简介与架构,Frankdeng,2018/08/01"
- ref "Kafka底层原理架构, qichangjian, 2019/03/05"
- ref "Kafka架构图, Zarten, 2019/04/12"
- ref "Kafka基本架构及实战经验,皮皮杂谈,2019/04/01"
前置
- 已经安装jdk, 这里是1.8 (必须)
- 已经安装zookeeper (必须)
注意 kafka安装包 自带zookeeper组件,但是一般不用它
下载和解压
http://kafka.apache.org/downloads
从链接中找到最新的稳定版,这里是 2.8
win 下下载, winscp 上传到linux
执行下面命令解压移动到安装目录/opt下
tar -zxvf kafka_2.13-2.8.0.tgz
sudo mv  kafka_2.13-2.8.0 /opt
看一下解压包里,了解一下有哪些文件。

参数配置
server.properties
先在 kafka_2.13-2.8.0 创建 data目录,用来存储数据的,在kafka里称为日志消息。
切换到 kafka_2.13-2.8.0/config kafka_2.13-2.8.0/config 目录,找到这个文件,里面已经有很多参数了, 修改或添加以下几个 ,其他保持不变。
# 服务器监听端口
listeners=PLAINTEXT://hc2108:9092

#  消息的存放目录,这里看配置是日志的意思,因为kafka把消息使用日志的形式存储,所以这里不要和kafka的运行日志相混淆
log.dirs=/opt/kafka_2.13-2.8.0/data

# 消息的副本数量,这是kafka高可用、数据不丢失的关键
default.replication.factor=2
其他参数虽然不用改动,有几个重要的要知道
broker.id=0 # broker(集群中每个机器的叫法)的id或者编号,在集群中该编号必须唯一
num.partitions=1 # topic创建时默认分区的数量
log.retention.hours=168 # 消息保存的小时数, 这里168小时前的数据都会删除
zookeeper.connect=localhost:2181 # zookeeper服务器地址
/etc/profile
添加环境变量,并执行 source 生效
### kafka
export KAFKA_HOME=/opt/kafka_2.13-2.8.0/
export PATH=$PATH:${KAFKA_HOME}/bin
启动和检验
1 启动 zookeeper
zkServer.sh start
2. 启动kafka服务器
执行以下命令, 这是前端会话,会一直占用shell,但是方便查看结果
cd /opt/kafka_2.13-2.8.0
bin/kafka-server-start.sh config/server.properties
测试完后 真正启动时 可以这样运行 nohup ./kafka-server-start.sh ../config/server.properties &
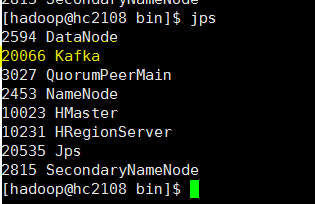

自动生成运行日志logs目录, 注意和 数据目录data区别,后者通过参数 log.dirs配置

3. 创建topic
kafka-topics.sh --bootstrap-server hc2108:9092 --create --topic testKafka

topic 查看
kafka-topics.sh --bootstrap-server hc2108:9092 --list
4. Producer和Consumer
分布打开连接hc2108的两个终端
在其中一个 执行消费者程度,另外一个程序发送者程序,并发送一些消息,整个过程可以在服务器进程shell查看日志变化
kafka-console-producer.sh --bootstrap-server hc2108:9092 --topic testKafka
kafka-console-consumer.sh --bootstrap-server hc2108:9092 --topic testKafka


5. 查看data目录


topic目录

带consumer的目录的文件

参考
- 20210803_大数据_伪分布式_kafka安装.txt
- ref1 "kafka 2.8.0 源码环境搭建,杨四正,2021/05/19"
- ref2 "kafka之二:手把手教你安装kafka2.8.0(绝对实用),北漂程序员,2021/06/06"
- ref3 "kafka单机安装2.8.0,凉城凉心凉忆悲, 2018/01/10"
后记
注意点
- kafka 自带zookeeper,但是不用它
- 命令行consumer、producer有 对应的参数文件,使用默认值也能运行程序
- 在1个机器节点上的kafka里创建的topic, 副本数量只能为1,分区数可以为2,超过机器数
待做
- kafka 带一个web接口查看,可以尝试用起来
4. hbase 2.3.6 20210803
简单资料
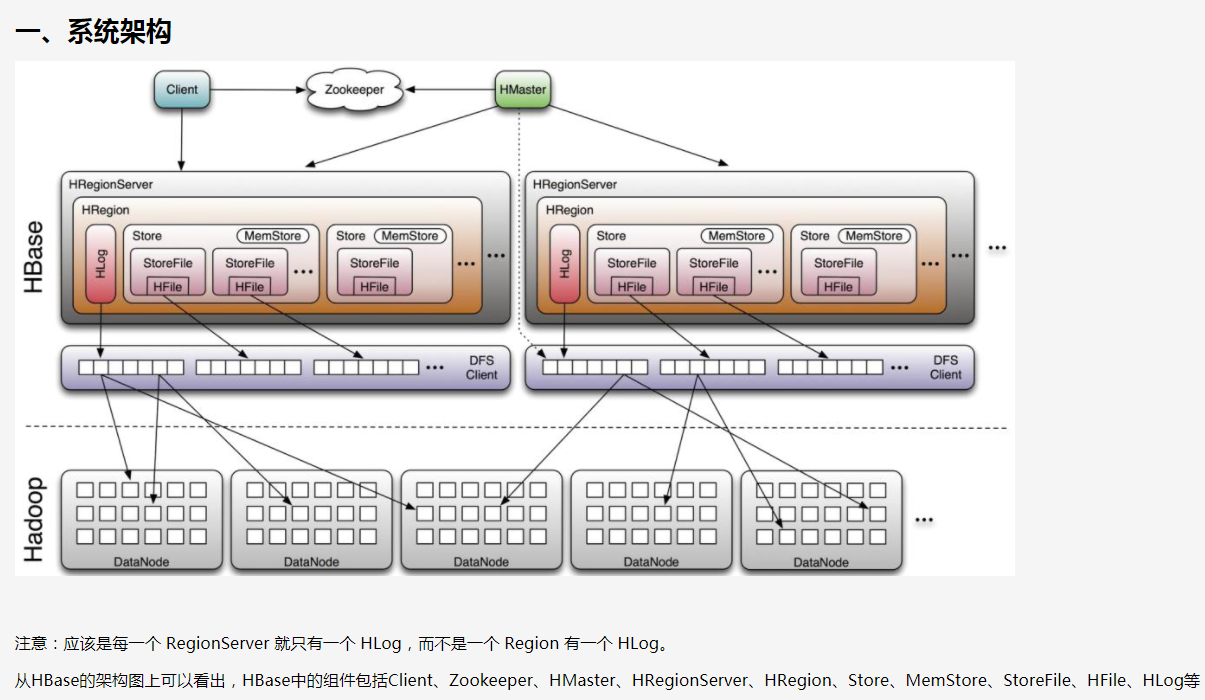
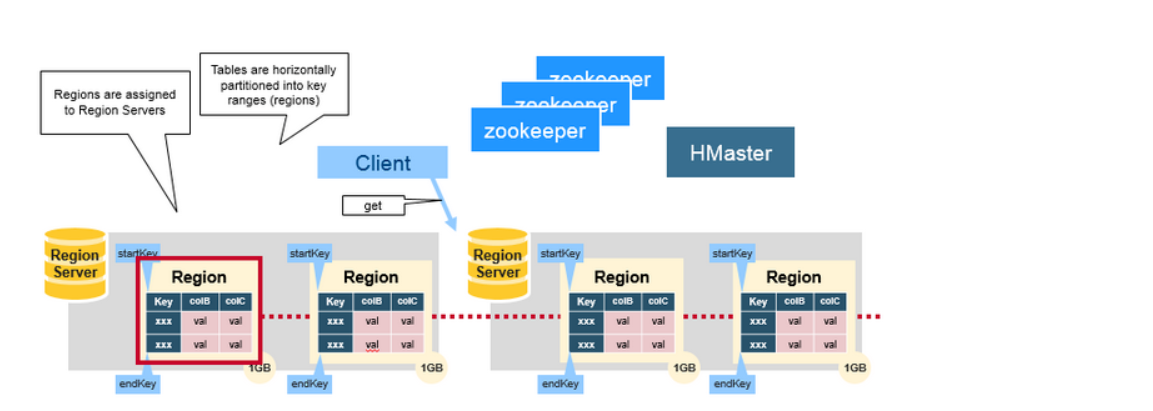
更详细参考
- ref "HBase(三)HBase架构与工作原理, Frankdeng, 2018/08/13"
- ref "HBase(2.2)-HBase架构详解, 不务正业的土豆, 2017/08/23"
前置
- 已经安装hadoop
- 已经安装zookeeper (其实hbase 默认自带一个,但是不用它的)
注意: hbase 安装 并不一定需要单独的hadoop和zookeeper, 比如做一款产品后端数据库用它,只是使用这些组件会增强hbase威力
下载和解压
从下载页面选择一个hadoop版本能支持的最新的稳定版 https://mirrors.tuna.tsinghua.edu.cn/apache/hbase/, 我这里是 hbase2.3.6.
官网是 http://hbase.apache.org/downloads.html , 除了有 服务器程序,还有客户端, Connectors, HBase Operator Tools
在win下下载, 用winscp 上传到linux
执行下面命令,解压并移动到安装目录 /opt
tar -zxvf hbase-2.3.6-bin.tar.gz
sudo mv hbase-2.3.6 /opt
关键目录结构的文件如下

参数配置
切换到 上面的conf目录下
1 hbase-env.sh
添加如下
export JAVA_HOME=/opt/jdk1.8.0_301
# 是否使用自带的zookeeper
export HBASE_MANAGES_ZK=false
2 hbase-site.xml
默认自带如下参数。
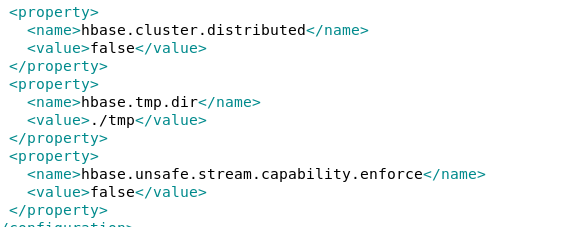
tmp目录可以选择是否设置另外的路径。
hbase-site.xml 添加以下内容, hbase.cluster.distributed的值修改了
<!-- 是否采用分布式,伪分布式也是true -->
<property>
    <name>hbase.cluster.distributed</name>
    <value>true</value>
</property>

<!-- zk地址 -->
<property>
    <name>hbase.zookeeper.quorum</name>
    <value>hc2108:2181</value>
</property>
<!-- 配置hbase存储位置,根据自己的hadoop集群配置端口 -->
<property>
    <name>hbase.rootdir</name>
    <value>hdfs://hc2108:9000/hbase</value>
</property>

<!-- 不加会报错 找不到  FanOutOneBlockAsyncDFSOutputHelper,hadoop与hbase版本兼容问题 -->
<property>
    <name>hbase.wal.provider</name>
    <value>filesystem</value>
</property>
3 regionservers
里面默认值是localhost,不需要改动
4 /etc/profile
添加, 并执行 source命令生效
###hbase
export HBASE_HOME=/opt/hbase-2.3.6
export PATH=$PATH:$HBASE_HOME/bin
启动和测试
1 先启动hadoop 和zookeeper
start-dfs.sh
zkServer.sh start

2 启动hbase
运行start-hbase.sh ,并查看进程, 过一会再看一下进程在不, 有可能服务器程序报错退出了
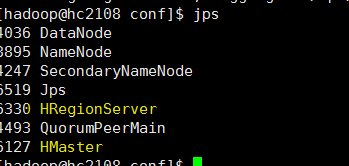
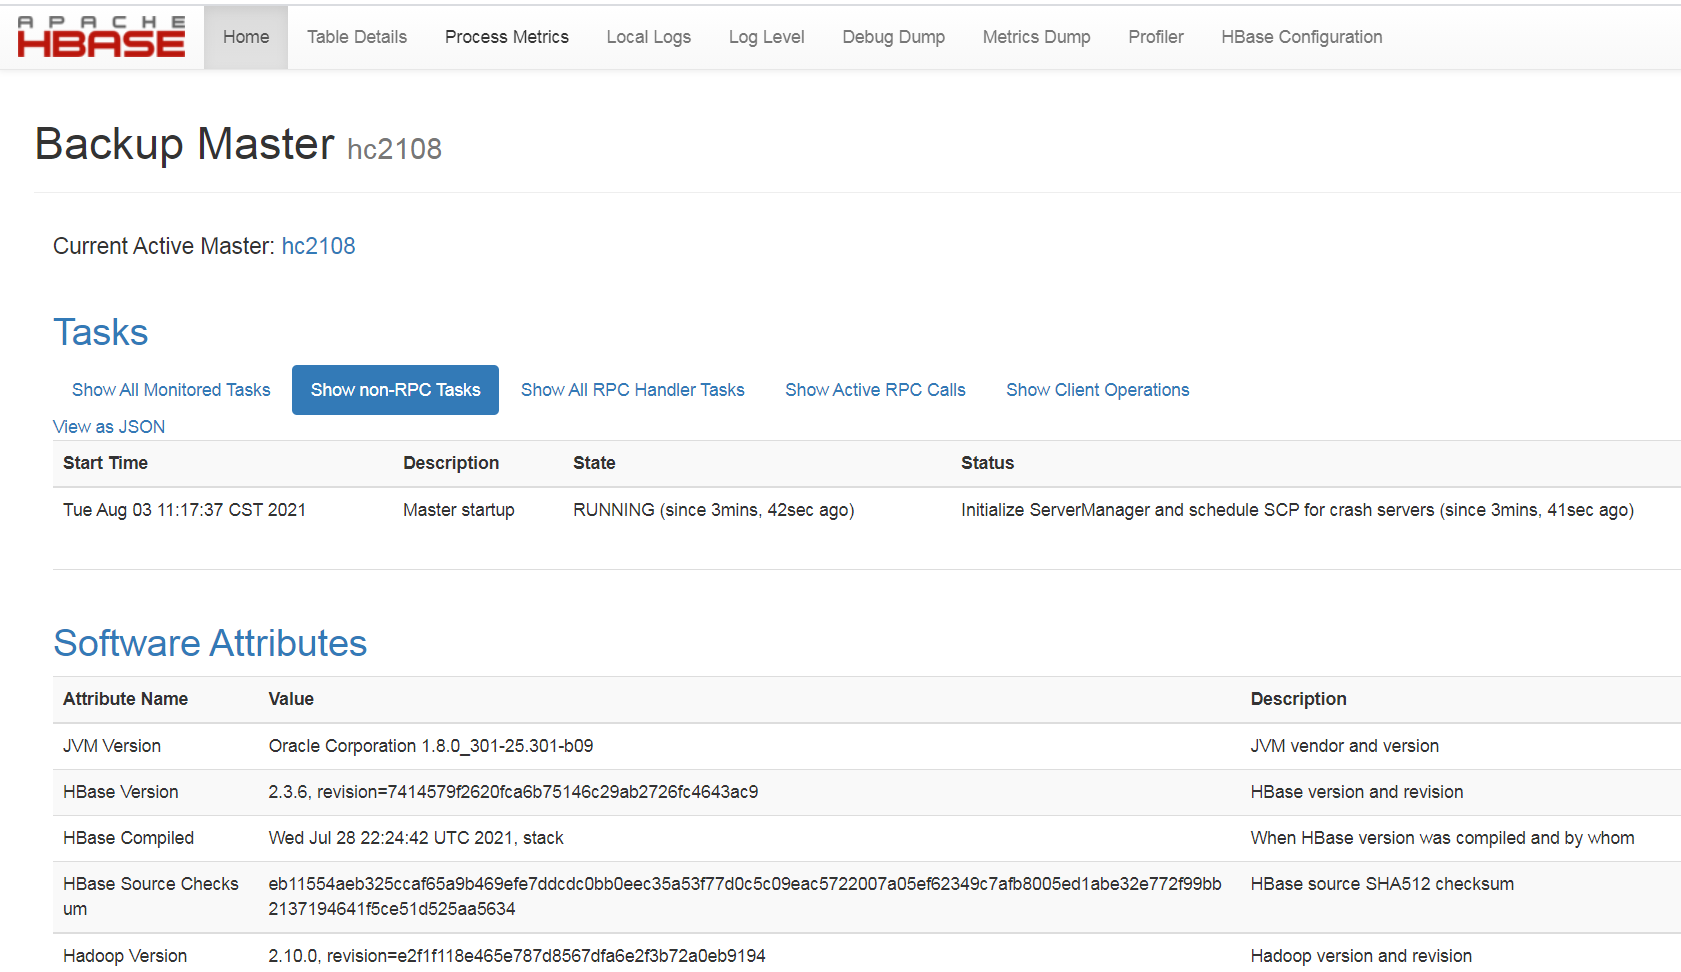
3 打开web 页面, http://hc2108:16010/, 查看状况
4 查看日志记录
到日志目录下 logs 下 查看 master和 regionserver的日志, 这一步很有必要,因为前面的步骤看上去一切运行正常, 但是错误还是可能存在,导致后面无法正常使用。
hbase-hadoop-master-hc2108.log, hbase-hadoop-regionserver-hc2108.log
如果有错就要找原因和解决。
5 命令行
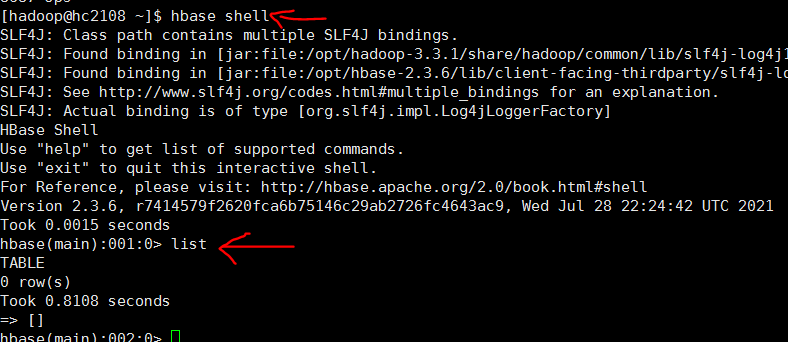
执行hbase shell,登录命令行
执行list 测试, 可能是和hadoop版本不兼容, 必须要设置 hbase-site.xml 中的 hbase.wal.provider的值为 filesystem 才没有报错 ,错误参考 b0107 大数据集群-2021伪分布式-运维/hbase/Q2
quit退出
6 停止hbase
执行 stop-hbase.sh 看能不能停止, jps查看进程是否存在。
如果配置不好,这里无法停止hbase的服务器进程。
a 可以 执行 hbase-daemon.sh stop master 关闭master, 还剩下 regionserer进程, jps查看,kill -9杀掉 。 不确定是否会造成数据丢失。 测试过一次,下次可以重启。
b 注意,不能直接 kill -9杀掉 master进程, 否则下次启动hbase时报错,应该是数据丢失,hbase启动不来,解决很麻烦。 测试过一次, 下次hbase坏了,清空了hbase目录弄好的。
这种情况需要寻找更安全的停止方法,而不是暴力终止,生产上可能会出大问题
参考
- disk 20210803_大数据_伪分布式_hbase相关记录.txt
- ref1 "hadoop2.9.2+hbase2.2.3安装与配置(伪分布式环境下, itjiangpo,2020/03/09"
- ref2 "hbase2.2.3安装记录, 5axz, 2021/05/13"
- ref3 "Hbase2.3.5安装, 逃跑的沙丁鱼, 2021/05/30"
- ref4 "大数据基础-hbase2.3.0安装教程, 知者乎也, 2020/12/17"
- ref5 "HBase 2.2.5 安装教程(基于centos7.x), 闻香识代码, 2020/08/27"
注意点
- 版本兼容问题, 注意参数配置 hbase.wal.provider
- 第一次启动hbase shell, 要留意日志文件内容,错误可能在这里才能最早发现
- 伪分布式也属于分布式,hbase.cluster.distributed 这个参数要设置为true, 之前设为false,结果报出错误
- hdfs 默认rpc端口8020, 如果指定了某个,需要设定hbase的参数 hbase.rootdir 为这种形式 hdfs://hc2108:9000/hbase
- hadoop 上的hbase 目录可以不用提前手工创建,hbase第一次启动会自动创建
- hbase 自带一个zookeeper, 需要注意这一点,留意一下相关参数
后续
- 搭建基于linux 版本的hbase,不安装hadoop和zookeeper,主要用来产品开发的快速搭建
- 在 客户机上安装 hbase 客户端
3. zookeeper 3.6.3 20210802
前置
- 已经安装jdk
zookeeper 与 hadoop 没有必然联系, 只是有些组件会用到。 不玩大数据, zookeepr也可以做其他用途。
下载和解压
win 下, 从zookeepr https://zookeeper.apache.org/ 官网,找到最新的稳定版,发现是 3.6.3 ,进去 找一个下载快的链接 下载下来 apache-zookeeper-3.6.3-bin.tar.gz
利用winscp 上传到linux服务器
解压并移动到 安装目录/opt下
tar -zxvf apache-zookeeper-3.6.3-bin.tar.gz
sudo mv  apache-zookeeper-3.6.3-bin  /opt
创建 数据目录和日志目录
如图,在zookeepr 安装文件夹下创建data、log目录

参数配置
zoo.cfg
进入 apache-zookeeper-3.6.3-bin/conf 目录, 复制一个文件
cp zoo_sample.cfg zoo.cfg
修改其中的参数值 , 将默认 dataDir=/tmp/zookeeper,改成如下
zoo.cfg 添加
dataDir=/opt/apache-zookeeper-3.6.3-bin/data # 数据目录
dataLogDir=/opt/apache-zookeeper-3.6.3-bin/log # 日志目录
/etc/profile
将zookeepr 的安装路径加入到环境变量中, 在该文件中添加以下信息,并执行 source /etc/profile 生效
/etc/profile添加
### zookeeper
export ZOOKEEPER_HOME=/opt/apache-zookeeper-3.6.3-bin
export PATH=$PATH:$ZOOKEEPER_HOME/bin
启动和测试
1 执行启动命令 zkServer.sh start


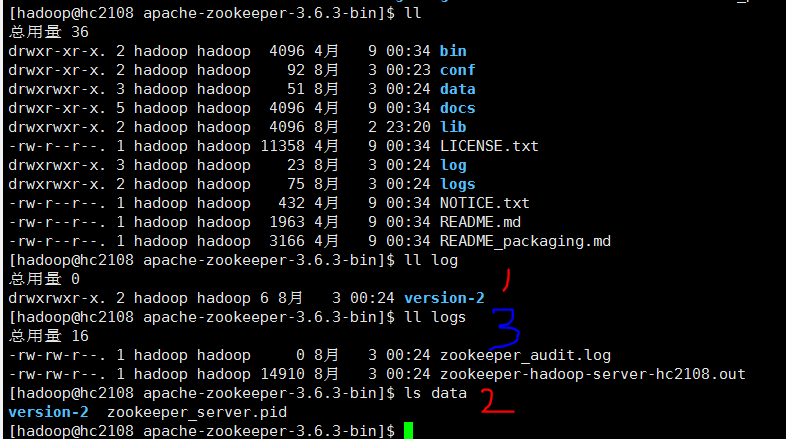
如上图, 3 logs 目录是 zookeeper服务器启动时自己创建的。1、2 data,log目录是人工创建的。
2 在服务器端执行客户端程序,模拟远程连接 zkCli.sh -server 127.0.0.1:2181

此时服务器下 data目录下新增了一个 锁定文件,如下
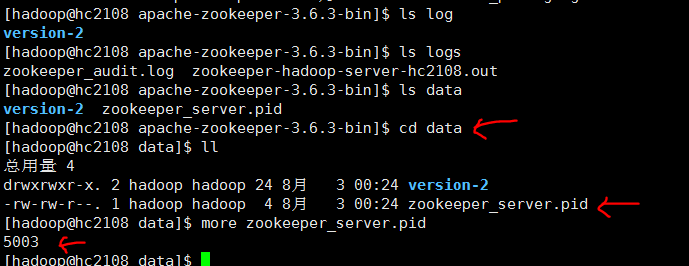
参考
- disk 20210803_大数据_伪分布式_zookeeer安装.txt
- ref1 "ZooKeeper的安装、配置和启动, liaosilzu2007, 2018/04/27"
- ref2 "zookeeper安装以及使用,燕少༒江湖,2018/07/05"
- ref3 "ZooKeeper安装及简单操作, H_D, 2019/01/15"
- ref4 "ZooKeeper的安装与部署,jimcsharp,2019/08/27"
遗留
zkServer.sh start 启动服务器进程后, 使用 zkServer.sh stop 停不下服务器程序, 只能 通过jps找到进程号,然后 kill -9 number 杀掉。 不清楚什么情况
2. HIVE 2.3.9 20210731
简单资料
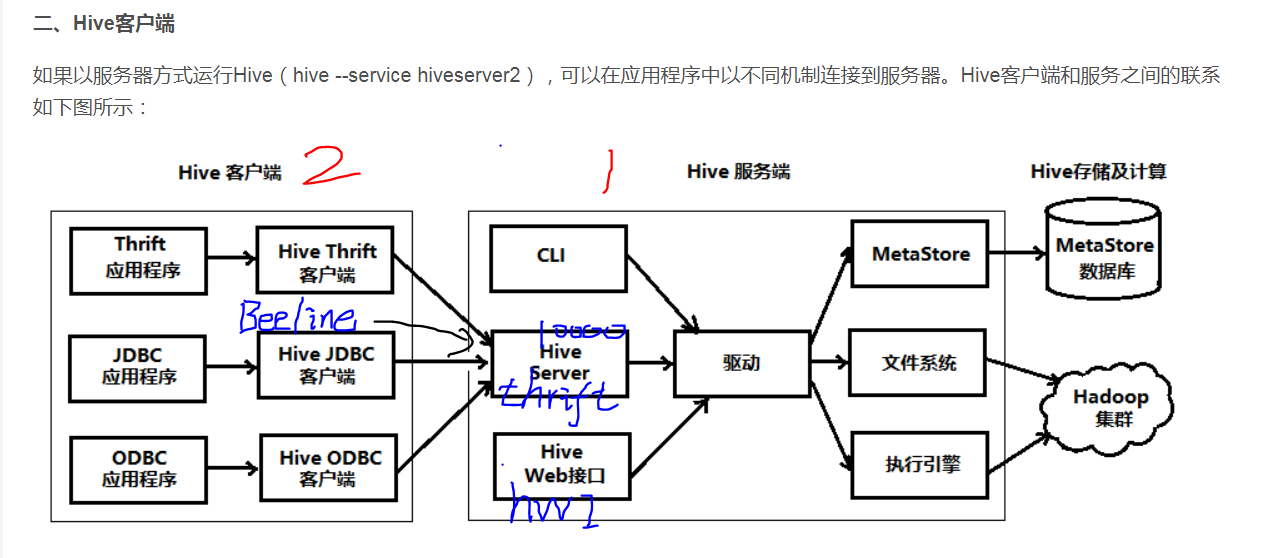
如果下载的 hive安装包 hivexxx.tar.gz , 在机器1上一定会安装和配置, 网上大部分hive安装教程应该是针对这种情况, 本文目前也是。
可以选择是否安装在 机器2上,此时hive 包作为客户端程序,启动Beeline, 这种安装的配置不需要指定 mysql数据库,其他可能也不一样, 这种安装 配置教程网上不多。
资料 参考本文最后 ref3.
前置
- 已经安装了hadoop, 这里是3.3.1, 参考本文相关章节
- 已经 安装了 数据库 MariaDB 5.5, 对应Mysql 开源版本,随着centos7.9 安装时装好的。数据库服务器在hc2102, 创建了数据库用户 hive1和数据库hivedb1,测试过可以远程命令行访问
下载和解压
1. hive 下载连接 https://hive.apache.org/downloads.html , 本来hadoop3应该安装 hive3的,但是发现hive3 最近只在2019年8月更新过。反而 hive2.3 最近更新在 2021年6月, 选了 hive2.3.9, 经常更新说明, 有什么问题都 及时解决了。
2. win 下下载, winscp 上传到 centos linux 目录下
3. 解压和移动到安装目录 tar -zxvf apache-hive-2.3.9-bin.tar.gz, sudo mv apache-hive-2.3.9-bin /opt
创建hive在hdfs用的目录
如下,创建3个目录,并赋权,
hadoop fs -mkdir -p /user/hive/warehouse
hadoop fs -mkdir -p /user/hive/tmp
hadoop fs -mkdir -p /user/hive/log
hadoop fs -chmod go+w /user/hive/warehouse
hadoop fs -chmod go+w /user/hive/tmp
hadoop fs -chmod go+w /user/hive/log

如果,相当于赋予每个目录 777权限
注: 如果这样赋权 hadoop fs -chmod g+w /user/hive/warehouse ,少了第3个w,启动hive 会报错
参数配置
/etc/profile
### 配置hive
export HIVE_HOME=/opt/apache-hive-2.3.9-bin
export HIVE_CONF_DIR=${HIVE_HOME}/conf
export PATH=${HIVE_HOME}/bin:$PATH
在文件中添加hive环境变量
执行以下代码生效并验证
[hadoop@hc2108 apache-hive-2.3.9-bin]$ source /etc/profile
[hadoop@hc2108 apache-hive-2.3.9-bin]$ hive --version
Hive 2.3.9
Git git://chaos-mbp.lan/Users/chao/git/hive -r 92dd0159f440ca7863be3232f3a683a510a62b9d
Compiled by chao on Tue Jun 1 14:02:14 PDT 2021
From source with checksum 6715a3ba850b746eefbb0ec20d5a0187
hive-env.sh
进入 hive 配置文件目录 /opt/apache-hive-2.3.9-bin/conf
cp hive-env.sh.template hive-env.sh
在文件中 添加以下环境变量的值
export HADOOP_HOME=/opt/hadoop-3.3.1
export HIVE_HOME=/opt/apache-hive-2.3.9-bin
export HIVE_CONF_DIR=${HIVE_HOME}/conf
hive-site.xml
进入 hive 配置文件目录 /opt/apache-hive-2.3.9-bin/conf , 直接创建一份新的 vi hive-site.xml ,因为模板文件hive-default.xml.template,5000多行,不方便复制和学习

<configuration>
<!-- 记录HIve中的元数据信息  记录在mysql中 -->
<property>
<name>javax.jdo.option.ConnectionURL</name>
<value>jdbc:mysql://hc2102:3306/hivedb1?createDatabaseIfNotExist=true</value>
</property>

<!-- jdbc mysql驱动 -->
<property>
<name>javax.jdo.option.ConnectionDriverName</name>
<value>com.mysql.jdbc.Driver</value>
</property>

<!-- mysql的用户名和密码 -->
<property>
<name>javax.jdo.option.ConnectionUserName</name>
<value>hive1</value>
</property>
<property>
<name>javax.jdo.option.ConnectionPassword</name>
<value>123456</value>
</property>


<!-- hive在hdfs用的目录 -->
<property>
<name>hive.metastore.warehouse.dir</name>
<value>/user/hive/warehouse</value>
</property>

<property>
<name>hive.exec.scratchdir</name>
<value>/user/hive/tmp</value>
</property>

<property>
<name>hive.querylog.location</name>
<value>/user/hive/log</value>
</property>


<!-- 客户端远程连接的端口 -->
<property>
<name>hive.server2.thrift.port</name>
<value>10000</value>
</property>
<property>
<name>hive.server2.thrift.bind.host</name>
<value>0.0.0.0</value>
</property>
<property>
<name>hive.server2.webui.host</name>
<value>0.0.0.0</value>
</property>

<!-- hive服务的页面的端口 -->
<property>
<name>hive.server2.webui.port</name>
<value>10002</value>
</property>


<!-- 执行引擎  -->
<property>
<name>hive.execution.engine</name>
<value>mr</value>
<description>
  Expects one of [mr, tez, spark].
  Chooses execution engine. Options are: mr (Map reduce, default), tez, spark. While MR
  remains the default engine for historical reasons, it is itself a historical engine
  and is deprecated in Hive 2 line. It may be removed without further warning.
</description>
</property>

<property>
<name>hive.default.fileformat</name>
<value>TextFile</value>
<description>
  Expects one of [textfile, sequencefile, rcfile, orc, parquet].
  Default file format for CREATE TABLE statement. Users can explicitly override it by CREATE TABLE ... STORED AS [FORMAT]
</description>
</property>

<!--客户端显示当前数据库名称信息 -->
<property>
  <name>hive.cli.print.current.db</name>
  <value>true</value>
</property>

</configuration>
添加以上信息, 主要分成几类
- 连接元数据库 mysql的参数,我这里是 MariaDB,一样的连接信息
- hive 在hdfs上用到的 路径
- hive服务器 对外提供服务的 端口和ip
- hive 执行引擎的配置
- hive客户端显示效果的
其他准备
准备好数据库 jdbc包
下载一个mysql jar 包,我这里是mysql-connector-java-5.1.39-bin.jar ,放到 /opt/apache-hive-2.3.9-bin/lib
启动Hive
初始化元数据库
执行命令 schematool -dbType mysql -initSchema


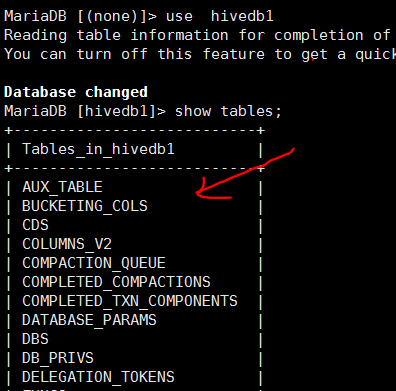
在数据库中验证如下,已经创建了一批表
启动hive并验证
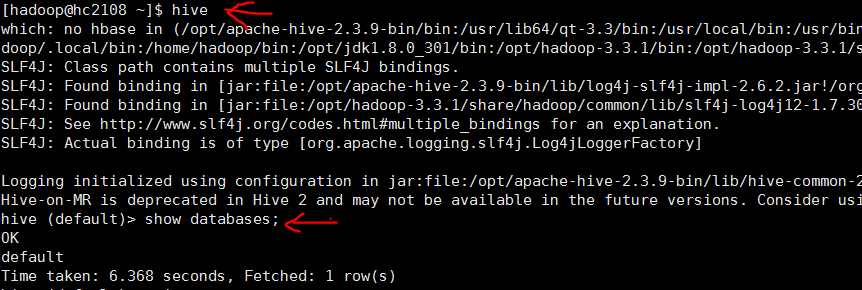
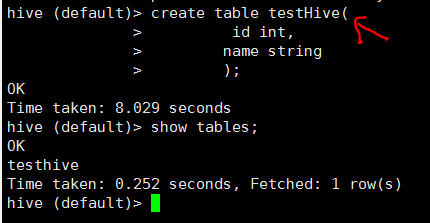
参考
- ref1 “Hive2.3.8安装配置, Emil, 2021/01/14"
- ref2 "Hive 3.1.2安装(基于Centos7.x和Hadoop3.2.1), 闻香识代码, 2020/08/24"
- disk 20210731_大数据_伪分布式_hive安装.txt
- disk 20210730_大数据_伪分布式_hive安装搜集材料.txt
- disk 积累_mariadb_mysql_20210729.txt, 对数据库用户的创建和赋权
- ref3 “Hive2.x体系结构, andyguan01_2, 2019/03/25" , comments:对整个架构一下就了解了
后记
遗留以下问题值得深入探索:
- 需不需专门在linux 创建一个hive用户,用来给hive数据库用
- hive所装机器可不可以不是hadoop集群。 早期记录这个xml参数 hive.metastore.warehouse.dir 可以这样取值 hdfs://ip地址:9000/opt/hive/warehouse,说明可以分开装。但是网上的全部是 装在hadoop集群所在机器
- 目前 hive CLI客户端和hive服务器 用同一个解压包,装在同一台机器hc2108上, 后续如果客户端、服务器程序分别装在2台机器,又分别如何配置参数。Beeline就属于客户端程序。
1. HADOOP3.3.1 20210727
前置
- 已经创建hadoop账号,添加了sudo 权限
- 已经安装jdk1.8
- 配置了 主机名 和静态ip地址
- 关闭防火墙
设置ssh无密登录
集群之间肯定要这样操作的,伪分布式不确定不这样做是否可以, 为了保险, 还是做了为好。
先测试 ssh hc2108 (当前主机名)
需要密码表示还没设置。
执行以下命令,一路回车。
hadoop@hc2108:~$ cd ~
hadoop@hc2108:~$ ssh-keygen -t rsa
hadoop@hc2108:~/.ssh$ cp id_rsa.pub authorized_keys
hadoop@hc2108:~/.ssh$ ls
authorized_keys  id_rsa  id_rsa.pub  known_hosts
hadoop@hc2108:~/.ssh$ more authorized_keys
ssh-rsa AAAAB3NzaC1yc2EAAAADAQABAAABAQCxjtfFUPSmTNNHJ4+4SubFrNEz7Teyu3HHvq7Lq0cOWXEJ6r53zA9LCawDyKUsrv5pNly4bqlt6SWJSELySieu+WgPVL6UNwROUE
uBDagbnURviUVt6dXLcCOlqsCvy0AQsk+YIvS+qQhmE839X4W+Zd5xBZgUlGIqS1WhXbCs8sHiho09rxA0MIBXBlyvkfwmh71ubXny6GQHH3ZriyRZO0KrcMgwPHgsC/83fzSujnw5
BKiesJkpLHejmCo8m+eqW1Hcmj7OFMnAbaih86rqUnAE4rNrJnQUin73KgUFKQeHwnGRL3CPWR/KXdNvoEyUPHc/eeW0HhfK8GCWlQ/P hadoop@ssmaster
再次测试,应该无密码登录成功
ssh hc2108
exit
下载和解压
win下 通过地址 https://hadoop.apache.org/releases.html下载二进制安装包 hadoop-3.3.1.tar.gz
通过winscp工具上传到  hadoop某个目录下

tar -zxvf hadoop-3.3.1.tar.gz # 解压

mv hadoop-3.3.1 /opt/ # 移动到安装目录下
参数配置
1 添加环境变量
sudo vi /etc/profile
添加文件内容:
### 配置hadoop
export HADOOP_HOME=/opt/hadoop-3.3.1
export PATH=$PATH:$HADOOP_HOME/bin:$HADOOP_HOME/sbin
source /etc/profile 生效
可以进行一个简单验证,如下,看看环境参数有没有成功
[hadoop@hc2108 ~]$ hadoop version
Hadoop 3.3.1
Source code repository https://github.com/apache/hadoop.git -r a3b9c37a397ad4188041dd80621bdeefc46885f2
Compiled by ubuntu on 2021-06-15T05:13Z
Compiled with protoc 3.7.1
From source with checksum 88a4ddb2299aca054416d6b7f81ca55
This command was run using /opt/hadoop-3.3.1/share/hadoop/common/hadoop-common-3.3.1.jar
2 在linux创建hadoop运行时目录
在 /opt/hadoop-3.3.1 下创建以下目录
- tmp 存放运行过程临时文件
- dfs/name 存放namenode的输出
- dfs/data 存放datanode的输出
3 添加jdk路径到 hadoop xxxx.sh 脚本文件中
在以下文件中添加环境变量
- hadoop-env.sh
- yarn-env.sh
- mapred-env.sh
export JAVA_HOME=/opt/jdk1.8.0_301
如果这里不添加,虽然在/etc/profile 有该环境变量,启动时还是会提示找不到它
4 core-site.xml
在目录下hadoop-3.31/etc/hadoop , 添加以下内容, 默认是空文件
<configuration>
     <!-- 指定hdfs的nameservice的地址为hc2108:9000 -->
    <property>
        <name>fs.defaultFS</name>
        <value>hdfs://hc2108:9000</value>
    </property>
    <property>
        <name>hadoop.tmp.dir</name>
        <value>/opt/hadoop-3.3.1/tmp</value>
    </property>

</configuration>
5 hdfs-site.xml
路径同上,添加以下内容,文件默认为空的
<configuration>
    <!-- HDFS的副本为1,即数据只保存一份 -->
    <property>
        <name>dfs.replication</name>
        <value>1</value>
    </property>
    <property>
        <name>dfs.namenode.name.dir</name>
        <value>file:/opt/hadoop-3.3.1/dfs/name</value>
    </property>
    <property>
        <name>dfs.datanode.data.dir</name>
        <value>file:/opt/hadoop-3.3.1/dfs/data</value>
    </property>
</configuration>
6 yarn-site.xml
路径同上,添加以下内容,文件默认为空的。 注意最后一个参数 yarn.application.classpath 不加,最后执行 mapreduce pi 报 b0107/hadoop/q1 错误
<configuration>
    <!-- 指定YARN ResourceManager的地址-->
    <property>
        <name>yarn.resourcemanager.hostname</name>
        <value>hc2108</value>
    </property>
    <!-- 指定reducer获取数据的方式, 可以设置多个比如mapreduce_shuffle,spark_shuffle -->
    <property>
        <name>yarn.nodemanager.aux-services</name>
        <value>mapreduce_shuffle</value>
    </property>
<!-- 报错后返回调整, value值为 命令行执行 hadoop classpath的输出-->
<property>
<name>yarn.application.classpath</name>
<value>/opt/hadoop-3.3.1/etc/hadoop:/opt/hadoop-3.3.1/share/hadoop/common/lib/*:/opt/hadoop-3.3.1/share/hadoop/common/*:/opt/hadoop-3.3.1/share/hadoop/hdfs:/opt/hadoop-3.3.1/share/hadoop/hdfs/lib/*:/opt/hadoop-3.3.1/share/hadoop/hdfs/*:/opt/hadoop-3.3.1/share/hadoop/mapreduce/*:/opt/hadoop-3.3.1/share/hadoop/yarn:/opt/hadoop-3.3.1/share/hadoop/yarn/lib/*:/opt/hadoop-3.3.1/share/hadoop/yarn/*</value>
</property>
</configuration>
7 mapred-site.xml
路径同上,添加以下内容,文件默认为空的
<configuration>
    <!--指定mr运行在yarn上-->
    <property>
        <name>mapreduce.framework.name</name>
        <value>yarn</value>
    </property>
</configuration>
8 workers
路径同上, 文件内容改成本主机名, 表示hadoop集群工作节点
[hadoop@hc2108 hadoop]$ more workers
hc2108
启动hadoop和检验
格式化
hdfs namenode -format
如果报错, 需要检查前面的配置漏了什么或者是否错误
启动
start-dfs.sh # 启动hdfs
start-yarn.sh # 启动yarn
报错就要检查。
成功后执行jps ,有如图进程

Web页面
http://192.168.25.108:9870/ # hdfs
# http://192.168.25.108:50070/ hadoop 2.0时代,3.0废弃
http://192.168.25.108:8088/ # yarn
检验
执行下面的计算pi程序,如果能够成功 , 说明一切正常
# 执行检验程序
hadoop jar $HADOOP_HOME/share/hadoop/mapreduce/hadoop-mapreduce-examples-3.3.1.jar pi 1 1

wordcount 需要准备好 输入目录下的文件、输出目录, 其中 run1 由程序运行后自动创建
hadoop jar $HADOOP_HOME/share/hadoop/mapreduce/hadoop-mapreduce-examples-3.3.1.jar wordcount /data/T/2021/wordcount /out/T/2021/wordcount/run1
参考
- "[b0001] 伪分布式 hadoop 2.6.4"
- disk 20210727_hadoop3.3伪分布式安装中间输出.txt
- disk 202107_hadoop使用操作命令.txt
- “b0102 centos7.9“
- "避坑之Hadoop安装伪分布式(Hadoop3.2.0/Ubuntu14.04 64位)"
其他
case1
网上有描述 需要在 hadoop shell脚本中添加以下参数 。 本人并没有这样做,集群目前还没有报错。 也许是 事先给了 安装账户hadoop sudo权限
# 这是hadoop集群用到的,  正常在以下文件中设置 start-dfs.sh,stop-dfs.sh,start-yarn.sh,stop-yarn.sh
# 没有弄明白为啥是root,而不是hadoop, 网上copy的
export HDFS_DATANODE_USER=root
export HADOOP_SECURE_DN_USER=hdfs
export HDFS_NAMENODE_USER=root
export HDFS_SECONDARYNAMENODE_USER=root
export YARN_RESOURCEMANAGER_USER=root
export HADOOP_SECURE_DN_USER=yarn
export YARN_NODEMANAGER_USER=root
