整理一下导航与路由的资料
https://sapui5.netweaver.ondemand.com/#/topic/1b6dcd39a6a74f528b27ddb22f15af0d
在传统的Web应用程序中,服务器根据请求的URL模式确定请求的资源,并相应地提供服务。服务器端逻辑控制如何以适当的方式显示请求的资源或页面。
在单页应用程序中,最初只从服务器请求一个页面,并且使用客户端逻辑动态加载其他资源。用户只能在此页面内导航。导航内容将保存在hash(#),用来代替服务器路径或URL参数。
关于hash可以参考这个bolg。https://www.cnblogs.com/hsprout/p/5837253.html
因为是单页面的程序,所以只需要使用hash来指定页面位置。有两个方法,一是使用锚点,比如<a name="user"></a>,二是使用id属性,比如<div id="user" ></div>。
例如,一个传统的web应用程序,使用url http:///< something -path to-the-app>/employees/resume.html?id=3 或 http:///< some-pathto -the-app>/employees/3/resume来显示员工的resume。
如果使用单页程序,可以基于hash的url http://<your-host>/<some-path-to-the-app>/#/employees/3/resume 来做同样的事情。
hash就是指在#后面的内容,这部分内容由路由解释。
官网提供了一个例子,来介绍这部分内容,这里一步一步来进行实现。

Step 1: Set Up the Initial App
将官网提供的代码下载到本地,并且运行。
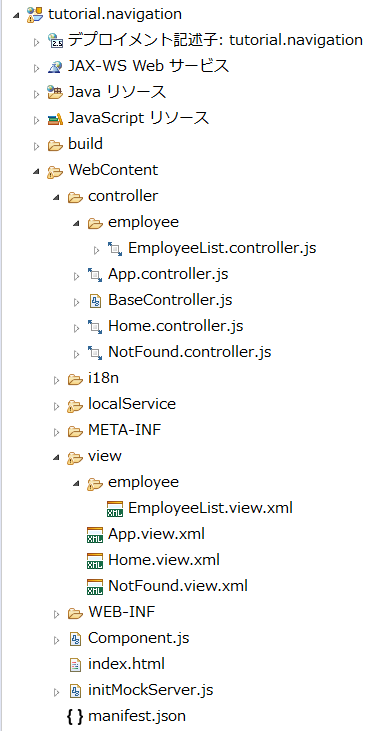
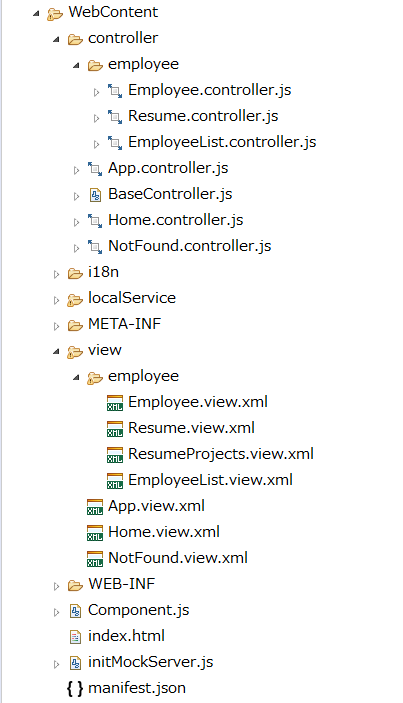
代码结构

运行结果

Step 2: Enable Routing
修改manifest.json
{
   "_version": "1.12.0",
   "sap.app": {
      ...
   },
   "sap.ui": {
      ...
   },
   "sap.ui5": {

      "rootView": {
          "viewName": "sap.ui.demo.nav.view.App",
          "type": "XML",
          "async": true,
          "id": "app"
      },
      "dependencies": {
         ...
      },
      "models": {
         ...
      },
      "routing": {
         "config": {
            "routerClass": "sap.m.routing.Router",
            "viewType": "XML",
            "viewPath": "sap.ui.demo.nav.view",
            "controlId": "app",
            "controlAggregation": "pages",
            "transition": "slide",
            "async": true
         },
         "routes": [{
            "pattern": "",
            "name": "appHome",
            "target": "home"
         }],
         "targets": {
            "home": {
               "viewId": "home",
               "viewName": "Home",
               "viewLevel" : 1
            }
         }
      }
   }
}
sapui5的单页程序,可以使用所谓的"router"通过对基于hash的url进行一个或多个视图的转发。因此,路由器需要知道如何定位和显示视图。
可以在manifest.json文件中对路由进行配置,主要有三个属性对程序进行配置。
config
routerClass的默认值是sap.ui.core.routing.Router,因为我们实现了一个基于sap.m的应用程序。routerClass的可能值是 sap.ui.core.routing.Router,sap.m.routing.Router,或sap.ui.core.routing.Router的任何其他子类。
与sap.ui.core.routing.Router相比,sap.m.routing.Router对移动应用程序进行了优化,添加了属性:viewLevel,transition,transitionParameters
viewPath定义了视图在程序中的位置。
为了自动加载和显示视图,我们还指定了用于显示页面的控件的controlId,与该控件的controlAggregation,当新页面显示的时候,他会被填充。
因为我们使用的是xml view所以这里viewType指定为xml。
transition为页面的切换模式。
如果需要的话,所以的config参数都可以在单独的路由定义中重写。
routes
每个路由定义一个name、一个pattern和一个或多个target,以便在路由被触发时导航到这些目标。
pattern是匹配到路由的hash部分。
路由的位置非常重要,因为第一个被匹配到的路由就是要使用的路由。
在这个例子中,用一个空的pattern还匹配空的hash。
name属性允许您选择惟一的路由名称,该名称可以帮助您导航特定的路由。
target属性引用targets的一个或多个目标。
targets
定义要显示的视图,与routes关联,不管何时显示都会将其加载到使用控件的controlAggregation中,这个控件是通过controlId来配置的。
每个target都有一个唯一的key,这里是home。
viewName用来指定要加载的view,由viewPath+viewName决定。
viewLevel用来指定transition的翻转方向,不是必须的。
修改Component.js
sap.ui.define([
    "sap/ui/core/UIComponent"
], function (UIComponent) {
    "use strict";

    return UIComponent.extend("sap.ui.demo.nav.Component", {

        metadata: {
            manifest: "json"
        },

        init: function () {
            // call the init function of the parent
            UIComponent.prototype.init.apply(this, arguments);

            // create the views based on the url/hash
            this.getRouter().initialize();
        }
    });
});
在init函数中,先调用父类的init函数,可以获得路由的引用,并且调用initialize() 对其进行初始化,路由会自动实例化。应用程序自动启动,路由配置跟路由事件。
修改App.view.xml
<mvc:View
    controllerName="sap.ui.demo.nav.controller.App"
    xmlns="sap.m"
    xmlns:mvc="sap.ui.core.mvc"
    displayBlock="true">
    <Shell>
        <App id="app"/>
    </Shell>
</mvc:View>
创建Home.view.xml
<mvc:View
   controllerName="sap.ui.demo.nav.controller.Home"
   xmlns="sap.m"
   xmlns:mvc="sap.ui.core.mvc">
   <Page title="{i18n>homePageTitle}" class="sapUiResponsiveContentPadding">
      <content>
         <Button text="{i18n>iWantToNavigate}" class="sapUiTinyMarginEnd"/>
      </content>
   </Page>
</mvc:View>
创建Home.controller.js
sap.ui.define([
   "sap/ui/core/mvc/Controller"
], function (Controller) {
   "use strict";

   return Controller.extend("sap.ui.demo.nav.controller.Home", {

   });

});


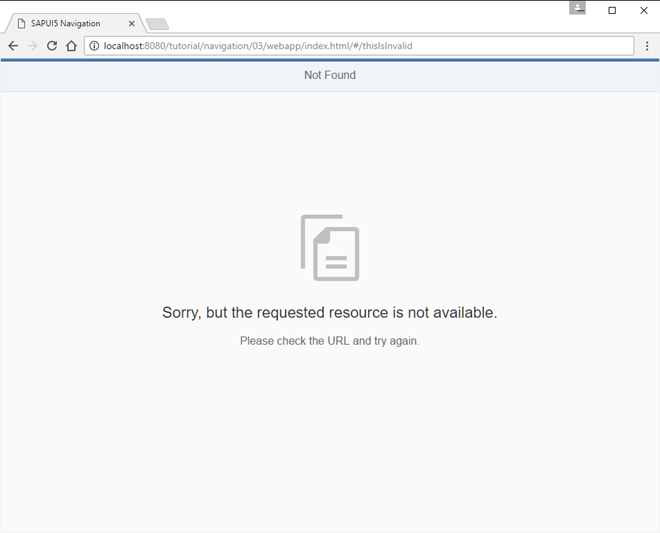
Step 3: Catch Invalid Hashes
检测无效的hash,并可视化。
修改manifest.json
{
   ...
   "sap.ui5": {
      ...
      "routing": {
         "config": {
            "routerClass": "sap.m.routing.Router",
            "viewType": "XML",
            "viewPath": "sap.ui.demo.nav.view",
            "controlId": "app",
            "controlAggregation": "pages",
            "transition": "slide",
            "bypassed": {
               "target": "notFound"
            },
            "async": true
         },
         "routes": [{
            "pattern": "",
            "name": "appHome",
            "target": "home"
         }],
         "targets": {
            "home": {
               "viewId": "home",
               "viewName": "Home",
               "viewLevel" : 1
            },
            "notFound": {
               "viewId": "notFound",
               "viewName": "NotFound",
               "transition": "show"
            }
         }
      }
   }
}
添加一个bypassed属性,告诉路由器没有匹配到当前的hash路径。并且配置一个notFound的target。
新建NotFound.view.xml
<mvc:View
   controllerName="sap.ui.demo.nav.controller.NotFound"
   xmlns="sap.m"
   xmlns:mvc="sap.ui.core.mvc">
   <MessagePage
      title="{i18n>NotFound}"
      text="{i18n>NotFound.text}"
      description="{i18n>NotFound.description}"/>
</mvc:View>
新建NotFound.controller.js
sap.ui.define([
   "sap/ui/core/mvc/Controller"
], function (Controller) {
   "use strict";
   return Controller.extend("sap.ui.demo.nav.controller.NotFound", {
      onInit: function () {
      }
   });
});
修改i18n.properties
...
NotFound=Not Found
NotFound.text=Sorry, but the requested resource is not available.
NotFound.description=Please check the URL and try again.
使用bypassed属性与他相对应的target来显示,使用sap.m.MessagePage现实路由相关的错误信息。

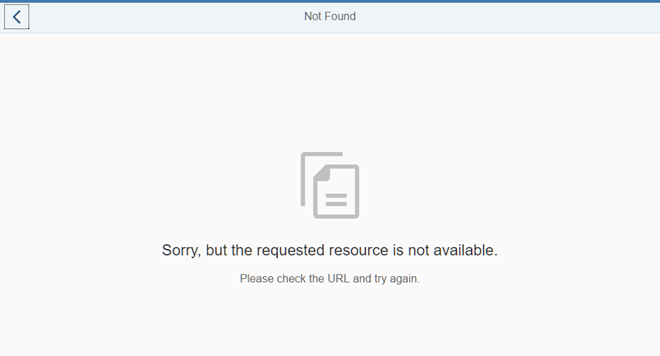
Step 4: Add a Back Button to Not Found Page
修改NotFound.view.xml
<mvc:View
    controllerName="sap.ui.demo.nav.controller.NotFound"
    xmlns="sap.m"
    xmlns:mvc="sap.ui.core.mvc">
    <MessagePage
        title="{i18n>NotFound}"
        text="{i18n>NotFound.text}"
        description="{i18n>NotFound.description}"
        showNavButton="true"
        navButtonPress="onNavBack"/>
</mvc:View>
设置showNavButton,显示后退按钮,当按钮点击时,触发事件onNavBack。
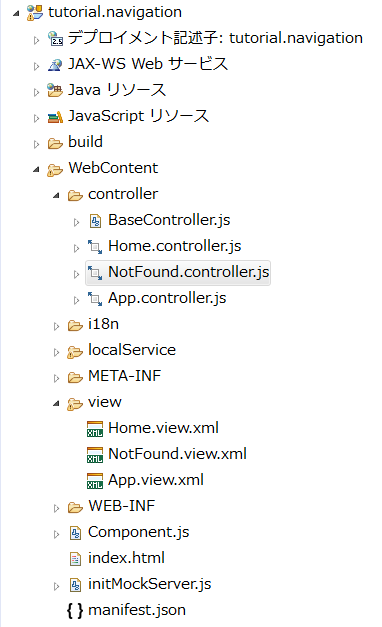
对于不同的视图,我们可能都需要实现后退功能,所以新建一个basecontroller,使其他控制器都继承他。
新建BaseController.js
sap.ui.define([
    "sap/ui/core/mvc/Controller",
    "sap/ui/core/routing/History",
    "sap/ui/core/UIComponent"
], function(Controller, History, UIComponent) {
    "use strict";

    return Controller.extend("sap.ui.demo.nav.controller.BaseController", {

        getRouter : function () {
            return UIComponent.getRouterFor(this);
        },

        onNavBack: function () {
            var oHistory, sPreviousHash;

            oHistory = History.getInstance();
            sPreviousHash = oHistory.getPreviousHash();

            if (sPreviousHash !== undefined) {
                window.history.go(-1);
            } else {
                this.getRouter().navTo("appHome", {}, true /*no history*/);
            }
        }

    });

});
创建一个basecontroller,里面的函数可以由其他子类调用。
onNavBack函数,先检查是否存在以前的hash value,如果有那么重定向到之前的hash value,如果没有,跳转到appHome。
navTo的第三个参数(“appHome”,{},true /*no history*/);值为true,可以确保替换hash value。
使用sap.ui.core.UIComponent.getRouterFor(this),可以在整个应用程序中轻松访问组件的路由器。在onNavBack中,它还用于在调用navTo之前获取对路由器的引用。
在其他cnotroller中继承basecontroller。
修改NotFound.controller.js
sap.ui.define([
    "sap/ui/demo/nav/controller/BaseController"

], function (BaseController) {
    "use strict";
    return BaseController.extend("sap.ui.demo.nav.controller.NotFound", {
        onInit: function () {
        }
    });
});
修改App.controller.js
sap.ui.define([
    "sap/ui/demo/nav/controller/BaseController"

], function (BaseController) {
    "use strict";
    return BaseController.extend("sap.ui.demo.nav.controller.App", {
        onInit: function () {
        }
    });
});
修改Home.controller.js
sap.ui.define([
    "sap/ui/demo/nav/controller/BaseController"

], function (BaseController) {
    "use strict";
    return BaseController.extend("sap.ui.demo.nav.controller.Home", {
    });
});
Step 5: Display a Target Without Changing the Hash
实现显示目标view而不改变hash的值。
修改Home.view.xml
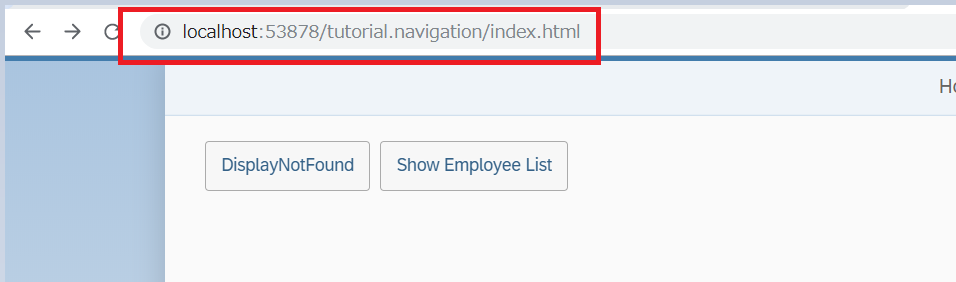
<mvc:View
    controllerName="sap.ui.demo.nav.controller.Home"
    xmlns="sap.m"
    xmlns:mvc="sap.ui.core.mvc">
    <Page title="{i18n>homePageTitle}" class="sapUiResponsiveContentPadding">
        <content>
            <Button id="displayNotFoundBtn" text="{i18n>DisplayNotFound}" press=".onDisplayNotFound" class="sapUiTinyMarginEnd"/>
        </content>
    </Page>
</mvc:View>
当按钮被压下时,onDisplayNotFound函数将被执行。
修改Home.controller.js
sap.ui.define([
    "sap/ui/demo/nav/controller/BaseController"
], function (BaseController) {
    "use strict";
    return BaseController.extend("sap.ui.demo.nav.controller.Home", {
        onDisplayNotFound : function () {
            //display the "notFound" target without changing the hash
            this.getRouter().getTargets().display("notFound");
        }
    });
});
在onDisplayNotFound函数中,router将去寻找配置在targets中的notFound,这个页面将由路由来显示,而不需要改变hash value。
sap.m.routing.targets可以通过该路由的getTargets()来检索。它为将视图放入应用程序提供了一种更方便的方法。
这里使用了this.getRouter().getTargets()来获得targets对象,其中this.getRouter(),在basecontroller中实现。
我们还可以用this.getOwnerComponent().getRouter().getTargets() 或者this.getOwnerComponent().getTargets()来获得target对象。
这时,url不变更,也会显示notFound。但是notFound的后退按钮失效,因为hash value依然是空的,只是显示了页面,没有命中路由。所以,要再次修改Home controller。
修改Home.controller.js
sap.ui.define([
    "sap/ui/demo/nav/controller/BaseController"
], function (BaseController) {
    "use strict";
    return BaseController.extend("sap.ui.demo.nav.controller.Home", {
        onDisplayNotFound : function () {
            //display the "notFound" target without changing the hash
            this.getRouter().getTargets().display("notFound", {
                fromTarget : "home"
            });
        }
    });
});
设置一个targers的key,用来标志从那个页面迁移过去。
修改NotFound.controller.js
sap.ui.define([
    "sap/ui/demo/nav/controller/BaseController"
], function (BaseController) {
    "use strict";

    return BaseController.extend("sap.ui.demo.nav.controller.NotFound", {

        onInit: function () {
            var oRouter, oTarget;

            oRouter = this.getRouter();
            oTarget = oRouter.getTarget("notFound");
            oTarget.attachDisplay(function (oEvent) {
                this._oData = oEvent.getParameter("data");    // store the data
            }, this);
        },

        // override the parent's onNavBack (inherited from BaseController)
        onNavBack : function () {
            // in some cases we could display a certain target when the back button is pressed
            if (this._oData && this._oData.fromTarget) {
                this.getRouter().getTargets().display(this._oData.fromTarget);
                delete this._oData.fromTarget;
                return;
            }

            // call the parent's onNavBack
            BaseController.prototype.onNavBack.apply(this, arguments);
        }
    });
});
当notFound页面显示的时候,在init中注册一个事件监听。
我们可以从路由器的引用中获取到notFound的引。每个target的配置,都将创建一个可以通过路由器访问的运行时的对象。
保存页面显示事件的参数到变量 _oData。这个变量中还包括fromTarget信息。
重写onNavBack函数,判断_oData是否指定了fromTarget,如果指定了,手动显示定义为fromTarget的目标,就像手动调用notFound目标一样。
这时notFound页面的back按钮就可以点击了。
修改i18n.properties
...
DisplayNotFound=Display Not Found
如果希望在不更改hash value的情况下触发导航,需要在代码中实现导航功能。
Step 6: Navigate to Routes with Hard-Coded Patterns
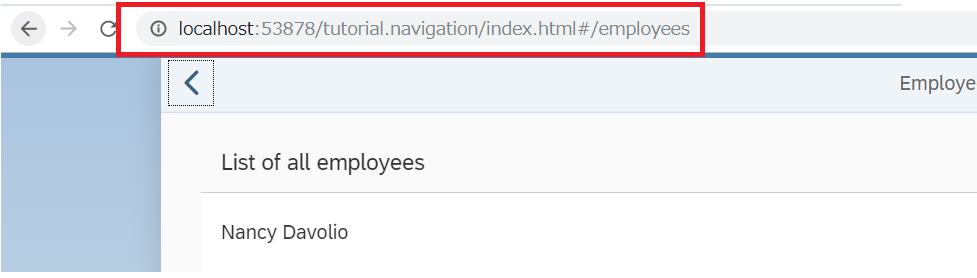
导航到员工列表画面,url中有pattern的硬编码
修改Home.view.xml
<mvc:View
    controllerName="sap.ui.demo.nav.controller.Home"
    xmlns="sap.m"
    xmlns:mvc="sap.ui.core.mvc">
    <Page title="{i18n>homePageTitle}" class="sapUiResponsiveContentPadding">
        <content>
            <Button id="displayNotFoundBtn" text="{i18n>DisplayNotFound}" press=".onDisplayNotFound" class="sapUiTinyMarginEnd"/>
            <Button id="employeeListBtn" text="{i18n>ShowEmployeeList}" press=".onNavToEmployees" class="sapUiTinyMarginEnd"/>
        </content>
    </Page>
添加了按钮,当这个按钮,按下的时候,会触发事件onNavToEmployees。
修改Home.controller.js
sap.ui.define([
    "sap/ui/demo/nav/controller/BaseController"
], function (BaseController) {
    "use strict";
    return BaseController.extend("sap.ui.demo.nav.controller.Home", {
        onDisplayNotFound : function () {
            // display the "notFound" target without changing the hash
            this.getRouter().getTargets().display("notFound", {
                fromTarget : "home"
            });
        },
        onNavToEmployees : function (){
            this.getRouter().navTo("employeeList");
        }

    });
});
实装函数onNavToEmployees,执行router实例navTo("employeeList")方法,employeeList就是我们将要导航的页面。
修改manifest.json
{
    "_version": "1.12.0",
    "sap.app": {
        ...
    },
    "sap.ui": {
        ...
    },
    "sap.ui5": {
        ...
        "routing": {
            "config": {
                "routerClass": "sap.m.routing.Router",
                "viewType": "XML",
                "viewPath": "sap.ui.demo.nav.view",
                "controlId": "app",
                "controlAggregation": "pages",
                "transition": "slide",
                "bypassed": {
                    "target": "notFound"
                }
            },
            "routes": [{
                "pattern": "",
                "name": "appHome",
                "target": "home"
            }, {
                "pattern": "employees",
                "name": "employeeList",
                "target": "employees"
            }],
            "targets": {
                "home": {
                    "viewId": "home",
                    "viewName": "Home",
                    "viewLevel" : 1
                },
                "notFound": {
                    "viewId": "notFound",
                    "viewName": "NotFound",
                    "transition": "show"
                },
                "employees": {
                    "viewId": "employeeList",
                    "viewPath": "sap.ui.demo.nav.view.employee",
                    "viewName": "EmployeeList",
                    "viewLevel" : 2
                }

            }
        }
    }
}
为了使导航工作,我们必须在manifest.json文件中扩展应用程序的路由配置。我们追加了一个新的pattern employeeList,我们使用这个名字在controller中触发导航。
employees是pattern的硬编码,表示路由的匹配hash value是浏览器地址栏中的/#/employees。
target中的employees指向targets中配置的employees,我们为所有与employee相关的视图添加了一个新的名称空间employee,并将路径记录在viewPath中,这将覆盖当前target的config部分中的默认设置。
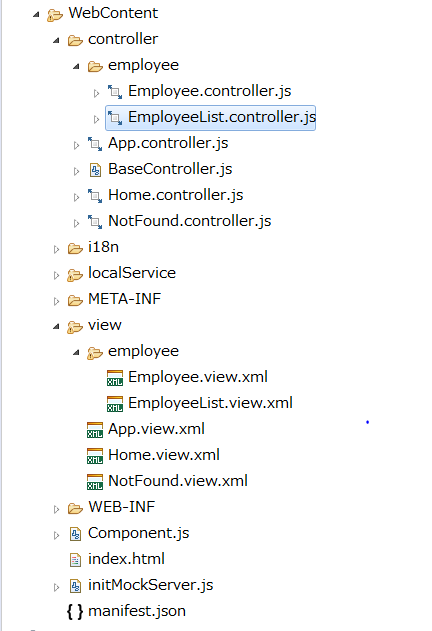
我们将要创建的视图必须相应地放在webapp/view/employee文件夹中。
也可以使用默认的viewPath,但是相应的,必须将viewName更改为employee.EmployeeList,这样才可以正确的读取到view文件。
viewLevel设置为2,是帮助router决定页面切换时的切换顺序。
新建EmployeeList.view.xml
<mvc:View
    controllerName="sap.ui.demo.nav.controller.employee.EmployeeList"
    xmlns="sap.m"
    xmlns:mvc="sap.ui.core.mvc">
    <Page
        id="employeeListPage"
        title="{i18n>EmployeeList}"
        showNavButton="true"
        navButtonPress=".onNavBack"
        class="sapUiResponsiveContentPadding">
        <content>
            <List id="employeeList" headerText="{i18n>ListOfAllEmployees}" items="{/Employees}">
                <items>
                    <StandardListItem
                        title="{FirstName} {LastName}"
                        iconDensityAware="false"
                        iconInset="false"/>
                </items>
            </List>
        </content>
    </Page>
</mvc:View>
将文件夹命名为业务对象,这样在url中可以很容易的看出view所在的位置。
比如本例中,可以从URL /#/employee来确定视图位于./employee的某个位置。
使用sap.m.List绑定数据,加入后退按钮。
新建EmployeeList.controller.js
sap.ui.define([
    "sap/ui/demo/nav/controller/BaseController"
], function (BaseController) {
    "use strict";
    return BaseController.extend("sap.ui.demo.nav.controller.employee.EmployeeList", {
    });
});
创建webapp/controller/employee ,将EmployeeList.controller.js放进去。保持view与controller的文件同步。
修改i18n.properties
...
ShowEmployeeList=Show Employee List
EmployeeList=Employee List
ListOfAllEmployees=List of all employees
按下按钮后
Step 7: Navigate to Routes with Mandatory Parameters
{
    "_version": "1.12.0",
    "sap.app": {
        ...
    },
    "sap.ui": {
        ...
    },
    "sap.ui5": {
        ...
        "routing": {
            "config": {
                "routerClass": "sap.m.routing.Router",
                "viewType": "XML",
                "viewPath": "sap.ui.demo.nav.view",
                "controlId": "app",
                "controlAggregation": "pages",
                "transition": "slide",
                "bypassed": {
                    "target": "notFound"
                }
            },
            "routes": [{
                "pattern": "",
                "name": "appHome",
                "target": "home"
            }, {
                "pattern": "employees",
                "name": "employeeList",
                "target": "employees"
            }, {
                "pattern": "employees/{employeeId}",
                "name": "employee",
                "target": "employee"
            }],
            "targets": {
                "home": {
                    "viewId": "home",
                    "viewName": "Home",
                    "viewLevel" : 1
                },
                "notFound": {
                    "viewId": "notFound",
                    "viewName": "NotFound",
                    "transition": "show"
                },
                "employees": {
                    "viewId": "employeeList",
                    "viewPath": "sap.ui.demo.nav.view.employee",
                    "viewName": "EmployeeList",
                    "viewLevel" : 2
                },
                "employee": {
                    "viewId": "employee",
                    "viewName": "employee.Employee",
                    "viewLevel" : 3
                }
            }
        }
    }
在数据模型Employees.json中,每条数据都有一个EmployeeID来标示该条数据,所以我们创建了一个新的路由,并且在该路由中强制使用employeeId来处理员工对象,这里我们使用了employees/{employeeId}作为该路由的pattern。
大括号 {employeeId} 是一个强制性的参数。在运行的时候,hash中包括employee id,它将与 employees/{employeeId}进行匹配。
employees/2, employees/7, employees/anInvalidId这种格式的hash会被匹配,但是employees/不会被匹配,因为他没有employee id。使用viewlevel 3创建员工信息,保证页面切换正常显示。
这里没有使用viewPath,而是使用了viewName:employee.Employee,表示在config配置的viewPath下的,employee.Employee。
创建Employee.view.xml
<mvc:View
    controllerName="sap.ui.demo.nav.controller.employee.Employee"
    xmlns="sap.m"
    xmlns:mvc="sap.ui.core.mvc"
    xmlns:f="sap.ui.layout.form"
    busyIndicatorDelay="0">
    <Page
        id="employeePage"
        title="{i18n>EmployeeDetailsOf} {FirstName} {LastName}"
        showNavButton="true"
        navButtonPress=".onNavBack"
        class="sapUiResponsiveContentPadding">
        <content>
            <Panel
                id="employeePanel"
                width="auto"
                class="sapUiResponsiveMargin sapUiNoContentPadding">
                <headerToolbar>
                    <Toolbar>
                        <Title text="{i18n>EmployeeIDColon} {EmployeeID}" level="H2"/>
                        <ToolbarSpacer />
                    </Toolbar>
                </headerToolbar>
                <content>
                    <f:SimpleForm
                        minWidth="1024"
                        editable="false"
                        layout="ResponsiveGridLayout"
                        labelSpanL="3" labelSpanM="3" emptySpanL="4" emptySpanM="4"
                        columnsL="1" columnsM="1">
                        <f:content>
                            <Label text="{i18n>formFirstName}"/>
                            <Text text="{FirstName}"/>
                            <Label text="{i18n>formLastName}"/>
                            <Text text="{LastName}"/>
                            <Label text="{i18n>formAddress}"/>
                            <Text text="{Address}"/>
                            <Label text="{i18n>formCity}"/>
                            <Text text="{City}, {Region}"/>
                            <Label text="{i18n>formPostalCode}"/>
                            <Text text="{PostalCode}"/>
                            <Label text="{i18n>formPhoneHome}"/>
                            <Text text="{HomePhone}"/>
                            <Label text="{i18n>formCountry}"/>
                            <Text text="{Country}"/>
                        </f:content>
                    </f:SimpleForm>
                </content>
            </Panel>
        </content>
    </Page>
</mvc:View>
在webapp/view/employee文件夹中创建Employee.view.xml文件。用来显示员工信息。
创建Employee.controller.js
sap.ui.define([
    "sap/ui/demo/nav/controller/BaseController"
], function (BaseController) {
    "use strict";
    return BaseController.extend("sap.ui.demo.nav.controller.employee.Employee", {
        onInit: function () {
            var oRouter = this.getRouter();
            oRouter.getRoute("employee").attachMatched(this._onRouteMatched, this);
            // Hint: we don't want to do it this way
            /*
            oRouter.attachRouteMatched(function (oEvent){
                var sRouteName, oArgs, oView;
                sRouteName = oEvent.getParameter("name");
                if (sRouteName === "employee"){
                    this._onRouteMatched(oEvent);
                }
            }, this);
            */
        },
        _onRouteMatched : function (oEvent) {
            var oArgs, oView;
            oArgs = oEvent.getParameter("arguments");
            oView = this.getView();

            oView.bindElement({
                path : "/Employees(" + oArgs.employeeId + ")",
                events : {
                    change: this._onBindingChange.bind(this),
                    dataRequested: function (oEvent) {
                        oView.setBusy(true);
                    },
                    dataReceived: function (oEvent) {
                        oView.setBusy(false);
                    }
                }
            });
        },
        _onBindingChange : function (oEvent) {
            // No data for the binding
            if (!this.getView().getBindingContext()) {
                this.getRouter().getTargets().display("notFound");
            }
        }
    });
});
<mvc:View
    controllerName="sap.ui.demo.nav.controller.employee.EmployeeList"
    xmlns="sap.m"
    xmlns:mvc="sap.ui.core.mvc">
    <Page
        id="employeeListPage"
        title="{i18n>EmployeeList}"
        showNavButton="true"
        navButtonPress=".onNavBack"
        class="sapUiResponsiveContentPadding">
        <content>
            <List id="employeeList" headerText="{i18n>ListOfAllEmployees}" items="{/Employees}">
                <items>
                    <StandardListItem
                        title="{FirstName} {LastName}"
                        iconDensityAware="false"
                        iconInset="false"
                        type="Navigation"
                        press=".onListItemPressed"/>
                </items>
            </List>
        </content>
    </Page>
</mvc:View>
添加导航,将StandardListItem 的type设置为Navigation,添加一个press事件,当item被点击时,触发onListItemPressed事件。
修改EmployeeList.controller.js
sap.ui.define([
    "sap/ui/demo/nav/controller/BaseController"
], function (BaseController) {
    "use strict";
    return BaseController.extend("sap.ui.demo.nav.controller.employee.EmployeeList", {
        onListItemPressed : function(oEvent){
            var oItem, oCtx;
            oItem = oEvent.getSource();
            oCtx = oItem.getBindingContext();
            this.getRouter().navTo("employee",{
                employeeId : oCtx.getProperty("EmployeeID")
            });
        }
    });
});
通过当前item的绑定数据,获取EmployeeID,将EmployeeID赋值给employeeId。
修改i18n.properties
...
formEmployeeDetailsOf=Employee Details of
formEmployeeIDColon=Employee ID:
formFirstName=First Name
formLastName=Last Name
formAddress=Address
formCity=City
formPostalCode=Postal Code
formPhoneHome=Phone (Home)
formCountry=Country


Step 8: Navigate with Flip Transition
切换页面使用flip。
修改Employee.view.xml
<mvc:View
    controllerName="sap.ui.demo.nav.controller.employee.Employee"
    xmlns="sap.m"
    xmlns:mvc="sap.ui.core.mvc"
    xmlns:f="sap.ui.layout.form"
    busyIndicatorDelay="0">
    <Page
        id="employeePage"
        title="{i18n>EmployeeDetailsOf} {FirstName} {LastName}"
        showNavButton="true"
        navButtonPress=".onNavBack"
        class="sapUiResponsiveContentPadding">
        <content>
            <Panel
                id="employeePanel"
                width="auto"
                class="sapUiResponsiveMargin sapUiNoContentPadding">
                <headerToolbar>
                    <Toolbar>
                        <Title text="{i18n>EmployeeIDColon} {EmployeeID}" level="H2"/>
                        <ToolbarSpacer />
                        <Link text="{i18n>FlipToResume}" tooltip="{i18n>FlipToResume.tooltip}" press=".onShowResume"/>
                    </Toolbar>
                </headerToolbar>
                <content>
                    ...
                </content>
            </Panel>
        </content>
    </Page>
</mvc:View>
添加一个link,触发事件,onShowResume。
修改Employee.controller.js
sap.ui.define([
    "sap/ui/demo/nav/controller/BaseController"
], function (BaseController) {
    "use strict";
    return BaseController.extend("sap.ui.demo.nav.controller.employee.Employee", {
        ...
        _onBindingChange : function (oEvent) {
            // No data for the binding
            if (!this.getView().getBindingContext()) {
                this.getRouter().getTargets().display("notFound");
            }
        }
            ...
        },
        onShowResume : function (oEvent) {
            var oCtx = this.getView().getElementBinding().getBoundContext();

            this.getRouter().navTo("employeeResume", {
                employeeId : oCtx.getProperty("EmployeeID")
            });
        }

    });
});
根据绑定内容,获取EmployeeID,作为参数传递给employeeId。并导航到路由emloyeeResume。
{
    "_version": "1.12.0",
    "sap.app": {
        ...
    },
    "sap.ui": {
        ...
    },
    "sap.ui5": {
        ...
        "routing": {
            "config": {
                "routerClass": "sap.m.routing.Router",
                "viewType": "XML",
                "viewPath": "sap.ui.demo.nav.view",
                "controlId": "app",
                "controlAggregation": "pages",
                "transition": "slide",
                "bypassed": {
                    "target": "notFound"
                }
            },
            "routes": [{
                "pattern": "",
                "name": "appHome",
                "target": "home"
            }, {
                "pattern": "employees",
                "name": "employeeList",
                "target": "employees"
            }, {
                "pattern": "employees/{employeeId}",
                "name": "employee",
                "target": "employee"
            }, {
                "pattern": "employees/{employeeId}/resume",
                "name": "employeeResume",
                "target": "employeeResume"
            }],
            "targets": {
                "home": {
                    "viewId": "home",
                    "viewName": "Home",
                    "viewLevel" : 1
                },
                "notFound": {
                    "viewId": "notFound",
                    "viewName": "NotFound",
                    "transition": "show"
                },
                "employees": {
                    "viewId": "employees",
                    "viewPath": "sap.ui.demo.nav.view.employee",
                    "viewName": "EmployeeList",
                    "viewLevel" : 2
                },
                "employee": {
                    "viewId": "employee",
                    "viewName": "employee.Employee",
                    "viewLevel" : 3
                },
                "employeeResume": {
                    "viewId": "resume",
                    "viewName": "employee.Resume",
                    "viewLevel" : 4,
                    "transition": "flip"
                }
            }
        }
    }
}
添加路由emloyeeResume。{employeeId}做为强制参数,/resume做为结尾。
<mvc:View
    controllerName="sap.ui.demo.nav.controller.employee.Resume"
    xmlns="sap.m"
    xmlns:mvc="sap.ui.core.mvc">
    <Page
        title="{i18n>ResumeOf} {FirstName} {LastName}"
        id="employeeResumePage"
        showNavButton="true"
        navButtonPress=".onNavBack">
        <content>
            <IconTabBar
                id="iconTabBar"
                headerBackgroundDesign="Transparent"
                class="sapUiResponsiveContentPadding"
                binding="{Resume}">
                <items>
                    <IconTabFilter id="infoTab" text="{i18n>tabInfo}" key="Info">
                        <Text text="{Information}"/>
                    </IconTabFilter>
                    <IconTabFilter id="projectsTab" text="{i18n>tabProjects}" key="Projects">
                        <mvc:XMLView viewName="sap.ui.demo.nav.view.employee.ResumeProjects"></mvc:XMLView>
                    </IconTabFilter>
                    <IconTabFilter id="hobbiesTab" text="{i18n>tabHobbies}" key="Hobbies">
                        <Text text="{Hobbies}"/>
                    </IconTabFilter>
                    <IconTabFilter id="notesTab" text="{i18n>tabNotes}" key="Notes">
                        <Text text="{Notes}"/>
                    </IconTabFilter>
                </items>
            </IconTabBar>
        </content>
    </Page>
</mvc:View>
在webapp/view/employee文件夹中创建Resume.view.xml。视图使用IconTabBar显示简历数据。它的绑定属性被设置为{Resume}。
在IconTabBar中创建了4个tab。其中三个使用了Text控件,还有一个使用了view控件,sapui5将自动加载这个view。
创建Resume.controller.js
sap.ui.define([
    "sap/ui/demo/nav/controller/BaseController"
], function (BaseController) {
    "use strict";
    return BaseController.extend("sap.ui.demo.nav.controller.employee.Resume", {
        onInit: function () {
            var oRouter = this.getRouter();
            oRouter.getRoute("employeeResume").attachMatched(this._onRouteMatched, this);
        },
        _onRouteMatched : function (oEvent) {
            var oArgs, oView;
            oArgs = oEvent.getParameter("arguments");
            oView = this.getView();
            oView.bindElement({
                path : "/Employees(" + oArgs.employeeId + ")",
                events : {
                    change: this._onBindingChange.bind(this),
                    dataRequested: function (oEvent) {
                        oView.setBusy(true);
                    },
                    dataReceived: function (oEvent) {
                        oView.setBusy(false);
                    }
                }
            });
        },
        _onBindingChange : function (oEvent) {
            // No data for the binding
            if (!this.getView().getBindingContext()) {
                this.getRouter().getTargets().display("notFound");
            }
        }
    });
});
创建ResumeProjects.view.xml
<mvc:View xmlns="sap.m" xmlns:mvc="sap.ui.core.mvc">
    <Text text="{Projects}"/>
</mvc:View>
这个文件不需要controller,是因为我们只需要他现实数据。
ResumeOf=Resume of
tabInfo=Info
tabProjects=Projects
tabHobbies=Hobbies
tabNotes=Notes
FlipToResume=Flip to Resume
FlipToResume.tooltip=See the resume of this employee


Step 9: Allow Bookmarkable Tabs with Optional Query Parameters
添加可选参数,导航到相应的tag。
在url中使用可选的参数,通过deep linking到对应的tag页。
修改manifect.json
{
    "_version": "1.12.0",
    "sap.app": {
        ...
    },
    "sap.ui": {
        ...
    },
    "sap.ui5": {
        ...
        "routing": {
            "config": {
                "routerClass": "sap.m.routing.Router",
                "viewType": "XML",
                "viewPath": "sap.ui.demo.nav.view",
                "controlId": "app",
                "controlAggregation": "pages",
                "transition": "slide",
                "bypassed": {
                    "target": "notFound"
                }
            },
            "routes": [{
                "pattern": "",
                "name": "appHome",
                "target": "home"
            }, {
                "pattern": "employees",
                "name": "employeeList",
                "target": "employees"
            }, {
                "pattern": "employees/{employeeId}",
                "name": "employee",
                "target": "employee"
            }, {
                "pattern": "employees/{employeeId}/resume:?query:",
                "name": "employeeResume",
                "target": "employeeResume"
            }],
            "targets": {
                ...
            }
        }
    }
}
现在只能导航到resume的页面,这时页面将始终固定在第一个tag上。为了定位tag,这里添加一个query参数到pattern中。
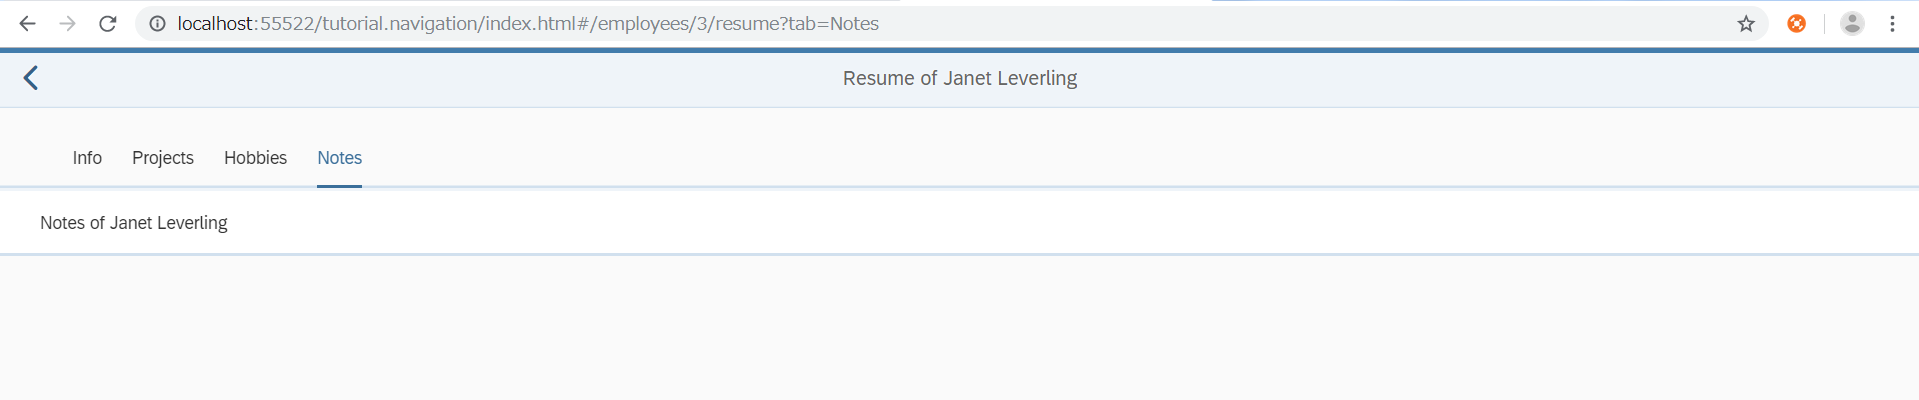
新的部分:?query:允许传递带有任何参数的查询,例如 /#/employees/3/resume?tab=Projects or /#/employees/3/resume?tab=Projects&action=edit。
:?query:用冒号开始与结束,这表示他是可选的。如果需要他是强制参数,那么就用 {?query} ,大括号的内容,都被认为是强制的。
修改Resume.view.xml
<mvc:View
    controllerName="sap.ui.demo.nav.controller.employee.Resume"
    xmlns="sap.m"
    xmlns:mvc="sap.ui.core.mvc">
    <Page
        title="{i18n>ResumeOf} {FirstName} {LastName}"
        id="employeeResumePage"
        showNavButton="true"
        navButtonPress=".onNavBack">
        <content>
            <IconTabBar
                id="iconTabBar"
                headerBackgroundDesign="Transparent"
                class="sapUiResponsiveContentPadding"
                binding="{Resume}"
                select=".onTabSelect"
                selectedKey="{view>/selectedTabKey}">
                <items>
                    <IconTabFilter id="infoTab" text="{i18n>tabInfo}" key="Info">
                        <Text text="{Information}"/>
                    </IconTabFilter>
                    <IconTabFilter id="projectsTab" text="{i18n>tabProjects}" key="Projects">
                        <mvc:XMLView viewName="sap.ui.demo.nav.view.employee.ResumeProjects"></mvc:XMLView>
                    </IconTabFilter>
                    <IconTabFilter id="hobbiesTab" text="{i18n>tabHobbies}" key="Hobbies">
                        <Text text="{Hobbies}"/>
                    </IconTabFilter>
                    <IconTabFilter id="notesTab" text="{i18n>tabNotes}" key="Notes">
                        <Text text="{Notes}"/>
                    </IconTabFilter>
                </items>
            </IconTabBar>
        </content>
    </Page>
</mvc:View>
select=".onTabSelect"用来监听IconTabBar的select事件。selectedKey绑定到视图模型。
修改Resume.controller.js
sap.ui.define([
    "sap/ui/demo/nav/controller/BaseController",
    "sap/ui/model/json/JSONModel"

], function (BaseController, JSONModel) {
    "use strict";
    var _aValidTabKeys = ["Info", "Projects", "Hobbies", "Notes"];
    return BaseController.extend("sap.ui.demo.nav.controller.employee.Resume", {
        onInit: function () {
            var oRouter = this.getRouter();
            this.getView().setModel(new JSONModel(), "view");

            oRouter.getRoute("employeeResume").attachMatched(this._onRouteMatched, this);
        },
        _onRouteMatched : function (oEvent) {
            var oArgs, oView, oQuery;
            oArgs = oEvent.getParameter("arguments");
            oView = this.getView();
            oView.bindElement({
                path : "/Employees(" + oArgs.employeeId + ")",
                events : {
                    change: this._onBindingChange.bind(this),
                    dataRequested: function (oEvent) {
                        oView.setBusy(true);
                    },
                    dataReceived: function (oEvent) {
                        oView.setBusy(false);
                    }
                }
            });
            oQuery = oArgs["?query"];
            if (oQuery && _aValidTabKeys.indexOf(oQuery.tab) > -1){
                oView.getModel("view").setProperty("/selectedTabKey", oQuery.tab);
            } else {
                // the default query param should be visible at all time
                this.getRouter().navTo("employeeResume", {
                    employeeId : oArgs.employeeId,
                    query: {
                        tab : _aValidTabKeys[0]
                    }
                },true /*no history*/);
            }

        },
        _onBindingChange : function (oEvent) {
            // No data for the binding
            if (!this.getView().getBindingContext()) {
                this.getRouter().getTargets().display("notFound");
            }
        },
        onTabSelect : function (oEvent){
            var oCtx = this.getView().getBindingContext();
            this.getRouter().navTo("employeeResume", {
                employeeId : oCtx.getProperty("EmployeeID"),
                query: {
                    tab : oEvent.getParameter("selectedKey")
                }
            }, true /*without history*/);
        }

    });
});
当tab被手动改变时,select事件会被触发。他将取得employeeID,与selectedKey,导航到employeeResume来更新url。第三个参数为true,表示当前进行tag切换的操作,不会被作为历史记录添加到浏览器中,这样当我们点返回按钮的时候就会跳到之前的页面,而不是跳回之前的tag。
onTabSelect事件中的this.getRouter().navTo()执行的时候,也会触发_onRouteMatched(),是因为在init页面的时候,路由已经被绑定了该监听方法。
在onInit事件中,添加一个jsonmodel,做为视图模型。数组_aValidTabKeys用来保证选择的tag,是在范围之内的。这些key就是IconTabFilters控件中的key。
_onRouteMatched中的oQuery,用来存储url中query的值。如果query传值了,并且这个值在_aValidTabKeys中,那么就将值放入IconTabBar的selectedKey中。否则就设置为第一个tag。