zoukankan      html  css  js  c++  java
  • Vue--axios:vue中的ajax异步请求(发送和请求数据)、vue-resource异步请求和跨域

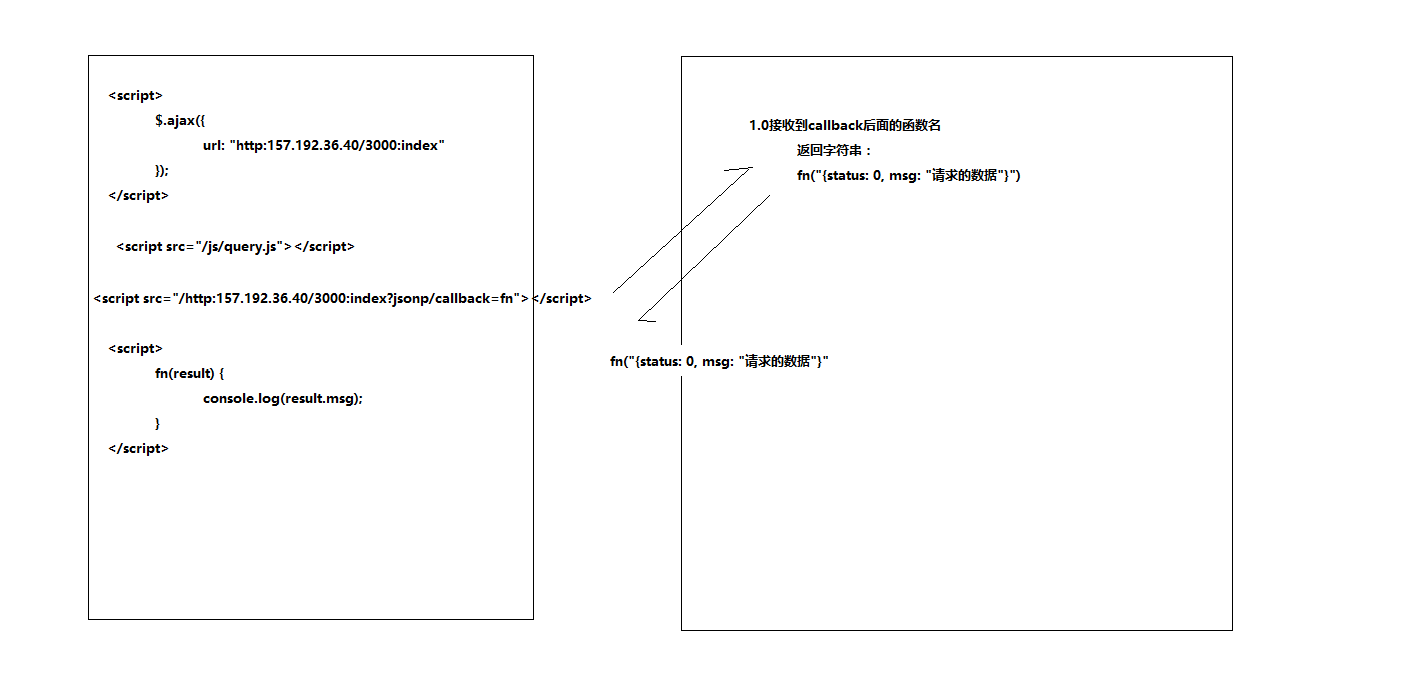
    跨域原理:

    一.使用axios发送get请求

     1 <!DOCTYPE html>
     2 <html lang="en">
     3 <head>
     4 <meta charset="UTF-8">
     5 <meta name="viewport" content="width=device-width, initial-scale=1.0">
     6 <meta http-equiv="X-UA-Compatible" content="ie=edge">
     7 <title>Document</title>   
     8 <script src="../vue2.4.4.js"></script>
     9 <script src="../axios.js"></script>
    10 
    11 </head>
    12 
    13 <body>
    14 <!-- 定义一个vue的管理区块,(MVVM中的View) -->
    15 <div id="app">
    16     <button @click="getApiData">点击得到数据</button>
    17     {{name}}
    18 </div>
    19 
    20 </body>
    21 
    22 <script>
    23 
    24     // 实例化vue对象(MVVM中的View Model)
    25     new Vue({
    26         // vm控制的区块为id为app的div,此div中的所有vue指令均可以被vm解析
    27         el:'#app',
    28         data:{
    29         // 数据 (MVVM中的Model)   
    30         name:""
    31         },
    32         methods:{
    33             getApiData:function() {
    34             //设置请求路径
    35             var url  = "http://157.122.54.189:9093/api/getprodlist";                
    36             // 发送请求:将数据返回到一个回到函数中
    37             _this= this;
    38             // 并且响应成功以后会执行then方法中的回调函数
    39             axios.get(url).then(function(result) {
    40                 // result是所有的返回回来的数据
    41                 // 包括了响应报文行
    42                 // 响应报文头
    43                 // 响应报文体
    44                 console.log(result.data.message[0]);
    45                 _this.name = result.data.message[0].name;
    46             });    
    47             }
    48         }
    49     })
    50 </script>
    51 </html>

    二.使用axios发送post请求

     1 <!DOCTYPE html>
     2 <html lang="en">
     3 <head>
     4 <meta charset="UTF-8">
     5 <meta name="viewport" content="width=device-width, initial-scale=1.0">
     6 <meta http-equiv="X-UA-Compatible" content="ie=edge">
     7 <title>Document</title>   
     8 <script src="../vue2.4.4.js"></script>
     9 <script src="../axios.js"></script>
    10 
    11 </head>
    12 
    13 <body>
    14 <!-- 定义一个vue的管理区块,(MVVM中的View) -->
    15 <div id="app">
    16     <button @click="postApiData">点击提交数据</button>
    17 </div>
    18 
    19 </body>
    20 
    21 <script>
    22 
    23     // 实例化vue对象(MVVM中的View Model)
    24     new Vue({
    25         // vm控制的区块为id为app的div,此div中的所有vue指令均可以被vm解析
    26         el:'#app',
    27         data:{
    28         // 数据 (MVVM中的Model)   
    29         },
    30         methods:{
    31             postApiData:function() {
    32                 var url = "http://157.122.54.189:9093/api/addproduct";
    33                 // post有两个参数
    34                 //参数1:请求的路径
    35                 //参数2:提交的参数
    36                 //提交参数的两种形态:
    37                 //          1.可以直接传入字符串 name=张三&age=19
    38                 //          2.可以以对象的形式传入{name:"三",age:19}
    39                 axios.post(url,{name:"拖油瓶前来报道"}).then(function(res) {
    40                    var resData = res.data;
    41                    if(resData.status == "0") { //0表示成功,1表示失败    
    42                         alert(resData.message);
    43                    }else{
    44                         alert(resData.message);
    45                    } 
    46                 });
    47 
    48             }
    49         }
    50     })
    51 </script>
    52 </html>

    三.使用axios发送post或get请求细节处理

     1 <!DOCTYPE html>
     2 <html lang="en">
     3 <head>
     4 <meta charset="UTF-8">
     5 <meta name="viewport" content="width=device-width, initial-scale=1.0">
     6 <meta http-equiv="X-UA-Compatible" content="ie=edge">
     7 <title>Document</title>   
     8 <script src="../vue2.4.4.js"></script>
     9 <script src="../axios.js"></script>
    10 
    11 </head>
    12 
    13 <body>
    14 <!-- 定义一个vue的管理区块,(MVVM中的View) -->
    15 <div id="app">
    16      <button @click="getApiData">点击得到数据</button>
    17      <button @click="postApiData">点击提交数据</button>
    18     {{name}}
    19   
    20 </div>
    21 
    22 </body>
    23 
    24 <script>
    25     //细节处理一:可以给axios的ajax请求设置统一的主机和端口号
    26     axios.defaults.baseURL = "http://157.122.54.189:9093/";
    27     //细节处理二: 可以将axios这个对象添加到Vue的原型对象中,将来在使用的时候就只需要使用this.对象名就可以了
    28     Vue.prototype.$http = axios;
    29 
    30 
    31     // 实例化vue对象(MVVM中的View Model)
    32     new Vue({
    33         // vm控制的区块为id为app的div,此div中的所有vue指令均可以被vm解析
    34         el:'#app',
    35         data:{
    36         // 数据 (MVVM中的Model) 
    37         name:"" 
    38         },
    39         methods:{ 
    40             getApiData:function() {
    41             //设置请求路径
    42             var url  = "api/getprodlist";                
    43             // 发送请求:将数据返回到一个回到函数中
    44             _this= this;
    45             // 并且响应成功以后会执行then方法中的回调函数
    46             this.$http.get(url).then(function(result) {
    47                 // result是所有的返回回来的数据
    48                 // 包括了响应报文行
    49                 // 响应报文头
    50                 // 响应报文体
    51                 _this.name = result.data.message[0].name;
    52             }).catch(function(){
    53                 alert("出错了");
    54             });    
    55             },
    56 
    57             postApiData:function() {
    58                 var url = "api/addproduct";
    59                 // post有两个参数
    60                 //参数1:请求的路径
    61                 //参数2:提交的参数
    62                 //提交参数的两种形态:
    63                 //          1.可以直接传入字符串 name=张三&age=19
    64                 //          2.可以以对象的形式传入{name:"三",age:19}
    65                 this.$http.post(url,{name:"拖油瓶前来报道3 "}).then(function(res) {
    66                    var resData = res.data;
    67                    if(resData.status == "0") { //0表示成功,1表示失败    
    68                         alert(resData.message);
    69                    }else{
    70                         alert(resData.message);
    71                    }
    72                 }).catch(function(){
    73                      alert("出错了");
    74                 }); ;
    75 
    76             }
    77         }
    78     })
    79 </script>
    80 </html>

    四.使用axios完成品牌管理

      1 <!DOCTYPE html>
      2 <html lang="en">
      3 
      4 <head>
      5     <meta charset="UTF-8">
      6     <meta name="viewport" content="width=device-width, initial-scale=1.0">
      7     <meta http-equiv="X-UA-Compatible" content="ie=edge">
      8     <title>Document</title>
      9     <style>
     10         #app {
     11              600px;
     12             margin: 10px auto;
     13         }
     14 
     15         .tb {
     16             border-collapse: collapse;
     17              100%;
     18         }
     19 
     20         .tb th {
     21             background-color: #0094ff;
     22             color: white;
     23         }
     24 
     25         .tb td,
     26         .tb th {
     27             padding: 5px;
     28             border: 1px solid black;
     29             text-align: center;
     30         }
     31 
     32         .add {
     33             padding: 5px;
     34             border: 1px solid black;
     35             margin-bottom: 10px;
     36         }
     37     </style>
     38     <script src="../vue2.4.4.js"></script>
     39     <script src="../axios.js"></script>
     40 </head>
     41 
     42 <body>
     43     <div id="app">
     44         <div class="add">
     45             品牌名称: <input v-model="name" type="text">
     46             <button @click="add">添加</button>
     47         </div>
     48         <div class="add">品牌名称:<input type="text"></div>
     49         <div>
     50             <table class="tb">
     51                 <tr>
     52                     <th>编号</th>
     53                     <th>品牌名称</th>
     54                     <th>创立时间</th>
     55                     <th>操作</th>
     56                 </tr>
     57                 <tr v-if="list.length <= 0">
     58                     <td colspan="4">没有品牌数据</td>
     59                 </tr>
     60                 <!--加入: key="index" 时候必须把所有参数写完整  -->
     61                 <tr v-for="(item,key,index) in list" :key="index">
     62                     <td>{{item.id}}</td>
     63                     <td>{{item.name}}</td>
     64                     <td>{{item.ctime}}</td>
     65                     <td><a href="#" @click="del(item.id)">删除</a></td>
     66                 </tr>
     67             </table>
     68         </div>
     69 
     70     </div>
     71 </body>
     72 
     73 </html>
     74 
     75 <script>
     76     // 1 将所有的主机名和端口 一起设置
     77     axios.defaults.baseURL = "http://157.122.54.189:9093";
     78     // 2 将axios添加到Vue的原型对象中
     79     Vue.prototype.$http = axios;
     80 
     81     var vm = new Vue({
     82         el: "#app",
     83         data: {
     84             name: '',
     85             list: []  // 数据应该来源于服务器提供的api
     86         },
     87         mounted:function() { //钩子函数
     88             this.getList();
     89         },
     90         methods: {
     91             // 得到所有的列表数据,这个方法应该等页面加载完成以后直接被调用的
     92             getList:function() {
     93                 var url = "/api/getprodlist";
     94                 // 改变this的指向
     95                 _this = this;
     96                 this.$http.get(url).then(function(result){
     97                     var res = result.data;
     98                     if(res.status ==  0) {
     99                         //将数据赋值给list
    100                         _this.list = res.message;     
    101                     }else{
    102                         alert("出错了");
    103                     }
    104                 }).catch(function(){
    105                     alert("出错了");
    106                 });
    107             },
    108             // 得到文本框中的值,并且将值通过api提交到服务器
    109             add:function() {
    110                 var url = "/api/addproduct";
    111                 _this = this;
    112                 // 得到name属性对应的值
    113                 this.$http.post(url,{"name":this.name}).then(function(result){
    114                     var res = result.data;
    115                     if(res.status == "0") {
    116                         alert(res.message);
    117                         _this.getList();
    118                     }else{
    119                         alert(res.message);
    120                     }
    121                 }).catch(function() {
    122                     alert("出错了");
    123                 });
    124             },
    125             del:function(id){
    126                 //格局id删除数据
    127                 var url =   "/api/delproduct/"+id;
    128                 // 发送异步请求
    129                 _this = this;
    130                 this.$http.get(url).then(function(result){
    131                     var res = result.data;
    132                     if(res.status == "0") {
    133                         alert(res.message);
    134                         //更新数据
    135                         _this.getList();
    136                     }else{
    137                         alert(res.message);
    138                     }
    139                     
    140                 }).catch(function(){
    141                     alert("出错了");
    142                 });
    143             }
    144         }
    145     });
    146 
    147 </script>

     五.使用vue-resource发送异步请求(包含get和post请求)

    两个js文件一定要按照顺序加载

     1 <!DOCTYPE html>
     2 <html lang="en">
     3 <head>
     4 <meta charset="UTF-8">
     5 <meta name="viewport" content="width=device-width, initial-scale=1.0">
     6 <meta http-equiv="X-UA-Compatible" content="ie=edge">
     7 <title>Document</title>   
     9 <script src="../vue-resource.js"></script>
    10 
    11 </head>
    12 
    13 <body>
    14 <!-- 定义一个vue的管理区块,(MVVM中的View) -->
    15 <div id="app">
    16     {{name}}
    17 </div>
    18 
    19 </body>
    20 
    21 <script>
    22 
    23     // 实例化vue对象(MVVM中的View Model)
    24     new Vue({
    25         // vm控制的区块为id为app的div,此div中的所有vue指令均可以被vm解析
    26         el:'#app',
    27         data:{
    28         // 数据 (MVVM中的Model)  
    29         name:"" 
    30         },
    31         methods:{
    32             
    33         },
    34         created:function() {
    35             // 发送请求到服务器加载数据
    36             //vue-resource发送get请求
    37            /* this.$http.get("http://157.122.54.189:9093/api/getprodlist").then(function(result){
    38                //得到响应的内容
    39                var res = result.body;
    40                this.name = res.message[0].name;
    41             });
    42             */
    43             //vue-resource发送post请求
    44             this.$http.post("http://157.122.54.189:9093/api/addproduct",{"name":"小明"}).then(function(result){
    45                var res = result.body;
    46                alert(res.message);
    47             });
    48         }
    49     })
    50 </script>
    51 </html>


    六.使用vue-resource来实现跨域


     1 <!DOCTYPE html>
     2 <html lang="en">
     3 <head>
     4 <meta charset="UTF-8">
     5 <meta name="viewport" content="width=device-width, initial-scale=1.0">
     6 <meta http-equiv="X-UA-Compatible" content="ie=edge">
     7 <title>Document</title>   
     8 
     9 <script src="../vue2.4.4.js"></script>
    10 <script src="../vue-resource.js"></script>
    11 </head>
    12 
    13 <body>
    14 <!-- 定义一个vue的管理区块,(MVVM中的View) -->
    15 <div id="app">
    16 
    17 </div>
    18 
    19 </body>
    20 
    21 <script>
    22 
    23     // 实例化vue对象(MVVM中的View Model)
    24     new Vue({
    25         // vm控制的区块为id为app的div,此div中的所有vue指令均可以被vm解析
    26         el:'#app',
    27         data:{
    28         // 数据 (MVVM中的Model)   
    29         },
    30         mounted:function() {
    31             var url = "http://157.122.54.189:9093/jsonp";
    32             //在vue-resources中会自动在路径上加入callback的函数名,得到的结果就是result
    33             this.$http.jsonp(url).then(function(result){
    34                 var res = JSON.parse(JSON.parse(result.body));
    35                 console.log(res.message);
    36             });
    37         }
    38     })
    39 </script>
    40 </html>
  • 相关阅读:
    C# using的三种用法
    C# 匿名方法和Lambda表达式
    c#中内置委托
    c#委托中的匿名方法和lambda表达式
    java生成条形码
    根据日期筛选和模糊查询
    mysql中ifnull()方法的用法
    mysql数据库中的出发器
    动态SQL之<where>、<if>条件判断
    动态sql
  • 原文地址:https://www.cnblogs.com/superAnny/p/8405715.html
Copyright © 2011-2022 走看看