环境规划:
| IP | 主机名 | 组件 | 配置 | 备注 |
|---|---|---|---|---|
| 192.168.3.81 | node1 | 8核16G 磁盘X2-50G | 没有8核16G无法添加服务器 | |
| 192.168.3.82 | node2 | cache,proxy | 8核16G 磁盘X2-50G | |
| 192.168.3.83 | node3c | cache,proxy | 8核16G 磁盘X2-50G | |
| 192.168.3.84 | node4 | cache | 8核16G 磁盘X2-50G | |
| 192.168.3.85 | node5 | cache | 8核16G 磁盘X2-50G |
安装包与配套文档
#官方安装包redis2.3
http://deliver-service-packet-1258877907.cos.ap-guangzhou.myqcloud.com/redis/V2.3/redis_for_tstack_x86-2.3-install.tar.gz?sign=q-sign-algorithm%3Dsha1%26q-ak%3DAKID54tUofahnurY7VvU8UjoZ4MN7aoxac2F%26q-sign-time%3D1622115037%3B1622374297%26q-key-time%3D1622115037%3B1622374297%26q-header-list%3Dhost%26q-url-param-list%3D%26q-signature%3Dd9463fdbd23851d8a7199289d1d620c62e60c811

#官方文档
http://deliver-service-packet-1258877907.cos.ap-guangzhou.myqcloud.com/redis/V2.3/Redis%E7%8B%AC%E7%AB%8B%E8%BE%93%E5%87%BA%E7%89%88%E4%B8%80%E9%94%AE%E9%83%A8%E7%BD%B2%E6%96%87%E6%A1%A3%282.3%E7%89%88%E6%9C%AC%29.docx?sign=q-sign-algorithm%3Dsha1%26q-ak%3DAKID54tUofahnurY7VvU8UjoZ4MN7aoxac2F%26q-sign-time%3D1622115040%3B1622374300%26q-key-time%3D1622115040%3B1622374300%26q-header-list%3Dhost%26q-url-param-list%3D%26q-signature%3D45337c72f36e1c1b73e630d84e05a86fe9aebcfd
基础优化
# --所有机器
#追加以下参数到/etc/sysctl.conf
net.ipv4.tcp_tw_reuse=1
net.ipv4.tcp_tw_recycle = 1
net.ipv4.tcp_timestamps = 1
net.ipv4.tcp_fin_timeout = 30
最后生效以上设置:
sysctl -p

# --cache_agent机器额外两条优化
#追加以下参数到/etc/sysctl.conf
net.core.somaxconn = 511
vm.swappiness = 1
最后生效以上设置:
sysctl -p

#--cache/Proxy机器配置以下设置:
echo never > /sys/kernel/mm/transparent_hugepage/enabled

#如果需要重启生效,需要追加命令到/etc/rc.local
echo 'echo never > /sys/kernel/mm/transparent_hugepage/enabled' >> /etc/rc.local


#--所有Cache/Proxy机器
 ulimit -SHn 65535

#配置重启生效
cat >>/etc/security/limits.conf<<eof
* soft nofile 65535
* hard nofile 65535
eof


#挂载磁盘

#每台服务器新增一块磁盘
echo "- - -" > /sys/class/scsi_host/host0/scan
echo "- - -" > /sys/class/scsi_host/host1/scan
echo "- - -" > /sys/class/scsi_host/host2/scan
lsblk

#挂载新磁盘
umount /dev/sdb
mkdir -p /data
mkfs.xfs -f /dev/sdb
echo '/dev/sdb   /data    xfs  defaults   0 0'  >>/etc/fstab
mount -a
df -h
中控机操作[第一台服务器]
#中控机服务器安装mariadb
yum install -y mariadb-server
systemctl start mariadb
systemctl enable mariadb

#mariadb初始化[可以不用初始化]:
[root@server1 ~]# mysql_secure_installation
Enter current password for root (enter for none):  <–初次运行直接回车
Set root password? [Y/n]   <– 是否设置root用户密码,输入y并回车或直接回车
New password:          <– 设置root用户的密码
Re-enter new password: <– 再输入一次你设置的密码
Password updated successfully!
… Success!
Remove anonymous users? [Y/n] <– 是否删除匿名用户,生产环境建议删除,所以直接回车
… Success!
Disallow root login remotely? [Y/n] n  <–是否禁止root远程登录,根据自己的需求选择Y/n并回车,建议禁止,这里不用禁止
… Success!
Remove test database and access to it? [Y/n] y <– 是否删除test数据库,直接回车
Reload privilege tables now? [Y/n] <– 是否重新加载权限表,直接回车
… Success!


连接数据库:
mysql -uroot -p123456


#创建用户并授权
GRANT ALL PRIVILEGES ON *.* to 'root'@'%' IDENTIFIED BY '123456' WITH GRANT OPTION;
FLUSH privileges;


GRANT ALL PRIVILEGES ON *.* TO 'mysql'@'%' IDENTIFIED BY '123456' WITH GRANT OPTION;
flush privileges;


#删除空账号密码的条目
use mysql;
delete from user where user='';
delete from user where password='';
select user,host,password from mysql.user;


#测试连接:
其他服务器安装一个mariadb,这里我直接用 node2 服务器测试连接node1的mysql
测试连接
yum install -y mariadb

#测试:
[root@node2 ~]#  mysql -umysql -p123456 -h 192.168.3.81
Welcome to the MariaDB monitor.  Commands end with ; or g.
Your MariaDB connection id is 17
Server version: 5.5.68-MariaDB MariaDB Server
Copyright (c) 2000, 2018, Oracle, MariaDB Corporation Ab and others.
Type 'help;' or 'h' for help. Type 'c' to clear the current input statement.

MariaDB [(none)]>


#注意
1.	MySQL密码说明
MySQL密码中不可出现"@"、"$"特殊符号


#创建redis使用的数据库:
mysql -uroot -p123456
安装redis[中控机操作]
mkdir -p /root
tar xf redis_for_tstack_x86-2.3-install.tar.gz
cd redis_for_tstack_x86-2.3-install/ted.redis/product/product-redis-cc_ccagent/module-redis-sql-oper/TCE/


#去新增用户
mysql
GRANT ALL PRIVILEGES ON *.* TO 'mysql'@'%' IDENTIFIED BY '123456';
flush privileges;

#创建库用于导入数据
mysql
create database newcc_1001;


#测试链接
mysql -h192.168.3.81 -umysql -p123456

#登录mysql导入数据
cd /root/redis_for_tstack_x86-2.3-install/ted.redis/product/product-redis-cc_ccagent/module-redis-sql-oper/TCE
./python/bin/python3 sqlimport.py -u "mysql@192.168.3.81:3306:root:123456:newcc_1001" -d common -b control_center -v 2.3

#导入结果:
[root@node1 TCE]# pwd
/root/redis_for_tstack_x86-2.3-install/ted.redis/product/product-redis-cc_ccagent/module-redis-sql-oper/TCE
[root@node1 TCE]# ./python/bin/python3 sqlimport.py -u "mysql@192.168.3.81:3306:root:123456:newcc_1001" -d common -b control_center -v 2.3
Execute sql_file/control_center/common/V2.1.0_0__create_table.sql success!
Execute sql_file/control_center/common/V2.1.0_1__insert_data.sql success!
Execute sql_file/control_center/common/V2.2.0_3__create_table.sql success!
Execute sql_file/control_center/common/V2.2.0_4__insert_data.sql success!
Execute sql_file/control_center/common/V2.2.0_5__alter_table.sql success!
Execute sql_file/control_center/common/V2.3.0_11__create_table.sql success!
Execute sql_file/control_center/common/V2.3.0_12__insert_data.sql success!
_SQL:
        INSERT INTO flyway_schema_history(installed_rank, version, description,
        type, script, checksum, installed_by, installed_on, execution_time, success)
        VALUES("1", "2.1.0.0", "create table", "SQL", "V2.1.0_0__create_table.sql", "31594625acf5ef500f738254d609a6fe", "root", "2021-05-29 21:24:14", "0", 1),("2", "2.1.0.1", "insert data", "SQL", "V2.1.0_1__insert_data.sql", "688485c275ae37ecc3c42be43f2f5aae", "root", "2021-05-29 21:24:14", "0", 1),("3", "2.2.0.3", "create table", "SQL", "V2.2.0_3__create_table.sql", "5a252a96a892417f0c686b388b0aa41b", "root", "2021-05-29 21:24:14", "0", 1),("4", "2.2.0.4", "insert data", "SQL", "V2.2.0_4__insert_data.sql", "310ce80193368c95dd56c886b042e748", "root", "2021-05-29 21:24:14", "0", 1),("5", "2.2.0.5", "alter table", "SQL", "V2.2.0_5__alter_table.sql", "738a9d41e31c0ddce0a444ef1ef77ab2", "root", "2021-05-29 21:24:14", "0", 1),("6", "2.3.0.11", "create table", "SQL", "V2.3.0_11__create_table.sql", "228dbcb8764022cfe2eb43b0926e092f", "root", "2021-05-29 21:24:14", "0", 1),("7", "2.3.0.12", "insert data", "SQL", "V2.3.0_12__insert_data.sql", "019e0d99abfab2a3b002319a1ff42d73", "root", "2021-05-29 21:24:14", "0", 1)


#导入数据[value="17179869184" 就是内存16G服务器配置需要大于等于16G才可以添加"是这个意思?不知道"]:
use newcc_1001;
update sys_misc_config_t set value="http://192.168.3.81:8086/query" where type_id=5 and name="influxdb_url";
update sys_misc_config_t set value="http://192.168.3.81:9090/writer" where name="ctsdb_receivers" and type_id=0;
update sys_misc_config_t set value="http://192.168.3.81:9090/cc" where name="ctsdbserver_cc_url" and type_id=5;
insert into sys_misc_config_t values(5,"any","0.0.0.0");
update sys_misc_config_t set value="17179869184" where type_id=5 and name="mixed_min_memory";


#创建monitor数据库并导入相关数据:
mysql -h192.168.3.81 -umysql -p123456
create database monitor_1001;

#导入
./python/bin/python3 sqlimport.py -u "mysql@192.168.3.81:3306:root:123456:monitor_1001" -d common -b monitor_center -v 2.3


#创建
create database access_auth;
#导入
./python/bin/python3 sqlimport.py -u "mysql@192.168.3.81:3306:root:123456:access_auth" -d common -b access_auth -v 2.3


#创建
create database access_gateway;
#导入
./python/bin/python3 sqlimport.py -u "mysql@192.168.3.81:3306:root:123456:access_gateway" -d common -b access_gateway -v 2.3


#创建
create database ctsdb_server;
#导入
./python/bin/python3 sqlimport.py -u "mysql@192.168.3.81:3306:root:123456:ctsdb_server" -d common -b ctsdb_server -v 2.3


#到此为止数据库安装完毕


#安装 module-redis-control-center [安装到中控机]
#修改db_config.py
ip_a=$(hostname -I|awk '{print $1}')
cd /root/redis_for_tstack_x86-2.3-install/ted.redis/product/product-redis-cc_ccagent/module-redis-control-center/config
sed -i  "s#9.134.241.18#$(hostname -I|awk '{print $1}')#g" db_config.py
sed -i "s#myPassword#123456#g" db_config.py


#修改cluster_watcher.properties
cd /root/redis_for_tstack_x86-2.3-install/ted.redis/product/product-redis-cc_ccagent/module-redis-control-center/config
sed -i  "s#9.134.241.18#$(hostname -I|awk '{print $1}')#g" cluster_watcher.properties
sed -i "s#myPassword#123456#g" cluster_watcher.properties


#修改 MulServer.conf
InfluxIp=127.0.0.1
由于InfluxIp就在本机部署,所以不需要修改


#修改redis_prober.conf
cd /root/redis_for_tstack_x86-2.3-install/ted.redis/product/product-redis-cc_ccagent/module-redis-control-center/config
sed -i "s#myPassword#123456#g" redis_prober.conf
sed -i  "s#9.134.241.18#$(hostname -I|awk '{print $1}')#g" redis_prober.conf
sed -i  "s#9.134.240.167#$(hostname -I|awk '{print $1}')#g" redis_prober.conf


#修改key_analyzer.conf
sed -i  "s#9.134.240.167#$(hostname -I|awk '{print $1}')#g"  key_analyzer.conf


#修改patrol_redis.yaml
sed -i  "s#9.134.241.18#$(hostname -I|awk '{print $1}')#g"  patrol_redis.yaml
sed -i "s#myPassword#123456#g" patrol_redis.yaml


#以上修改无误后返回TCE目录执行安装操作:
cd ../TCE/
pwd
/root/redis_for_tstack_x86-2.3-install/ted.redis/product/product-redis-cc_ccagent/module-redis-control-center/TCE

#执行安装操作
sh -x install.sh all

#检查安装结果
sh check.sh
提示:
control_center is ok.
代表安装完成 redis-control


#安装influxdb
cd /root/redis_for_tstack_x86-2.3-install/ted.redis/product/product-redis-cc_ccagent/module-redis-influxdb
sed -i  "s#9.134.241.18#$(hostname -I|awk '{print $1}')#g" config/ctsdbserver.conf
sed -i "s#myPassword#123456#g" config/ctsdbserver.conf

cd /root/redis_for_tstack_x86-2.3-install/ted.redis/product/product-redis-cc_ccagent/module-redis-influxdb/TCE
sh -x install.sh all

检查安装结果:
sh check.sh

提示:
influxdb is ok.
代表安装完成 influxdb


#安装lvs_keepalived
cd /root/redis_for_tstack_x86-2.3-install/ted.redis/product/product-redis-cc_ccagent/module-redis-lvs-keepalived
sed -i "s#eth1#eth0#g" config/redis_lvs.conf

#sed只是把网卡替换成了真实网卡名 eth0
[root@node1 module-redis-lvs-keepalived]# cat config/redis_lvs.conf
! Configuration File for keepalived
global_defs {               ##全局配置部分
    router_id LVS_MASTER       ##运行keepalived机器的一个标识
}
vrrp_instance VI_1 {       ##设置vrrp组,唯一且同一LVS服务器组要相同
    state MASTER               ##备份LVS服务器设置为BACKUP
    interface eth0       # #设置对外服务的接口(根据实际情况修改)
    virtual_router_id 51       ##设置虚拟路由标识
    priority 100               #设置优先级,数值越大,优先级越高,backup设置小于100,当master宕机后自动将backup高的变为master。
    advert_int 1               ##设置同步时间间隔
    authentication {           ##设置验证类型和密码,master和buckup一定要设置一样
        auth_type PASS
        auth_pass 1111
    }
virtual_ipaddress {        ##设置VIP,可以多个,每个占一行
       100.000.100.182
    }
}
include /data/redis/keepalived/etc/redis_lvs/*.conf


#修改lvsmanger.conf
cd /root/redis_for_tstack_x86-2.3-install/ted.redis/product/product-redis-cc_ccagent/module-redis-lvs-keepalived
sed -i "s#9.134.241.18#$(hostname -I|awk '{print $1}')#g"  config/lvsmanger.conf
sed -i "s#myPassword#123456#g" config/lvsmanger.conf
sed -i "s#:9010#$(hostname -I|awk '{print $1}'):9010#g" config/lvsmanger.conf
sed -i "s#106.55.61.42#$(hostname -I|awk '{print $1}')#g" config/lvsmanger.conf
cd ../TCE
[root@node1 TCE]# pwd
cd /root/redis_for_tstack_x86-2.3-install/ted.redis/product/product-redis-cc_ccagent/module-redis-lvs-keepalived/TCE
sh -x install.sh all

#检查:
sh -x check.sh
输出信息:
lvs_keepalived is ok.
安装 cache服务和proxy
看环境规划中有两台是作为cache服务的

分别是
192.168.3.84
192.168.3.85


需要把安装包传到这两台服务器进行安装:
[可以全部安装 然后界面选择就好,我这里全部安装了,演示只装了2台]

# 192.168.3.84安装cache_agent服务:
scp -r root@192.168.3.81:/root/redis_for_tstack_x86-2.3-install.tar.gz ./
tar xf redis_for_tstack_x86-2.3-install.tar.gz
cd /root/redis_for_tstack_x86-2.3-install/ted.redis/product/product-redis-cc_ccagent/module-redis-cache-agent/

#IP改为管控机的ip,而不是本机IP
sed -i "s#9.134.240.167#192.168.3.81#g" config/mul_monitor_agent.conf


#结果如下:
[root@node4 module-redis-cache-agent]# cat config/mul_monitor_agent.conf
waterLogLevel 2
coloeLogLevel 2
ShmChangeIntval 600
reportIntval 60
LOG_FILE ../log

zkhost 10.24.0.10:2181,10.24.0.11:2181,10.24.0.12:2181
sysId 1001
cityid 1001

mulservers 192.168.3.81:55100


#安装cache-agent
cd /root/redis_for_tstack_x86-2.3-install/ted.redis/product/product-redis-cc_ccagent/module-redis-cache-agent/TCE
sh -x install.sh all

#检查cache-anget是否正常安装:
[root@node4 TCE]# sh  check.sh
cache_agent is ok.


--------------------------------------
# 192.168.3.85安装cache_agent服务:
scp -r root@192.168.3.81:/root/redis_for_tstack_x86-2.3-install.tar.gz ./
tar xf redis_for_tstack_x86-2.3-install.tar.gz
cd /root/redis_for_tstack_x86-2.3-install/ted.redis/product/product-redis-cc_ccagent/module-redis-cache-agent/


#IP改为管控机的ip,而不是本机IP
sed -i "s#9.134.240.167#192.168.3.81#g" config/mul_monitor_agent.conf


#结果如下:
[root@node4 module-redis-cache-agent]# cat config/mul_monitor_agent.conf
waterLogLevel 2
coloeLogLevel 2
ShmChangeIntval 600
reportIntval 60
LOG_FILE ../log

zkhost 10.24.0.10:2181,10.24.0.11:2181,10.24.0.12:2181
sysId 1001
cityid 1001

mulservers 192.168.3.81:55100


#安装cache-agent 【这里安装的服务器可以被动选择为proxy服务器或者cache服务器 由自己决定,只要安装了就可以把这个服务器加入到集群】
cd /root/redis_for_tstack_x86-2.3-install/ted.redis/product/product-redis-cc_ccagent/module-redis-cache-agent/TCE
sh -x install.sh all

#检查cache-anget是否正常安装:
[root@node4 TCE]# sh  check.sh
cache_agent is ok.


------------------------------------------------------------------------------------------

#安装web页面【中控机】
# 修改web地址
cd /root/redis_for_tstack_x86-2.3-install/ted.redis/product/product-redis-cc_ccagent/module-redis-user-interface/config
sed -i "s#9.134.241.18#192.168.3.81#g" application.yml

# 密钥生成工具添加执行权限:
chmod +x aestool

#2. 生成密文的连接服务器的密码[123456] 如果服务器root密码不是这个就需要改成别的:
[root@node1 config]# ./aestool -e 123456
18hvlaMM7yvK6GKFsYbdFx31O8IaNw==

#3. 密码配置到 application.yml 文件中的password项中
url: jdbc:mysql://192.168.3.81:3306/access_auth?useSSL=false&characterEncoding=utf8
username: root
password: ENC(18hvlaMM7yvK6GKFsYbdFx31O8IaNw==)    # 生成服务器密码123456写在这里


#4.  找到: cluster-nodes: 127.0.0.1:6379 这行下方的密码应该是Tcdn@2007加密后的密码
./aestool -e Tcdn@2007
spk4z9YIKWTnYSZMwl+FG0zVLN0bDlselg==

vim application.yml:
--------------------------------------------------
redis:
  cluster-nodes: 127.0.0.1:6379
  mode: single
  password: ENC(spk4z9YIKWTnYSZMwl+FG0zVLN0bDlselg==)    #这个密码是Tcdn@2007加密后的密码,写入application.yml配置文件中
--------------------------------------------------


# application_gateway.yml 文件修改
修改:
url: jdbc:mysql://9.134.241.18:3306/access_gateway?useSSL=false&characterEncoding=utf8
username: root
password: ENC(i4MMwOVJbjuiAnY04AQAGLWgym+KFbZrftY=)

1. 修改IP
sed -i "s#9.134.241.18#192.168.3.81#g" application_gateway.yml

2. 修改密码
password: ENC(i4MMwOVJbjuiAnY04AQAGLWgym+KFbZrftY=)
其中密码改为: 18hvlaMM7yvK6GKFsYbdFx31O8IaNw==


#8. 安装redis-user-interface [中控机]
cd /root/redis_for_tstack_x86-2.3-install/ted.redis/product/product-redis-cc_ccagent/module-redis-user-interface/TCE
sh -x install.sh all

#安装完成后通过check.sh 脚本来检测成功
sh check.sh

正确输出:
user_interface is ok.


此时打开web页面检查:
默认账号密码:
账号:qcloudAdmin
密码:qcloudAdmin


#添加proxy服务:
本质上proxy服务与cache服务配置相同
本文规划的proxy
192.168.3.81
192.168.3.82
192.168.3.83


192.168.3.81 第一台服务器啥也不用装

192.168.3.82安装proxy
# cd /root
scp  -r root@192.168.3.85:/root/redis_for_tstack_x86-2.3-install.tar.gz ./
tar xf redis_for_tstack_x86-2.3-install.tar.gz
cd redis_for_tstack_x86-2.3-install/ted.redis/product/product-redis-cc_ccagent/module-redis-cache-agent/
sed -i "s#9.134.240.167#192.168.3.81#g" config/mul_monitor_agent.conf
cd TCE/
sh -x install.sh all
sh check.sh


192.168.3.83安装proxy
# cd /root
scp  -r root@192.168.3.85:/root/redis_for_tstack_x86-2.3-install.tar.gz ./
tar xf redis_for_tstack_x86-2.3-install.tar.gz
cd redis_for_tstack_x86-2.3-install/ted.redis/product/product-redis-cc_ccagent/module-redis-cache-agent/
sed -i "s#9.134.240.167#192.168.3.81#g" config/mul_monitor_agent.conf
cd TCE/
sh -x install.sh all
sh check.sh


192.168.3.84安装cache
# cd /root
scp  -r root@192.168.3.85:/root/redis_for_tstack_x86-2.3-install.tar.gz ./
tar xf redis_for_tstack_x86-2.3-install.tar.gz
cd redis_for_tstack_x86-2.3-install/ted.redis/product/product-redis-cc_ccagent/module-redis-cache-agent/
sed -i "s#9.134.240.167#192.168.3.81#g" config/mul_monitor_agent.conf
cd TCE/
sh -x install.sh all
sh check.sh


192.168.3.85安装cache
# cd /root
scp  -r root@192.168.3.85:/root/redis_for_tstack_x86-2.3-install.tar.gz ./
tar xf redis_for_tstack_x86-2.3-install.tar.gz
cd redis_for_tstack_x86-2.3-install/ted.redis/product/product-redis-cc_ccagent/module-redis-cache-agent/
sed -i "s#9.134.240.167#192.168.3.81#g" config/mul_monitor_agent.conf
cd TCE/
sh -x install.sh all
sh check.sh
上架机器
#proxy 2台 [规划 192.168.3.82,192.168.3.83]
连接到数据库i:
mysql -h192.168.3.81 -umysql -p123456

#首先把所有cacahe都上架完成
cache 4台 [规划 192.168.3.82,192.168.3.83,192.168.3.84,192.168.3.85]
MariaDB [newcc_1001]> select * from redis_machine_t;
+--------------+-------+--------+
| ip           | state | idc_id |
+--------------+-------+--------+
| 192.168.3.82 |     1 |      0 |
| 192.168.3.83 |     1 |      0 |
| 192.168.3.84 |     1 |      0 |
| 192.168.3.85 |     1 |      0 |
+--------------+-------+--------+
4 rows in set (0.01 sec)


#然后通过数据库上架两台proxy
MariaDB [(none)]> use newcc_1001;
MariaDB [newcc_1001]> insert into interface_machine_t values("192.168.3.82",1,0);
MariaDB [newcc_1001]> insert into interface_machine_t values("192.168.3.83",1,0);
MariaDB [newcc_1001]> select * from interface_machine_t;
+--------------+-------+--------+
| ip           | state | idc_id |
+--------------+-------+--------+
| 192.168.3.82 |     1 |      0 |
| 192.168.3.83 |     1 |      0 |
+--------------+-------+--------+
2 rows in set (0.00 sec)


#然后开始进行web页面创建redis实例

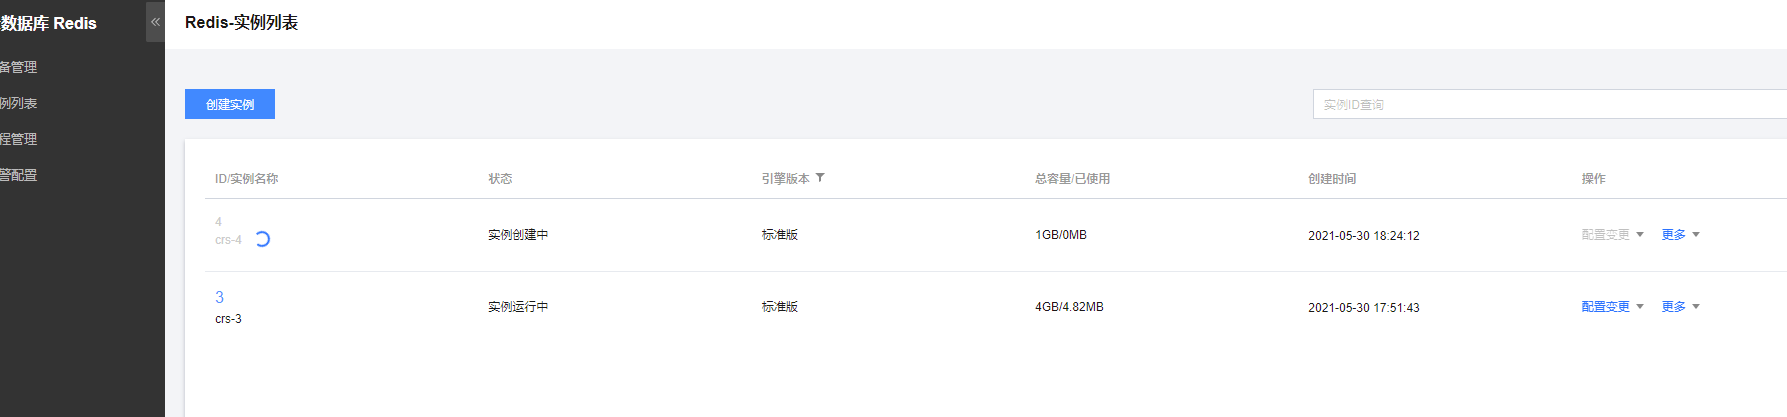
创建实例测试


 微信赞赏
微信赞赏

 支付宝赞赏
支付宝赞赏