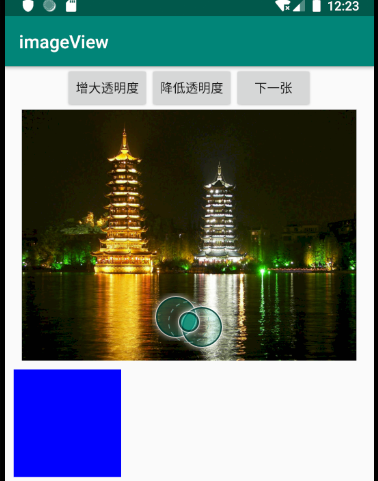
界面代码:

<?xml version="1.0" encoding="utf-8"?>
<LinearLayout xmlns:android="http://schemas.android.com/apk/res/android"
              android:orientation="vertical"
              android:layout_width="match_parent"
              android:layout_height="match_parent">
    <LinearLayout
            android:orientation="horizontal"
            android:layout_width="match_parent"
            android:layout_height="wrap_content"
            android:gravity="center">
        <!-- 此处省略三个按钮定义 -->
        <Button android:id="@+id/plus"
                android:layout_width="wrap_content"
                android:layout_height="wrap_content"
                android:text="增大透明度"/>
        <Button android:id="@+id/minus"
                android:layout_width="wrap_content"
                android:layout_height="wrap_content"
                android:text="降低透明度"/>
        <Button android:id="@+id/next"
                android:layout_width="wrap_content"
                android:layout_height="wrap_content"
                android:text="下一张"/>
    </LinearLayout>
    <!-- 定义显示图片整体的ImageView -->
    <ImageView android:id="@+id/image1"
               android:layout_width="wrap_content"
               android:layout_height="280dp"
               android:src="@drawable/shuangta"
               android:scaleType="fitCenter"/>
    <!-- 定义显示图片局部细节的ImageView -->
    <ImageView android:id="@+id/image2"
               android:layout_width="120dp"
               android:layout_height="120dp"
               android:background="#00f"
               android:layout_margin="10dp"/>
</LinearLayout>
程序代码

package com.example.imageview

import android.graphics.Bitmap
import android.graphics.drawable.BitmapDrawable
import android.support.v7.app.AppCompatActivity
import android.os.Bundle
import android.view.View
import android.widget.Button
import android.widget.ImageView

class MainActivity : AppCompatActivity() {

    // 定义一个访问图片的数组
    private var images = intArrayOf(R.drawable.lijiang, R.drawable.qiao,
        R.drawable.shuangta, R.drawable.shui, R.drawable.xiangbi)
    // 定义默认显示的图片
    private var currentImg = 2
    // 定义图片的初始透明度
    private var alpha = 255
    override fun onCreate(savedInstanceState: Bundle?) {
        super.onCreate(savedInstanceState)
        setContentView(R.layout.activity_main)

        val plus = findViewById<Button>(R.id.plus)
        val minus = findViewById<Button>(R.id.minus)
        val image1 = findViewById<ImageView>(R.id.image1)
        val image2 = findViewById<ImageView>(R.id.image2)
        val next = findViewById<Button>(R.id.next)
        // 定义查看下一张图片的监听器
        next.setOnClickListener {
            // 控制ImageView显示下一张图片
            image1.setImageResource(images[++currentImg % images.size])
        }
        // 定义改变图片透明度的方法
        val listener = View.OnClickListener { v ->
            if (v == plus) {
                alpha += 20
            }
            if (v == minus) {
                alpha -= 20
            }
            if (alpha >= 255) {
                alpha = 255
            }
            if (alpha <= 0) {
                alpha = 0
            }
            // 改变图片的透明度
            image1.imageAlpha = alpha
        }
        // 为两个按钮添加监听器
        plus.setOnClickListener(listener)
        minus.setOnClickListener(listener)
        image1.setOnTouchListener { view, event ->
            val bitmapDrawable = image1.drawable as BitmapDrawable
            // 获取第一个图片显示框中的位图
            val bitmap = bitmapDrawable.bitmap
            // bitmap图片实际大小与第一个ImageView的缩放比例
            val scale = 1.0 * bitmap.height / image1.getHeight()
            // 获取需要显示的图片的开始点
            var x = (event.x * scale).toInt()
            var y = (event.y * scale).toInt()
            if (x + 120 > bitmap.width) {
                x = bitmap.width - 120
            }
            if (y + 120 > bitmap.height) {
                y = bitmap.height - 120
            }
            // 显示图片的指定区域
            image2.setImageBitmap(Bitmap.createBitmap(bitmap, x, y, 120, 120))
            image2.imageAlpha = alpha
            false
        }
    }
}
知识点
创建数组:
private var images = intArrayOf(R.drawable.lijiang, R.drawable.qiao,
        R.drawable.shuangta, R.drawable.shui, R.drawable.xiangbi)
利用代码控制imageView显示的图片:
image1.setImageResource(images[++currentImg % images.size])
通过委托的方法绑定点击事件
val listener = View.OnClickListener { v ->
            if (v == plus) {
                alpha += 20
            }
            if (v == minus) {
                alpha -= 20
            }
            if (alpha >= 255) {
                alpha = 255
            }
            if (alpha <= 0) {
                alpha = 0
            }
            // 改变图片的透明度
            image1.imageAlpha = alpha
        }
imageView加载Bitmap
val bitmapDrawable = image1.drawable as BitmapDrawable//将图片转换成bitmap
            image2.setImageBitmap(Bitmap.createBitmap(bitmap, x, y, 120, 120))//裁切一部分
            image2.imageAlpha = alpha
            false//设置没有透明度
